Overview
Apollo offers several advanced security protocols to give you additional layers of security that help you keep your account and data safe:
- IP allowlisting
- Password policy
- Login controls
- Single sign-on
- Multi-factor authentication
Please note, you must be an admin member to access the security settings in your Apollo account. Access to the advanced security protocols also depends on your Apollo plan. Please refer to the Apollo pricing page for more details.
Refer to the following sections for more information on the security protocols you can configure in Apollo to add extra security to your account.
IP Allowlisting
Enable IP allowlisting to restrict unauthorized access to your Apollo account. When you activate IP allowlisting in Apollo, you can choose the specific IP addresses or ranges you consider trustworthy and only give those IPs access to your account.
Apollo accepts the following IP formats:
- Single IP Address
- IP Range
- Classless Inter-Domain Routing (CIDR)
To access IP whitelisting settings:
- Launch Apollo and go to Settings > Security > IP whitelisting.
- Use the toggle to enable IP whitelisting and add your approved IP addresses.
For more information and to enable IP allowlisting for your Apollo account, follow the steps in the Enable IP Allowlisting in Apollo article.
Password Policy
Configure password regulations for your team to increase security and improve password strength.
There are 4 password policy components in Apollo:
- Password complexity: Define the compulsory characteristics of your users' passwords to prevent the use of easy-to-hack words or phrases. Enforce a mixture of uppercase and lowercase letters, numbers, and/or non-alphanumeric characters.
- Password length: Set a minimum character length to increase password strength. You can choose anywhere between 10 and 100 characters.
- Password expiration: Define the number of days a user's password can remain valid before they must change it. Select a period between 10 and 365 days.
- Password reuse: Prevent your team from using the same password twice. Specify whether or not users can repeat previous passwords and set a limit of between 1 and 50.
To access the password policy settings:
- Launch Apollo and go to Settings > Security > Password policy.
- Configure password settings according to your preferences, then click Save.
You have now configured the password policy settings for your team in Apollo.
Login Controls
Set login controls for your team in Apollo to determine how you approach multiple login attempts and user session duration.
There are currently 2 types of login controls that you can configure for users in your Apollo account:
- Session timeout: Decide when you want Apollo to automatically log users out of your account since their last sign-in. This means they must periodically re-enter their password to get back into your Apollo instance. You can choose a session timeout period of between 1 and 30 days.
- Failed login settings: Choose the number of failed login attempts a user can make within a 24-hour period. You can set the cap at anywhere between 3 and 10 attempts. If a user fails to enter the correct credentials within the given limit you set, Apollo temporarily disables their access and sends password reset instructions via email.
To access the settings for login controls:
- Launch Apollo and go to Settings > Security > Login controls.
- Configure settings according to your preferences, then click Save.
You have now configured login controls for your team in Apollo.
Single Sign-On
Set up single sign-on (SSO) on Apollo empowers your team to securely log into multiple apps and sites with just one set of credentials using your preferred SSO provider. With Okta and Entra ID SSO providers, you can also configure SCIM user provisioning on Apollo.
Apollo supports both SP and IdP-initiated SSO through SAML and SCIM integrations.
- SP-initiated SSO
- IdP-initiated SSO
To access single sign-on settings, launch Apollo and navigate to Settings > Security > Single sign on.
If your team uses SSO, follow the steps in the Set Up SSO on Apollo to get started.
Multi-factor Authentication
Mitigate security risks and add an extra layer of verification with multi-factor authentication (MFA). If you are an admin user on an Apollo paid plan, you can make it mandatory for users to provide at least one extra verification method on top of their username and password to gain access to your Apollo account.
If you're on a paid plan but aren't an admin user, you don't have to wait for an admin to get started. To configure multi-factor authentication for your own account, head to Settings and click the Multi-factor authentication tab in your personal profile settings to get set up right away. 
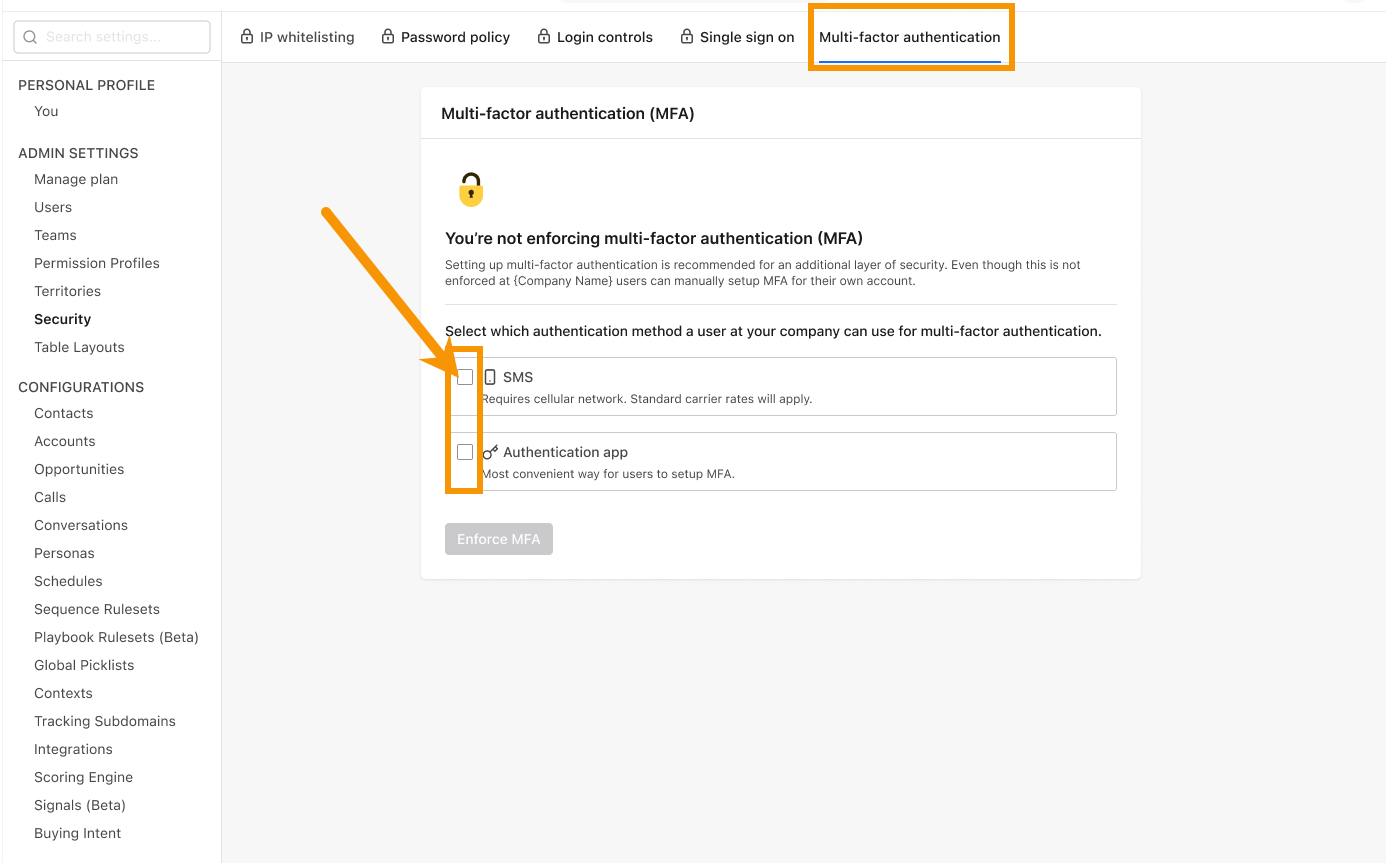
There are currently 2 multi-factor authentication methods which you can force your users to log in to their Apollo account with:
- SMS: Users receive a code to their phone via SMS in real-time any time they try to log into Apollo.
- Authentication app: Users add Apollo to their authentication app and input a verification code in real-time any time they log into Apollo.
To enable multi-factor authentication for your team in Apollo:
- Launch Apollo and go to Settings > Security > Multi-factor authentication.
- Check each MFA method you want to enable.
- Choose when you want to enforce multi-factor authentication and then click Enforce MFA.
You have now successfully configured multi-factor authentication for your team. Apollo then guides users through the MFA set-up steps when they next try to log into Apollo.


