Overview
You can integrate web forms from your own website with inbound routers in Apollo, rather than building an intake form from scratch.
Integrating your web forms enables you to collect prospect data on your own website while seamlessly scheduling meetings via your inbound routers in Apollo.
Watch the Prospect Experience
The following tour shows how simple it is for a prospect to book a meeting with you and your team when you integrate your web forms with Apollo.
Before You Begin
Apollo admins need to complete Step 1 and Step 2 below. Reach out to your team's admin to configure these settings.
Step 3 requires knowledge of HTML and a front-end language like JavaScript, along with access to your website's codebase. To complete this setup, reach out to your team's admin user or another point of contact in your organization who has the required skill sets.
If you choose to use website form integration, you need to build the HTML form yourself and integrate it with an Apollo-provided form submission handler.
Step 1: Create an Inbound Router
If you haven't already, create an inbound router in Apollo.
Your inbound router should include all the fields you want to map from your integrated web form.
Step 2: Copy Apollo JS Snippet and Map Fields
Once you create an inbound router, map fields between your web form and Apollo. Then, you can generate a JavaScript snippet to add to your website.
- Launch Apollo and go to Meetings > Admin console > Inbound router.
- Click the inbound router you want to integrate with your web form.

- Click Share.

- Click Integrate with your website form.

- Type the domains where your web form is located, then press
EnterorReturnto save them. Don't include/at the end of your domains. You can add up to 5 domains, including subdomains. Remember to include all domain variations, such ashttps://apollo.ioandhttps://www.apollo.io, as well as domains for test environments.

- Toggle Auto fill form fields to populate fields automatically with Apollo data when a prospect adds their email address to your form.
Hop into this article to test how Apollo auto-fills your form when a prospect enters their email.

- Toggle Hide auto-filled fields to hide fields that Apollo autofills from prospects. When you enable this setting, your prospects only see the fields they still need to fill out. Apollo recommends enabling hidden form fields to keep your prospects from being confused when Apollo auto-fills form fields.

Have additional questions about form enrichment settings? Check out this article to learn more.
- Map your inbound router fields to your web form fields by copying and pasting the
nameattribute from each form input. If an inbound router field allows prospects to select multiple options, make sure that your web form provides the same options. Click Continue.
Map all fields to ensure Apollo routes your prospects correctly. The field names you provide are case sensitive and need to match your web form field names exactly. For example, if your web form uses the field name email address, use the full name instead of email when setting up your router.
In addition, make sure to format your web form's HTML properly. Wrap all inputs within the form element and assign relevant label tags.

- Apollo generates a JavaScript snippet to add to your website. Click Copy code snippet to add it to your clipboard, and then click Done.

Save your code snippet and continue to Step 3 to build your web form integration.
Step 3: Build Your Web Form Integration
You need the code snippet from Step 2 to build your web form integration. If you don't have this snippet, follow the instructions in Step 2 to generate it before updating your website.
The following sections provide the building blocks that you can use to build your integration, from establishing the basic flow of passing the web form entries to defining more advanced options.
Add the JS Snippet to Your Website
Add the JavaScript snippet generated in Step 2 to your website's code.
In the following example, Apollo added the snippet between the head tags of a website's HTML.
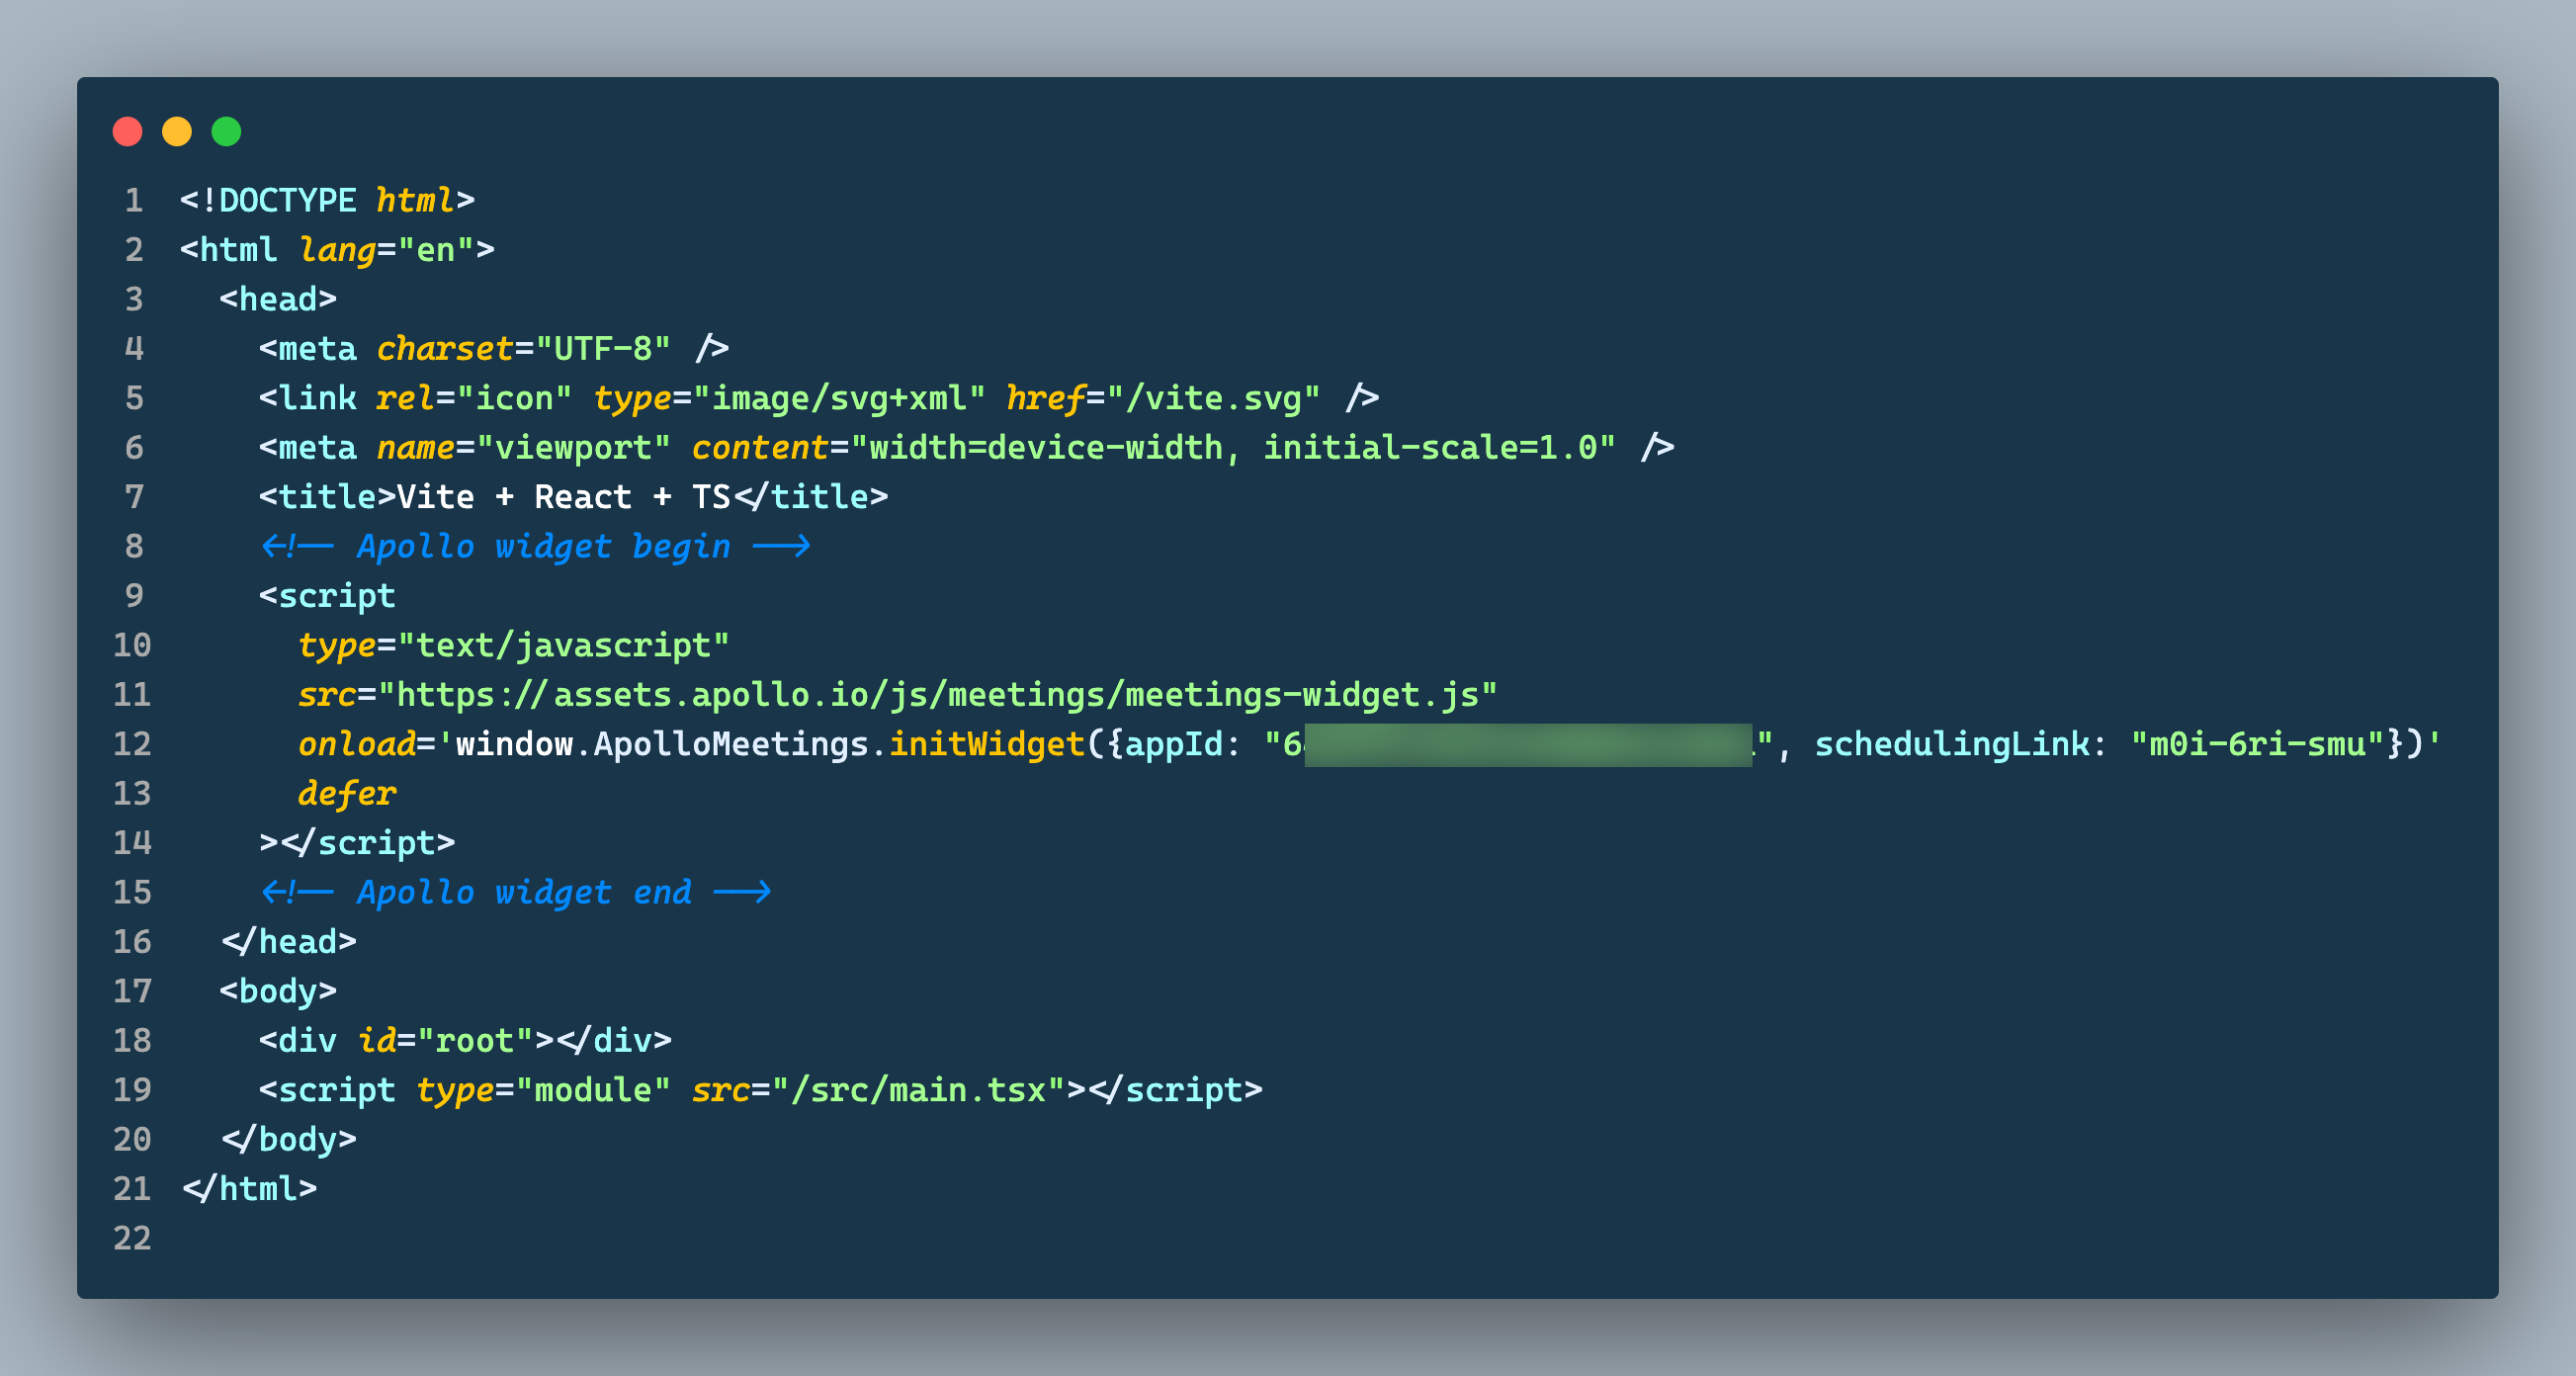
The snippet does not render anything by default.
The snippet creates a window.ApolloMeetings API that can be accessed from anywhere in the app/console. You should use the API to handle submitting your custom form to Apollo and, if you choose, to utilize custom options.

Integrate with the Inbound Router Form Submission Handler
After the JS snippet is added to your website, you need to capture the data from your existing web form and pass the results to Apollo.
The easiest way to do this is to use window.ApolloMeetings.submit() without any parameters. When no parameters are provided, entries from the first form element on the webpage will be captured. Only input elements with name attributes are captured, and each input name has to match the name as defined in the form field mapping. If you prefer to manually provide all field values instead, refer to the Advanced Customizations section of this article.
<form onsubmit="window.ApolloMeetings.submit(); return false">
You should now be able to see the meeting booking modal when submitting the form.
(Optional) Customize the Booking Widget Rendering
The initWidget method, which is invoked in the provided JavaScript snippet, initiates the scheduling flow from Apollo.
initWidget: ({ appId: string, schedulingLink: string, domElement?: HTMLElement }) = void;
This widget accepts 3 parameters:
- appId: This is a unique ID that is provided by Apollo and cannot be changed. It is generated along with the JavaScript snippet in Apollo.
- schedulingLink: This is identifier for your inbound router. It is provided by Apollo and cannot be changed.
-
domElement: By default, Apollo renders the widget at the end of your website's
bodytag. The widget opens on the form submission. If you prefer to attach the widget to a different DOM element, you can define that choice here.
(Optional) Add Third-party Form Integrations
In addition to your own web forms, you can also capture data from HubSpot and Marketo web form submissions on your website and pass those entries to Apollo. You still need to add Apollo's JS snippet to your website.
HubSpot
For HubSpot forms, add the following snippet to your website. When a user submits the HubSpot form, the data is passed to Apollo and the scheduling flow is triggered. Hubspot forms dispatch an event called hsFormCallback on the window object, which has the values of the Hubspot form integrated on the respective website. A listener to this event is attached to the window object.
window.addEventListener("message", function(event) {
  if (event.data.type === "hsFormCallback" && event.data.eventName === "onFormSubmitted") {
    const lead = event.data.data.submissionValues;
    window.ApolloMeetings.submit({
      map: false,
      lead
    });
  }
});
Marketo
For Marketo forms, add the following snippet to your website. When a user submits the Marketo form, the data is passed to Apollo and the scheduling flow is triggered. This snippet attaches Apollo's submit function to the MktoForms2.loadForm method.
MktoForms2.loadForm(BASE_URL, MUNCHKIN_ID, FORM_ID, function(form) {
  form.onSuccess(function(values) {
    window.ApolloMeetings.submit({
      map: false,
      lead: values
    });
    return false;
  });
});
(Optional) Advanced Customizations
In addition to using window.ApolloMeetings.submit() to pass web form entries to Apollo, you can set several options to customize the experience for you and your prospects.
formId (String)
By default, Apollo captures entries from the first web form to appear on a webpage. Any element of a webpage that captures user input could be a form though.
If you have multiple forms defined, formId captures entries from a specific form. Use the id attribute from the form and add it in window.ApolloMeetings.submit().
const handleFormSubmit = (e) = {
    e.preventDefault();
    // myForm is the id attribute for the form.
    window.ApolloMeetings.submit({formId : "myForm"});
};
map (Boolean) and lead (Object)
By default, map is set to true, which means Apollo automatically manages the extraction of data from your web form. Apollo relies on input tags within your form's HTML structure to retrieve the necessary information.
If you choose to provide your data object directly, you can pass it using the lead key while keeping the map option set to false.
window.ApolloMeetings.submit({
    map: false,
    lead : {name: state.name, email: state.email}
});
closeOnOutside (Boolean)
The scheduling flow is delivered via an Apollo pop-up modal. By default, a prospect clicking the gray background area outside the pop-up closes the modal.
To change this behavior, set closeOnOutside to true.
window.ApolloMeetings.submit({
    closeOnOutside : true
});
preventRedirect (Boolean) and onRedirect (Function)
When creating an inbound router in Apollo, you can choose to send prospects to an external URL. This option prevents non-ideal prospects from booking meetings.
If the inbound router uses this option, you can choose to take control of all the URL redirects and send prospects to a different URL. This could enable you to perform better metric tracking or to pass prospects through URL shorteners.
To manually control the redirect, set preventRedirect to true. Then, implement a custom onRedirect callback to handle redirection logic.
window.ApolloMeetings.submit({
    preventRedirect: true,
    onRedirect: (url) => {
      // You can add custom logic here (such as analytics).
      window.location.href = 'https://www.replacethisurl.com';
    }
});
onSuccess (Function), onError (Function), and onRouted (Function)
Use these 3 callback functions to extend the form submission logic.
Set onSuccess to define an additional callback to be called after a prospect has successfully scheduled a meeting. This does not override the logic provided by the Apollo integration.
If the inbound router fails at any point, Apollo delivers the specific error in response. Set onError to handle the error.
window.ApolloMeetings.submit({
    onError: (error) => {
      // Define your additional custom error handler.
    },
    onSuccess: () => {
      // Define your additional success handler.
    }
})
Set onRouted to call a function when the inbound router has determined the applicable action handler. This occurs when the Submit form button is clicked within your form, but before the prospect has either successfully or unsuccessfully scheduled a meeting.
window.ApolloMeetings.submit({
    onRouted: (result) => {
      // Implement your custom logic here (such as analytics).
    }
})
onRouted provides details on whether an action was successfully reached in the inbound router and, if so, which action was reached.