
Overview
Map Apollo fields to ensure that contact, lead, and account data from Salesforce syncs properly to Apollo. You can also set auto-fill or overwrite settings to define how Apollo updates data from your CRM during enrichment.
Check out the following sections to learn how to learn to map Apollo fields and configure data writing rules.
Map Fields to Salesforce
After you connect Salesforce to Apollo, map Apollo's default fields to the fields in Salesforce.
To map Apollo fields to Salesforce:
- Launch Apollo and go to Integrations > Salesforce, then click Contacts, Leads, Accounts, or Deals, depending on the type of record you want to map.
The process to map Apollo fields to Salesforce fields is the same for contacts, accounts, leads, and deals, so repeat these steps for all record types.
- Click Fields.
- Map Apollo fields to their corresponding Salesforce fields.
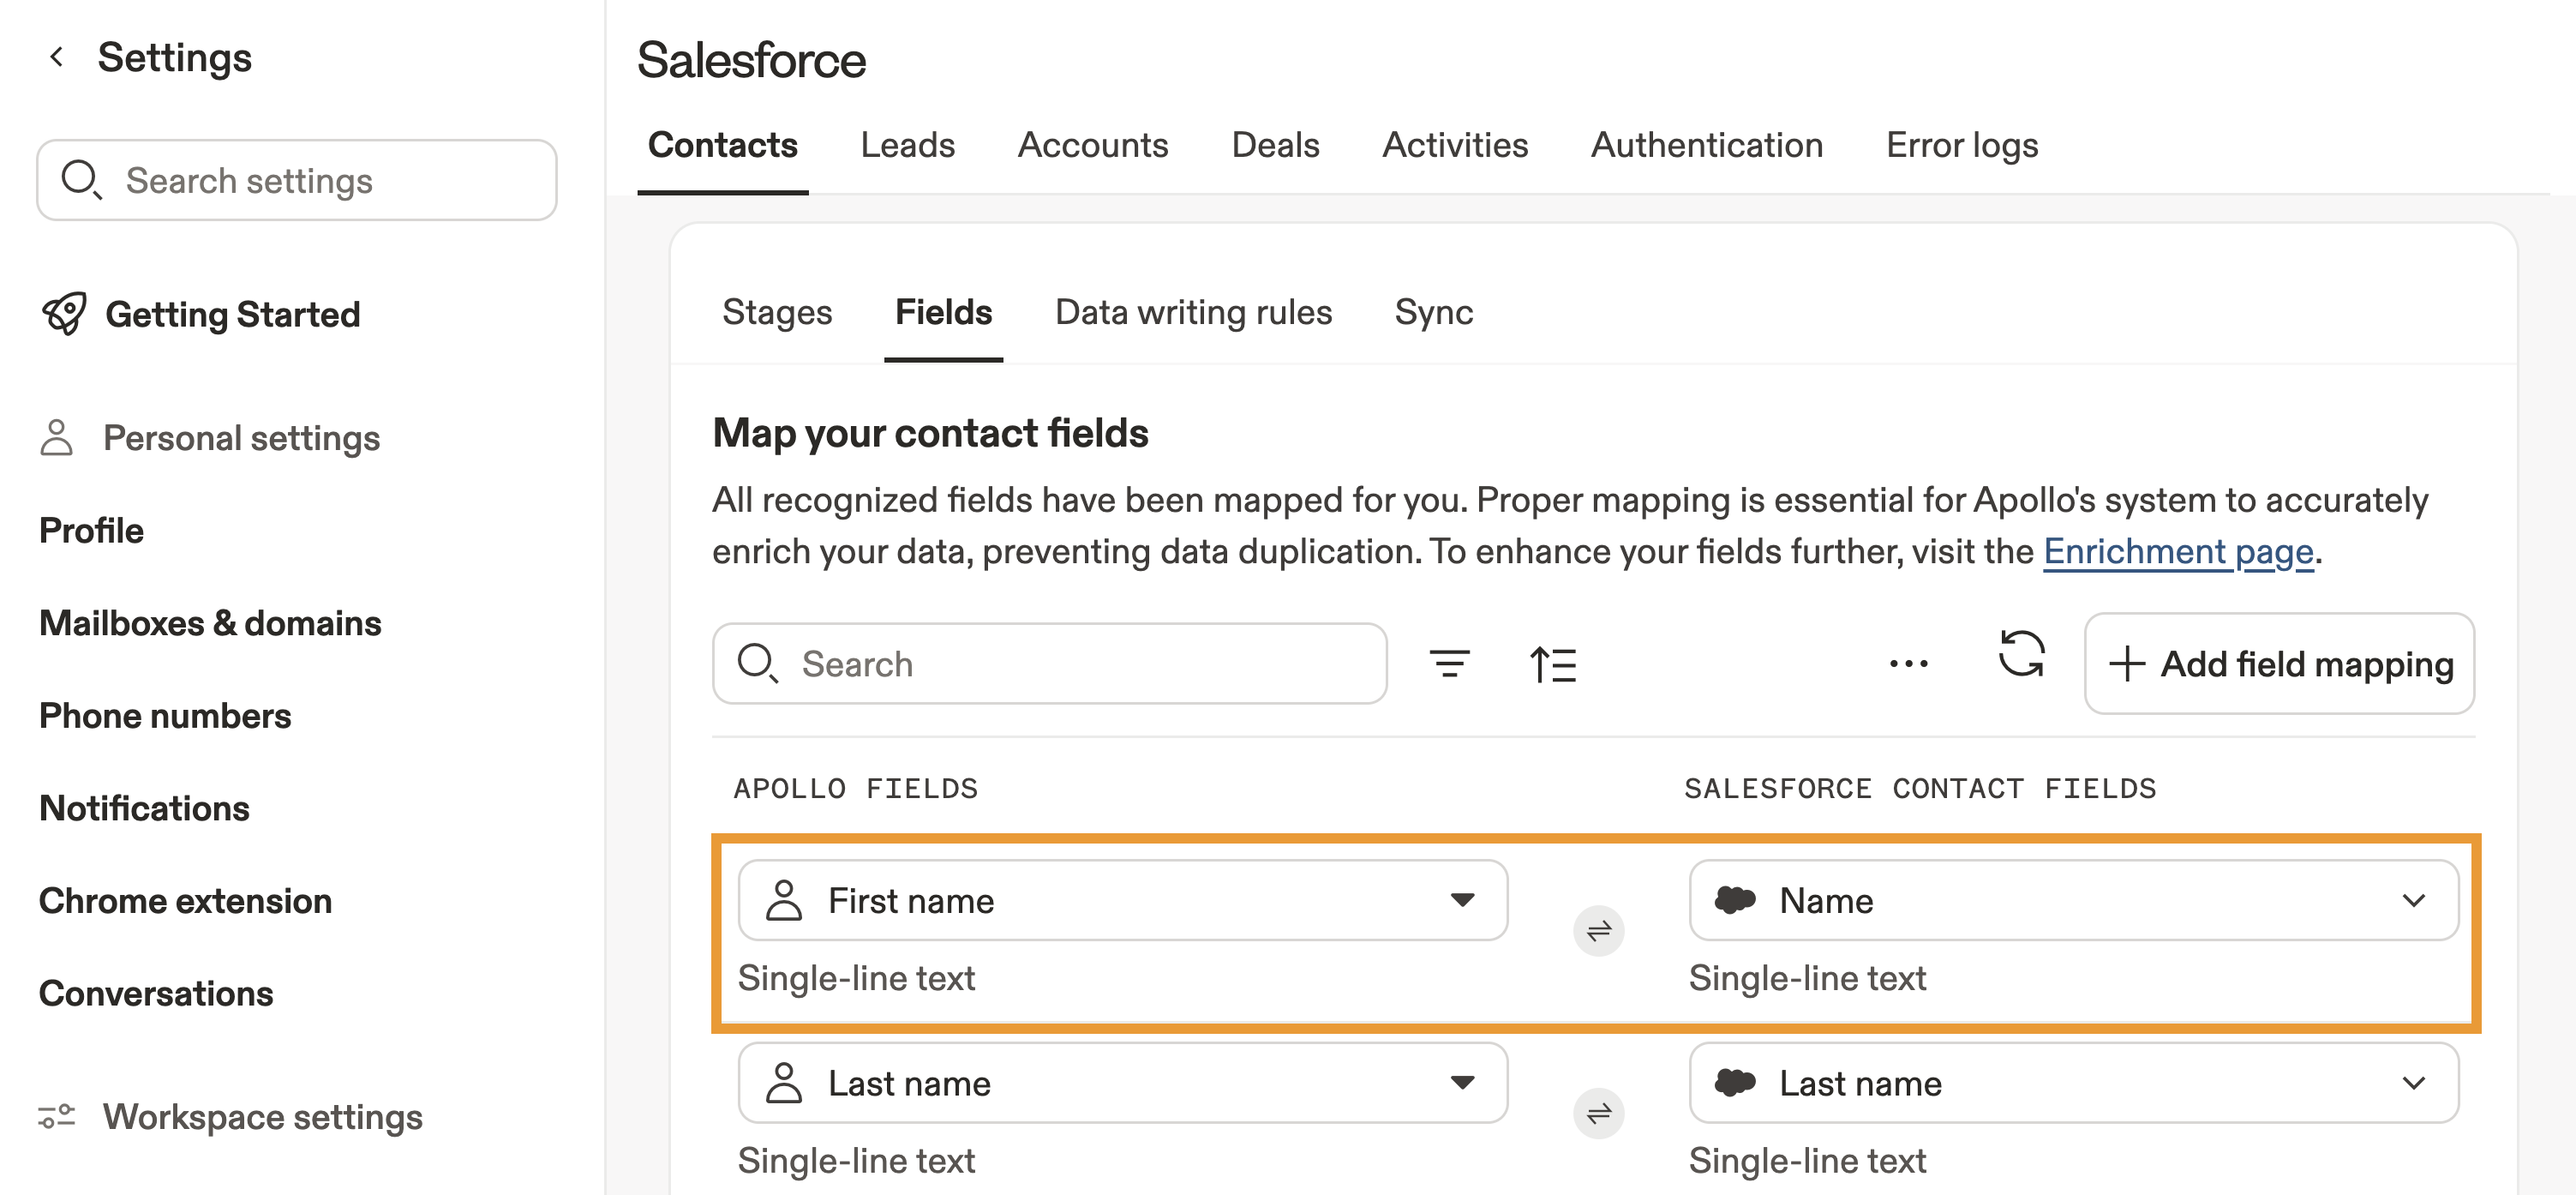
Fields that Apollo can enrich are marked with ⟳ next to the field type in the Apollo field column. This makes it easy to quickly identify which fields Apollo enrichment can automatically keep up to date through the integration.
- Click Add field mapping to map any additional non-default fields.
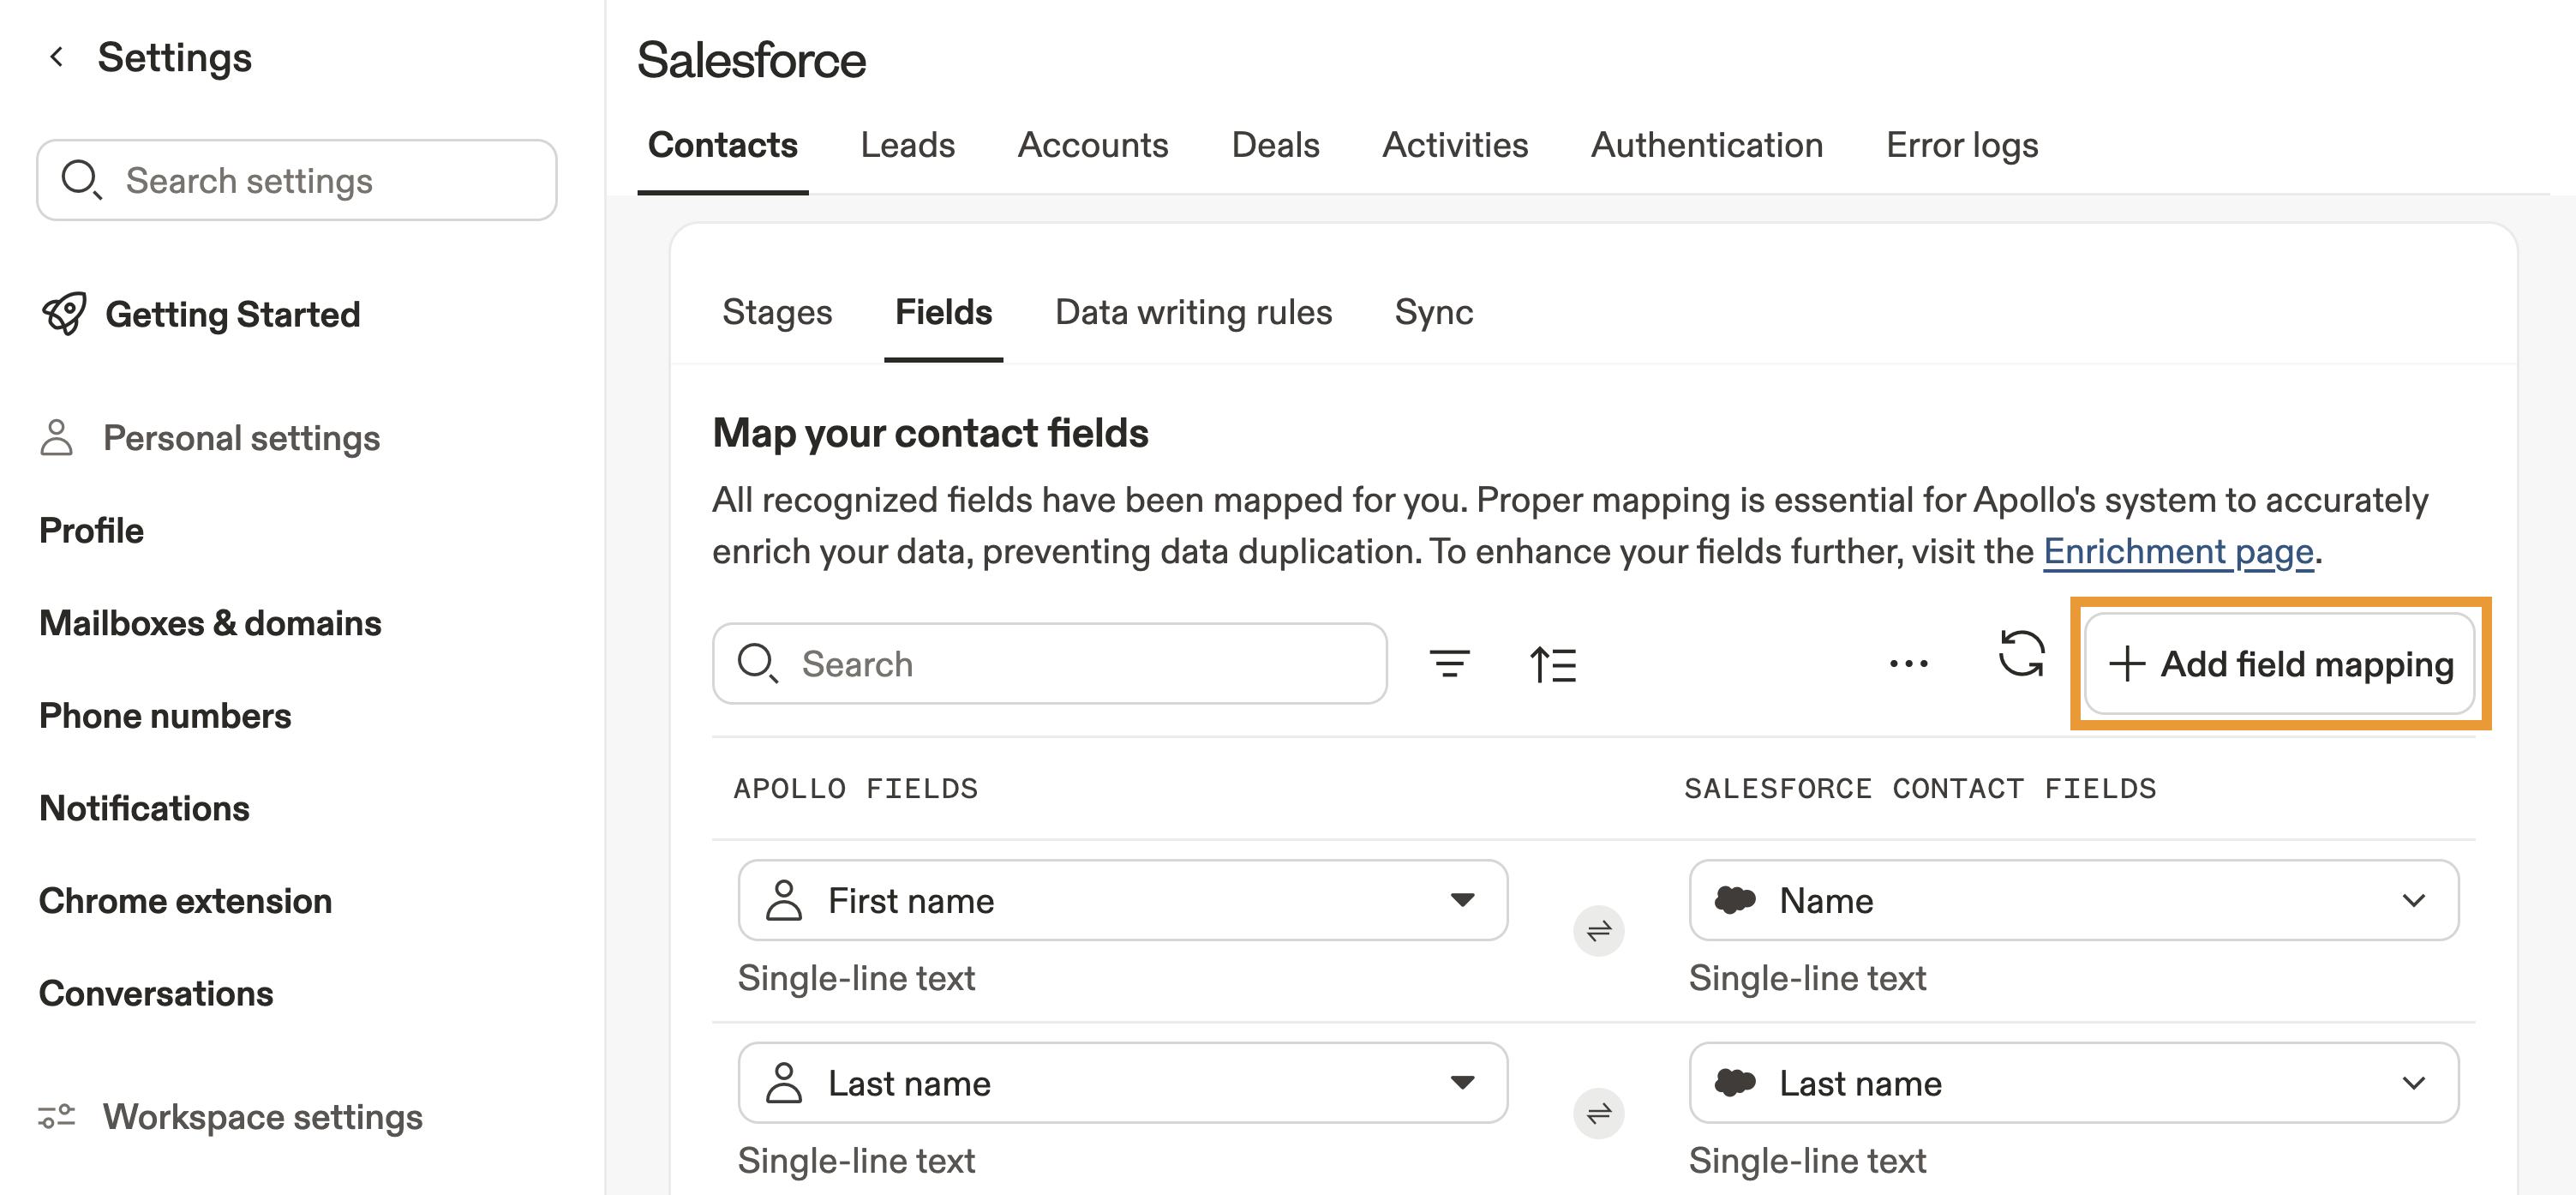
Apollo has multiple phone types such as primary, mobile, work, and other. Each phone type must be mapped to its own Salesforce field. If you only map one field like "phone," only that phone type is pushed. Other phone types won't sync unless you map them separately. If mobile or work numbers aren't appearing in Salesforce, check that those specific phone types are mapped to their own fields.
The do not call field syncs a contact's stored DNC status between Apollo and Salesforce. To use this field, you must first enable DNC phone screening on Apollo.
Apollo only syncs the DNC status already stored for the contact. Apollo doesn't run a live DNC check during CRM sync.
- Click Delete to remove a field mapping.
- When finished, click Save.
Apollo sends a default source value, for example, "Apollo," when you create new contacts or leads in Salesforce. By default, this is written to the lead source field. This mapping doesn't appear in the field mapping table because it's controlled separately.
To change the lead source or value, update the setting in Settings > Integrations > Salesforce > Contacts or Leads, then look for Source for contacts and leads that are pushed to Salesforce.
Only single-line text fields are supported for this setting. Picklist fields aren't supported.
You have now mapped fields between Apollo and Salesforce. To update your existing records to match the mapping, go to Integrations > Salesforce and select contacts, accounts, leads, or deals. Click Push all to apply Apollo stage data to existing Salesforce records or Pull all to apply Salesforce stage data to existing Apollo records.
If you update or add fields or stages in Salesforce, update the mapping in Apollo to reflect these changes. If you delete a stage in Salesforce, move the lead, contact, account, or deal into an active stage. Check out Automatically Create and Map Stages Between Salesforce and Apollo for more best practices.
Map 'Created By' Attribution to Salesforce
By default, records created by Apollo in Salesforce show the team sync user in the Salesforce Created By field. If your team uses Salesforce Created By to represent record ownership, individual Apollo users can connect their personal Salesforce accounts, and then you can use this mapping to preserve ownership attribution when records sync to Salesforce.
When Apollo's created_by field is mapped to Salesforce CreatedById, Apollo syncs the Apollo user who originally created a supported new record as the Salesforce Created By user.
If your team uses Created By for routing, reporting, dashboards, or attribution in Salesforce, this workflow is useful to ensure the Apollo user who originally created the record shows as the Salesforce Created By user.
This mapping can be applied to new Salesforce contacts, leads, accounts, or deal/opportunities.
A Salesforce admin must enable Set Audit Fields upon Record Creation and grant that permission to the Salesforce user that Apollo uses for syncing. If the permission isn't enabled for the connected Salesforce user, Salesforce rejects new records when Apollo tried to create them and the sync fails.
To map Apollo-created attribution to Salesforce:
- In Salesforce, confirm that Set Audit Fields upon Record Creation is enabled and assigned to the Salesforce user Apollo uses for syncing to Salesforce.
- Next, launch Apollo and go to Settings > Integrations > Salesforce.
- Click Contacts, Leads, or Accounts, depending on the type of record you want to map.
- Click Fields > Add field mapping.
- Check Apollo's
Created byuser lookup field under Activity.
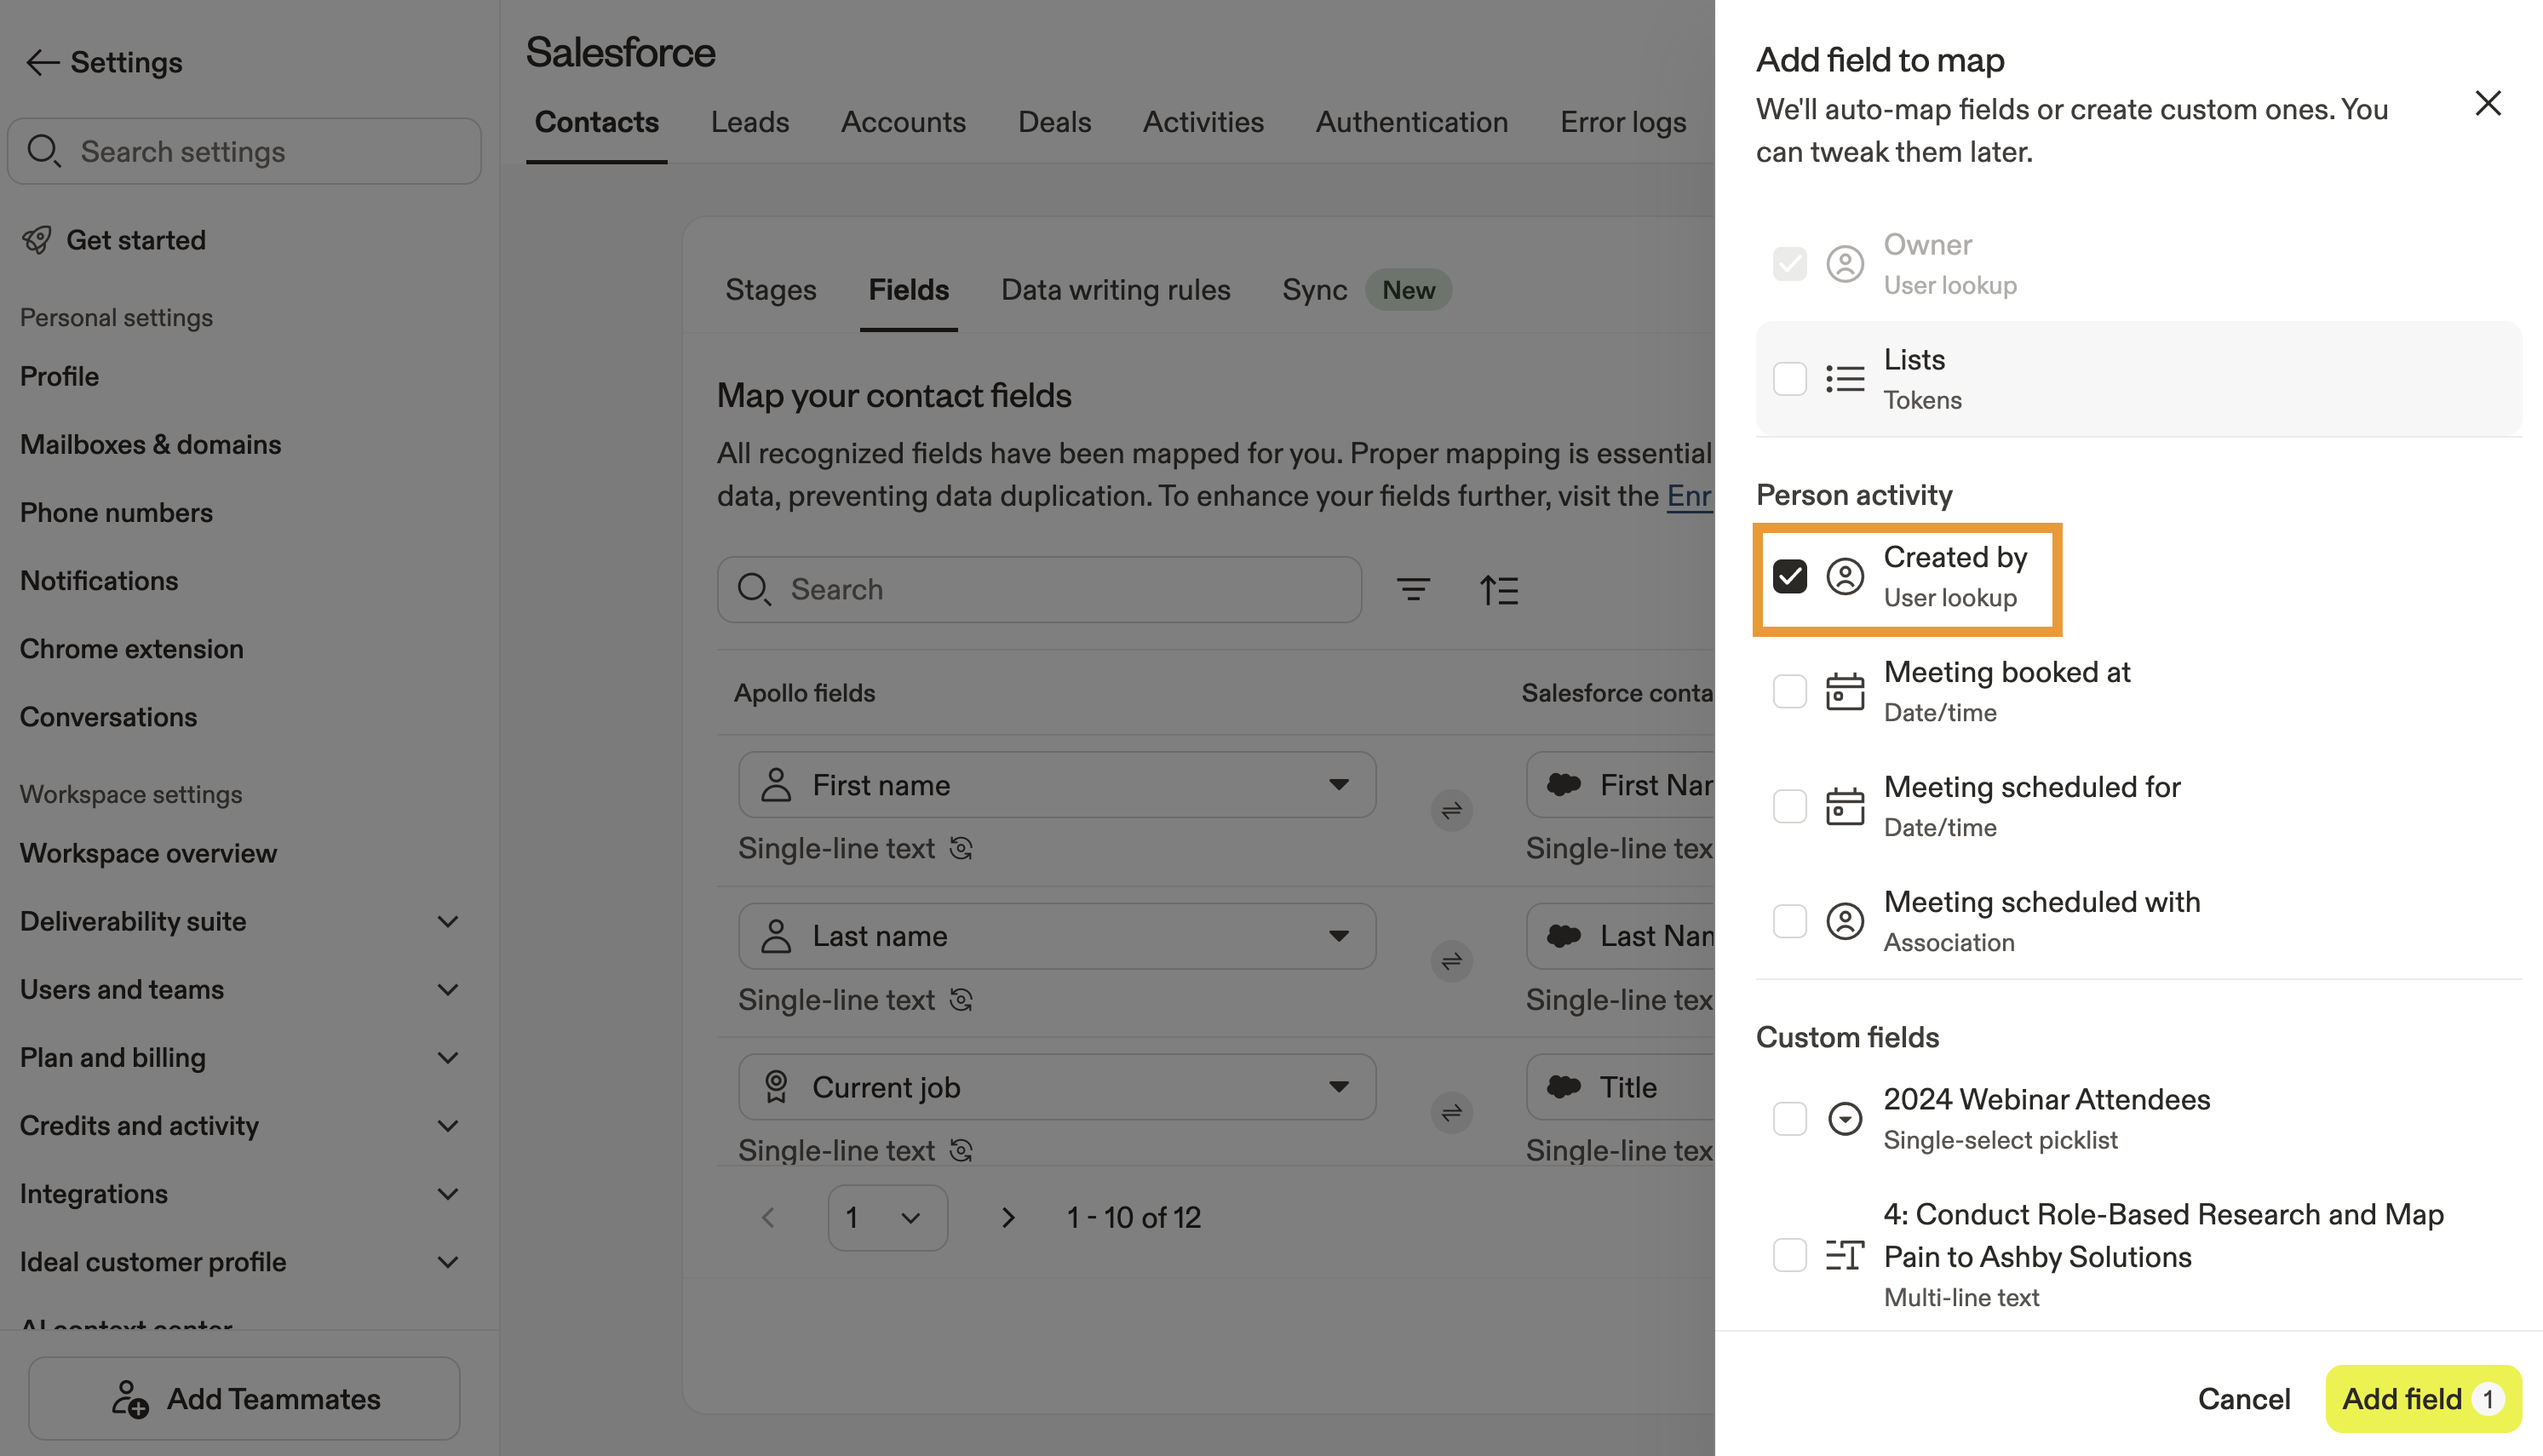
- Click Add field.
- Map the field to Salesforce's
CreatedByIdfield.
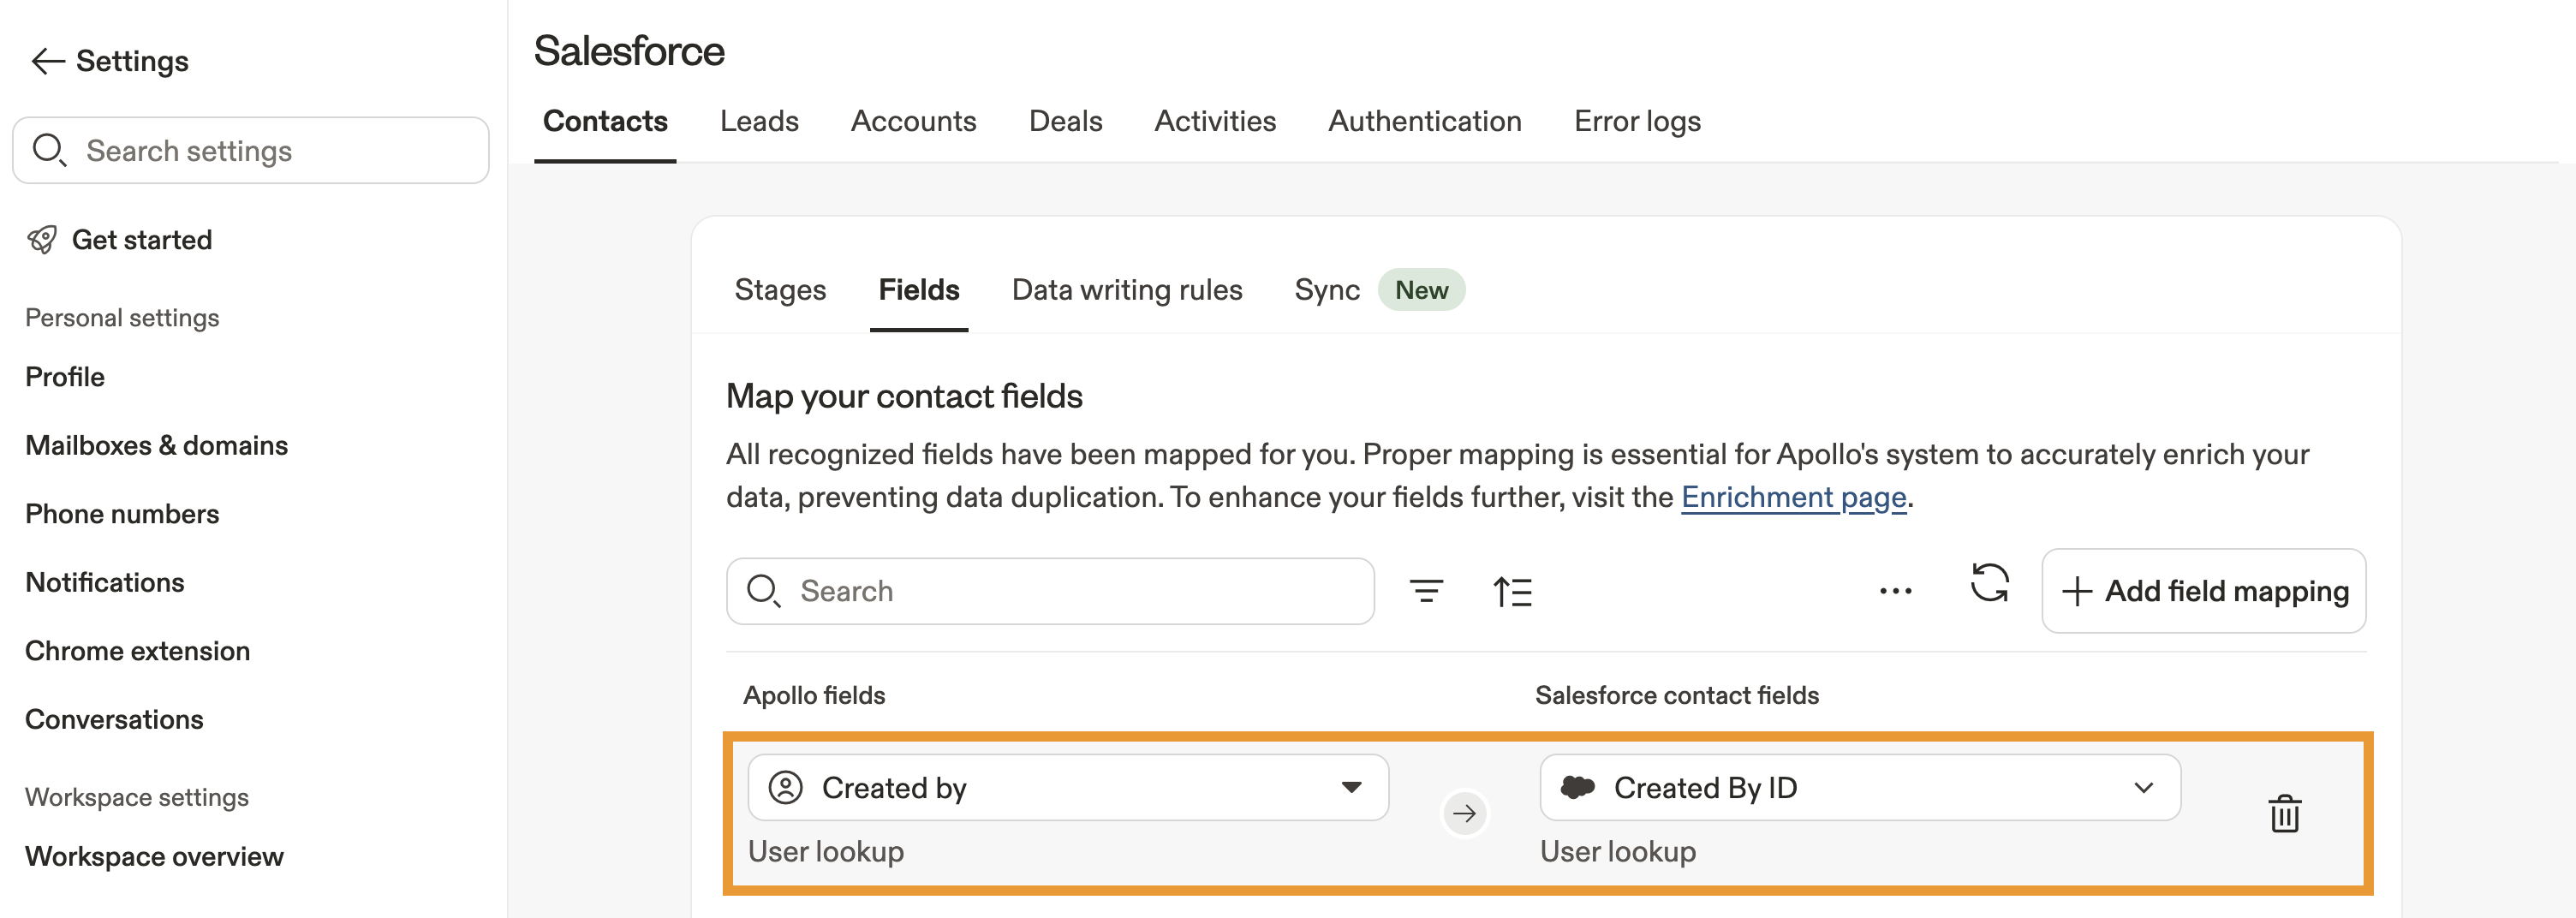
- When finished, click Save.
You have now mapped the created by field.
This mapping uses the Apollo user who originally created the record. For example, if Rep A creates a contact in Apollo and Rep B later pushes it to Salesforce, Apollo uses Rep A as the Salesforce Created By user when Apollo can match Rep A to a Salesforce user. If your team uses Salesforce Created By as its ownership signal, this allows Rep A to retain or claim ownership attribution even though Rep B performed the later sync.
Apollo can only send a Salesforce CreatedById value when Apollo can match the Apollo record creator to a Salesforce user. If Apollo can't match the user, Salesforce may use the connected Salesforce sync user as the creator instead.
Salesforce doesn't allow CreatedById to be changed after a record is created, so existing Salesforce records aren't backfilled, and updates to existing records won't change the Salesforce Created By value.
Configure Data Writing Rules
After you map fields, set data writing rules for contacts, leads, and accounts. These settings define how Apollo manages Salesforce data when you enrich it with Apollo. Data writing rules are required for you to use real-time or scheduled enrichment.
Manual actions always take precedence. If you manually enrich a field from with CRM enrichment, Apollo pushes the update to your CRM, even if you have deactivated auto-fill or overwrite data writing rules for the field.
To configure data writing rules:
- Launch Apollo and navigate to Integrations > Salesforce, then click Contacts, Leads, or Accounts.
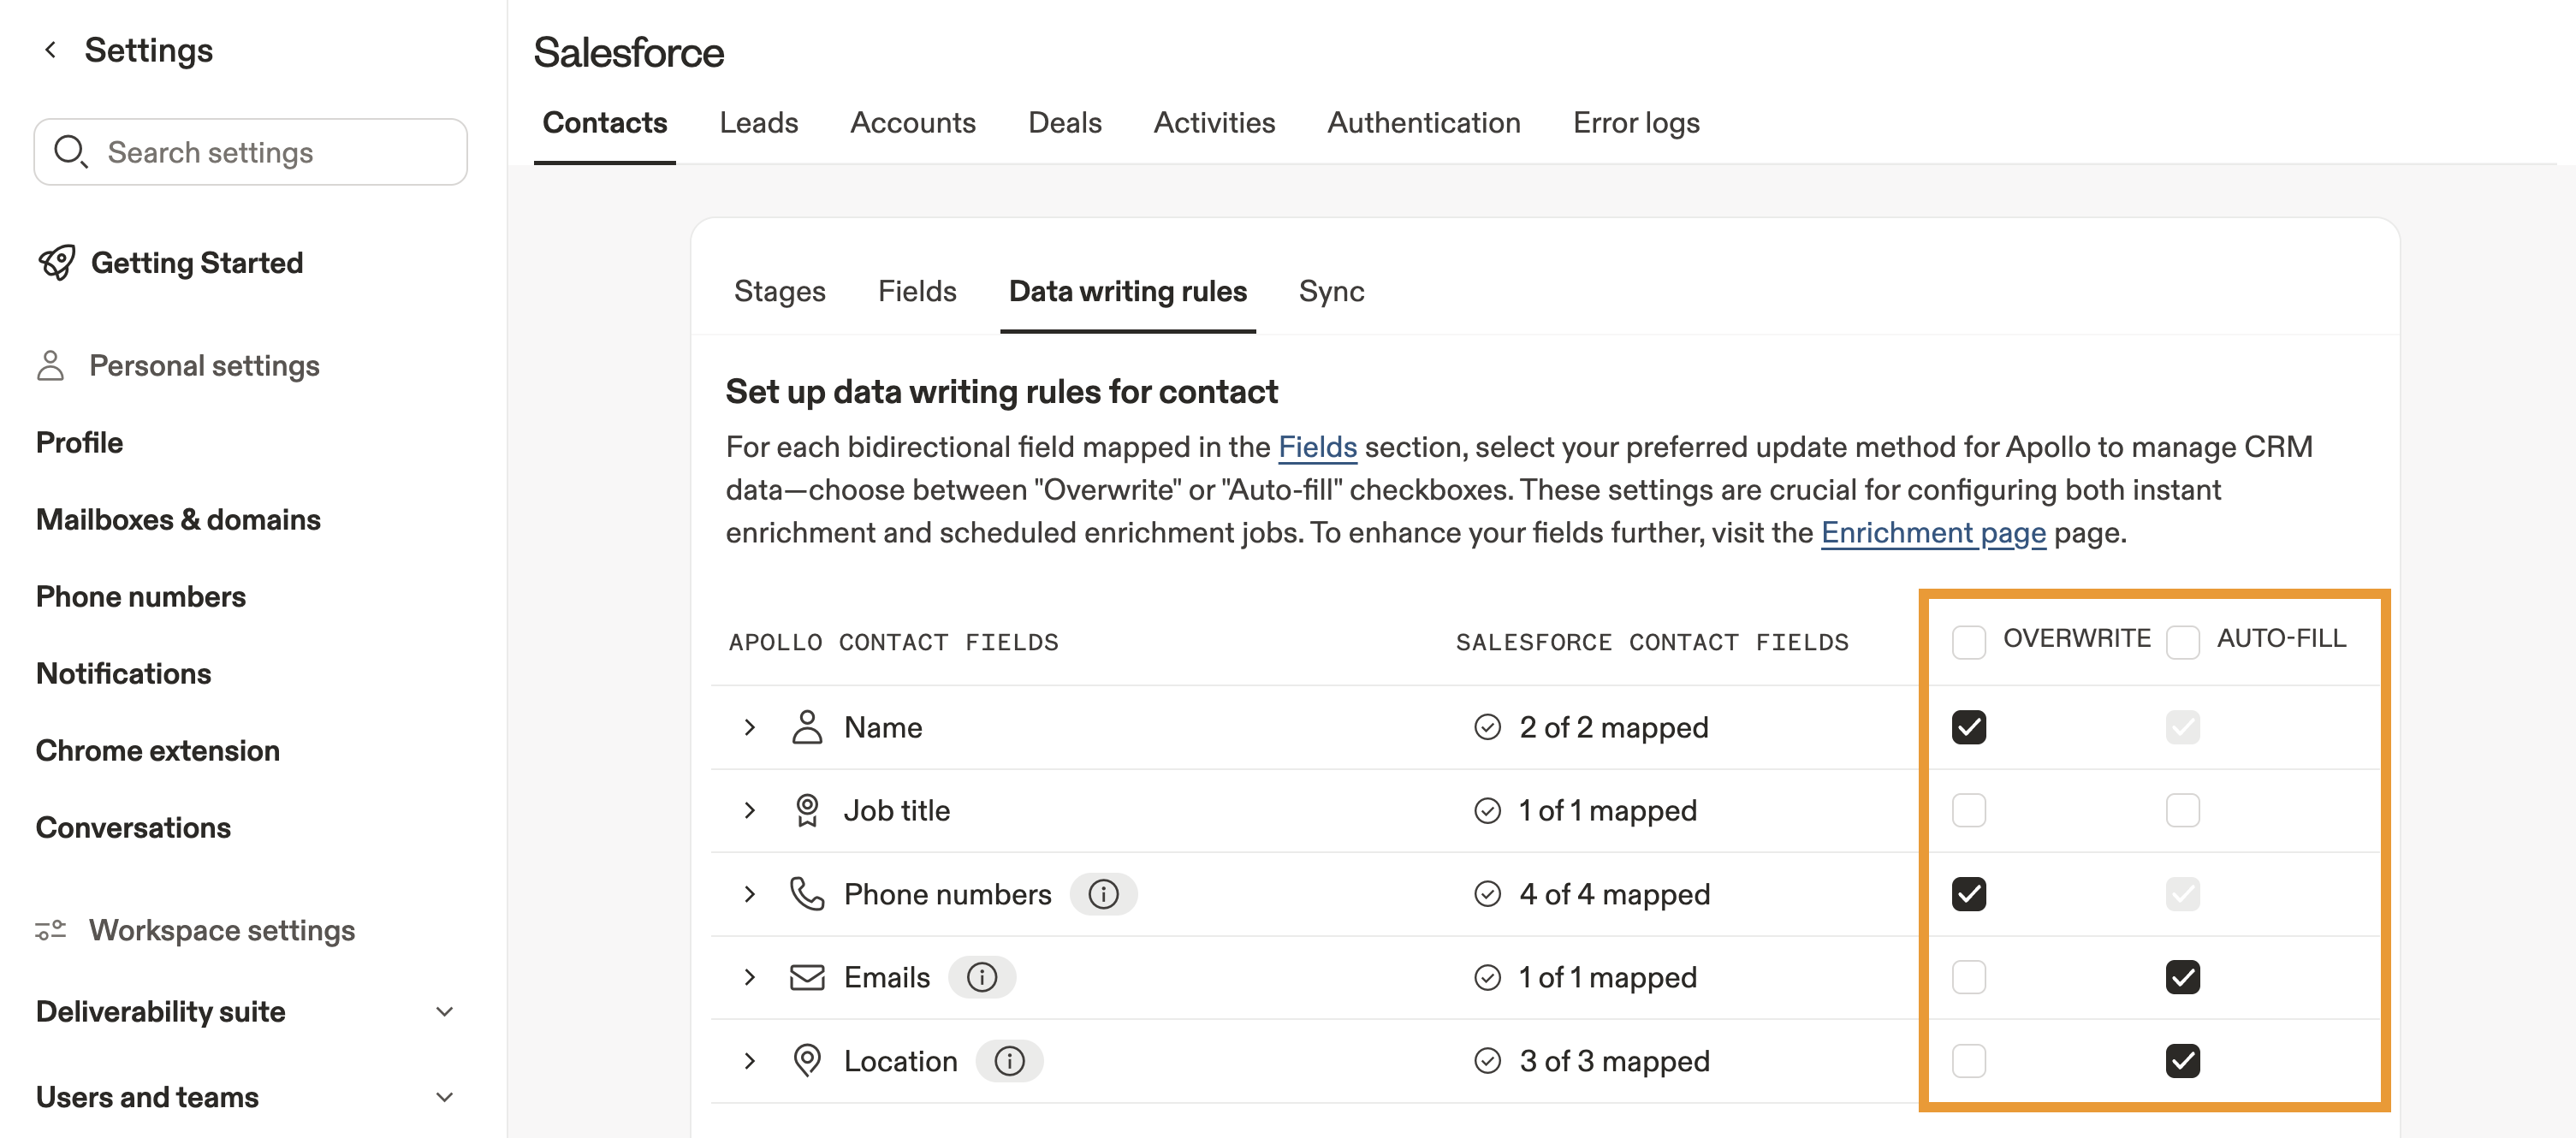
- Click Data writing rules.
- Select whether to overwrite or auto-fill your Salesforce CRM fields with Apollo data:
- Check Auto-fill to automatically use Apollo data to fill in a Salesforce field. Apollo only autofills if the Salesforce field is empty and Apollo has relevant data available.
- Check Overwrite to automatically overwrite the existing information in a Salesforce field with data from Apollo. Apollo only overwrites field data if relevant information is available that differs from the record data already in Salesforce.
Salesforce only updates the address fields Apollo sends during a sync. For example, if a contact's country changes from the United States to another country and Apollo only sends the updated country, the existing city and state values in Salesforce may remain unchanged.
If this creates an incorrect address, update the city and state in Salesforce or update the corresponding address fields in Apollo and sync the record again.
- When finished, click Save.
You have now configured data writing rules.
Auto-fill and overwrite settings only apply when Apollo pulls record data from Salesforce. It can take up to thirty minutes to pull records from Salesforce.
Next Steps
Here are a few Salesforce resources you can use to round out your field mappings and keep your Apollo ↔ Salesforce sync running smoothly.
| Integrate Salesforce with Apollo | If your team's still wiring things together, integrate Salesforce with Apollo to turn your field map plans into a live, two-way sync between both systems. |
|---|---|
| Manage Salesforce Integration Credentials | Tighten your foundation by having an admin manage Salesforce integration credentials so Apollo always syncs with the right permissions and ownership rules in place. |
| Configure Salesforce Push Settings | You can configure Salesforce push settings to decide exactly which Apollo updates write back to Salesforce so your mapped fields don't flood the CRM with noise. |
| Map Default Apollo Fields to Salesforce | Make sure the basics are rock solid by having your team map default Apollo fields to Salesforce so core contact, account, and deal data always lands in the right place. |
| Link Custom Salesforce Fields to Custom Apollo Fields | If you rely on extra data points, you can link custom Salesforce fields to custom Apollo fields to keep all your unique attributes enriched and perfectly aligned across both platforms. |