Overview
Once you connect HubSpot to Apollo, configure how data is shared between both platforms.
Before you configure sync settings, map fields and stages so data flows correctly between HubSpot and Apollo.
Check out the following sections to configure sync settings for the HubSpot integration.
Configure Push Settings
Did you know? For paid Apollo plans, after you enable the HubSpot integration there's a 6-hour window of time to configure sync settings and map fields. This gives your team time to properly configure the integration. During this time, you can't manually pull records. After six hours, syncing is automatically enabled.
Missed the window? You can still adjust sync settings at any time. Go to Settings > Integrations >
HubSpot to review or update sync settings.
Push settings determine when Apollo sends information to HubSpot.
To configure HubSpot push settings:
- Launch Apollo and click Settings > Integrations > HubSpot.
- Click Contacts, Accounts, Deals, or Activities, then click Sync.
HubSpot push settings only affect net new contacts saved in Apollo or imported to Apollo from a CSV file. Apollo pushes any updates to your existing contacts automatically, regardless of push settings.
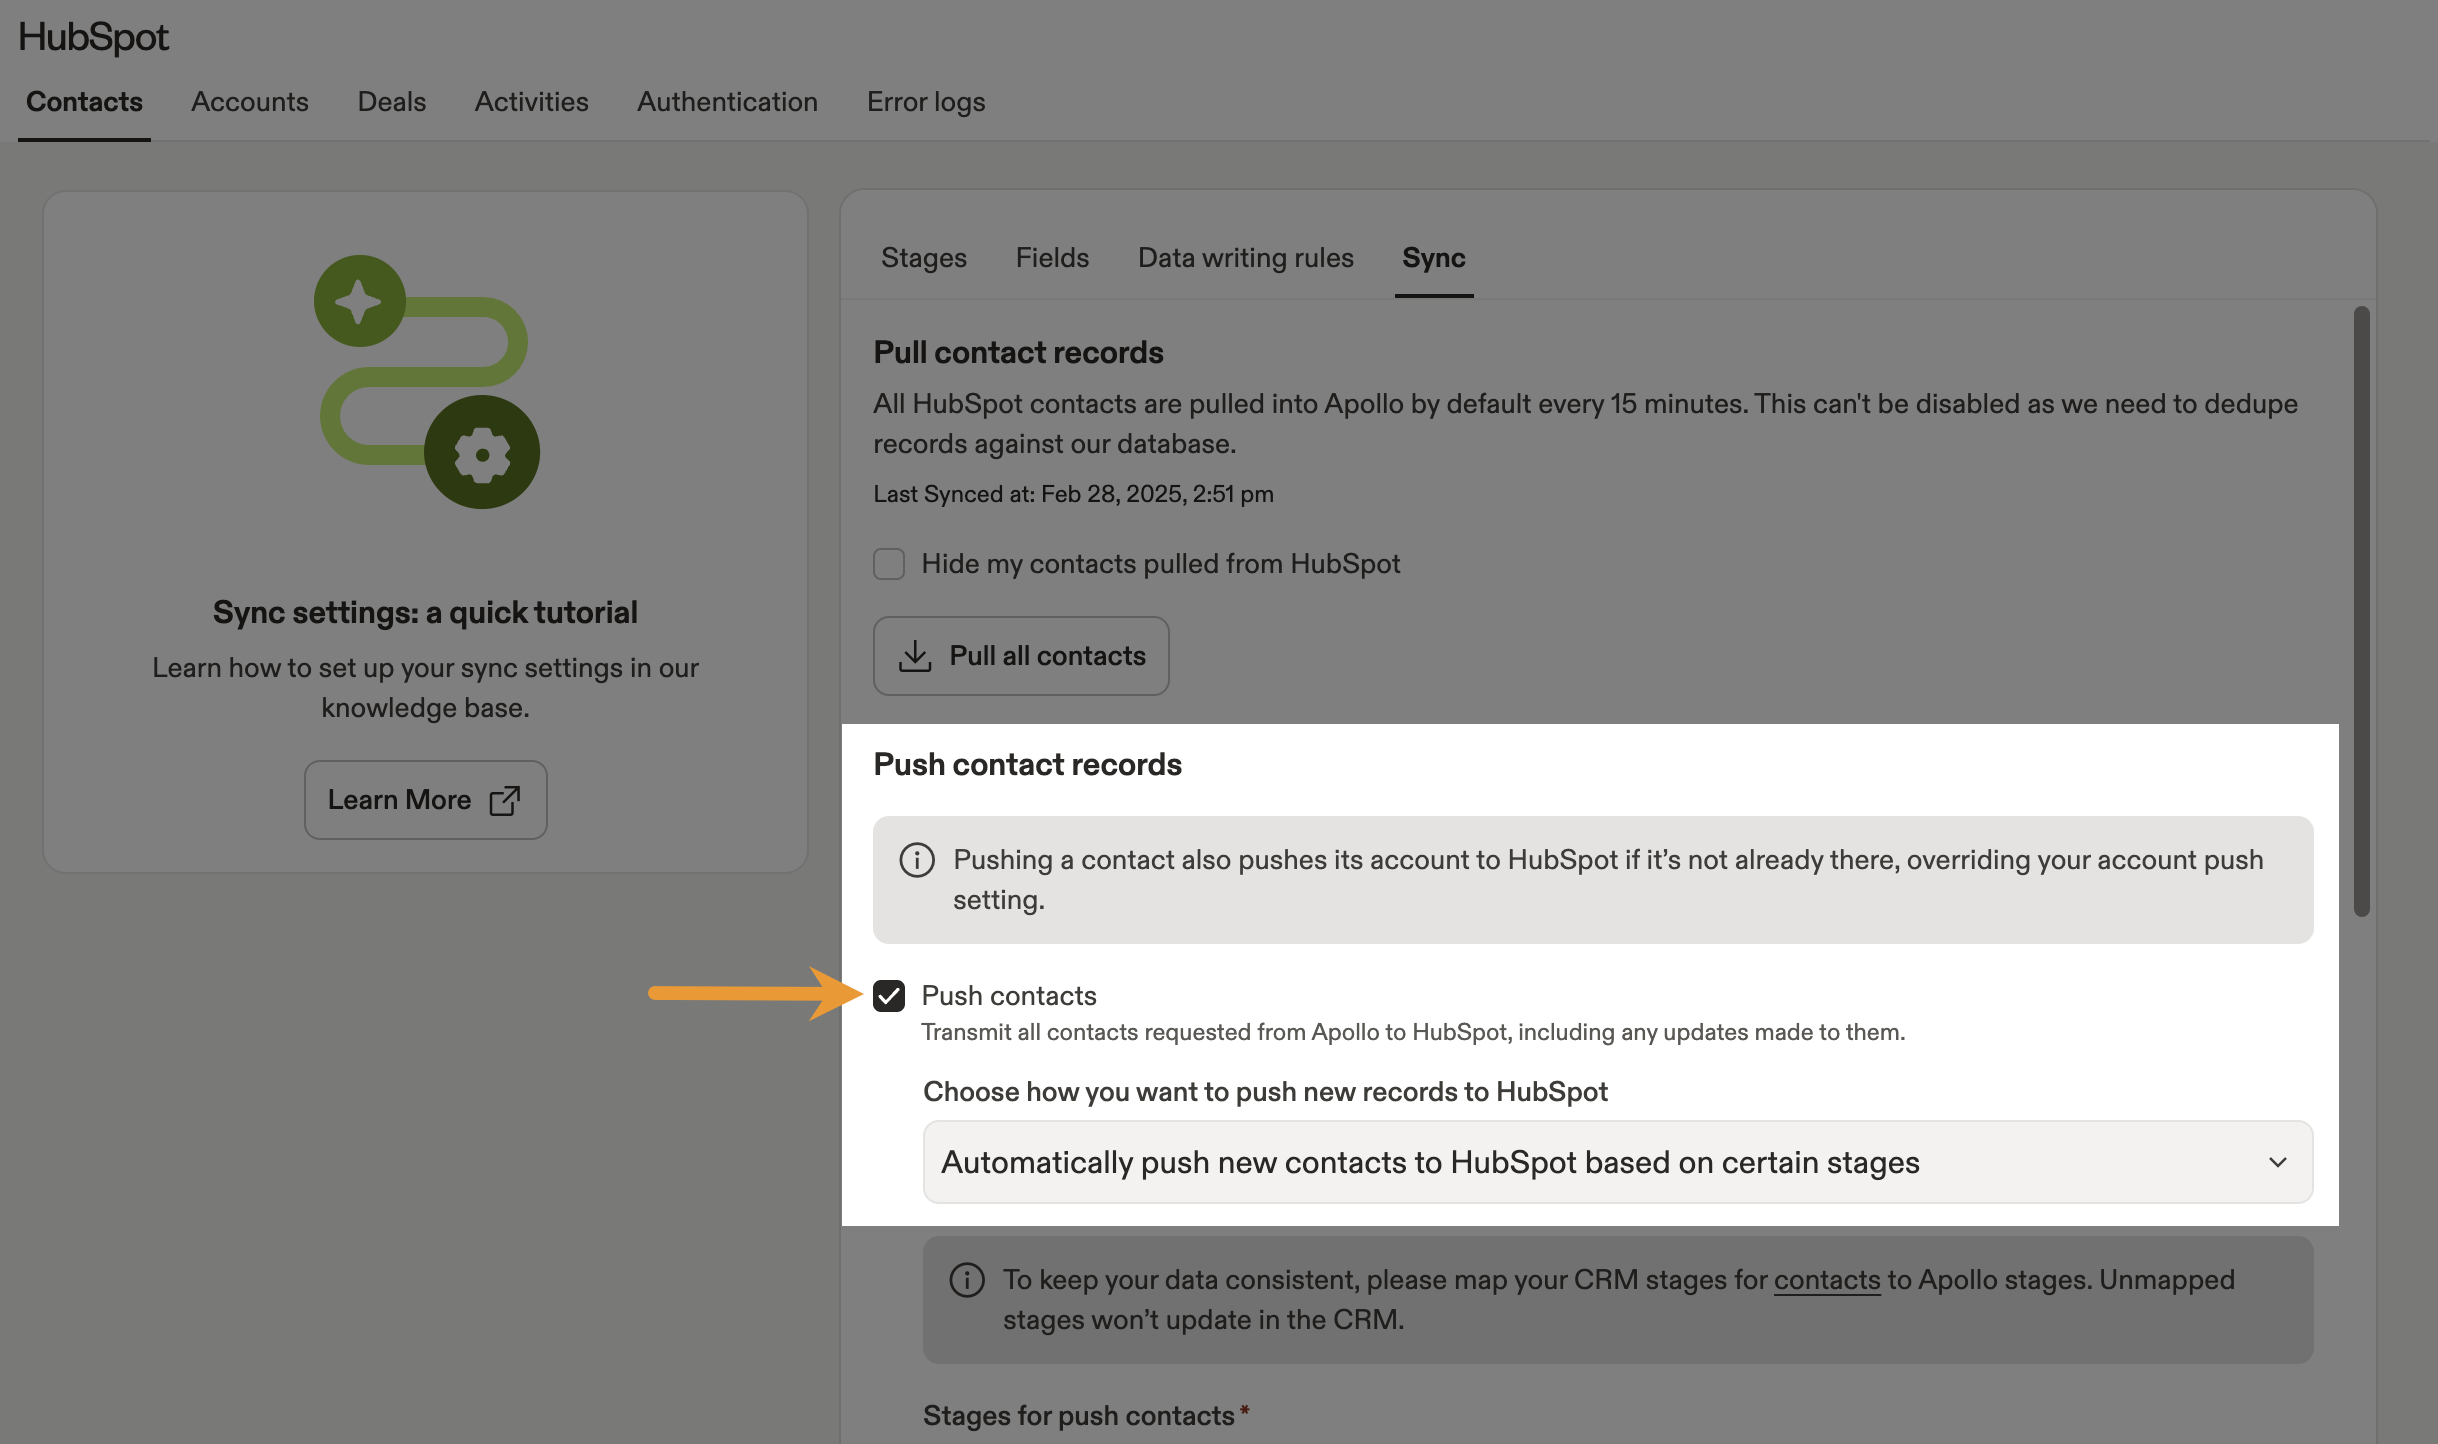
- Check Push contacts to push any newly created or updated contacts to HubSpot. When you push a new or updated contact, Apollo also pushes the associated account if it isn't already in HubSpot.
When you request a net new contact in Apollo and push it to HubSpot:
- If the associated account isn't already in HubSpot, Apollo pushes the account, too. This overrides your account push settings.
- If the contact matches multiple existing accounts in HubSpot, Apollo randomly chooses which account to sync the contact to. For example, if you save John Smith from Cloud Cave, Inc. as a contact in Apollo, but HubSpot has multiple Cloud Cave, Inc. accounts, Apollo randomly assigns John Smith to one of the accounts.
- This can create new companies in HubSpot even if account push is disabled, because Apollo sends the associated account during the contact push.
- Click Edit Conditions to choose how new contacts are pushed. You can automatically push all new contacts or push contacts based on specific stage, email verification status, or a custom field.

If push filters are enabled and require a selected email status, contacts without an email address in Apollo won't sync to HubSpot. Otherwise, you can push contacts to HubSpot without an email address.
- Set a source for contacts synced from Apollo to HubSpot. The default source is Apollo. You can search for a source from the dropdown. If the source field you select is a picklist field, select a value for the field.

- If you've already synced duplicate records from HubSpot to Apollo, there are two sync settings to remove them:
- Contact deletion sync: Check to delete duplicate records in either Apollo or HubSpot. When enabled, Apollo automatically deletes any Apollo records linked to deleted HubSpot records, and vice versa.
- Contact merge sync: Check to merge duplicate records in HubSpot. When enabled, Apollo automatically merges any Apollo records that are linked to merged records in HubSpot.

- When finished, click Save.
You have now configured HubSpot push settings for your contacts.
When you push contacts to HubSpot, ownership is determined by whether the user who pushes the record has linked their personal HubSpot credentials in Apollo. For a single record, use the HubSpot push action on the contact profile. For bulk records, go to Settings > Integrations > HubSpot > Contacts > Sync. Depending on your team's authentication setup, the pushed contact may be assigned based on the pushing user's linked HubSpot account. Learn more on Contact and Account Ownership with CRM Integrations.
When HubSpot updates a contact owner, Apollo can reflect that owner change during sync. For this to work, the sync user must have permission to assign owners in Apollo. The sync user is usually the Apollo user who connected HubSpot to Apollo, or the user set as the team's default CRM sync user. The sync user's permission profile must have Assign contact owner enabled in Apollo. Otherwise owner changes from HubSpot won't be applied. Check the user's permission profile under Settings > Users and teams > Permission profiles. If owner changes still don't appear after a full sync, check Settings > Integrations > HubSpot > Error logs for owner sync or permission-related messages.
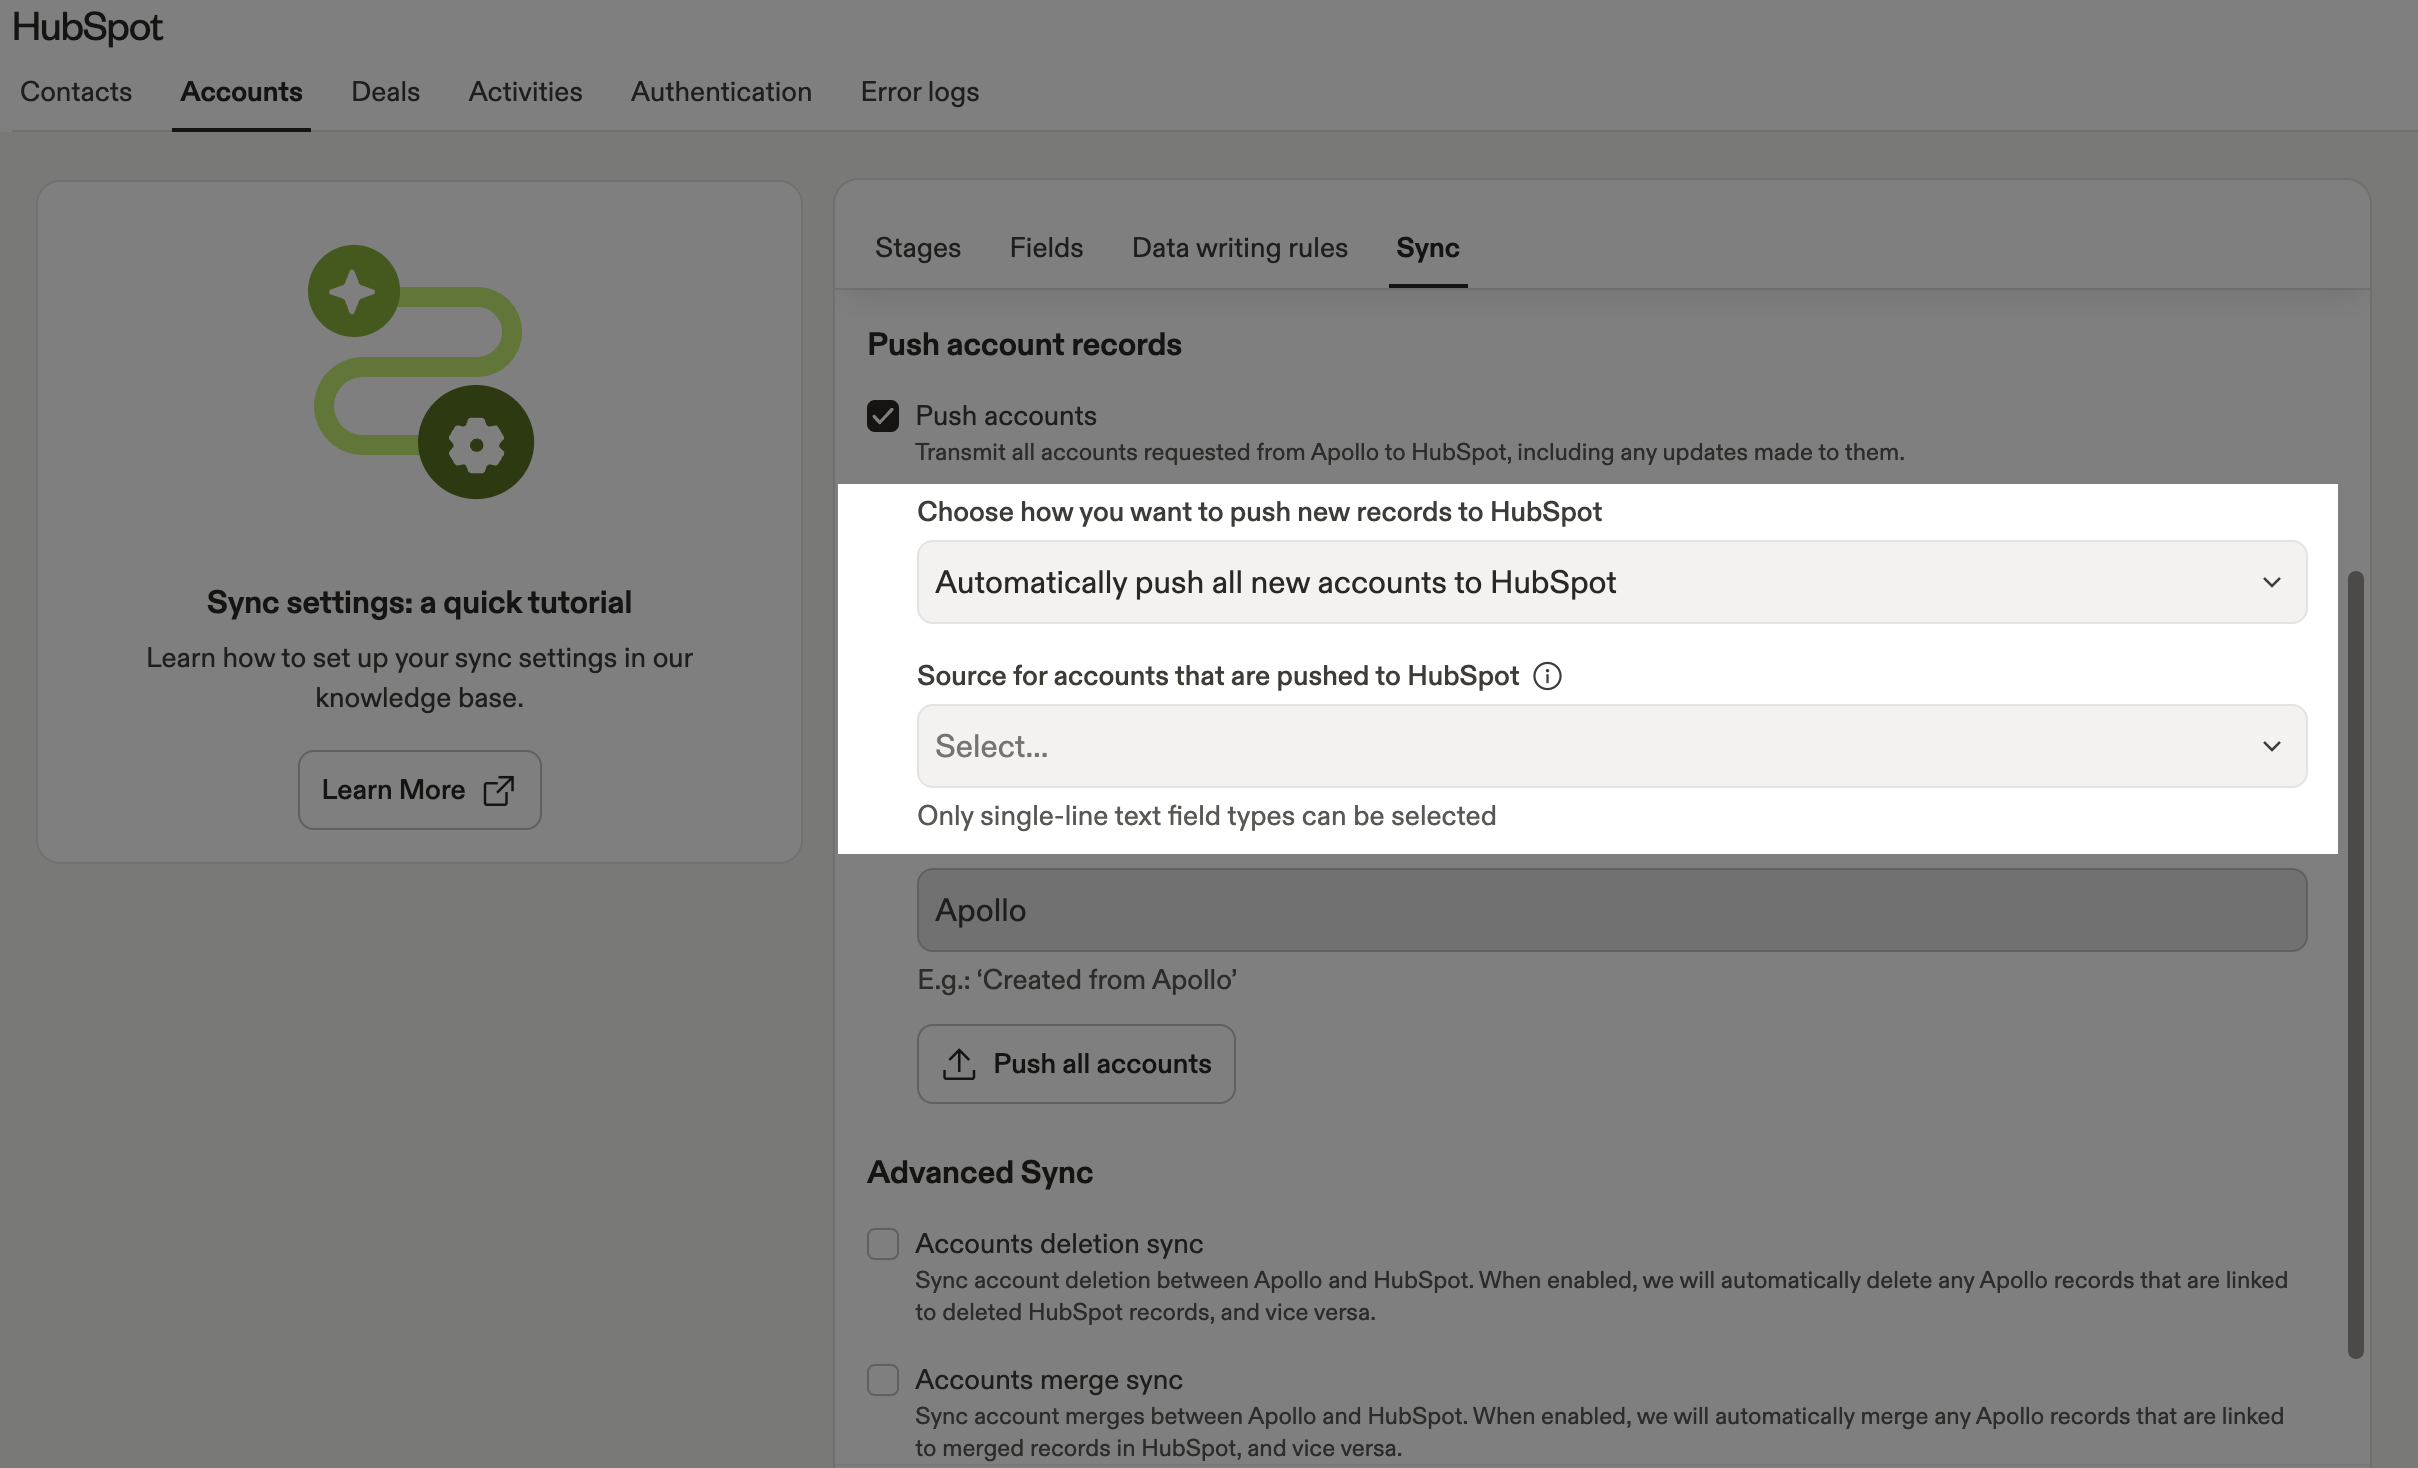
- By default, Apollo pushes new accounts to HubSpot. Uncheck Push accounts to change this setting.

- Set a source for contacts synced from Apollo to HubSpot. The default source is Apollo. If the source field you select is a picklist field, select a value for the field.
- If you already synced duplicate records from HubSpot to Apollo, there are two sync settings to remove them:
- Account deletion sync: Check to delete duplicate records in either Apollo or HubSpot. When enabled, Apollo automatically deletes any Apollo records linked to deleted HubSpot records, and vice versa.
- Account merge sync: Check to merge duplicate records in HubSpot. When enabled, Apollo automatically merges any Apollo records linked to merged records in HubSpot.

- When finished, click Save.
You have now configured HubSpot push settings for your accounts.
When you push accounts to HubSpot, ownership is determined by whether the user who pushes the record has linked their personal HubSpot credentials in Apollo. For a single record, use manual to HubSpot. For bulk records, go to Settings > Integrations > HubSpot > Accounts > Sync to push all. Depending on your team's authentication setup, the pushed account may be assigned based on the pushing user's linked HubSpot account.
When HubSpot updates an account owner, Apollo can reflect that owner change during sync. For this to work, the sync user must have permission to assign account owners in Apollo. The sync user is usually the Apollo user who connected HubSpot to Apollo, or the user set as the team's default CRM sync user. The sync user's permission profile must have Assign account owner enabled in Apollo. Otherwise owner changes from HubSpot won't be applied. Check the user's permission profile under Settings > Users and teams > Permission profiles. If owner changes still don't appear after a full sync, check Settings > Integrations > HubSpot > Error logs for owner sync or permission-related messages.
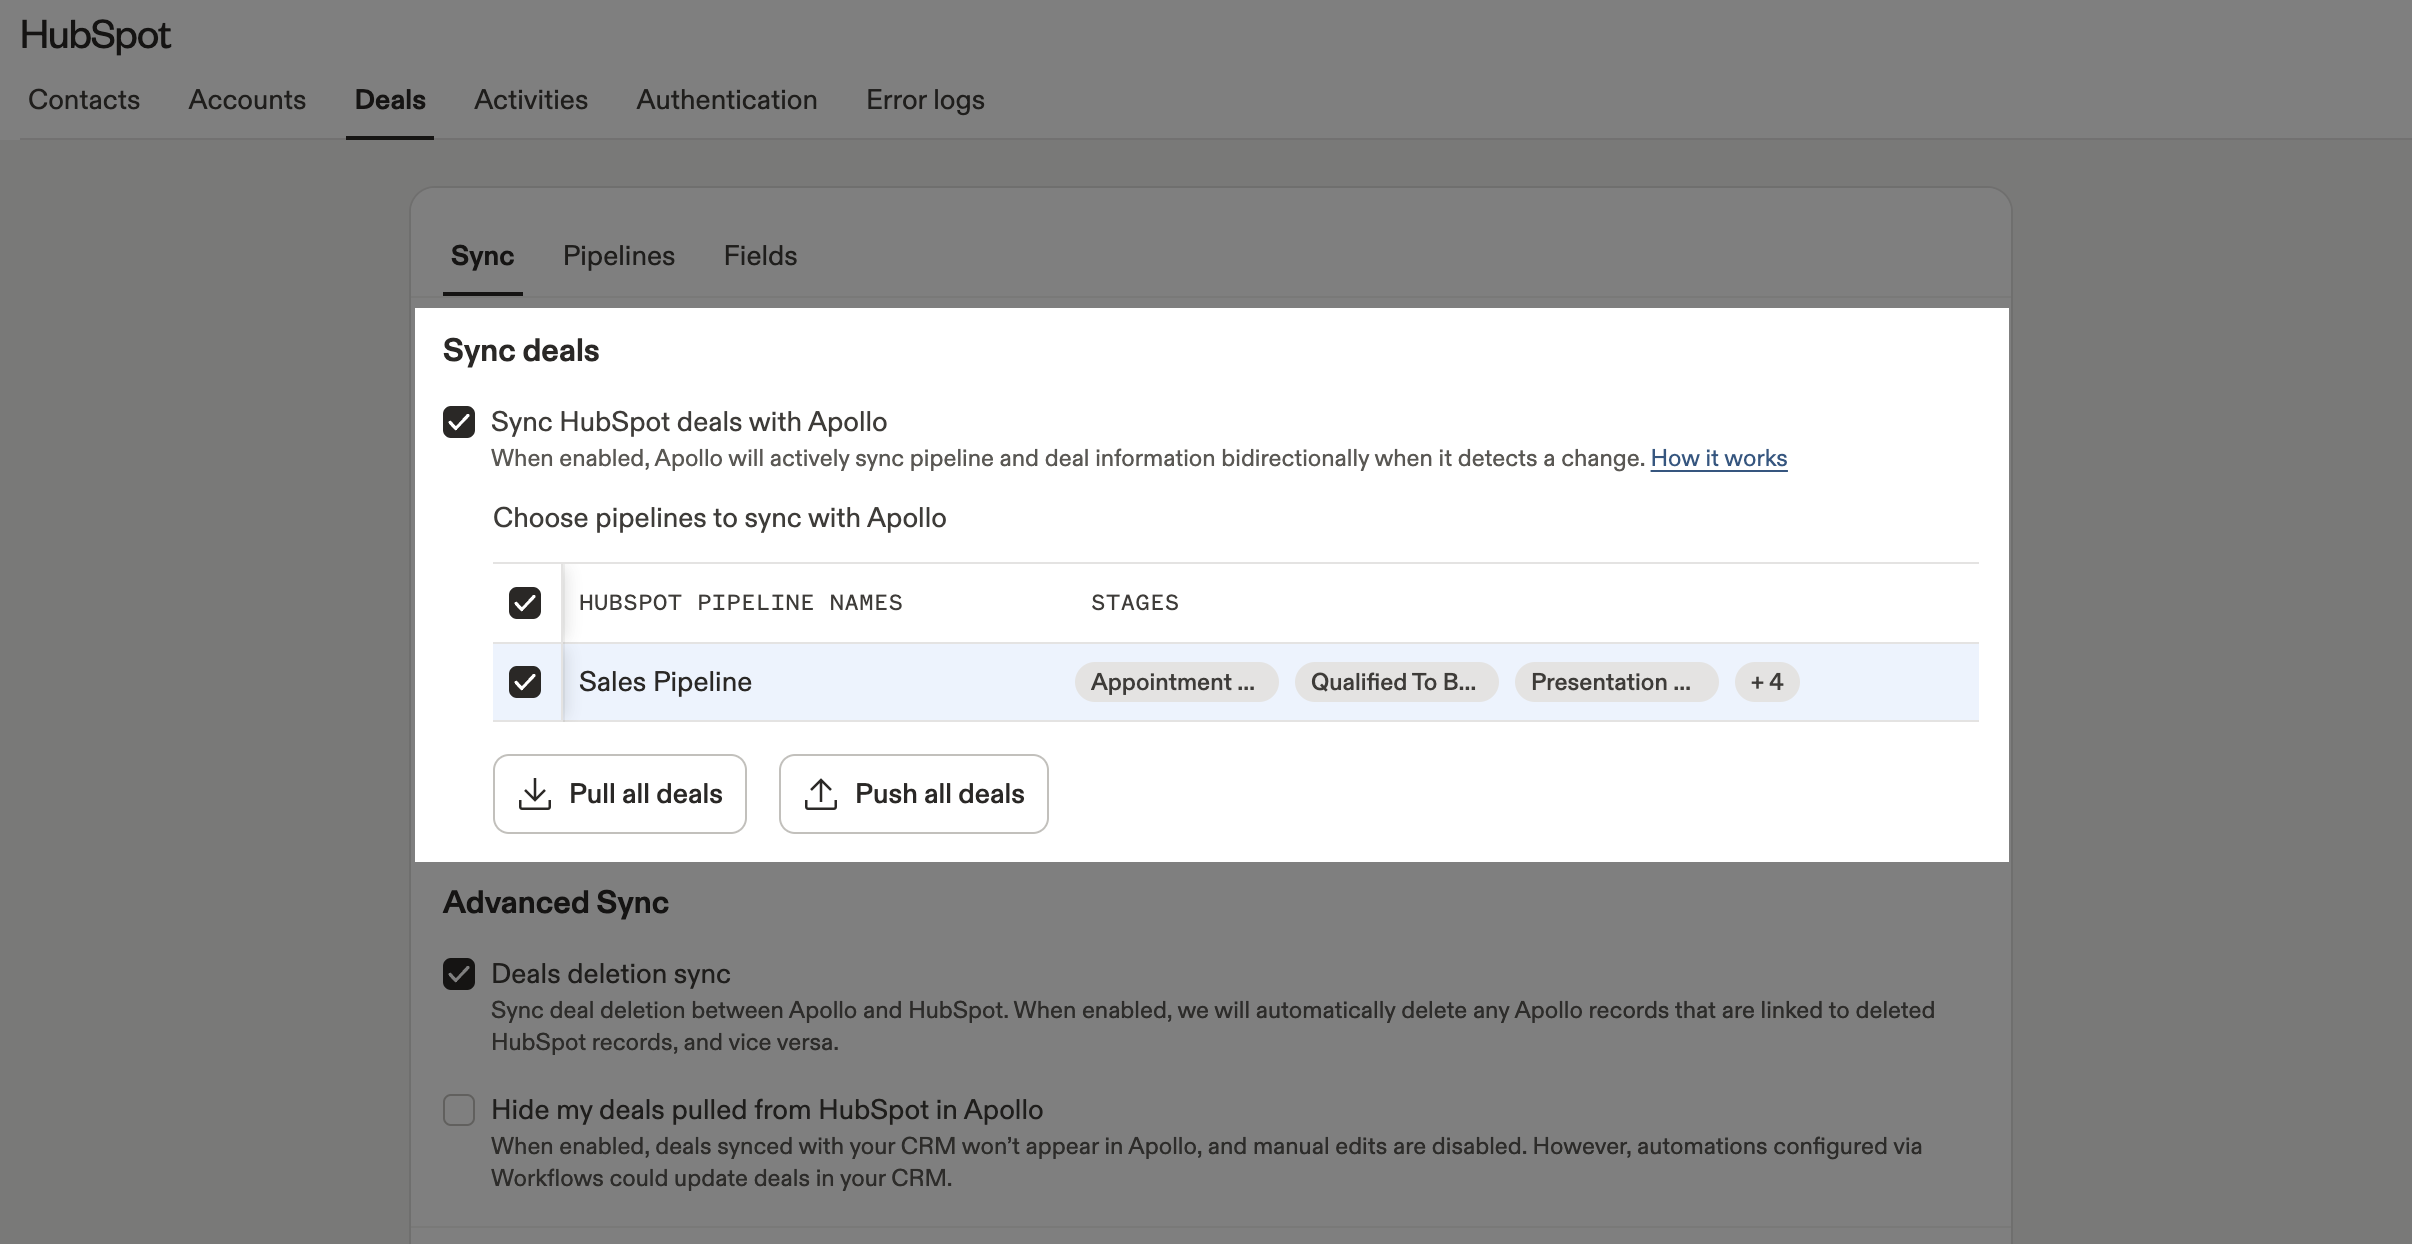
To configure push settings for deals:
- Check Sync HubSpot deals with Apollo to actively sync pipeline and deal information bidirectionally when Apollo detects a change. It may take up to 24 hours for your deals to appear in Apollo.
- When enabled, Apollo pulls all HubSpot deal information and uses HubSpot as the source of truth for any previously synced deals.
- If you deactivate this setting at any point, HubSpot deal information remains in Apollo, but Apollo no longer actively syncs with HubSpot.

- (Optional) Click Push all deals to manually push all deals.
- After you sync your HubSpot deals, you can edit your selected pipelines:
- Uncheck to deactivate sync for a pipeline. Apollo removes the pipeline and deletes its existing deals from Deals overview and from Settings > Deal fields & stages > Pipelines.
- Check an inactive pipeline to restart deals sync for that pipeline. When you reactivate a pipeline, Apollo creates new deal records from HubSpot and cannot retrieve any prior data deleted from Apollo.

When you deactivate a pipeline, deals deletion may take up to 24 hours. Check back later!
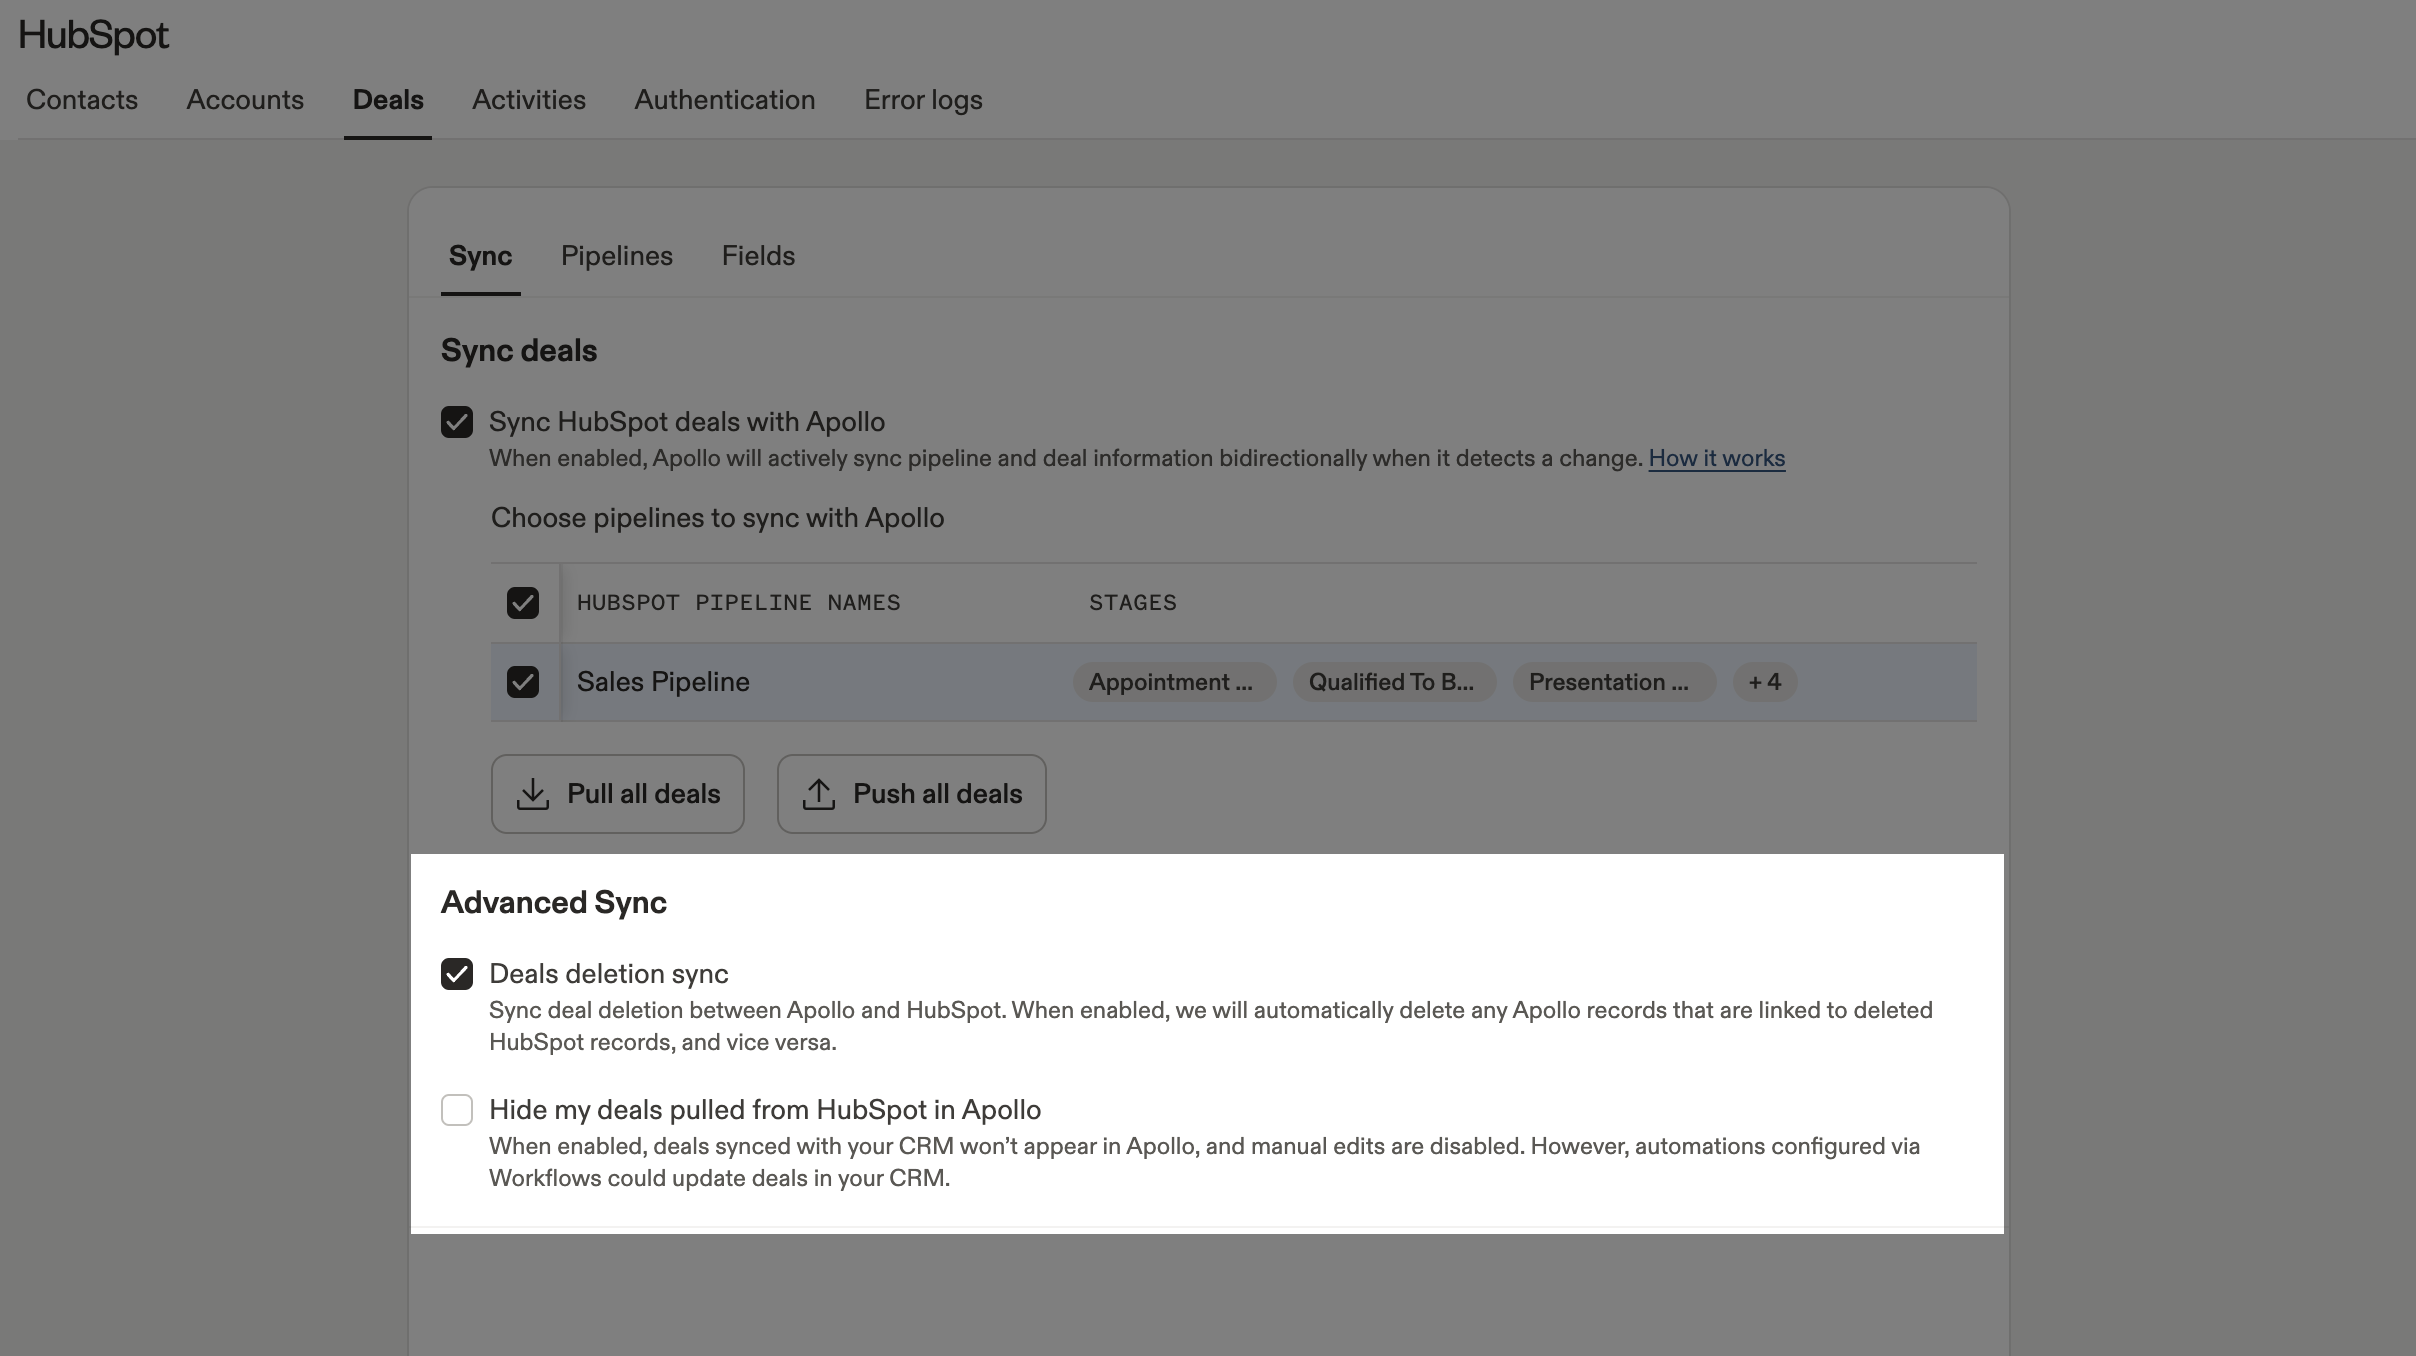
- (Optional) Check Deal deletion sync to allow Apollo to automatically delete any Apollo records linked to deleted HubSpot records, and vice versa.
- (Optional) Check Hide my deals to hide deals pulled from HubSpot to Apollo. When enabled, synced deals won't appear in Apollo, but automations could still update deals in HubSpot.

- When finished, click Save.
You have now configured push settings for deals.
On Apollo, activities are engagement records you can sync to HubSpot, including emails, tasks, notes, meeting summaries, and phone calls. Configure each activity type separately to control what Apollo pushes to HubSpot.
Make sure you push contacts, accounts, or deals when you push activities to avoid sync failures. When you push activities, by default Apollo pushes activities to both contacts and accounts in HubSpot.
If emails, calls, or tasks from Apollo aren't appearing in HubSpot, confirm the following:
- Contacts must be pushed: Activities sync to existing records in HubSpot. Make sure contacts are successfully pushed or already exist in HubSpot. If a contact or account doesn't exist in HubSpot, activity may not appear until the record is created or synced.
- Connect your mailbox To sync email activity, link your mailbox to Apollo under Settings > Mailboxes.
You can push the following activities from Apollo to HubSpot:
Emails
To push emails to your CRM:
- Check Push emails then select the type of email to push:
- Push outgoing emails sent within Apollo
- Push outgoing emails not sent within Apollo
- Push incoming emails that are replies to emails sent within Apollo
- Push incoming emails from all other sources
- Push internal emails
- Push emails even if sender or recipient doesn't exist in HubSpot
Use caution with Push emails even if the sender or recipient doesn't exist. Enabling this feature may result in the creation of contacts in HubSpot that you don't expect to see.
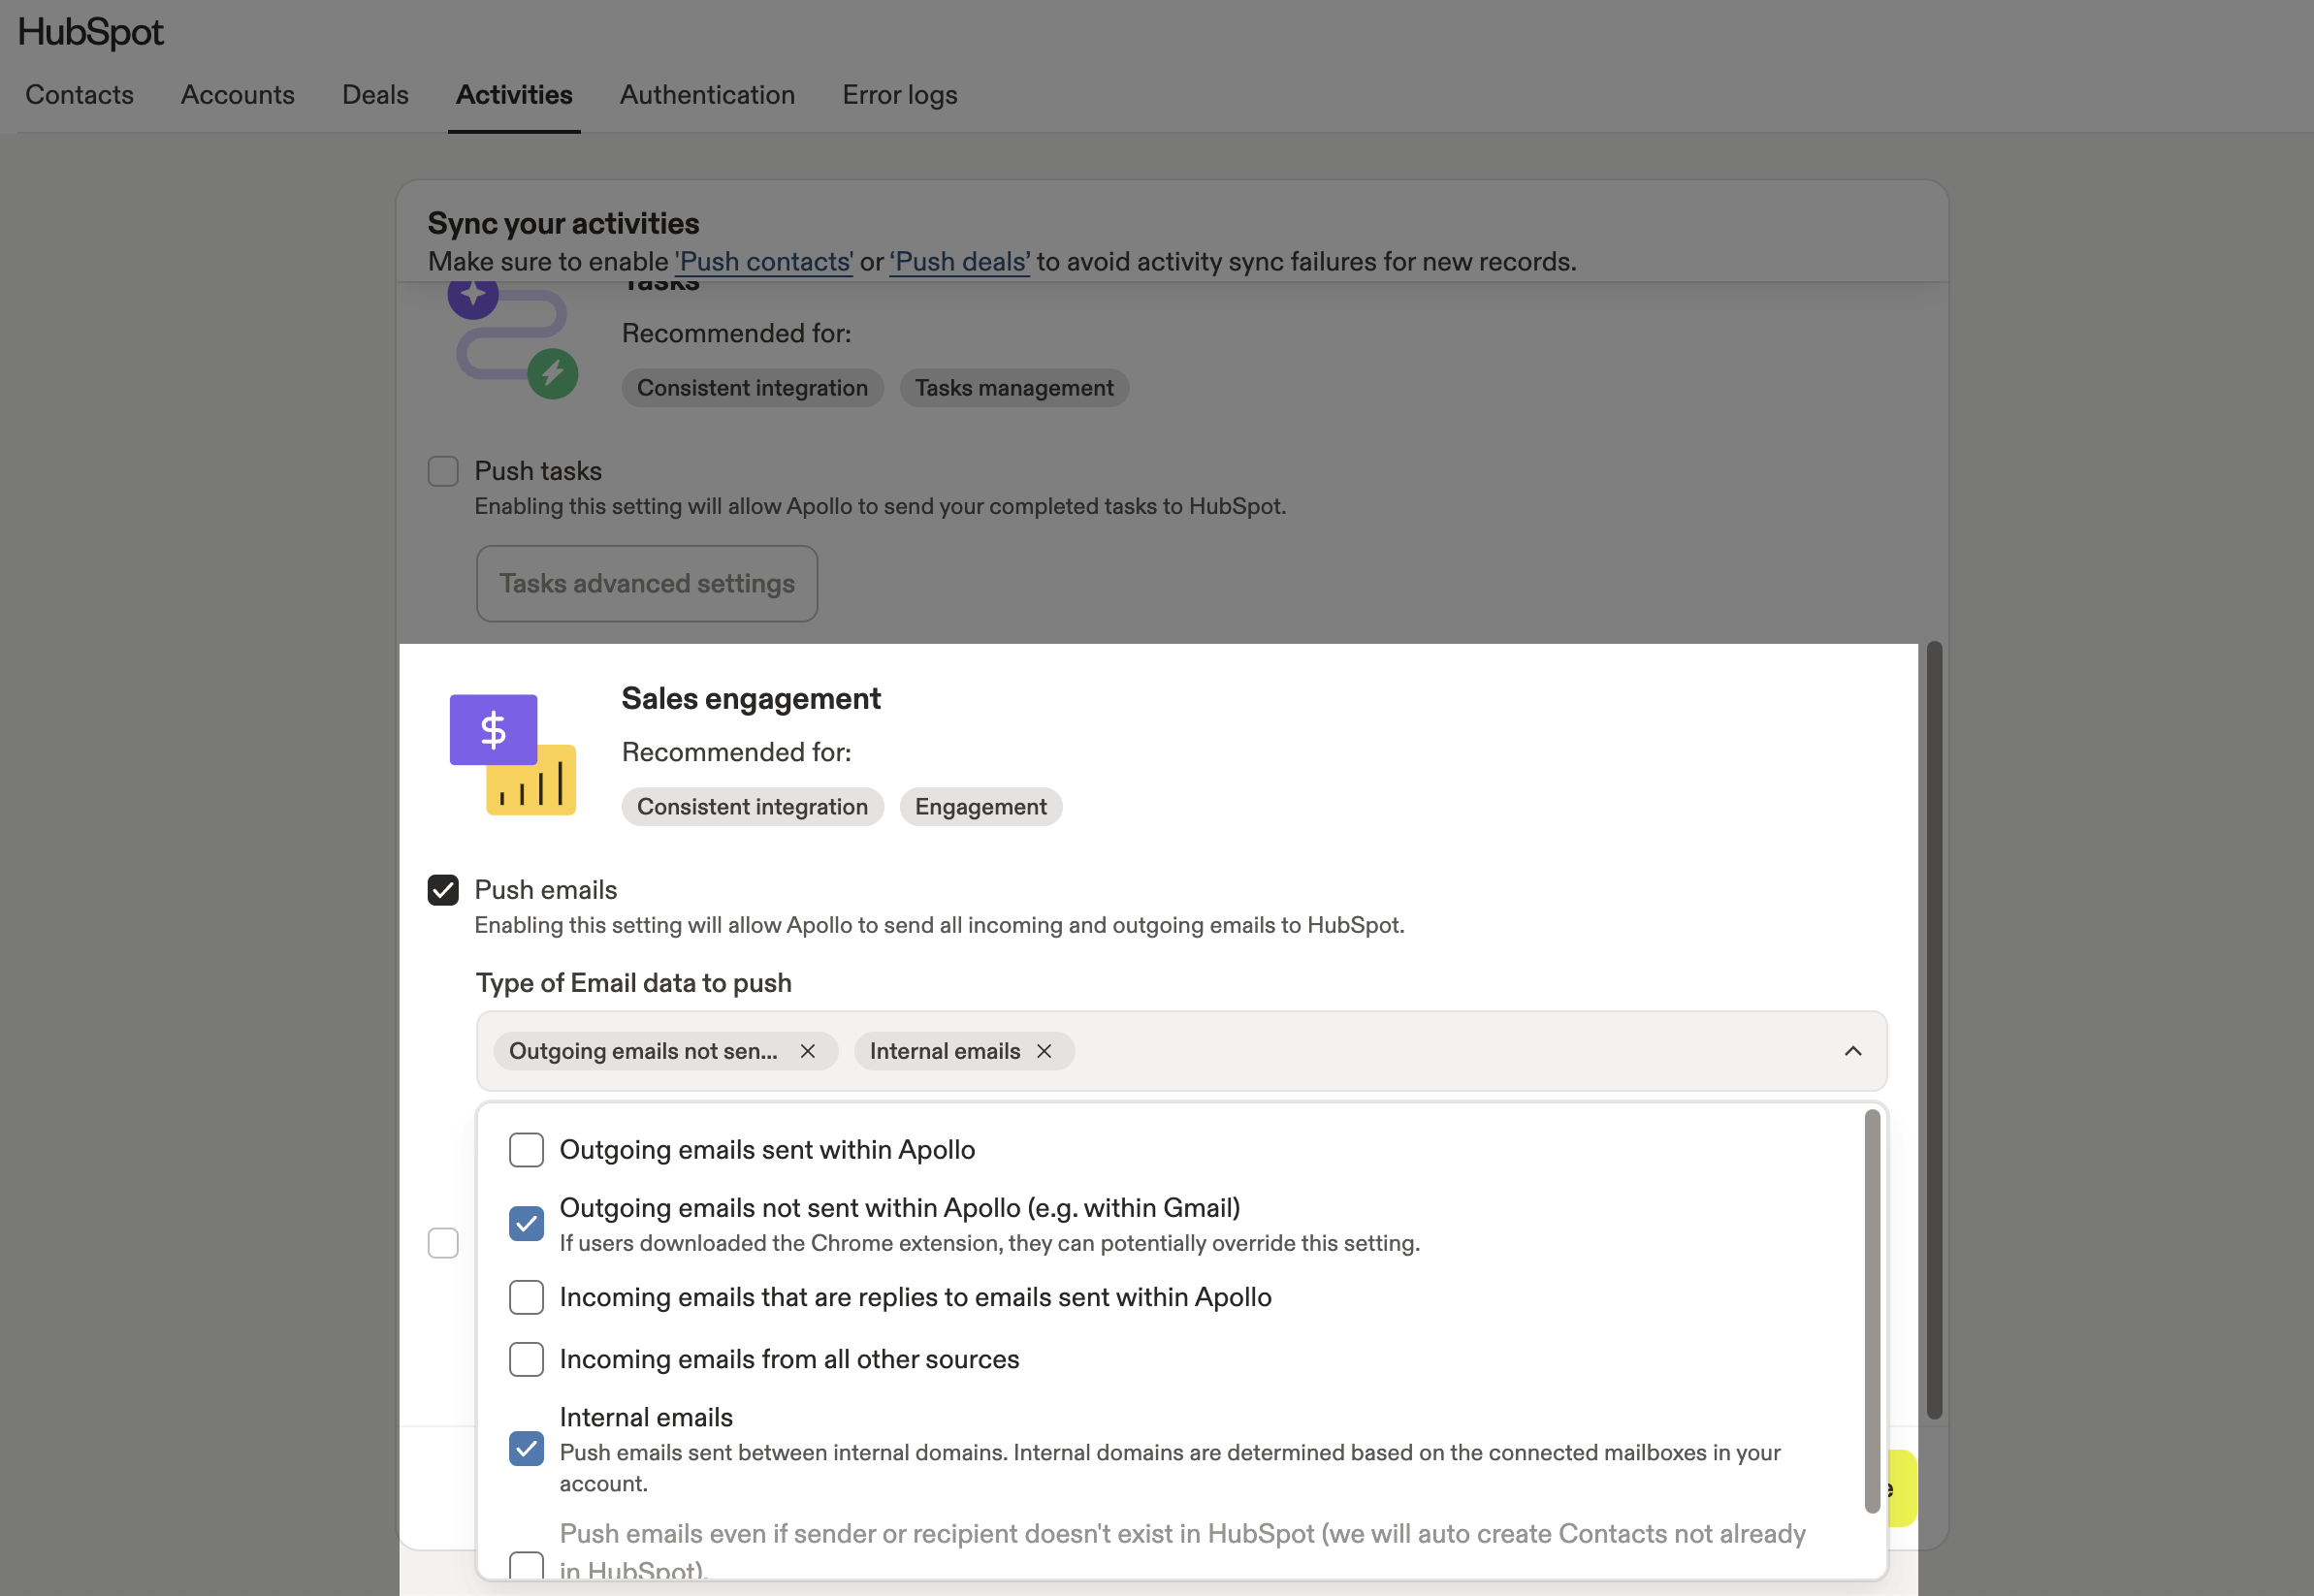
What's an internal email? Internal emails are communications between the domains of the connected mailboxes on your Apollo account. Non-corporate domains, such as gmail.com, aren't considered to be internal.
- (Optional) Click Email advanced settings to customize the email title template.
- (Optional) Click Email push exclusion filter to filter the emails that are synced to HubSpot.
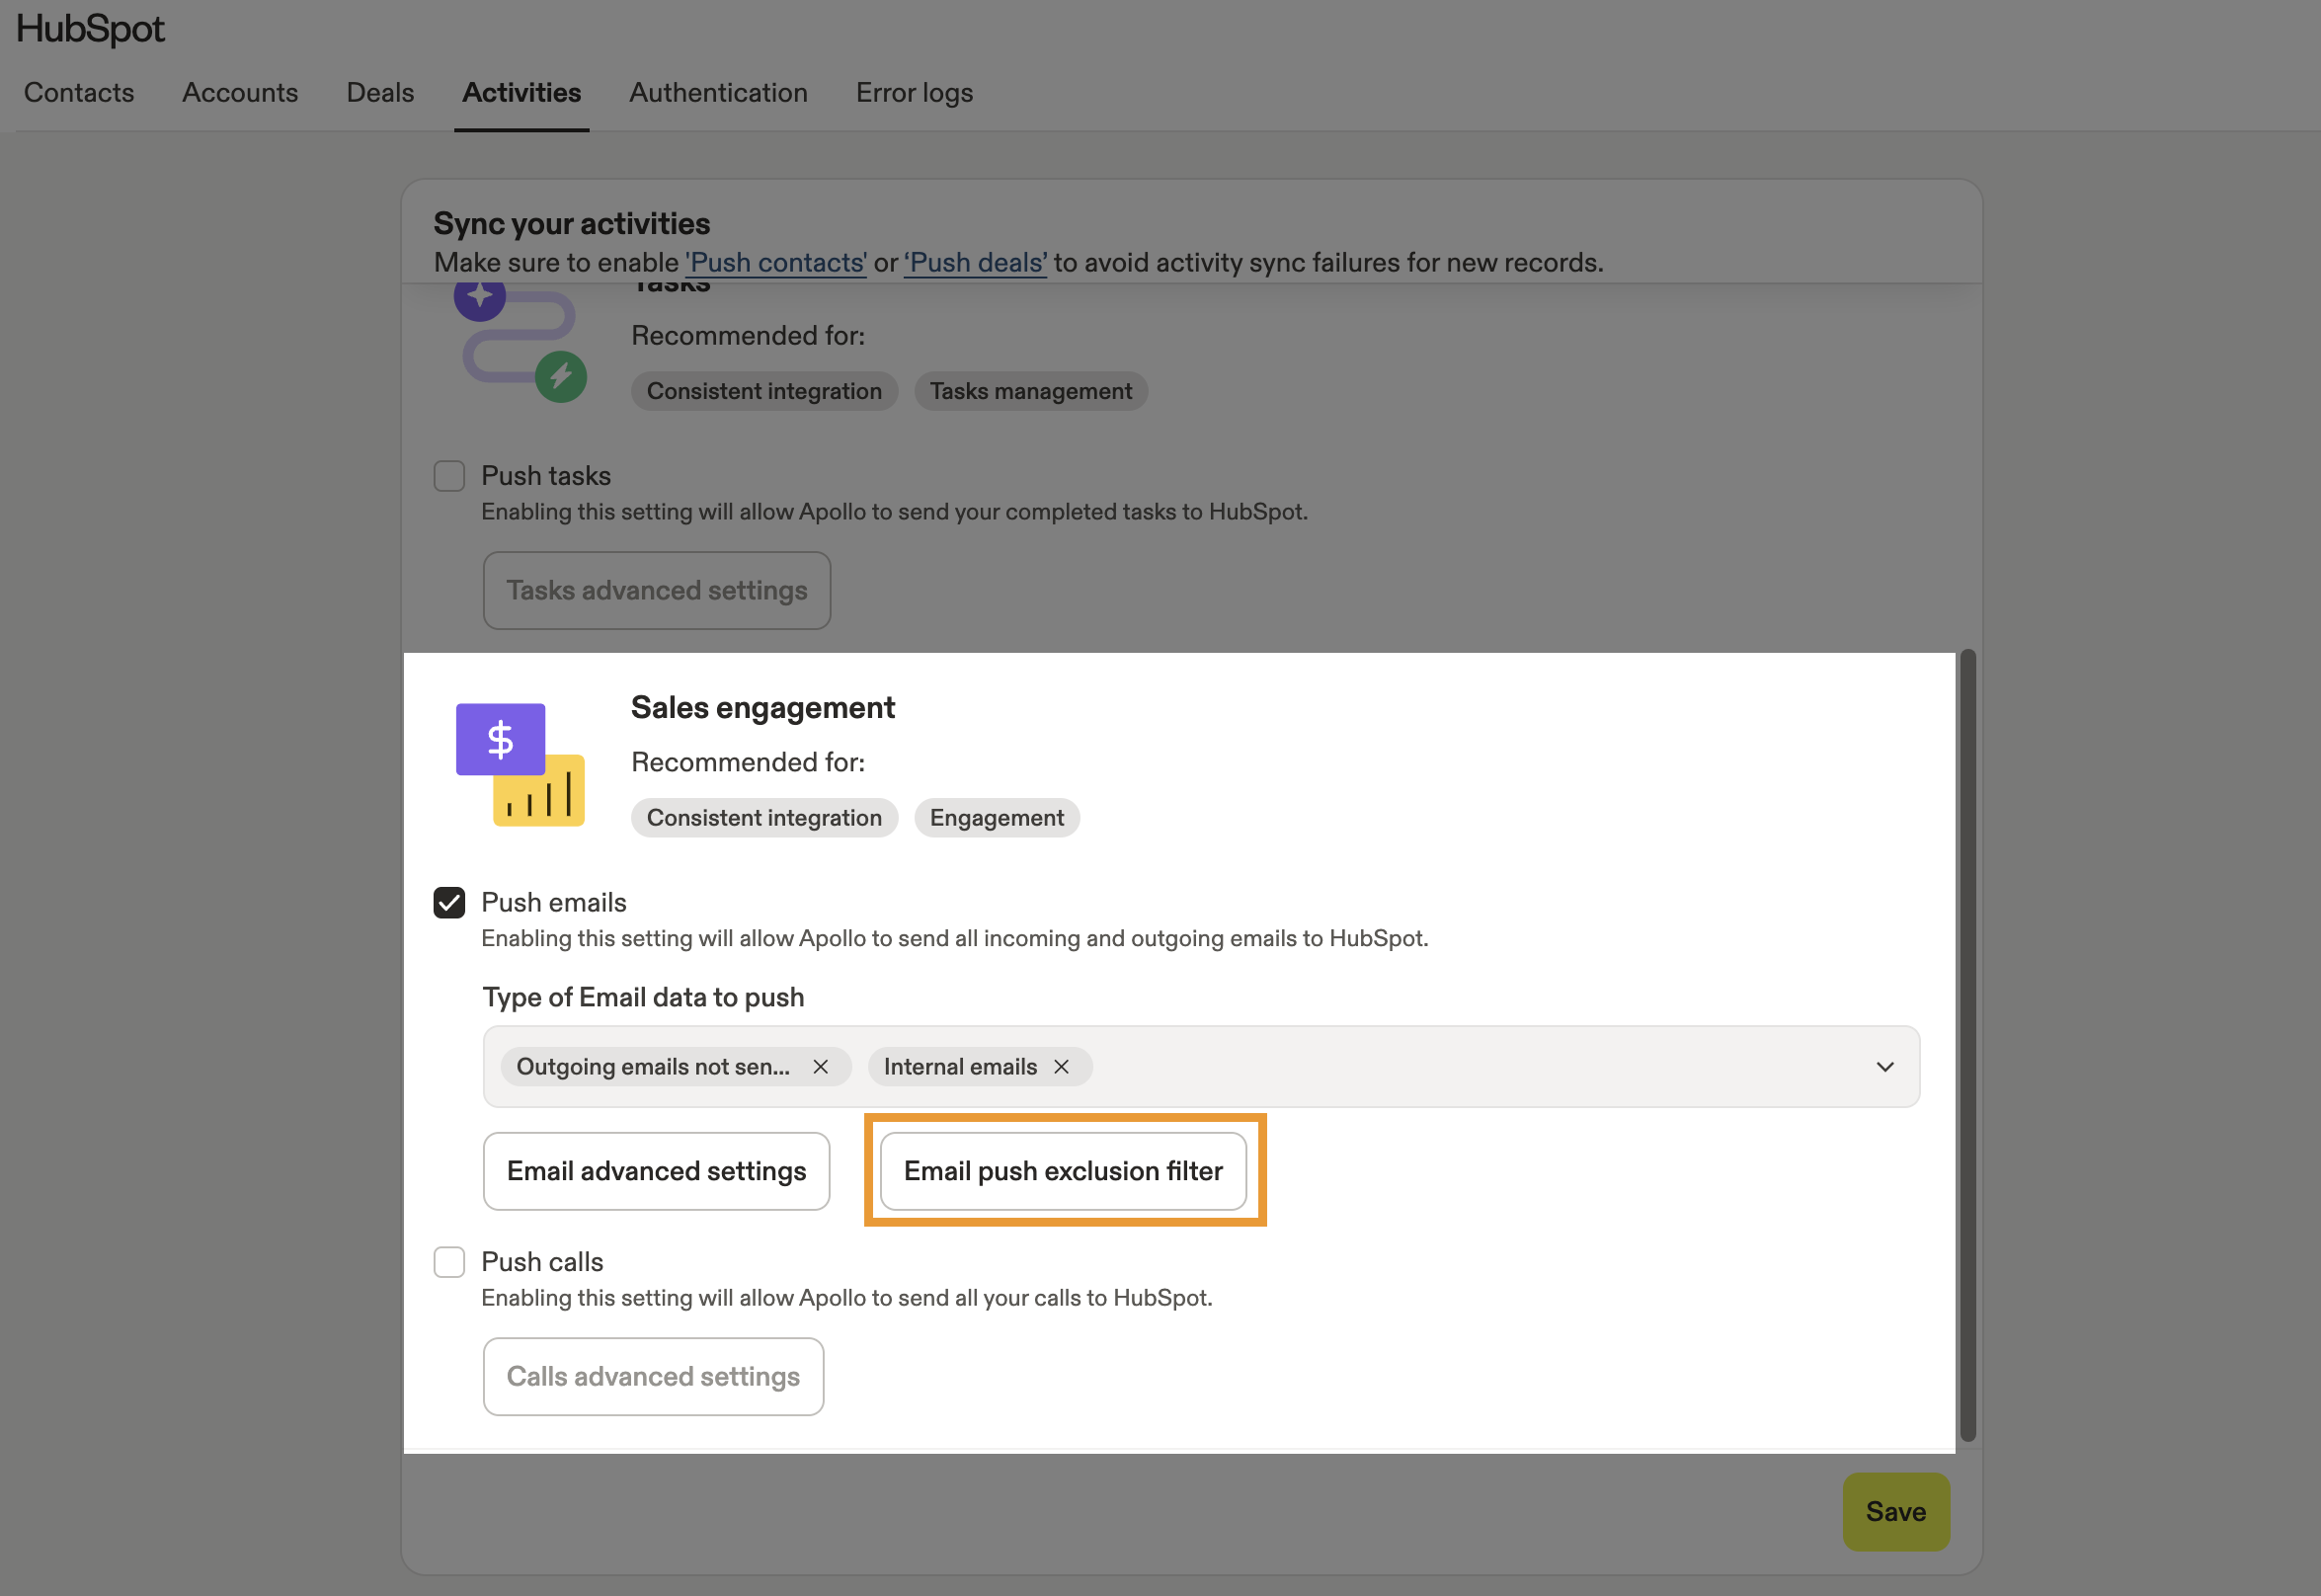
The email push exclusion filter may be useful to filter out email communications with external contacts that are sensitive or irrelevant, such as with board members or third-party contractors.
- Enter specific email domains, email addresses, or subject line keywords to create email exclusion rules. You can create incoming or outgoing email exclusions by setting From and To rules.
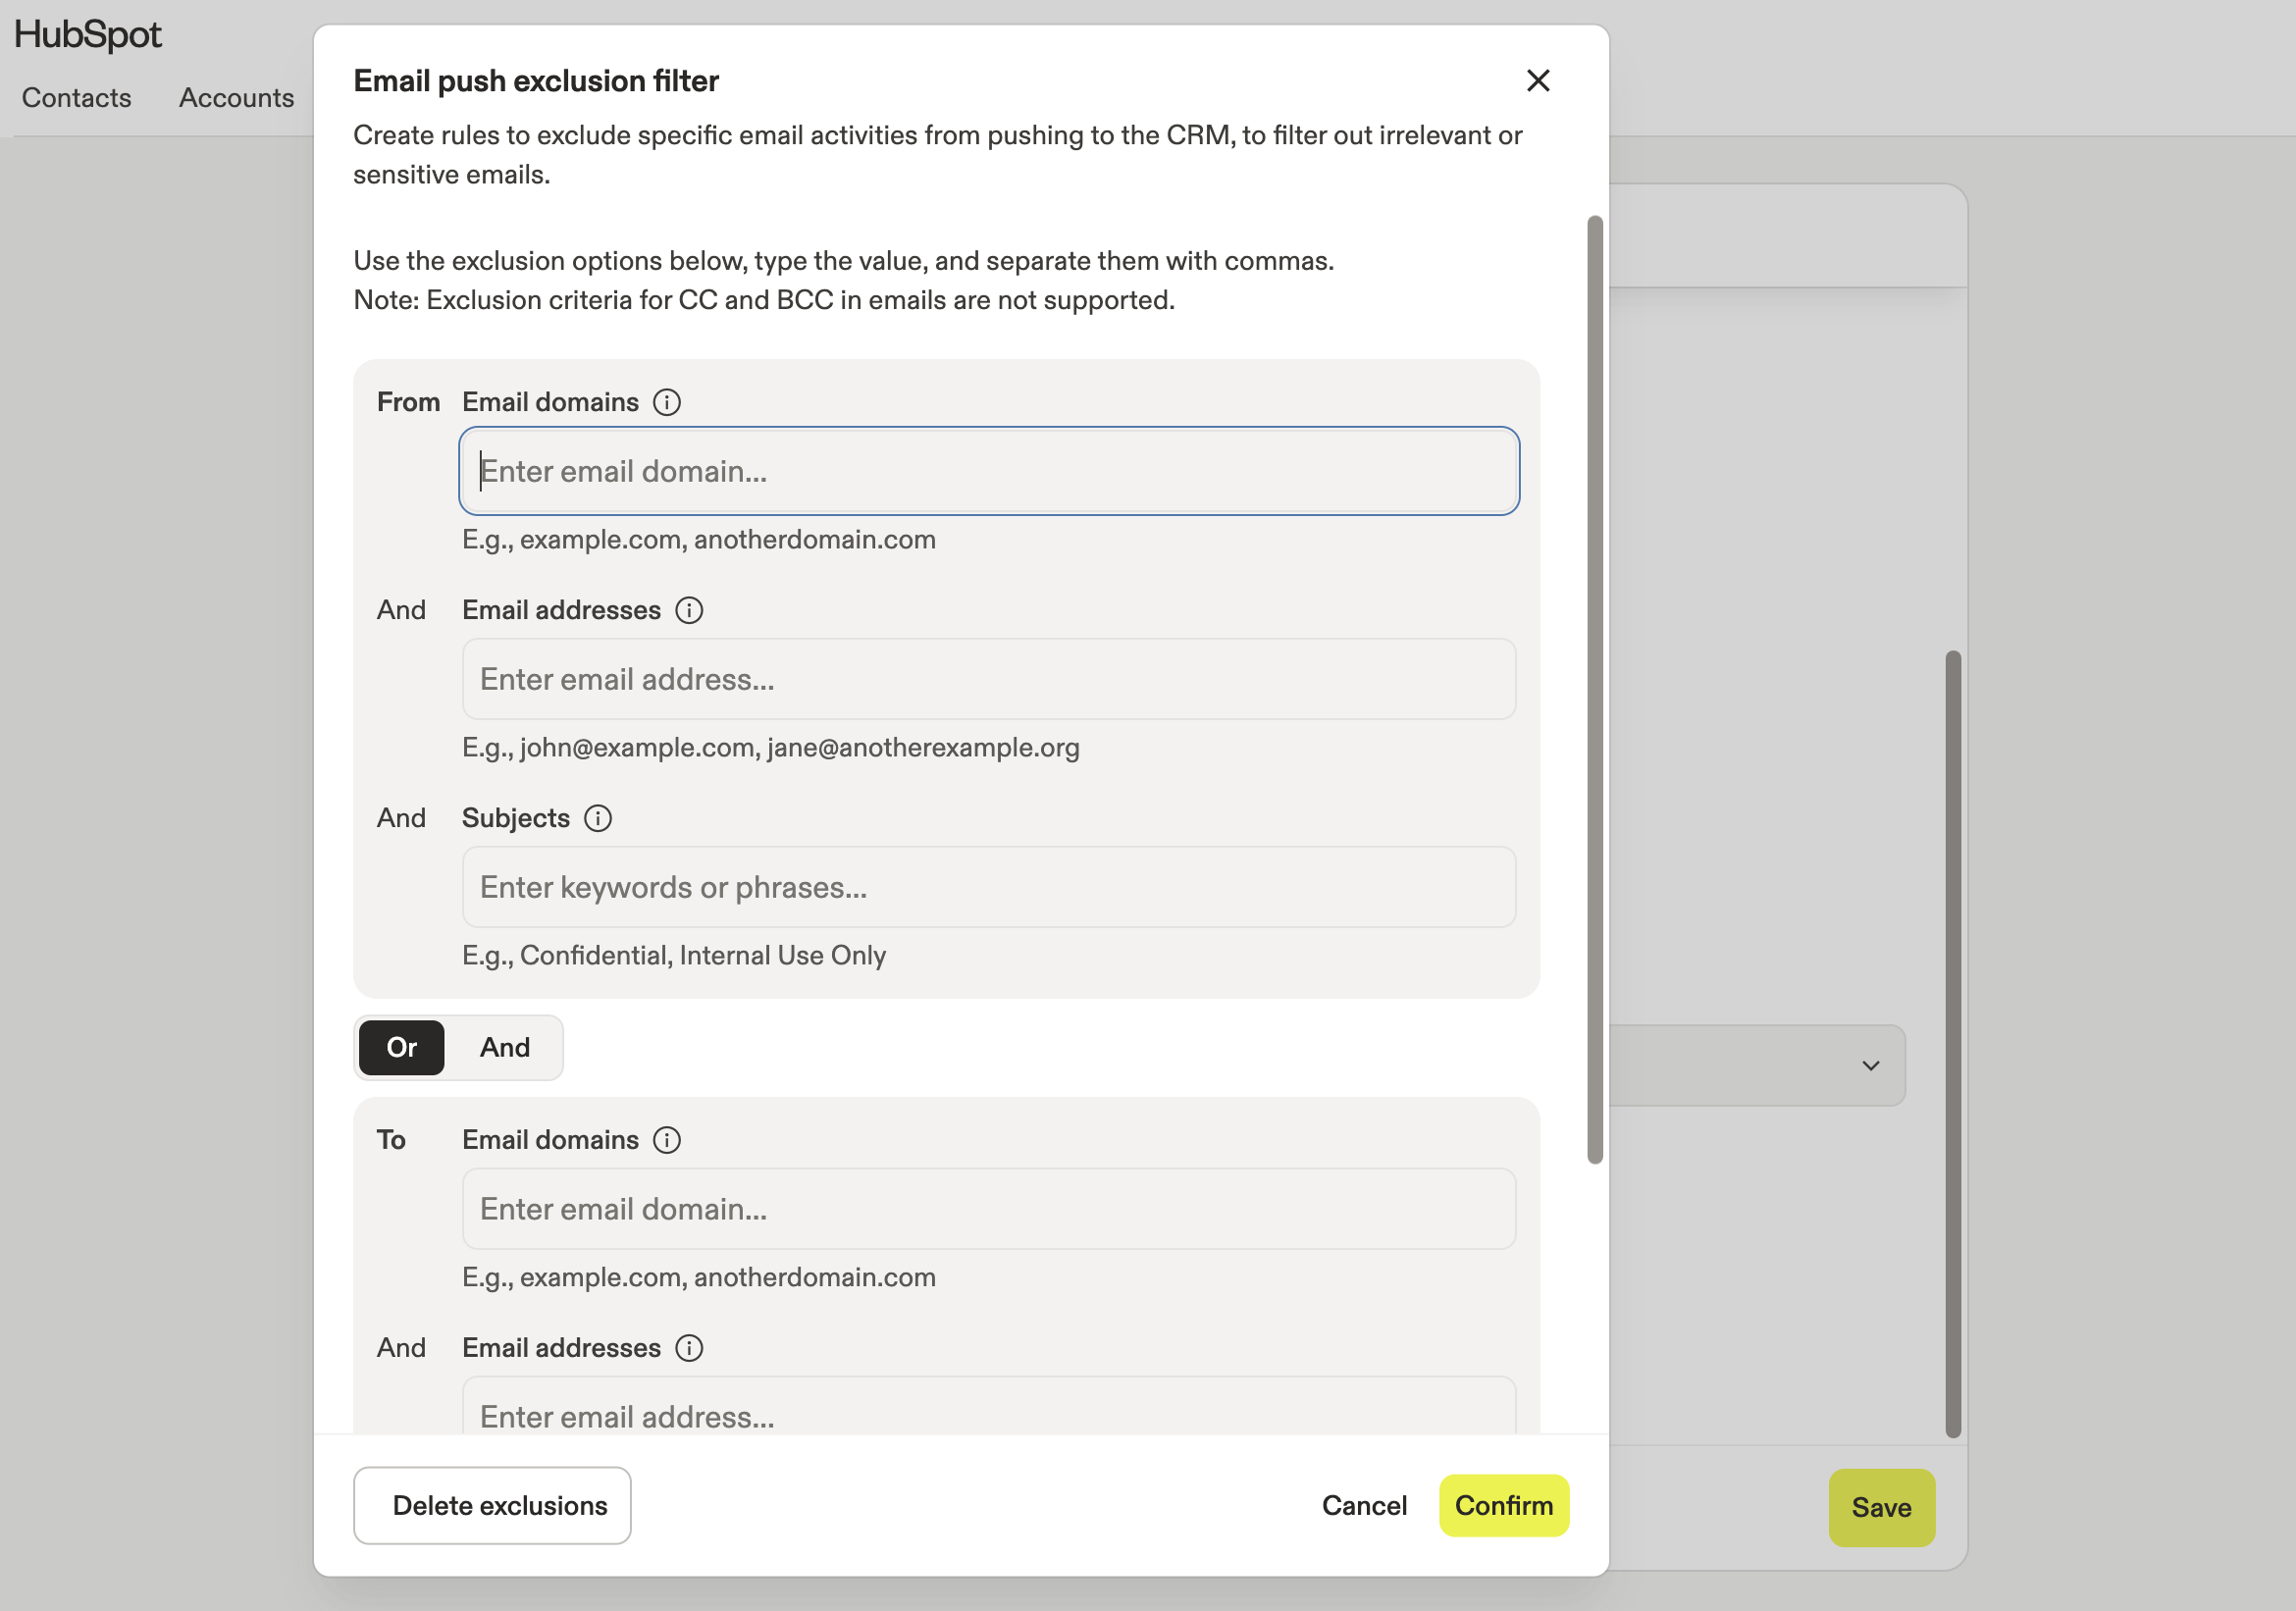
Each email domain, email address, and subject line you add on a rule works with AND logic. If you filter emails from "ymail.org" with the subject line "Confidential," Apollo only filters emails from ymail.org — and not emails from other domains with the subject line keyword "Confidential."
Apollo doesn't filter by CC or BCC in emails.
Toggle AND orOR to control how a rule applies to both the From and To values:
-
AND: Only emails that match both from and to criteria will be filtered. -
OR: Emails that match either from or to criteria will be filtered.
- Click Confirm.
- When finished, click Save.
You have now configured push settings for emails.
Tasks
Apollo pushes tasks to HubSpot only after they are marked as completed in Apollo. Tasks aren't pushed at creation.
- Check Push tasks to push tasks from Apollo to HubSpot.
- When finished, click Save.
Notes
- Check Push notes to push notes from Apollo to HubSpot.
- When finished, click Save.
Conversations
- Check Push meeting summaries to push conversation summaries as an activity / note to an associated deal.
- When finished, click Save.
To push meeting summaries to HubSpot, enable and use deals on Apollo.
Calls
- Check Push calls to push phone calls made in Apollo to HubSpot.
- When finished, click Save.
You have now configured HubSpot integration push settings for your activities.
Push Records Manually
You can manually push contacts or accounts to HubSpot, in bulk or individually. The same push rules and field mappings apply to bulk push as to individual push. If you want to push records regardless of your push conditions, manual push is useful.
If you manually push records, you override any sync settings configured. This means that Apollo pushes a record to HubSpot regardless of contact stage restrictions or other limits you enabled in the push settings.
To manually push records to HubSpot:
- Launch Apollo and click People or Companies.
- Click Saved, then check one or more contacts or accounts. Click Hubspot > Push to HubSpot.

- Alternatively, navigate to Lists then select a list. Check one or more contacts or accounts then click HubSpot > Push to HubSpot.
Manual push may be unavailable in the following cases:
- If your team hasn't connected a CRM, you can't push to HubSpot.
- If your CRM is connected but push isn't enabled in sync settings, you can't push to HubSpot.
- If your team is still in the initial data pull after first connecting HubSpot, the option appears but you can't use it yet. Once push is enabled and the initial pull completes, manual push works as expected.
You have now manually pushed a record to HubSpot.
For large selections, the push runs in the background. To review push status or troubleshoot failed records, go to Settings > Integrations > HubSpot > Error logs.
Configure Pull Settings
Did you know? After you enable the HubSpot integration on a paid Apollo plan, there's a six-hour window to configure sync settings and map fields. This gives you time to properly configure the integration. During this time, you can't manually pull records. After six hours, Apollo automatically enables syncing. You can still adjust sync settings at any time. Go to Settings > Integrations > HubSpot to review or update sync settings. Records already imported aren't automatically re-pulled if you tighten conditions. Instead, use Pull all to re-pull with new settings.
Pull settings determine when Apollo pulls information from HubSpot to Apollo.
To configure the HubSpot integration pull settings:
- Launch Apollo and click Settings > Integrations > HubSpot.
- Click Contacts, Accounts, or Deals. Then click Sync.
Apollo automatically pulls all contacts from HubSpot and, by default, makes them visible to your team when prospecting in Apollo. You can also manually pull contacts at any time and choose whether pulled contacts are visible to your team.
Manual pull allows you to manually pull records from HubSpot at once. This may be useful if you recently changed your sync settings. To manually pull records:
- Click Pull all contacts.
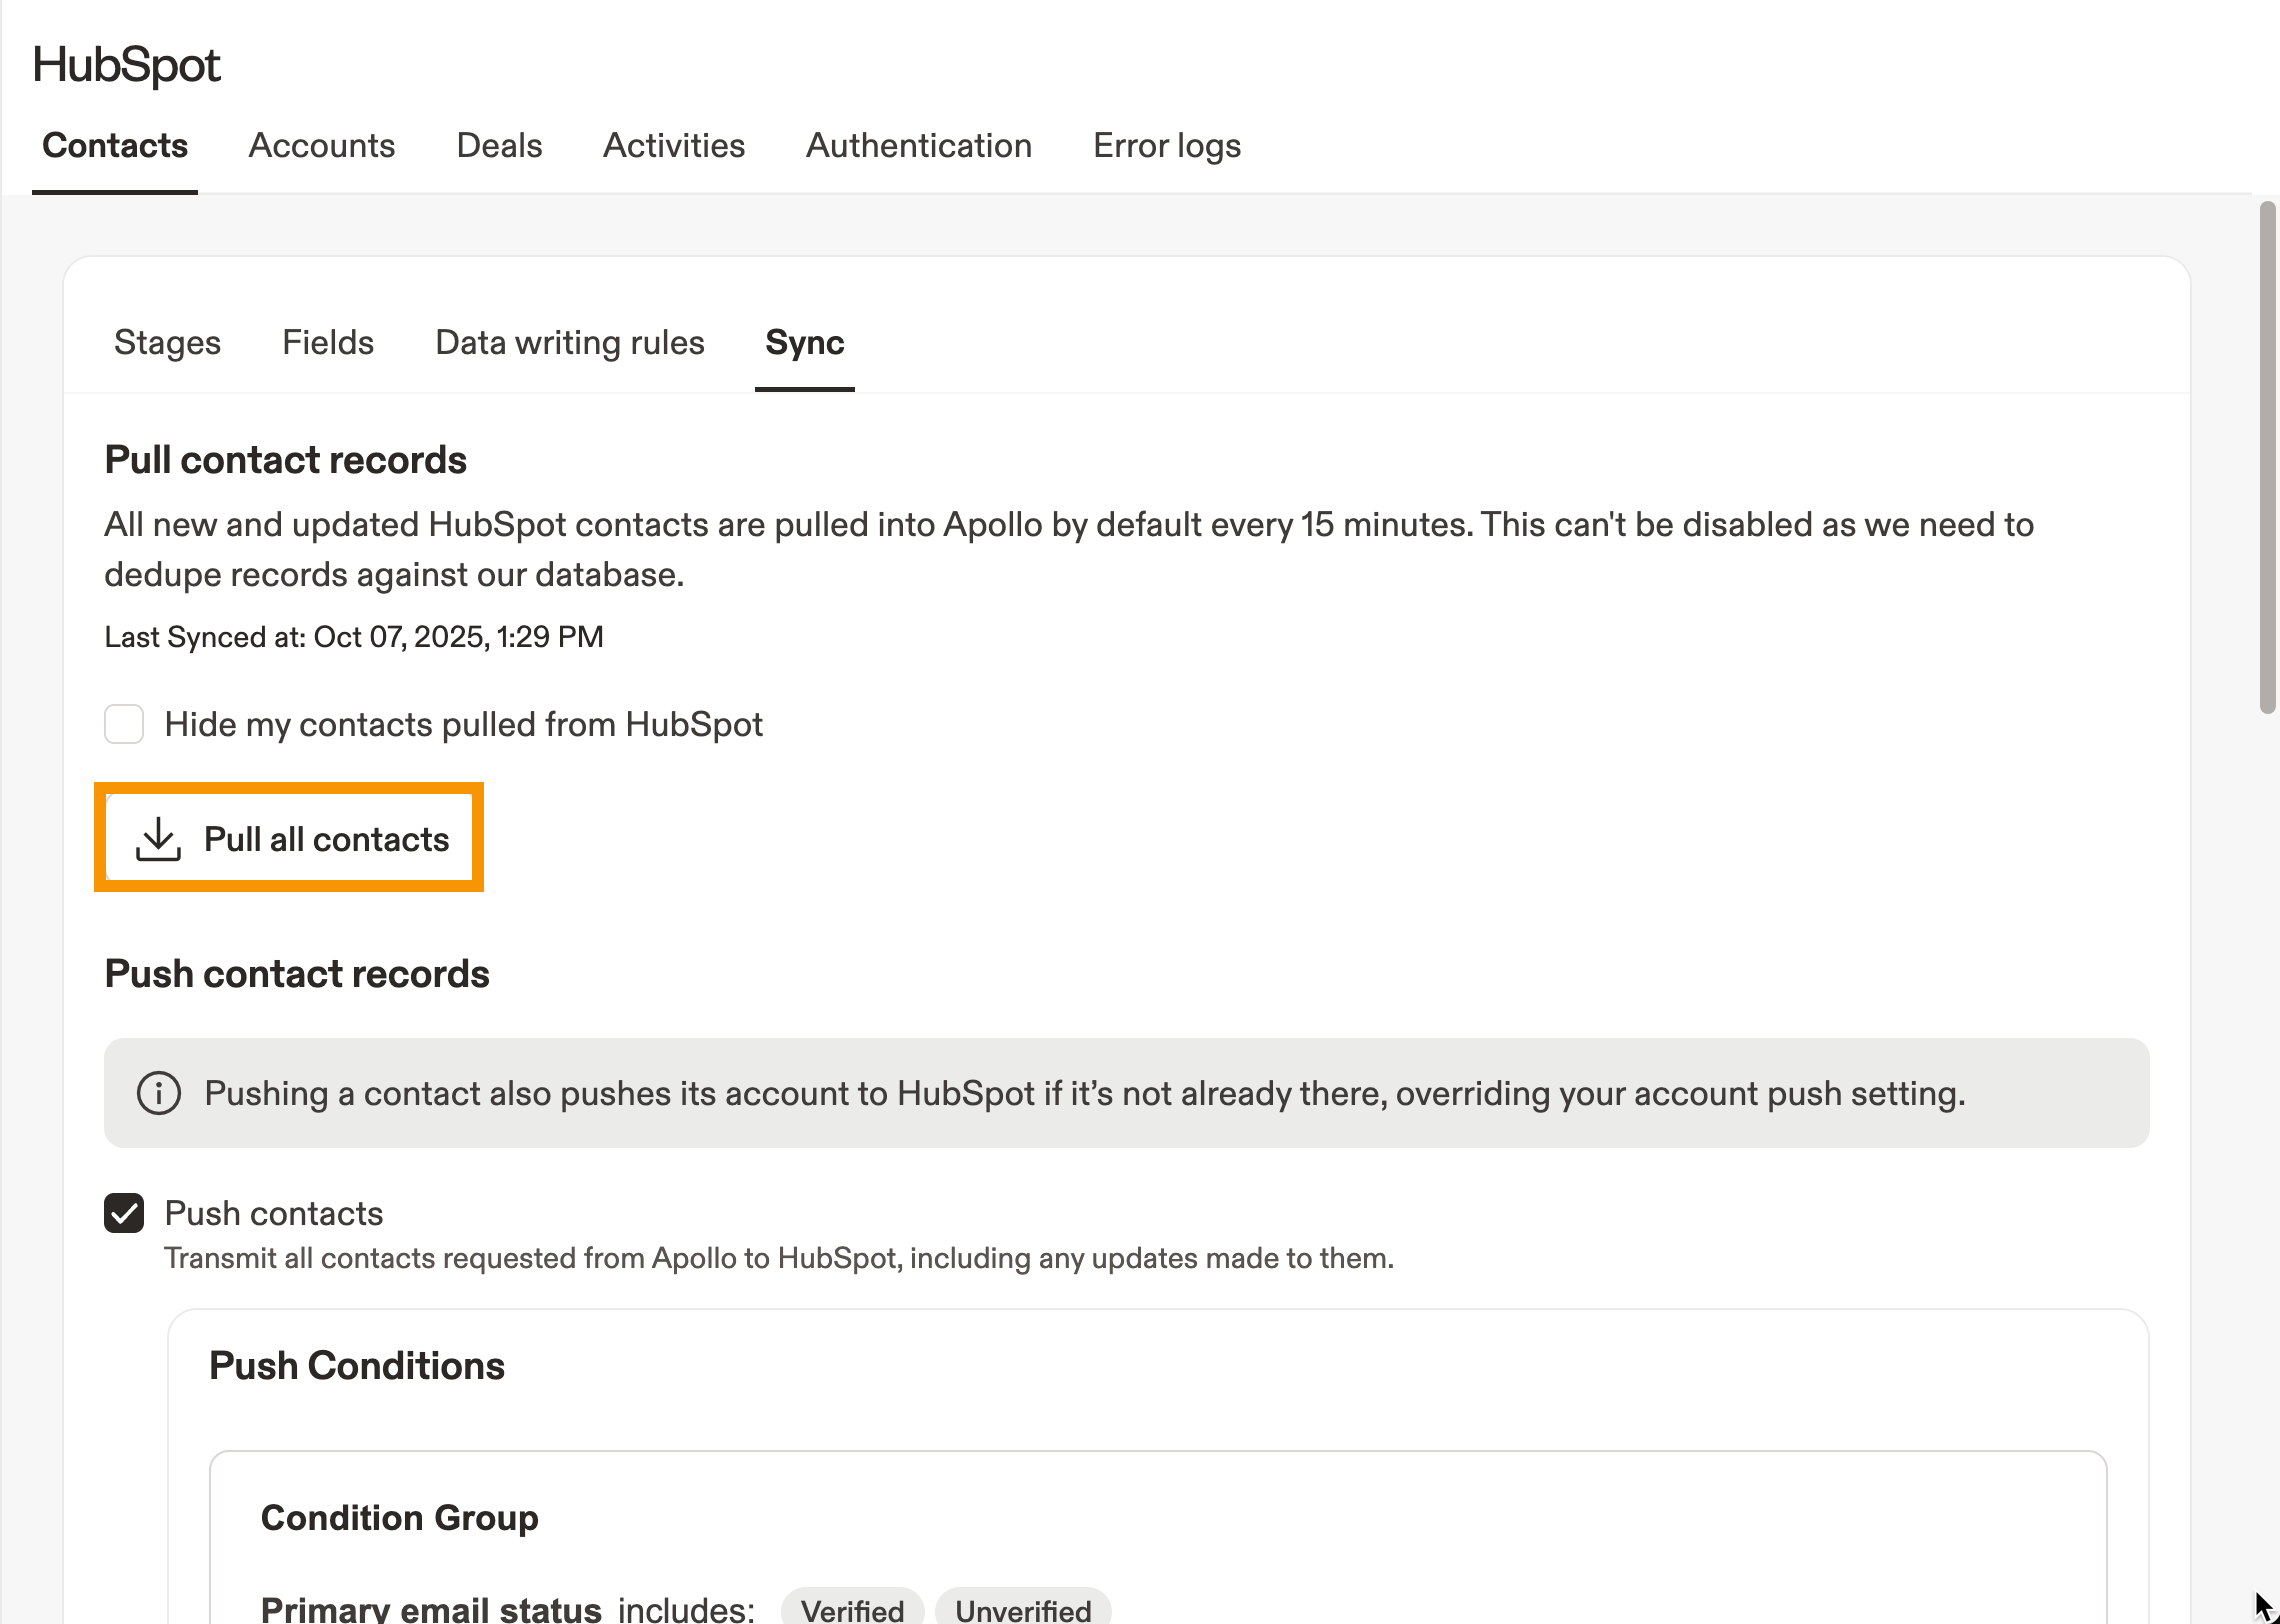
You have now manually pulled contacts. With CRM sync history, can view queued records and a history of record pulls on Apollo.
By default, Apollo makes contacts synced from HubSpot visible to your team when prospecting in Apollo. This is the recommended setting to engage with contacts.
To change record visibility:
- Check Hide my contacts pulled from HubSpot, then click Save.
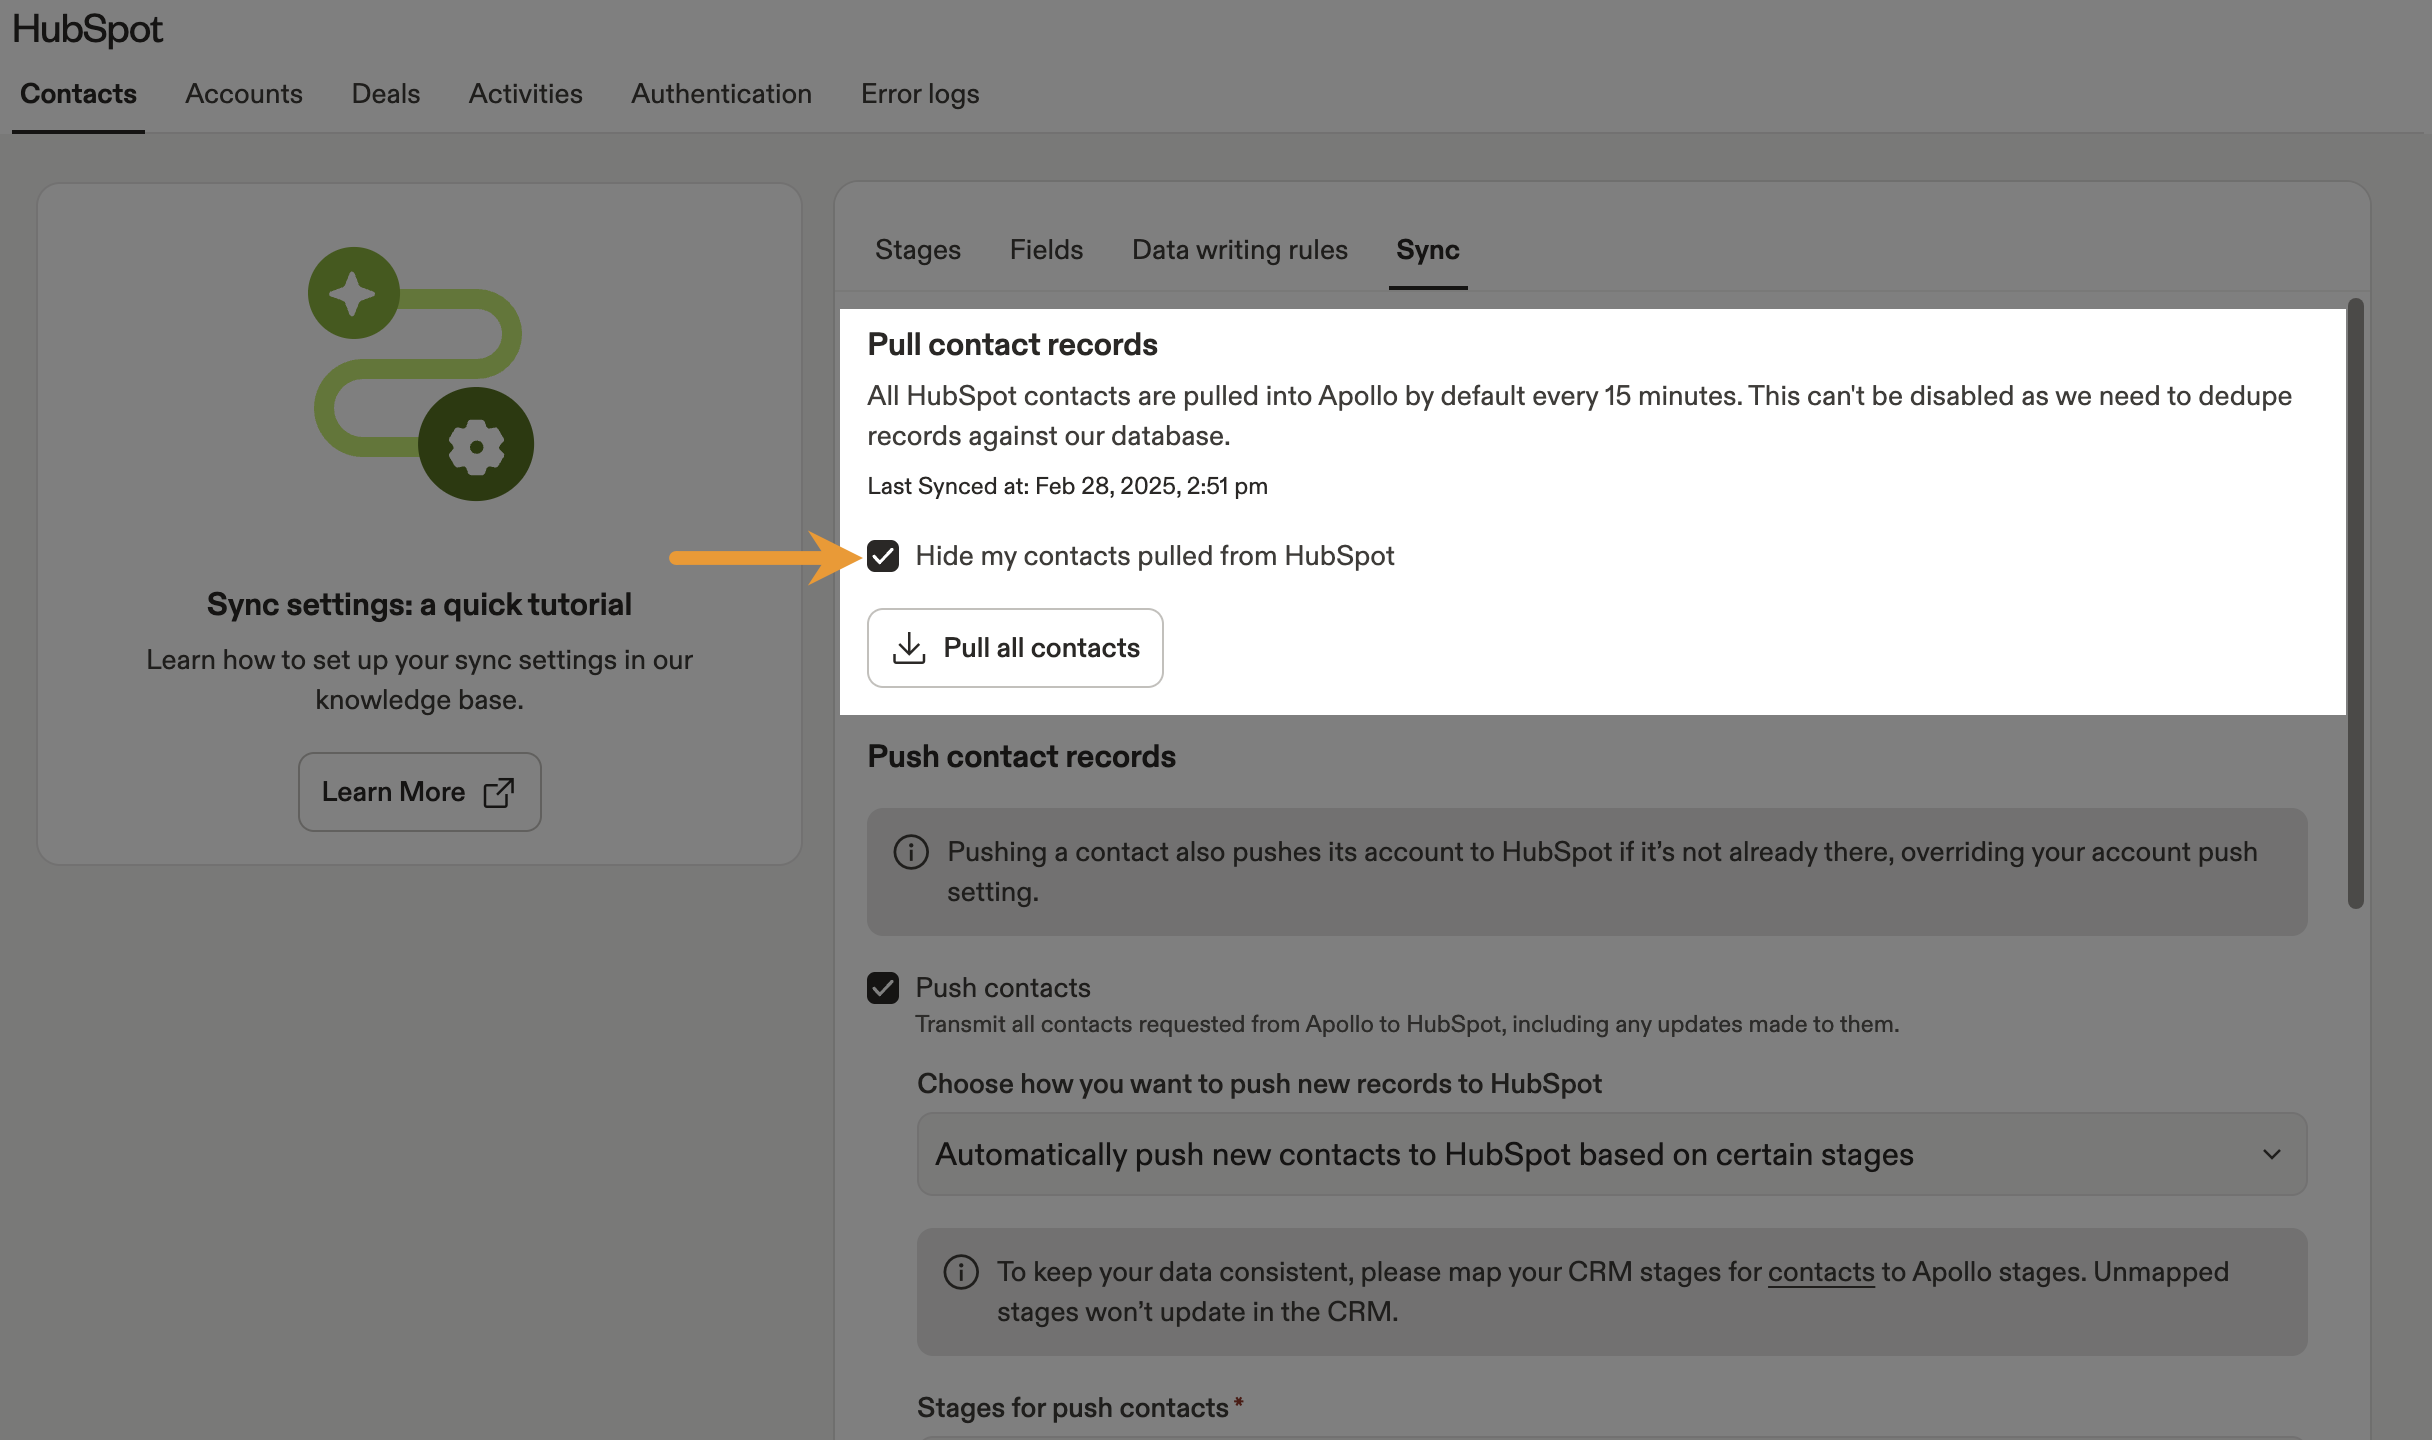
You have now configured record visibility.
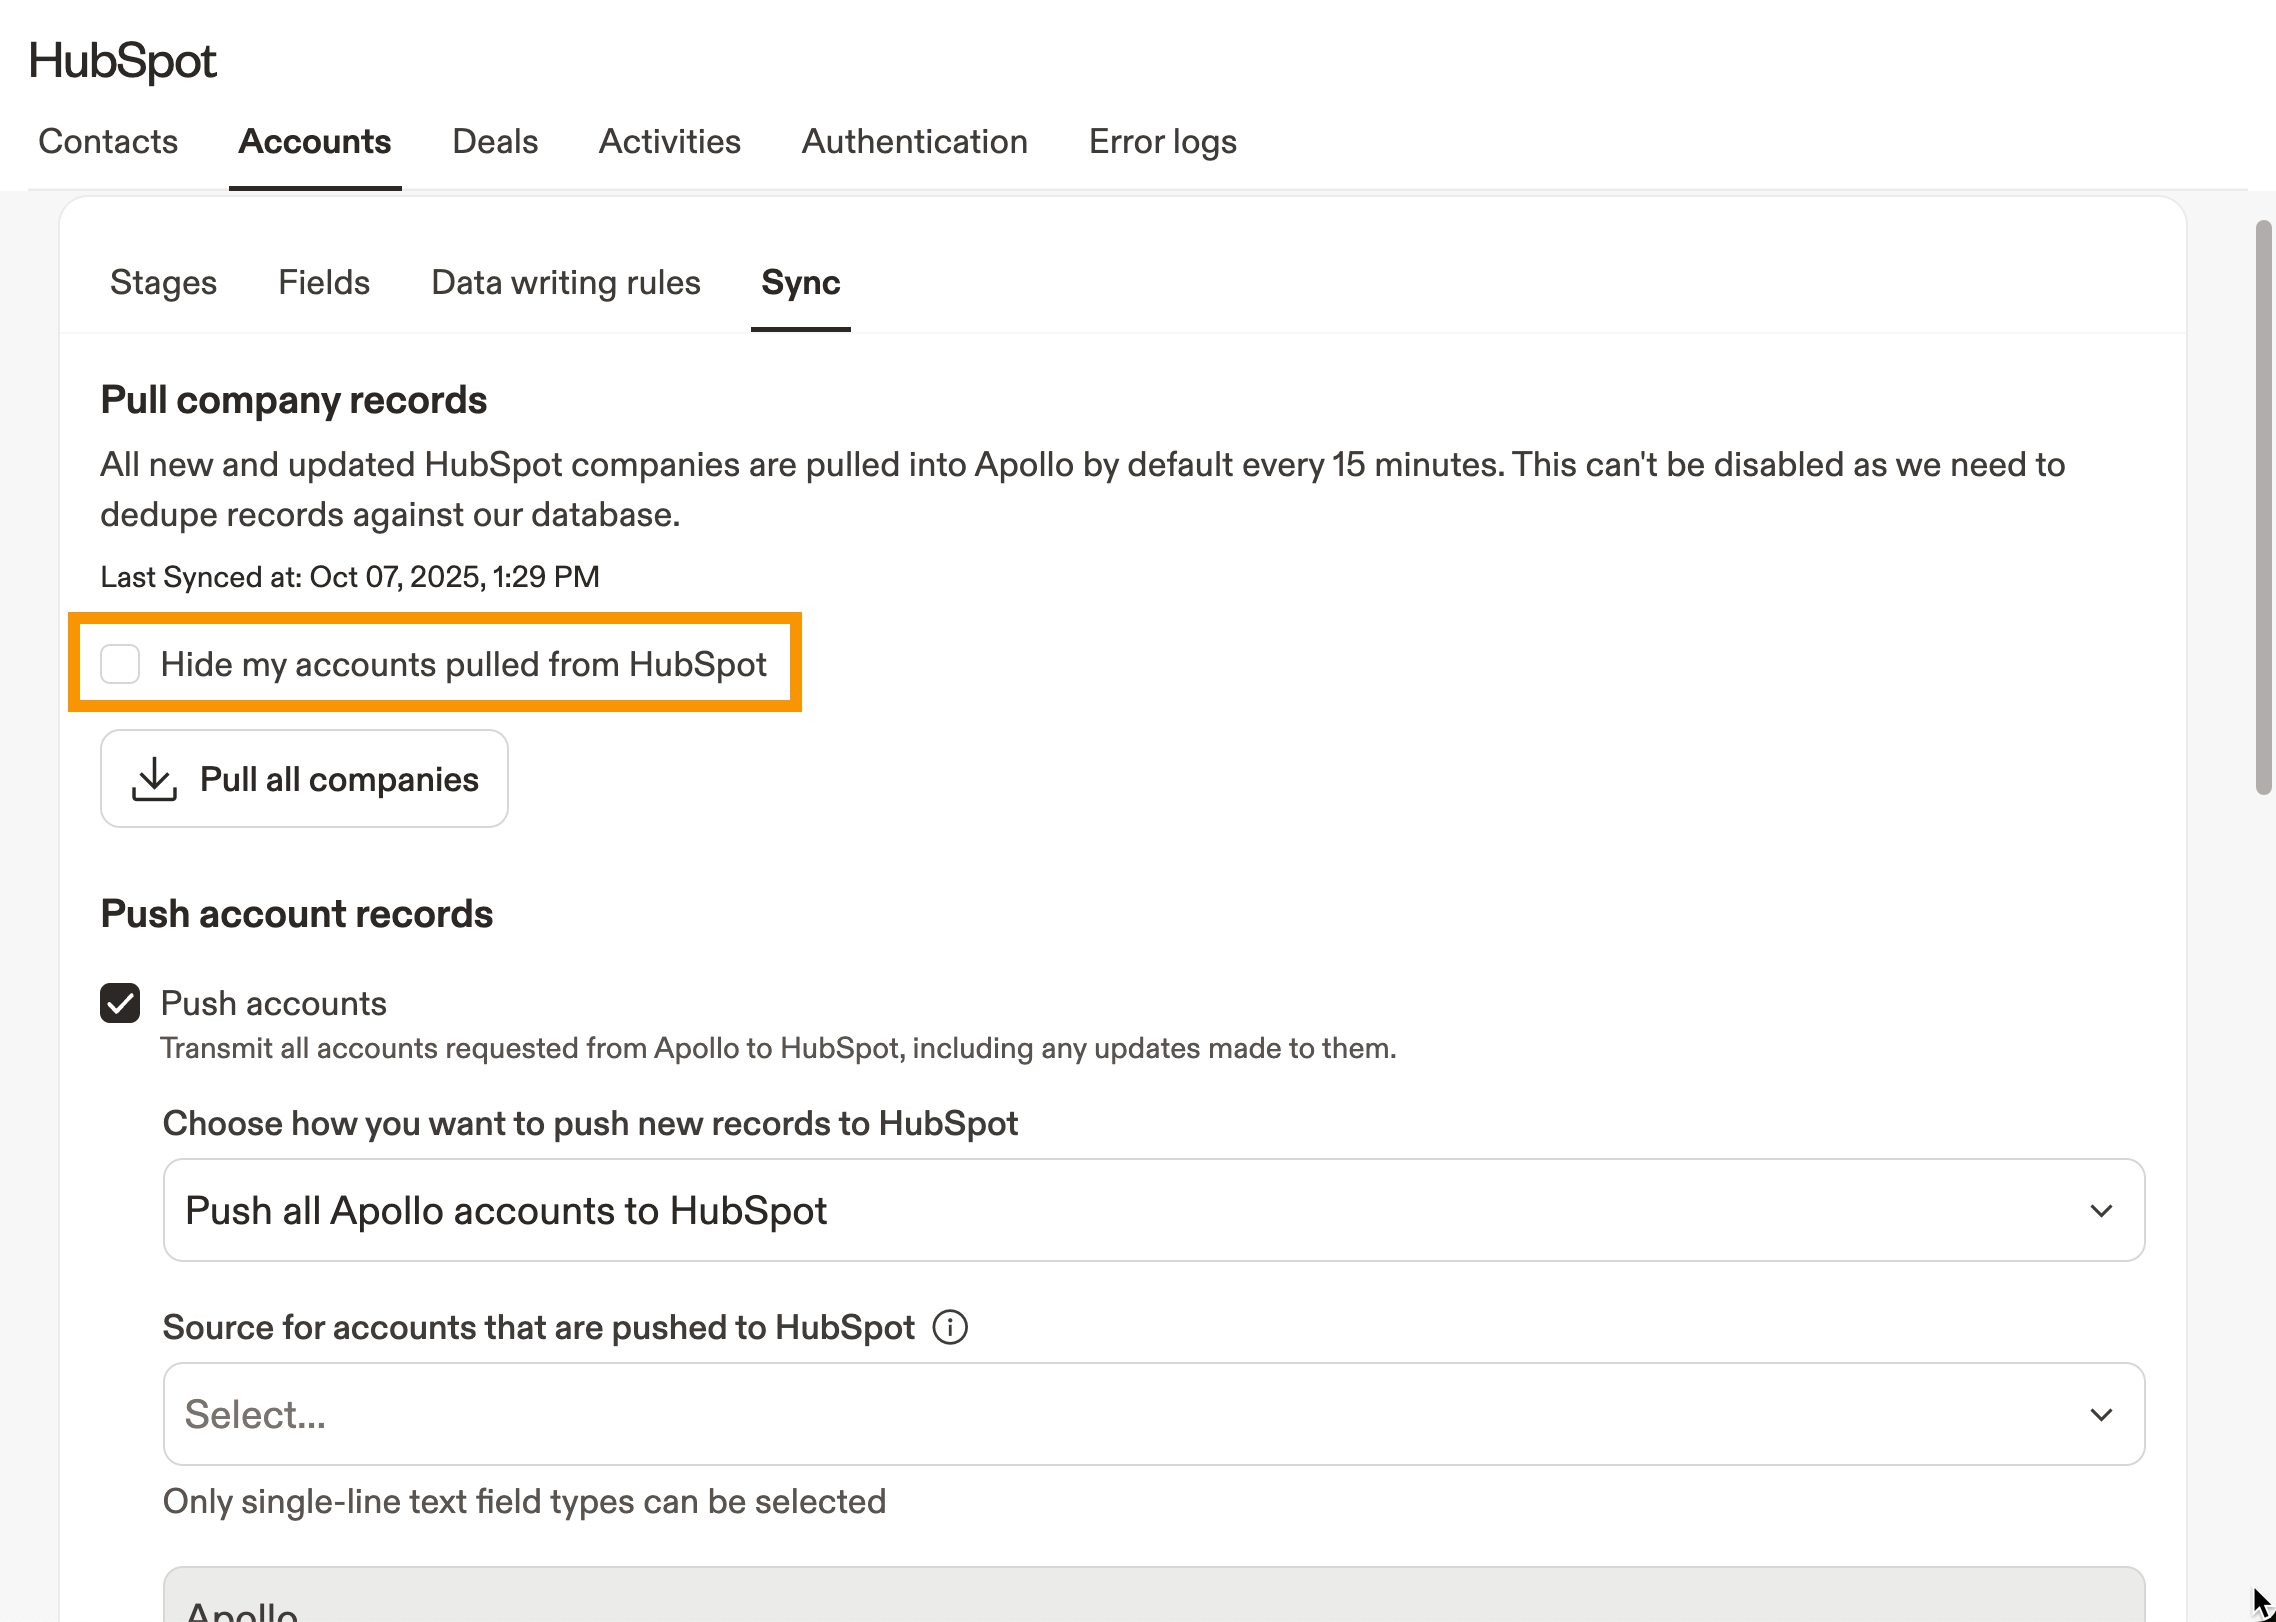
Apollo automatically pulls all accounts from HubSpot and, by default, makes them visible to your team when prospecting in Apollo. You can also manually pull accounts at any time and choose whether pulled accounts are visible to your team.
Manual pull allows you to manually pull records from HubSpot at once. This may be useful if you recently changed sync settings. To manually pull records:
- Click Pull all companies.

You have now manually pulled accounts. With CRM sync history, can view queued records and a history of record pulls on Apollo.
By default, Apollo makes accounts synced from HubSpot visible to your team when prospecting in Apollo. This is the recommended setting to engage with prospects.
To change record visibility:
- Check Hide my accounts pulled from HubSpot, then click Save.
You have now configured record visibility.
To configure pull settings for deals:
- Check Sync deals with Apollo to actively sync pipeline and deal information bidirectionally when Apollo detects a change.
- When enabled, Apollo pulls all HubSpot deal information and uses HubSpot as the source of truth for any previously synced deals.
- After you sync your HubSpot deals, you can edit your selected pipelines:
- Uncheck to deactivate sync for a pipeline. Apollo removes the pipeline and deletes its existing deals.
- Check an inactive pipeline to restart deals sync for that pipeline. When you reactivate a pipeline, Apollo creates new deal records from HubSpot and cannot retrieve any prior data deleted from Apollo.
- Uncheck Sync HubSpot deals with Apollo to manage your synced deals manually in Apollo. This prevents further sync updates between HubSpot and Apollo without removing your deal data from Apollo.
- (Optional) Click to manually pull deals. This may be useful if you recently changed sync settings.
- (Optional) Check Hide my deals to hide deals pulled from HubSpot to Apollo. When enabled, synced deals won't appear in Apollo, but automation could still update deals in HubSpot.
- When finished, click Save.
You have now configured pull settings for deals.
View Pull History
By default, all new or updated contacts and accounts are pulled from HubSpot to Apollo every fifteen minutes.
Apollo shows queued record pulls as well as your pull history so you can see exactly when records came from HubSpot.
To view pull history:
- Launch Apollo and click Settings > Integration > HubSpot.
- Click Contacts or Accounts, then click Sync.
- Scroll to Pull all, then click Queue activity to review queued records, or Sync history for an activity log.
- Apollo displays queued record pulls along a timeline, including when each pull request occurred and how many records are queued, so you can easily visualize your data activity. This may be helpful to spot progress on very large data pulls from HubSpot.
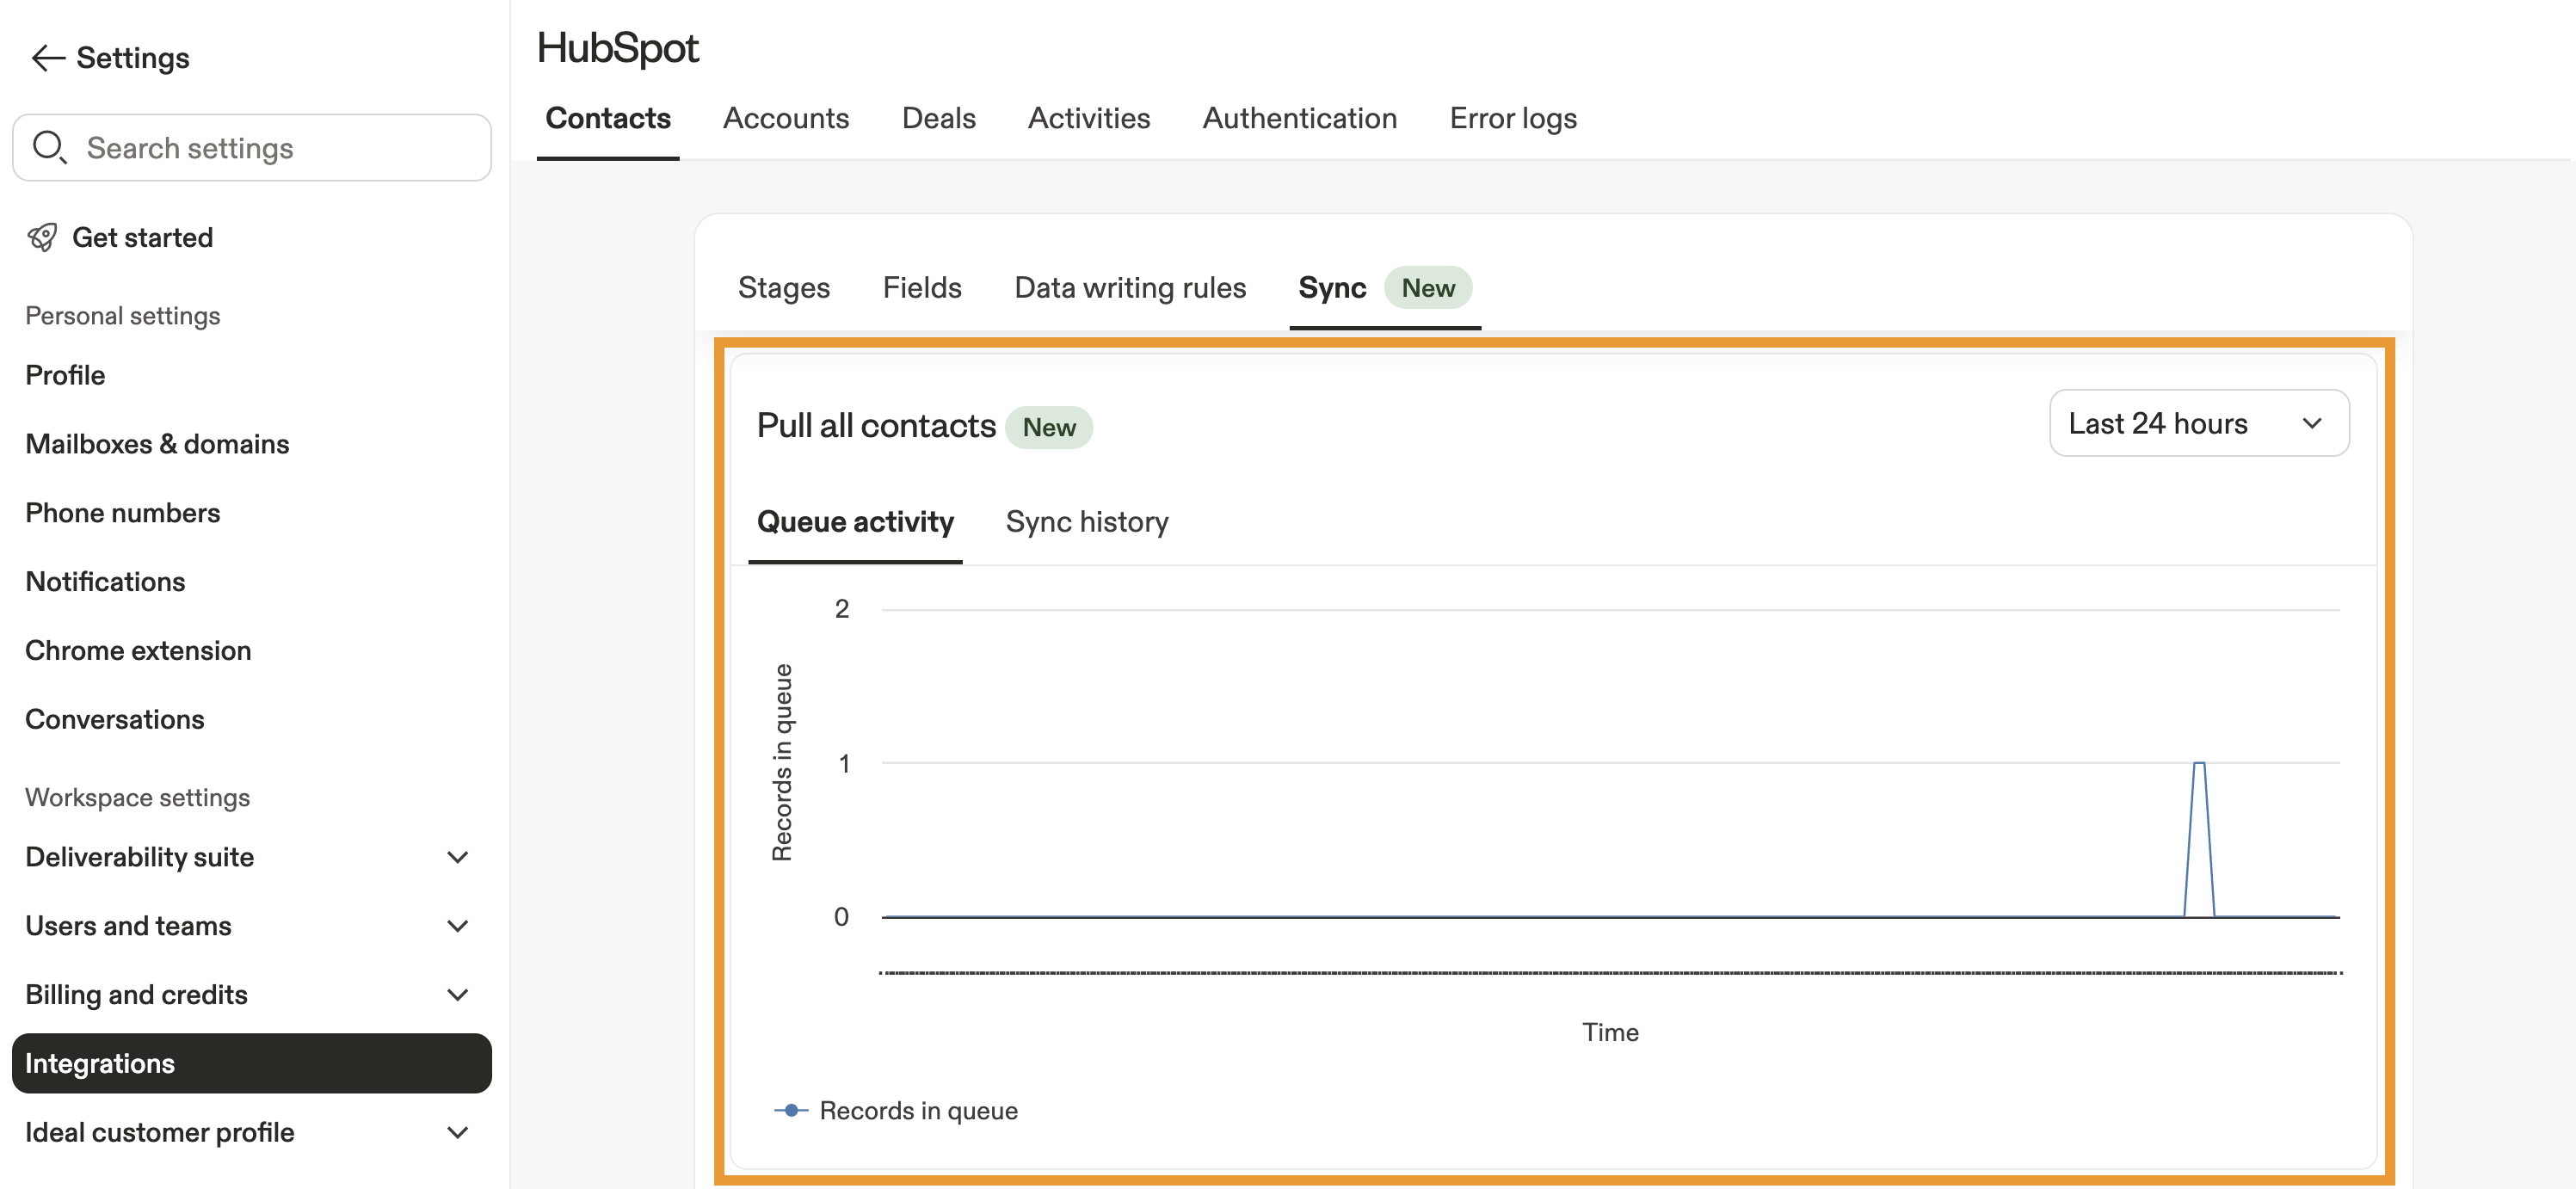
- (Optional) Click Last 24 hours to change the time, then select Last 3 days, Last 7 days, or Custom for a custom range.

- Hover over a queued pull to see the exact date and time of the request, as well as the number of records queued.

- Apollo displays a log of completed pulls from HubSpot to Apollo. Each entry shows when a sync ran and whether any records were updated.

- (Optional) Click Last 24 hours to change the time, then select Last 3 days, Last 7 days, or Custom for a custom range.
Most record pulls run automatically in the background. It's normal to see runs where no records were pulled if no changes were detected in HubSpot.
FAQs
|
Frequently asked questions |
||
| What does "not synced" mean on the synced to HubSpot filter? | Why are there fewer contacts in HubSpot than I pushed from Apollo? | Why aren't my contacts pushing to HubSpot? |
| Why did Apollo skip pushing a company or account to HubSpot? | Why did Apollo skip pushing a contact with an email that already exists in HubSpot? | What does the "property values were not valid" error mean? |
| What happens if the Apollo user who configured HubSpot is deactivated? | Where can I find contacts that failed to push to HubSpot? | Does Apollo automatically create companies in HubSpot when I push contacts? |
What does "not synced" mean on the synced to HubSpot filter?
When you search for prospects, you can filter by the synced to CRM filter to see which contacts exist within both platforms. Within this filter, if you select No for synced to HubSpot, it means the contact doesn't have a HubSpot contact ID on Apollo. This group includes both contacts that were never pushed because they did not meet your push rules and contacts that were attempted but failed to push.
This is why the filter can include more records than you see on error logs. The filter shows all contacts without a HubSpot ID, while the integration error log only show records that Apollo actually tried to push and that failed.
Why are there fewer contacts in HubSpot than I pushed from Apollo?
If you pushed a large batch of contacts from Apollo but see fewer in HubSpot, some records were likely skipped because of sync errors. Apollo doesn't create invalid or duplicate records in HubSpot, and any failed records are logged in Settings > Integrations > HubSpot > Error logs.
Common causes include domain conflicts on associated companies, duplicate contact emails that already exist in HubSpot, missing or unverified emails when verified-only push rules are enabled, and property validation errors.
Where can I find contacts that failed to push to HubSpot?
To review failed contact or account pushes, go to Settings > Integrations > HubSpot > Error logs. Error logs show only records that Apollo attempted to push and couldn't create or update in HubSpot.
Use filters like job type or date range to narrow results, then open a row to review the full error message and the affected record. This is the best place to identify actionable sync failures.
Why did Apollo skip pushing a company or account to HubSpot?
One common reason is a domain conflict. Before Apollo creates a contact in HubSpot, it creates or updates the linked company. If HubSpot already has a different company with the same domain, Apollo doesn't create a second company and may skip the related contact push as well.
You may see an error like Account not pushed. A different company with this domain already exists in HubSpot. To fix this, review your company setup on HubSpot and Apollo so the correct records are linked and only one company exists for that domain.
Why did Apollo skip pushing a contact with an email that already exists in HubSpot?
HubSpot only allows one contact per email address. If a contact with that email already exists in HubSpot, Apollo skips creating a duplicate record and logs the issue on the integration error log.
This helps prevent duplicate contacts in your CRM. Review the existing HubSpot contact, confirm it's the right record, and update or associate it as needed instead of pushing a second contact with the same email.
What does the "property values were not valid" error mean?
This error means HubSpot rejected a value sent from Apollo because the value isn't one of the allowed options for that HubSpot property. This usually happens with a dropdown, enumeration, or picklist field.
To fix it, review the error details in the integration error log, then check the property in HubSpot to confirm the allowed values. Then update your field mapping on Apollo so the mapped value or default matches one of the accepted HubSpot options. Then retry the push.
What happens if the Apollo user who configured HubSpot is deactivated?
HubSpot integration settings remain active under the credentials of the Apollo user who last authenticated or configured the integration, even if that user is later deactivated in Apollo.
To change the active sync user, another Apollo admin must authenticate their HubSpot credentials in Apollo.
Go to Settings > Integrations > HubSpot, then reconnect or reauthorize HubSpot with the new admin's credentials.
Why aren't my contacts pushing to HubSpot?
Most push syncs for contacts and companies complete within 15-30 minutes after you create or update a record, especially for small batches. Large batches or or the initial push can take longer, depending on volume and HubSpot API limits. If changes were made just a few minutes ago, it's usually best to wait at least 15-30 minutes and then refresh the HubSpot record.
If your contact still isn't appearing in HubSpot, start by identifying whether the issue affects one contact or all contacts:
First, check whether the contact meets your push criteria. If stage-based push is enabled, the contact's stage must be included in the allowed list. If you also enabled criteria like verified email only or a custom field condition, the contact must meet those rules too.
Next, check whether the contact already exists in HubSpot, whether push was enabled at the time, and whether the push failed due to an error. If the contact already exists in HubSpot with the same email address, Apollo updates the existing record instead of creating a new one. If Apollo attempted the push and it failed, you can review the reason in the integration error log.
If Push to HubSpot is greyed out, missing, or contacts aren't appearing in HubSpot after a manual push, check the following:
- Initial setup or data pull still in progress: After you connect HubSpot, Apollo runs an initial data pull from HubSpot. The push option may appear during this period, but you can't use it until the pull completes. Go to Settings > Integrations > HubSpot > Pull History to check progress.
- Push isn't enabled in sync settings: Confirm push is enabled under Settings > Integrations > HubSpot > Contacts > Sync.
- A contact stage filter is blocking the push: If you restricted push to specific contact stages, Apollo won't push contacts outside those stages. Review your stage conditions under Settings > Integrations > HubSpot > Contacts > Sync.
- HubSpot rejected the push: Go to Settings > Integrations > HubSpot > Error logs to review HubSpot-side errors, such as validation failures or required field issues.
- Integration connection or permissions issue: Make sure HubSpot shows as connected under Settings > Integrations > HubSpot. The user pushing records must also have the required permissions in Apollo and HubSpot. If your permissions are restricted, push may be unavailable.
Does Apollo automatically create companies in HubSpot when I push contacts?
Yes, in some cases Apollo automatically creates or updates companies in HubSpot when you push contacts.
When you push a net-new contact from Apollo and the associated account doesn't exist in HubSpot yet, Apollo sends the account as well so HubSpot can create the matching company. This behavior overrides your account push settings for that specific contact push.
HubSpot can also be configured to automatically create companies based on email domains, so even if Apollo only sends a contact, HubSpot may still create a company record depending on your HubSpot settings.
To reduce unexpected company creation:
- Use push filters so only qualified contacts are pushed, such as filters based on stage, email verification, or a custom field.
- Use manual pushes for test batches and high-impact segments instead of enabling push for every new contact.
- Clean and deduplicate companies in HubSpot before connecting Apollo. Apollo mirrors HubSpot duplicates and doesn't automatically merge them.
Reminder: Apollo doesn't automatically delete or merge duplicate companies created in either system. If you create duplicates, merge or delete them in HubSpot. Apollo respects those changes on the next sync.
Next Steps
Want to keep your HubSpot sync running smoothly? These next steps can help you tighten your setup and avoid common pitfalls.
| Connect HubSpot to Apollo | If you're setting things up for the first time, connect HubSpot to Apollo to ensure your integration is fully enabled before configuring advanced settings. |
|---|---|
| Configure HubSpot Data Mapping | Make sure your fields align by mapping your HubSpot data correctly to keep records clean, consistent, and usable across both systems. |
| Important Information about the HubSpot Integration | Get to know the HubSpot integration so you can tackle data mapping, sync settings, and configuration with ease. |
| Connect Your Mailbox | Ensure activity sync works as expected by connecting your mailbox so you can sync email outreach to HubSpot. |