Overview
If you already actively use Mailgun for transactional or marketing emails, you can integrate Mailgun with Apollo to send higher volumes of emails.
Before you set up the integration, link your mailbox on Apollo. This integration only works if you have already connected your mailbox on Apollo. Next, ensure you have an active Mailgun account. Reach out to Mailgun support if you have questions getting started.
Access to the Mailgun integration depends on your Apollo plan. If you need access, upgrade your plan. If you have questions about upgrading, reach out to the Apollo sales team.
If you created your Mailgun account with a domain from an EU server, you can't integrate your Mailgun account with Apollo.
Check out the following sections to integrate Mailgun with Apollo.
Set Up the Integration
If you use Mailgun for open tracking, Apollo doesn't sync click events from Mailgun like self-opens or bot-opens. Apollo only tracks process events from Mailgun like dropped or not sent messages, bounced messages, and spam blocked messages. However, Mailgun does count bot and self-opens in open tracking, which could lead to an inflated report on engagement events. To avoid this, consider using Apollo for open tracking.
Additionally, Apollo doesn't support IP allowlisting in Mailgun. If you enable IP allowlisting, you can't deliver Mailgun messages through Apollo. For more information on IP allowlisting, check out IP Reputation Management on Mailgun support.
To integrate Mailgun with Apollo:
- Launch Apollo and click Settings > Integrations.
- Click Connect beside Mailgun.

- Enter your Mailgun primary account API key, and click Link API key.

Apollo doesn't support Mailgun domain sending keys. The primary account API key must be a private key. If you're not sure where to find your API key, check out Where Can I Find My API Key? or Authentication on Mailgun.
You have now connected Mailgun to Apollo. Apollo automatically displays all the domains connected to your Mailgun account.

To use Mailgun's platform responsibly, you and your team must comply with Mailgun's user consent policy and follow email best practices. If you email contacts without their consent, Mailgun may block your domain.
If you add or delete a domain in Mailgun after connecting, the change doesn't immediately reflect on Apollo. Click Refresh List to get updates. For more information about how to add and delete domains in Mailgun, check out How do I add or delete a domain? on Mailgun support.
Next, add Mailgun webhooks for your connected domains.
Add Mailgun Webhooks for Your Domains
Add a webhook for each domain you use to send emails from in Apollo. Once enabled, you can track the performance of your sequences and identify bounced emails to improve your email deliverability rates.
First, create webhooks in Mailgun for each domain you use for emailing on Apollo.
Next, activate tracking on Apollo:
- In Apollo, navigate to Settings > Integrations.
- Click Add tracking next to each of the domains that you want to connect.

You have now activated tracking via the Mailgun webhook on Apollo. To delete a connected webhook from Apollo, click Remove tracking.
If you add or remove a webhook from a domain that no longer exists in Mailgun, Apollo displays an error message that the webhook doesn't exist. Ensure the domain's webhook is enabled on Mailgun.
You can only connect one webhook per domain with this integration. If you encounter an error that a similar webhook is already setup, delete the non-Apollo webhook from Mailgun or manually add the webhook in Mailgun.
Next, enable Mailgun for your connected mailboxes.
Enable Mailgun for a Mailbox
To enable Mailgun for a mailbox:
- Launch Apollo and click Settings > Mailboxes.
- Click ... beside your mailbox, then click Send emails from Mailgun.
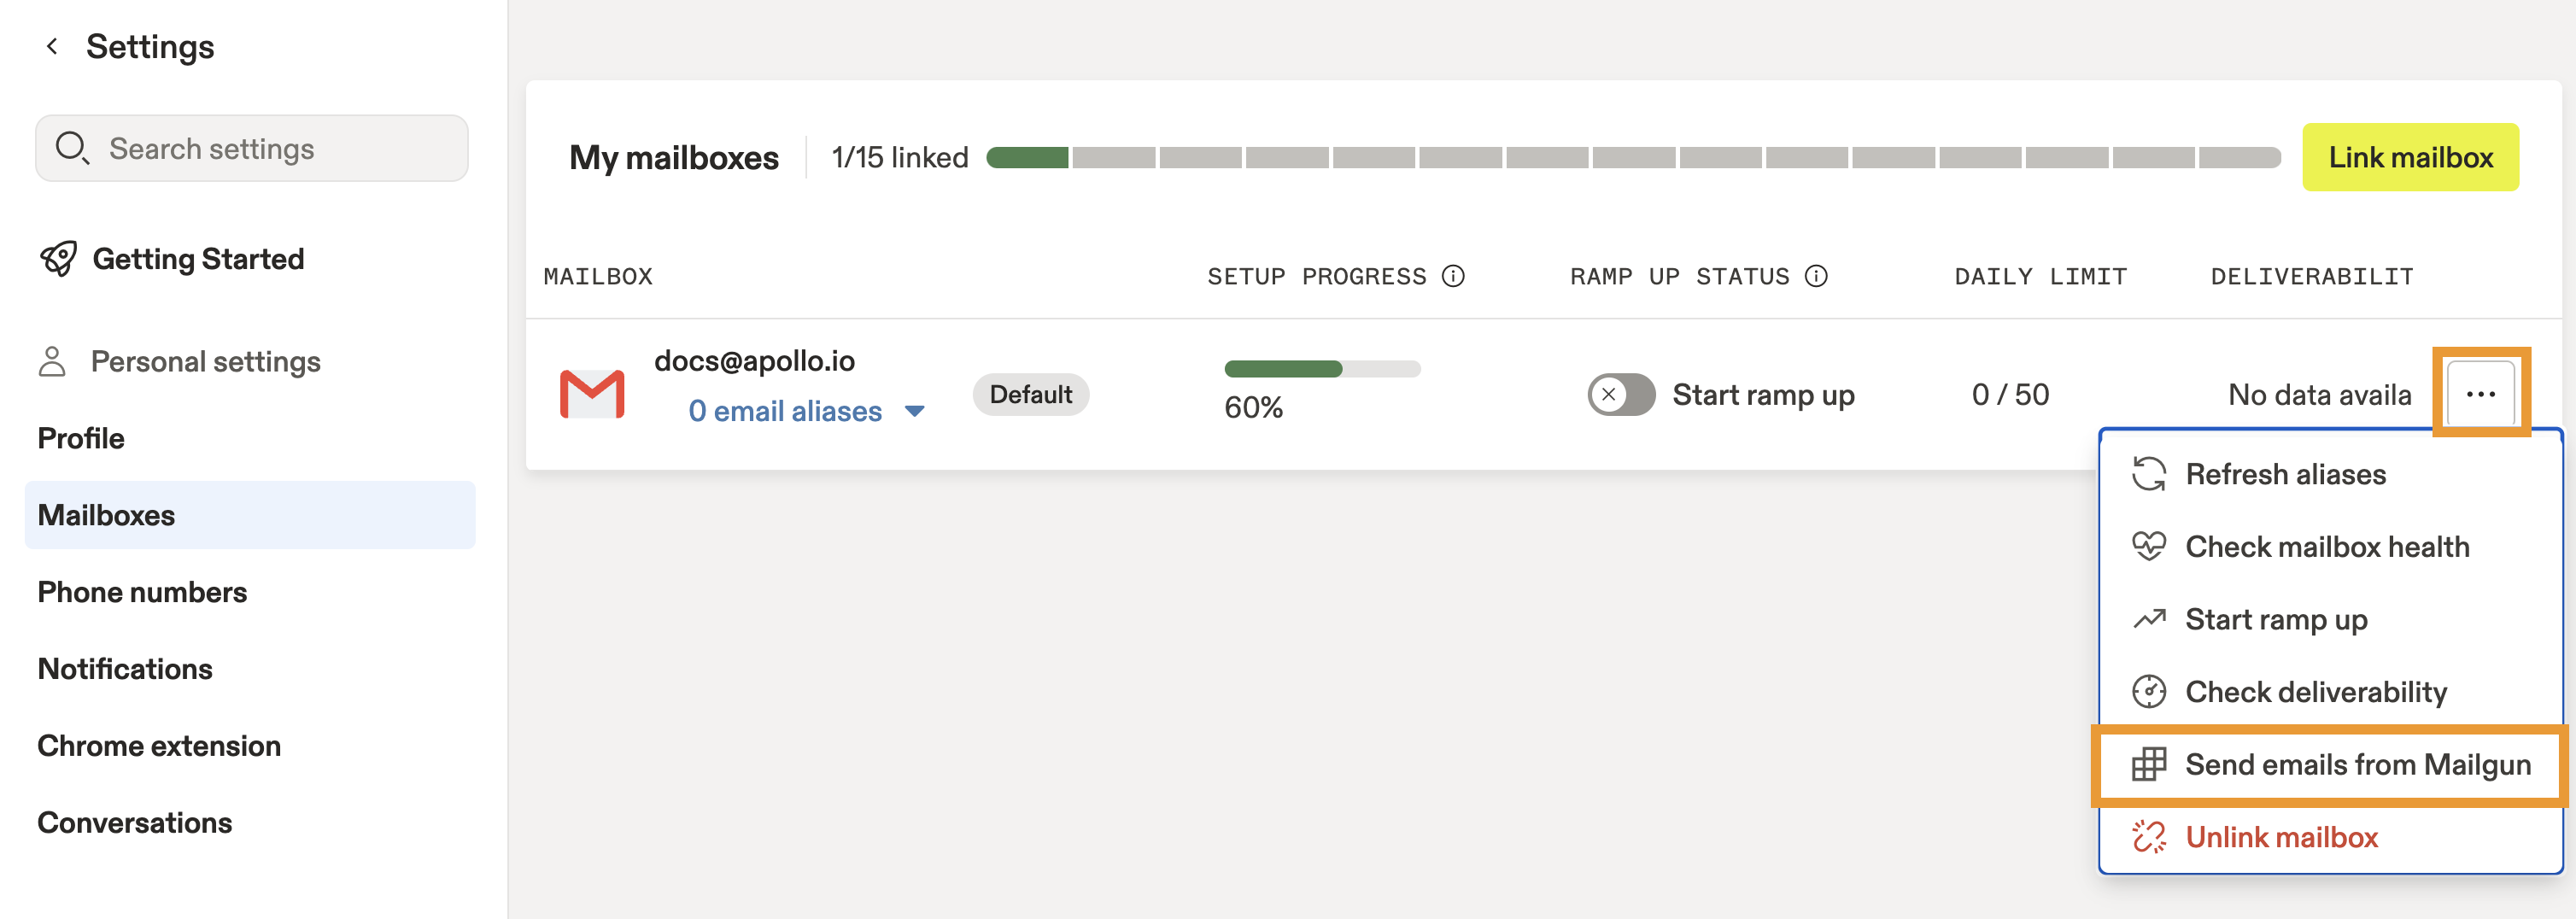
To send with Mailgun, your email address domain must first be connected through your Mailgun account.
You have now enabled Mailgun for a mailbox in Apollo.
You can stop sending emails from Mailgun at any time. To do so, click ... beside your mailbox, then click Stop sending emails from Mailgun.
Confirm Setup
To confirm that you integrated Mailgun correctly:
- Launch Apollo and click Settings > Mailboxes.
- Apollo displays Send From Mailgun below the default email address. This confirms that you have set up Mailgun correctly in Apollo.

Set up a custom tracking subdomain to protect your domain reputation. Tracking subdomains forward the emails that you send from Mailgun to your primary domain. Make sure you link both mailboxes with Apollo. If you don't connect your primary domain with Apollo, but forward the emails you send via Mailgun to it, those emails will not appear in Apollo. Check out Link Your Mailbox for more information.
Configure Email Sending Limits
To adjust your email sending limits:
- Launch Apollo and click Settings > Mailboxes.
- Select your mailbox.
- Adjust the limit for emails sent per day and per hour.
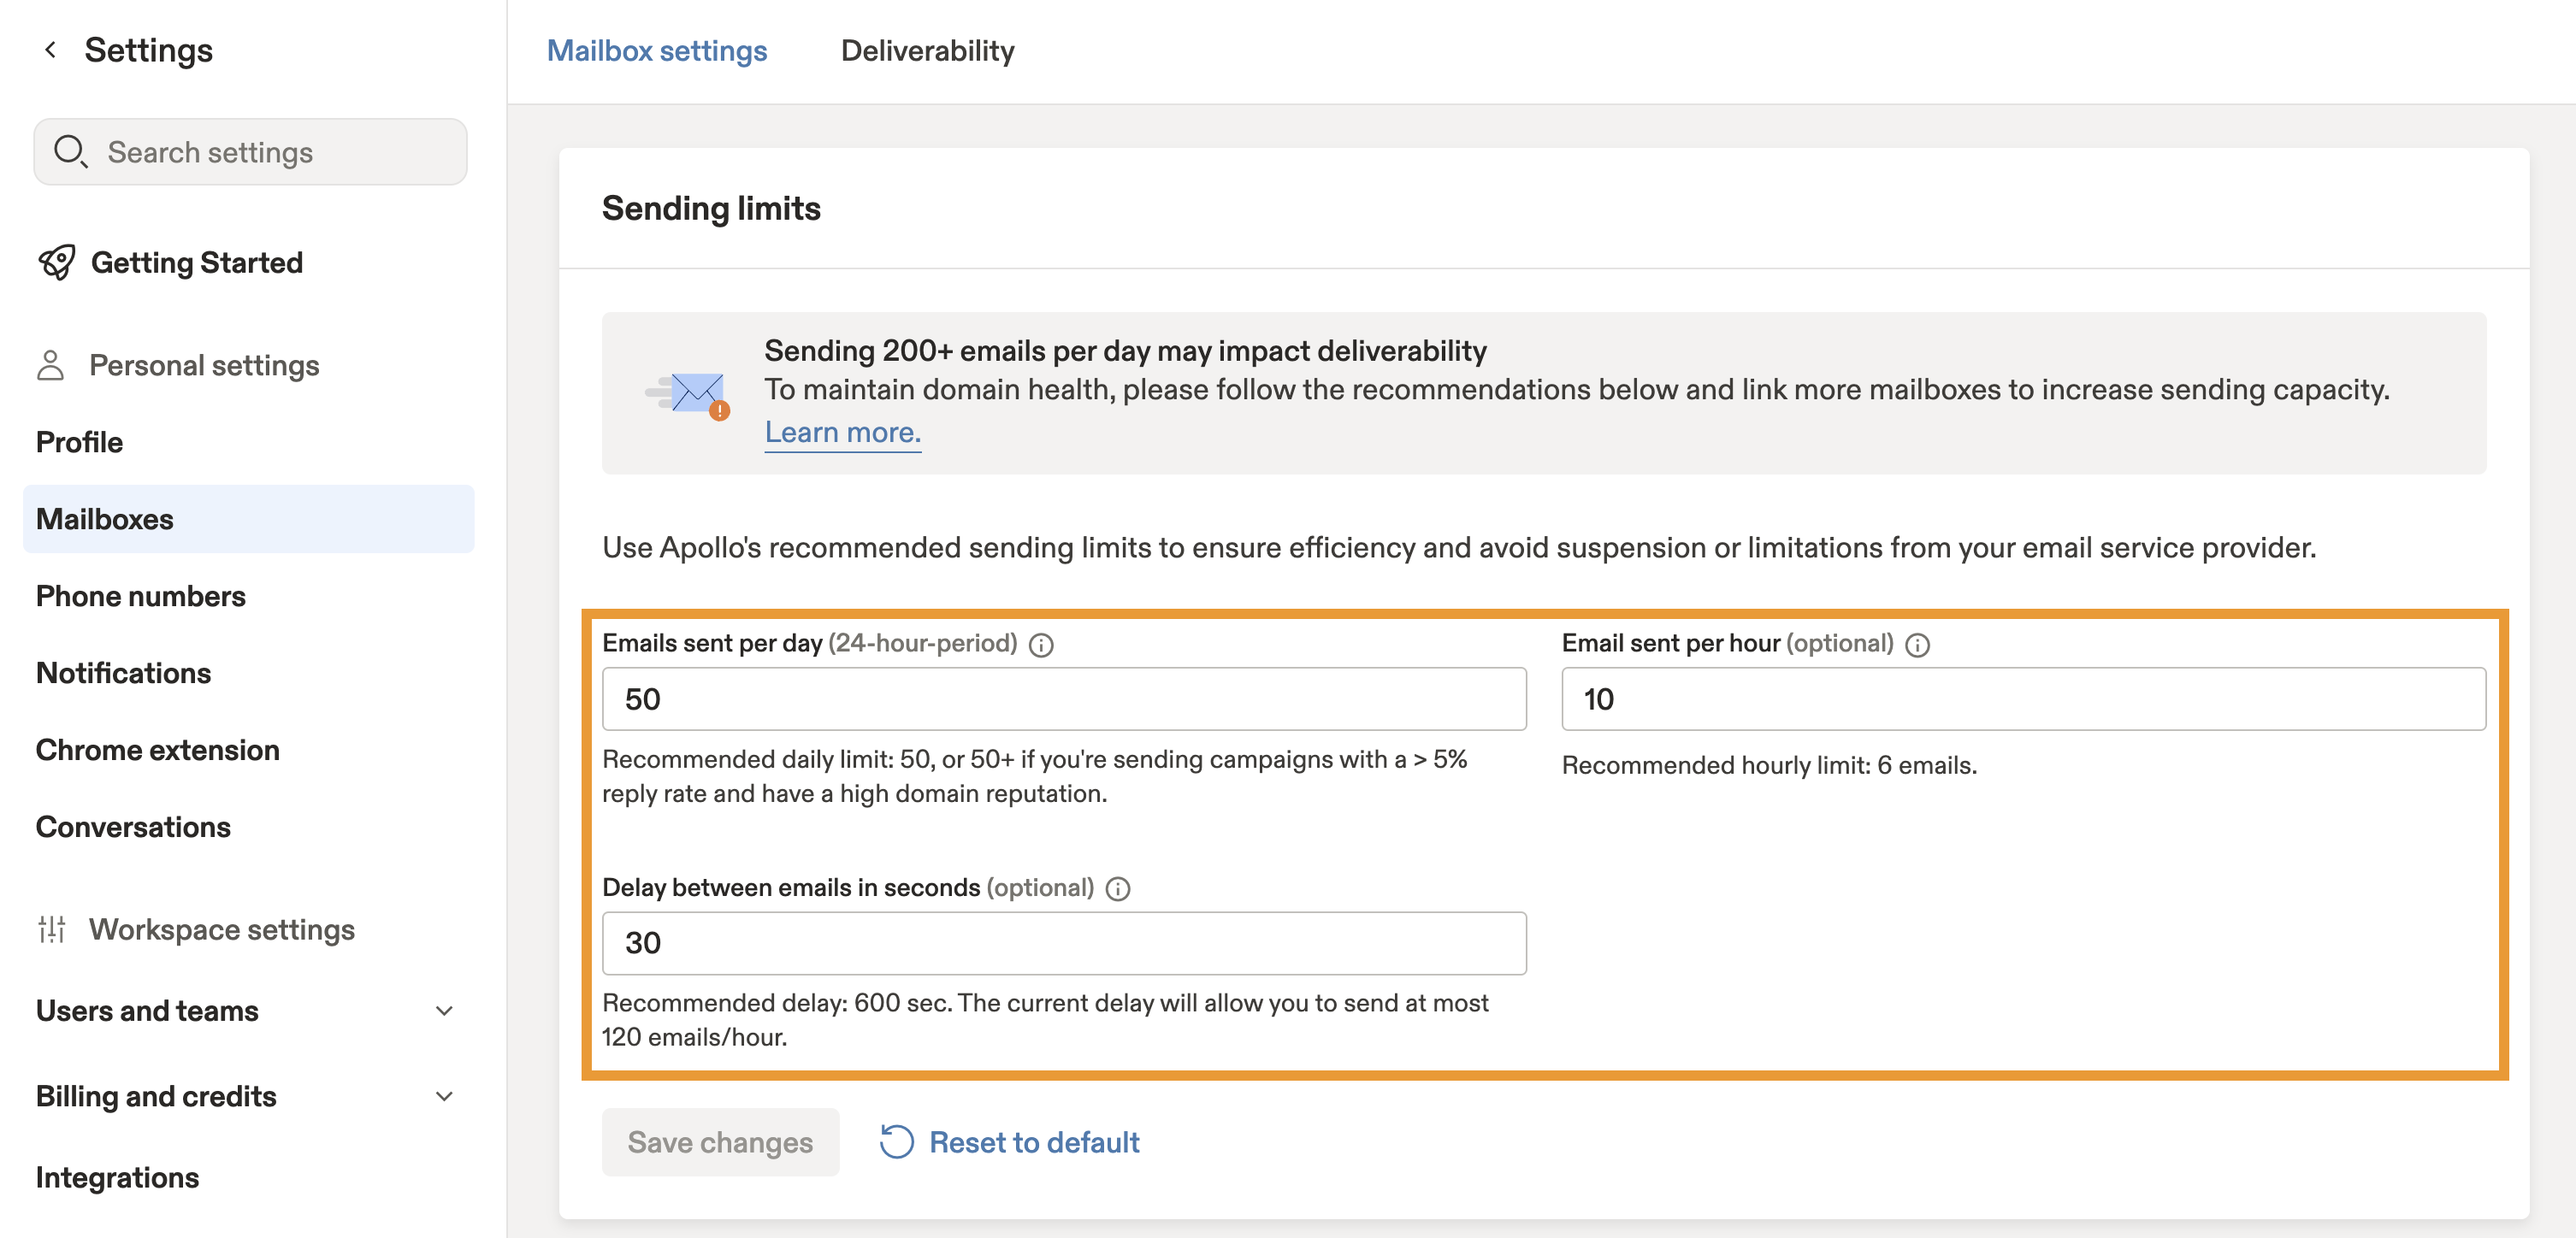
- When finished, click Save.
You have now configured your sending limits.
Did you know? Emails sent via Mailgun don't appear in your mailbox sent folder.
Next Steps
If you’re ready to go further with high-volume sending and deliverability, here are a few solid next steps.
| Email Sending Limits Overview | Fine-tune how aggressively your team emails by adjusting sending limits to keep volumes healthy and maintain deliverability as you scale. |
|---|---|
| Set Up a Custom Tracking Subdomain URL | Protect your domain reputation by configuring a tracking subdomain to route engagement events through a clean, authenticated path. |
| Avoid Spam Filters | Give your deliverability a lift by tightening list quality and sender hygiene to help your Mailgun-powered sends land where they belong. |
| Sequences Overview | Increase output without burning your domain by optimizing how sequences send and track mail so your campaigns stay targeted and efficient. |