Overview
Inbound routers help you automate the process of scheduling meetings via Apollo and scale processes across teams and organizations. You can choose which meeting type your team's prospects can book based on their answers to your intake form. You can also redirect prospects to websites or present custom messages.
At an organization level, you as an Apollo admin can set up a single link that routes meetings across different teams or SDRs. This means prospects will always schedule meetings with the right people.
Only Apollo admins can create inbound routers. Other users can be assigned meetings via inbound routers and view them, but cannot create them.
Customers on paid plans can create as many inbound routers as needed! If you are on a free plan, your organization's admins are limited to creating 3 inbound routers total across all admins.
Step 0: Before You Begin
A key function of inbound routers is to route scheduled meetings to the appropriate teams or SDRs. Before setting up your inbound routers, create the meeting types that you want to use for this purpose.
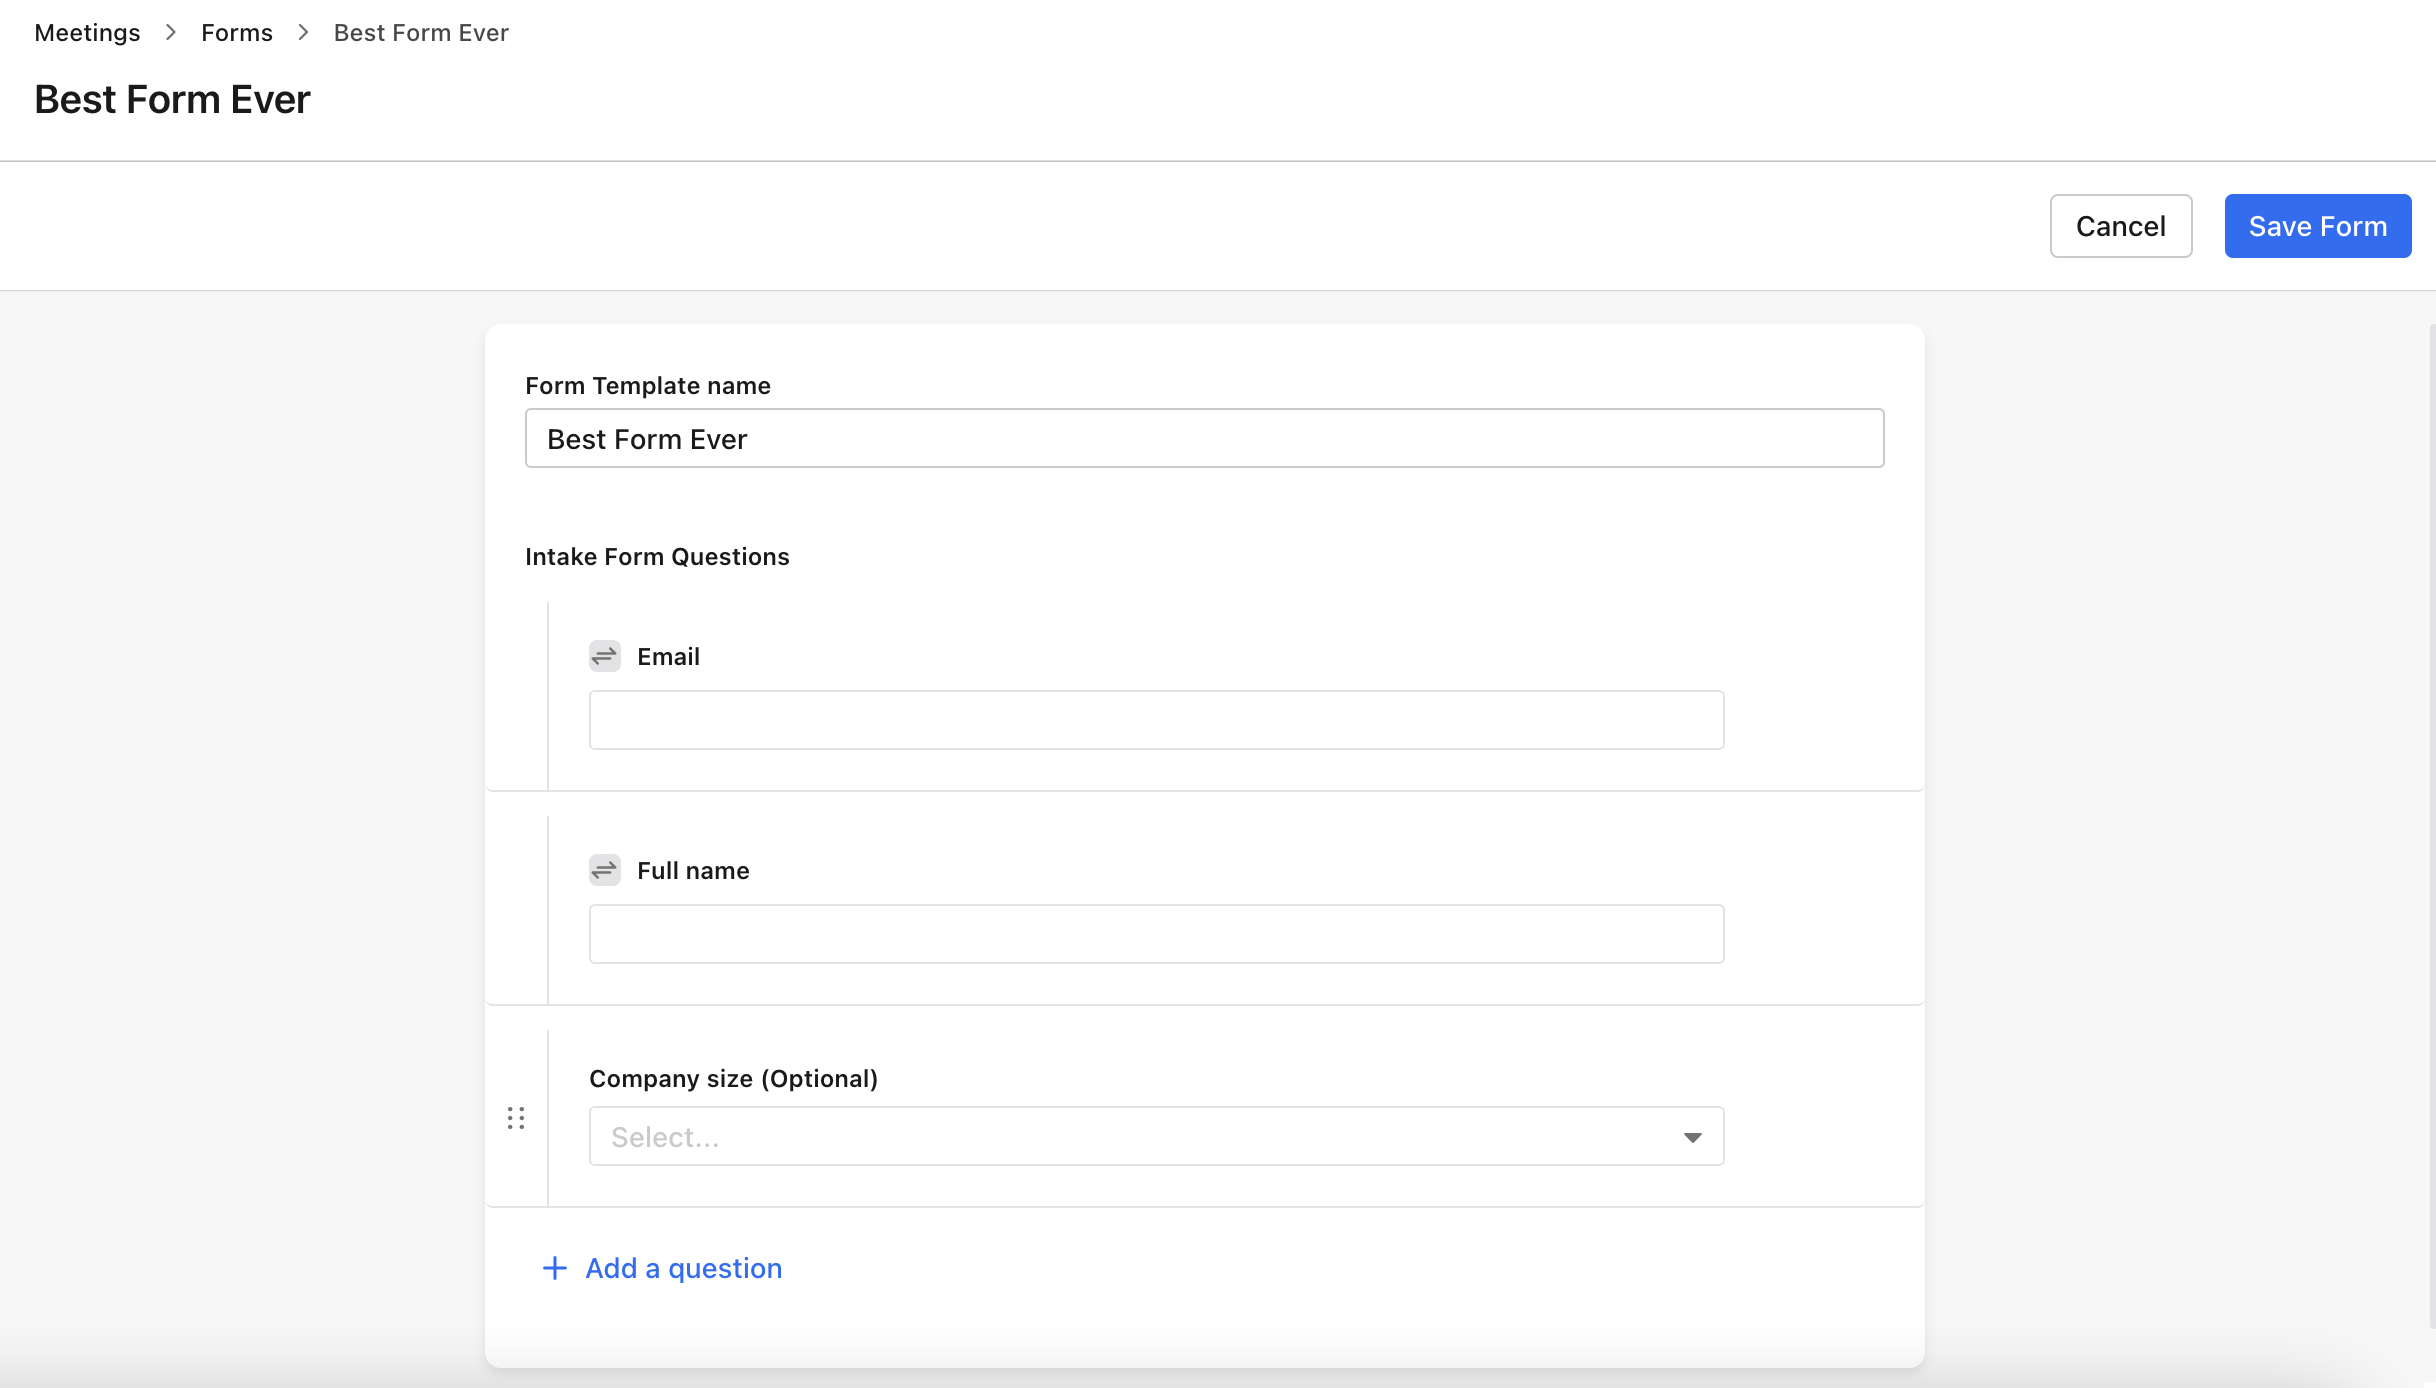
Step 1: Create Your Intake Form Template
For the intake form, you decide which questions you ask your prospects when they schedule a meeting with you. Then, the answers determine the rules and actions that apply to them later in this process.
Each form template can be reused across your inbound routers as well as round-robin meetings. If you want to ask different prospects the same set of questions, add the same form template to the applicable routers.
When a prospect submits your intake form, Apollo checks whether they are already a contact or account. If not, Apollo creates a contact/account with the information the prospect submitted.
To create your intake form template:
- Launch Apollo and click Meetings.
- Click Create, then Intake forms.

- Enter a name for your form template, then click Create.

- By default, your intake form requires prospects to enter their name and email address. These fields cannot be removed from your form, but you can rename the question.
To add more fields to the form, click Add a question. Choose from standard options such as company size and phone number, or create a custom question with your own input types. When choosing routing options, responses to custom questions can be linked to custom fields you've created in Apollo.
If you choose Single-select or Multi-select as your input type for a custom question, you need to provide answers that the prospects can select.
- (Optional) If you add a custom question, there are 3 separate choices you can make.
First, if a contact or account does not already exist, Apollo automatically creates them when prospects submit your intake form. Choose an option from the Apollo field drop-down to map responses to a custom contact field in Apollo. If you set up the Salesforce or HubSpot integrations and adjusted the push settings, Apollo might also push the response to the CRM field that you mapped to the Apollo field.
Next, to make a question mandatory, toggle the Set as required option on.
Finally, to hide the question from the prospect, toggle the Set as hidden slider on. Then, enter a URL query parameter and default field value to track meetings booked via this link. The URL query parameter serves as a UTM tracking component in the meeting link URL.
This option enables you to track important metrics related to how a meeting is booked. For example, if you are adding the meeting link to your company's Facebook page, you can set the URL query parameter tofacebookto track the source. Deal Creation
You can automate your workflows in Apollo so that deals are automatically created whenever a prospect books a meeting. This ensures that you are tracking deals activity from the first contact with a prospect.
To do so, use the Meeting booked event as a trigger when setting up your automations. - Click Add to save the intake form question.
- When you have finished adding questions, click Save.
Repeate these steps to create more form templates.
To edit or deactivate form templates, go to Meetings and click the Admin console tab. You cannot change the status of a form template until it has been removed from any linked meeting types and inbound routers.
Step 2: Set Up a New Inbound Router
To set up an inbound router:
- Launch Apollo and click Meetings.
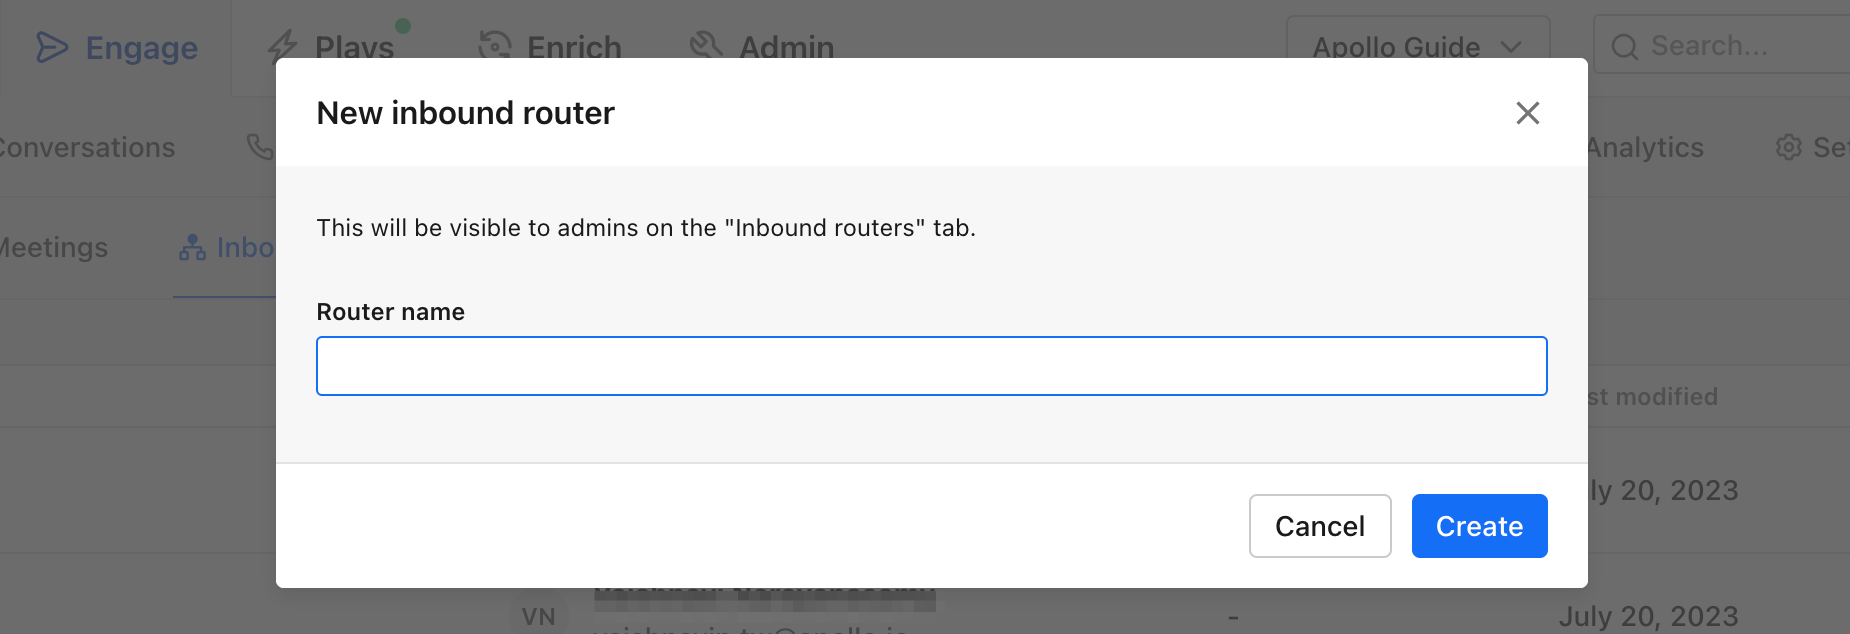
- Click Create, then Inbound router setup.
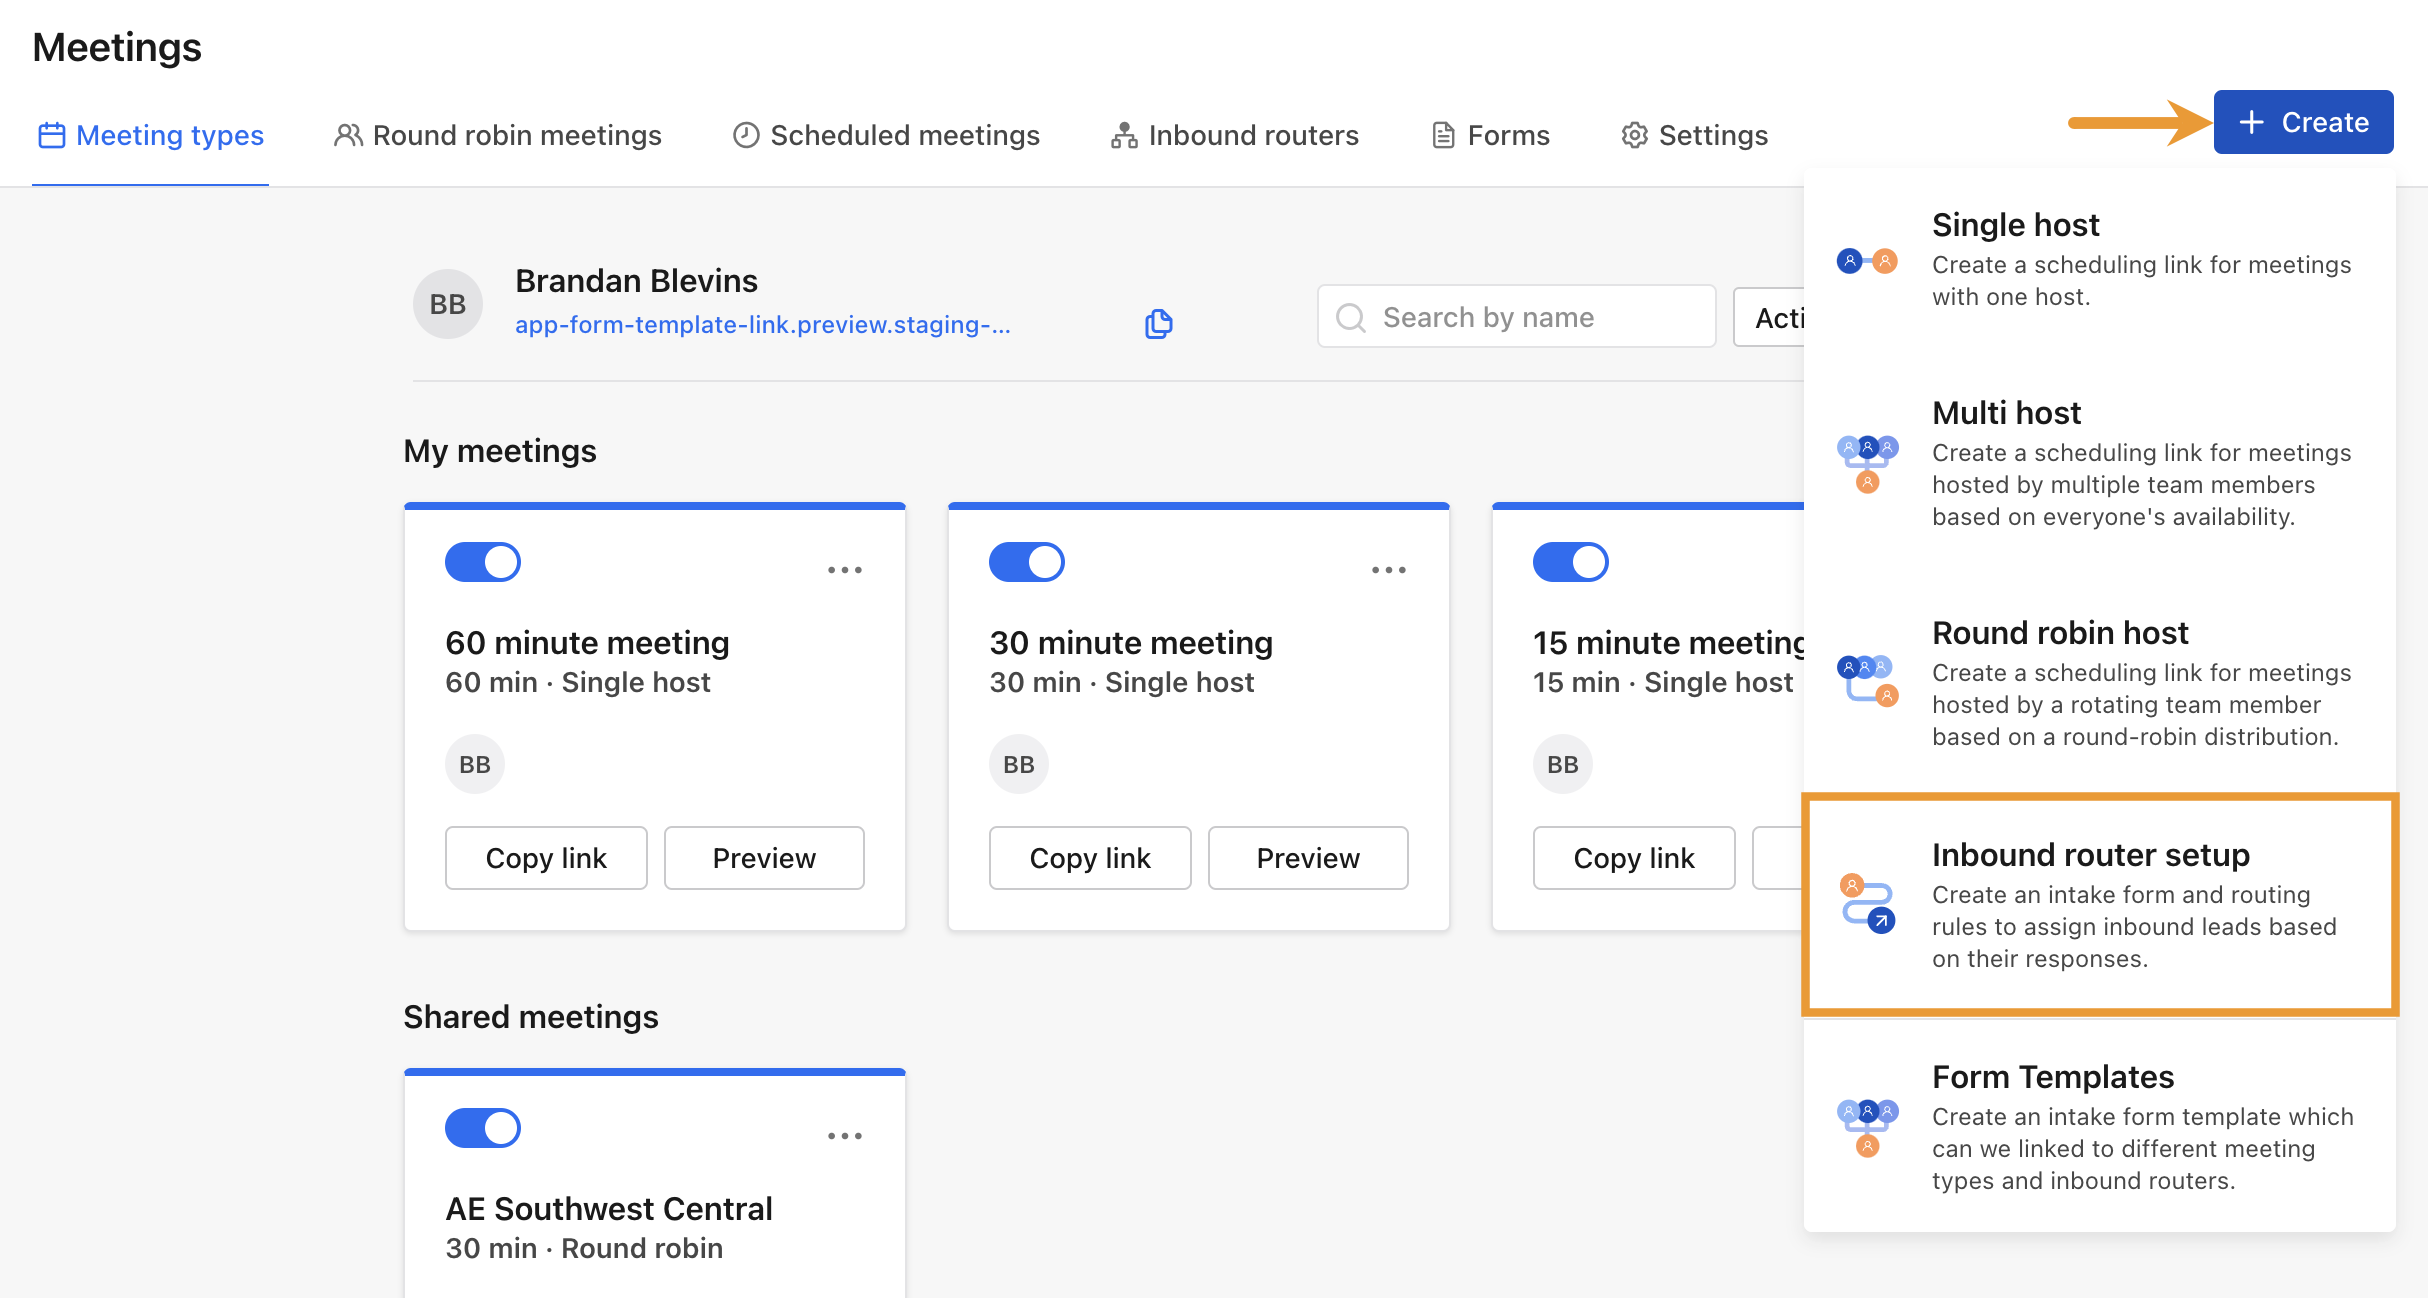
- Enter a router name, then click Create.
- Click Select form to add the form template that you created in Step 1.
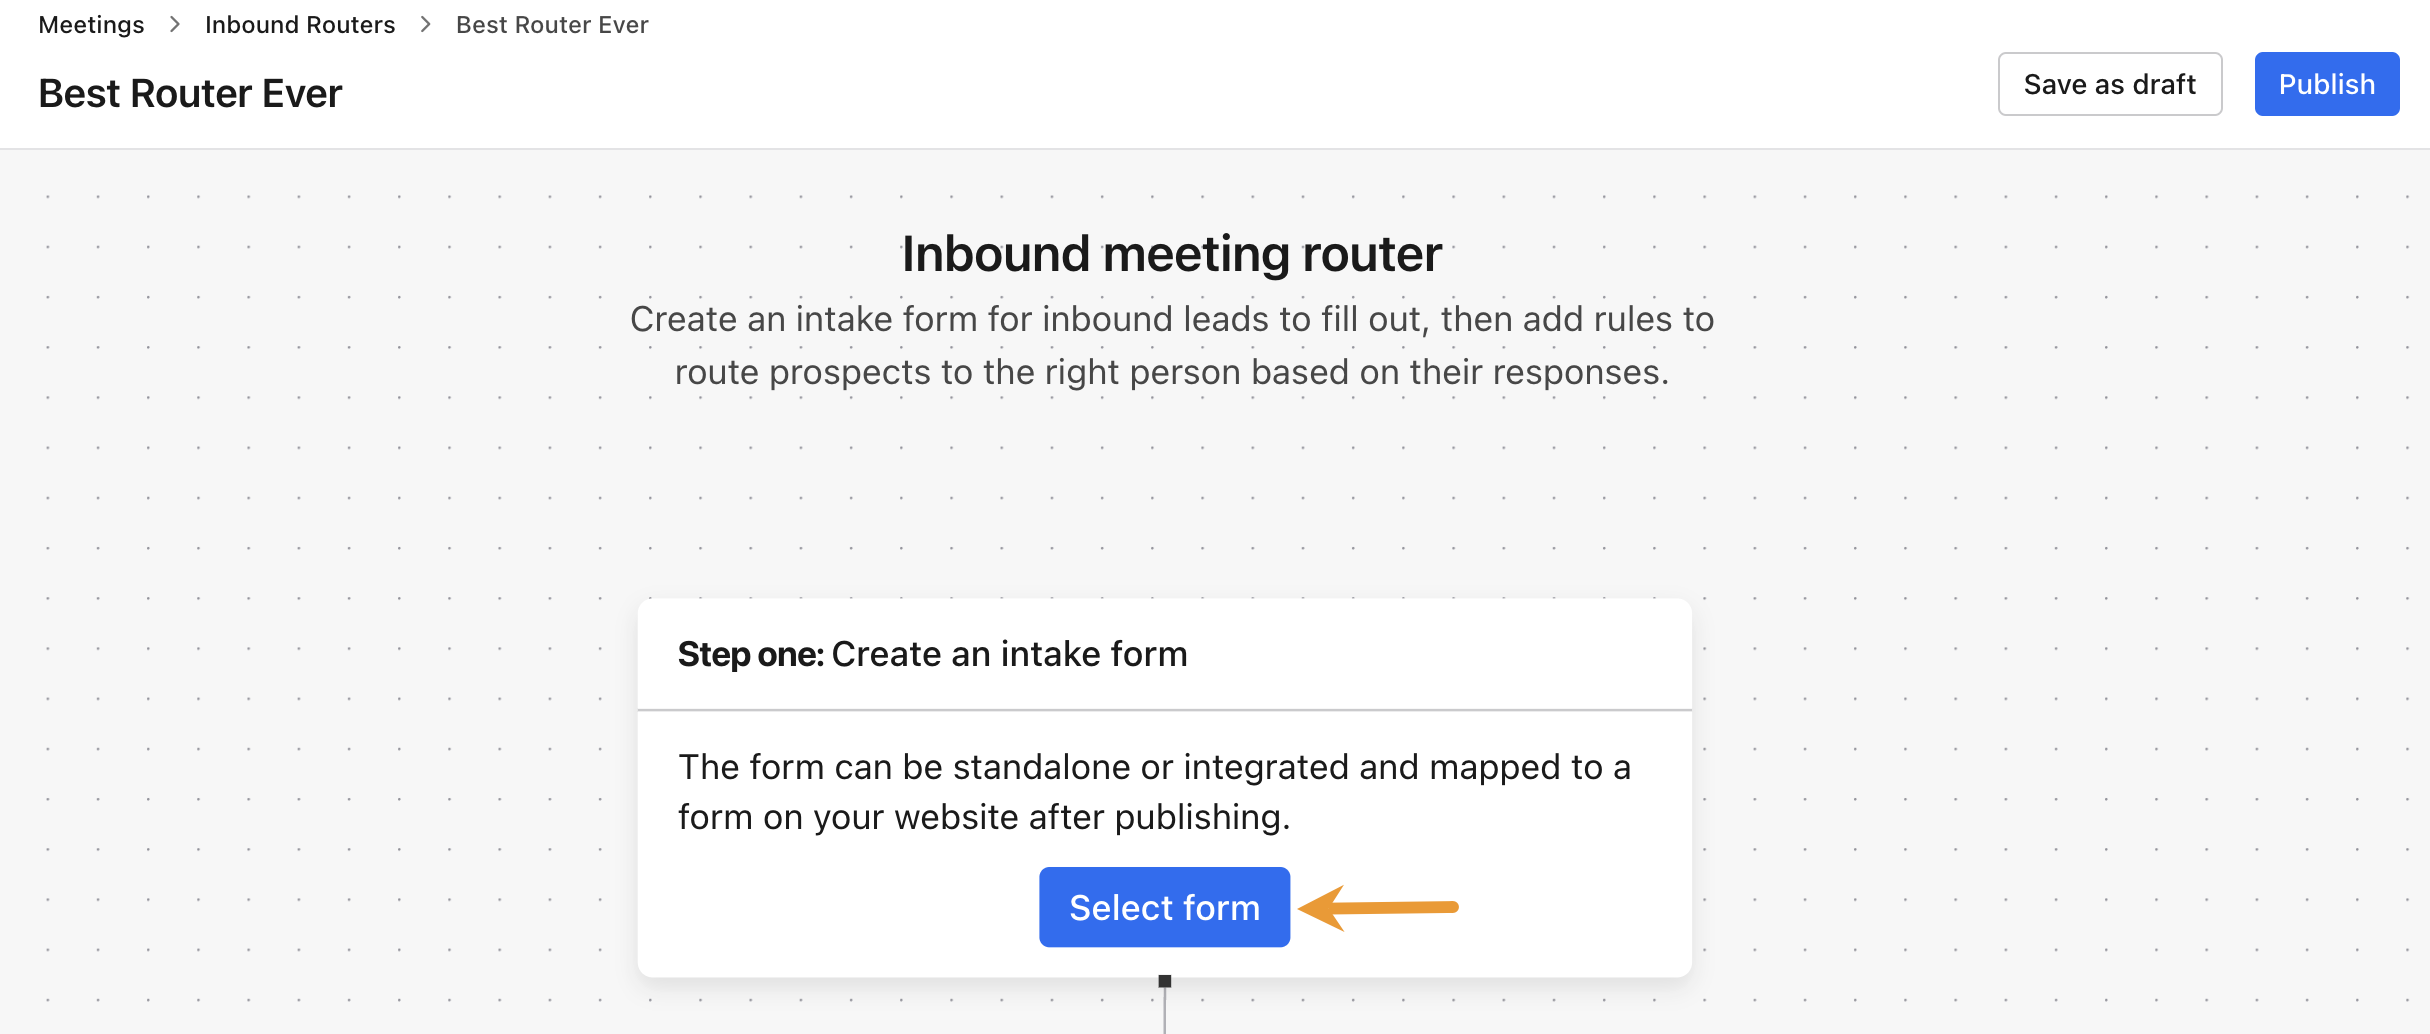
- Click the Choose Form drop-down and select the form template that you want to use for your inbound router. Then, click Save.
 Form Meets Function
Did you know? You can use Apollo's inbound router with form enrichment by selecting a standalone intake form. This lets you centralize and reuse form templates across different routers. You can also use form submissions as a trigger to start a workflow.
Step 3: Add Your Routing Options
With your intake form ready to collect prospects' answers, you can create rules and actions that determine which prospects Apollo filters to specific final destinations.
To set up rules and actions for your inbound router:
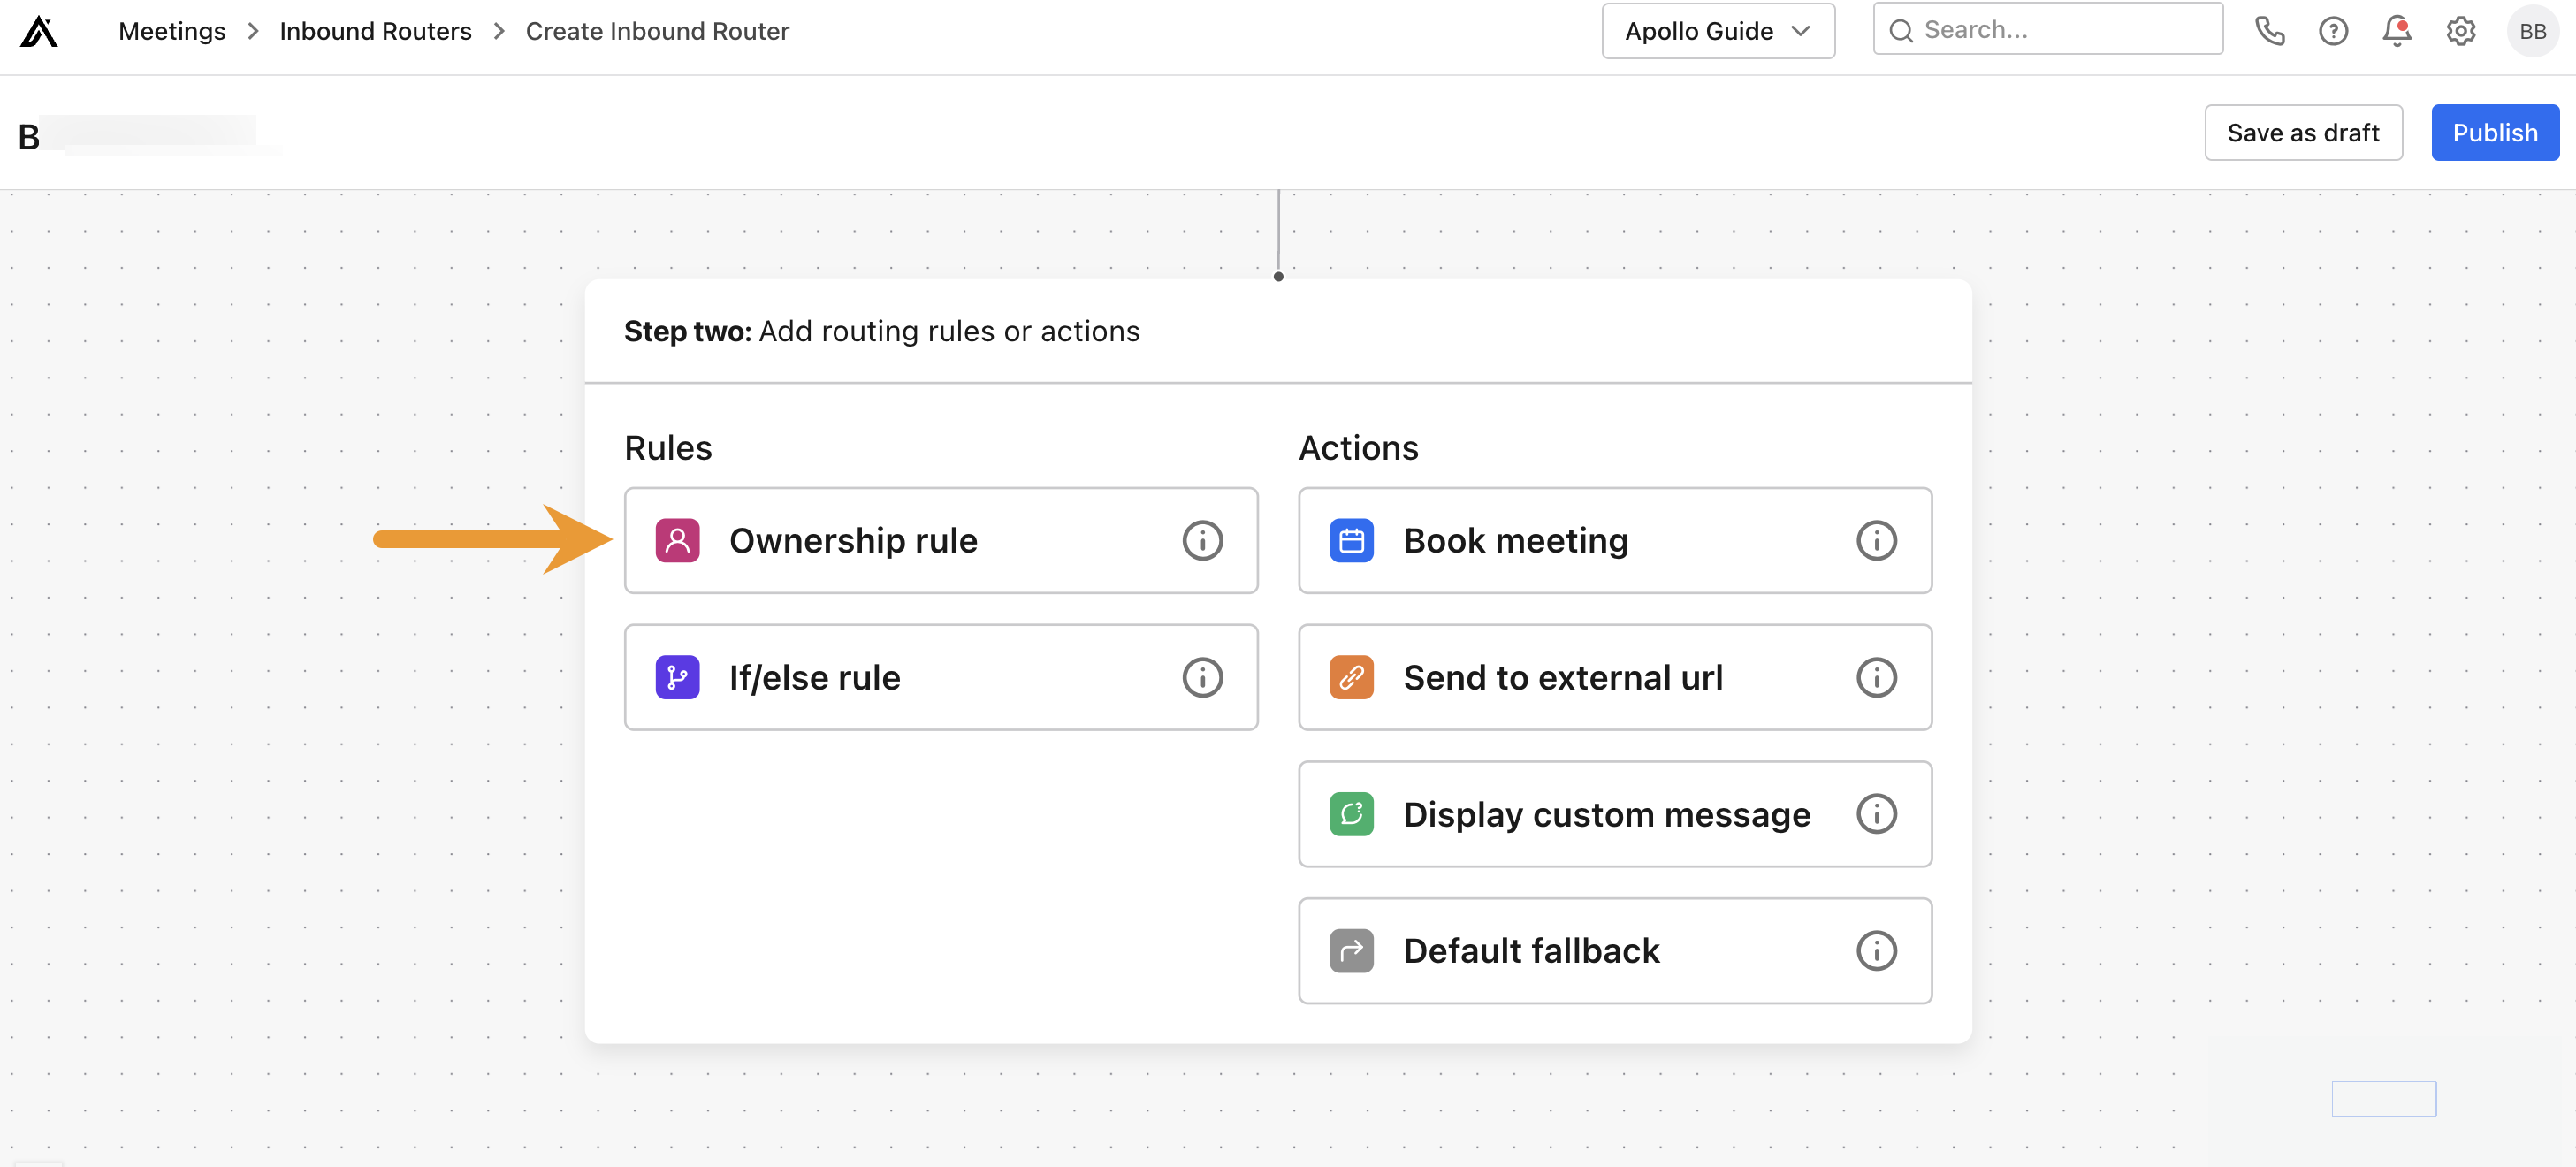
- Go to the rules and actions section of the inbound router. Here, you can choose from the following options:
-If/else rule: Create different Yes/No paths, with each path ending in a different action. For more details, refer to the If/else Rule section of this article.
-Ownership rule: Create a Yes/No based on whether a prospect is already assigned to account owners or contact owners within Apollo. For more details, refer to the Ownership Rule section of this article.
-Book meeting: End the path with the prospect scheduling a meeting. Choose from existing meeting types or create a new meeting type just for this path.
-Send to external url: Redirect prospects to a landing page or other website of your choice. Prospects do not have the option to schedule a meeting.
-Display custom message: Present prospects with a message that you craft. Prospects do not have the option to schedule a meeting.
-Default fallback: Present prospects with a standard message across your inbound router. Use this option to display the same custom message to end multiple paths. Prospects do not have the option to schedule a meeting.

- For this walkthrough, Apollo shows you the simplest route—ending a path with prospects booking a meeting based on an existing meeting type.
Click Book meeting, then Link to existing meeting type.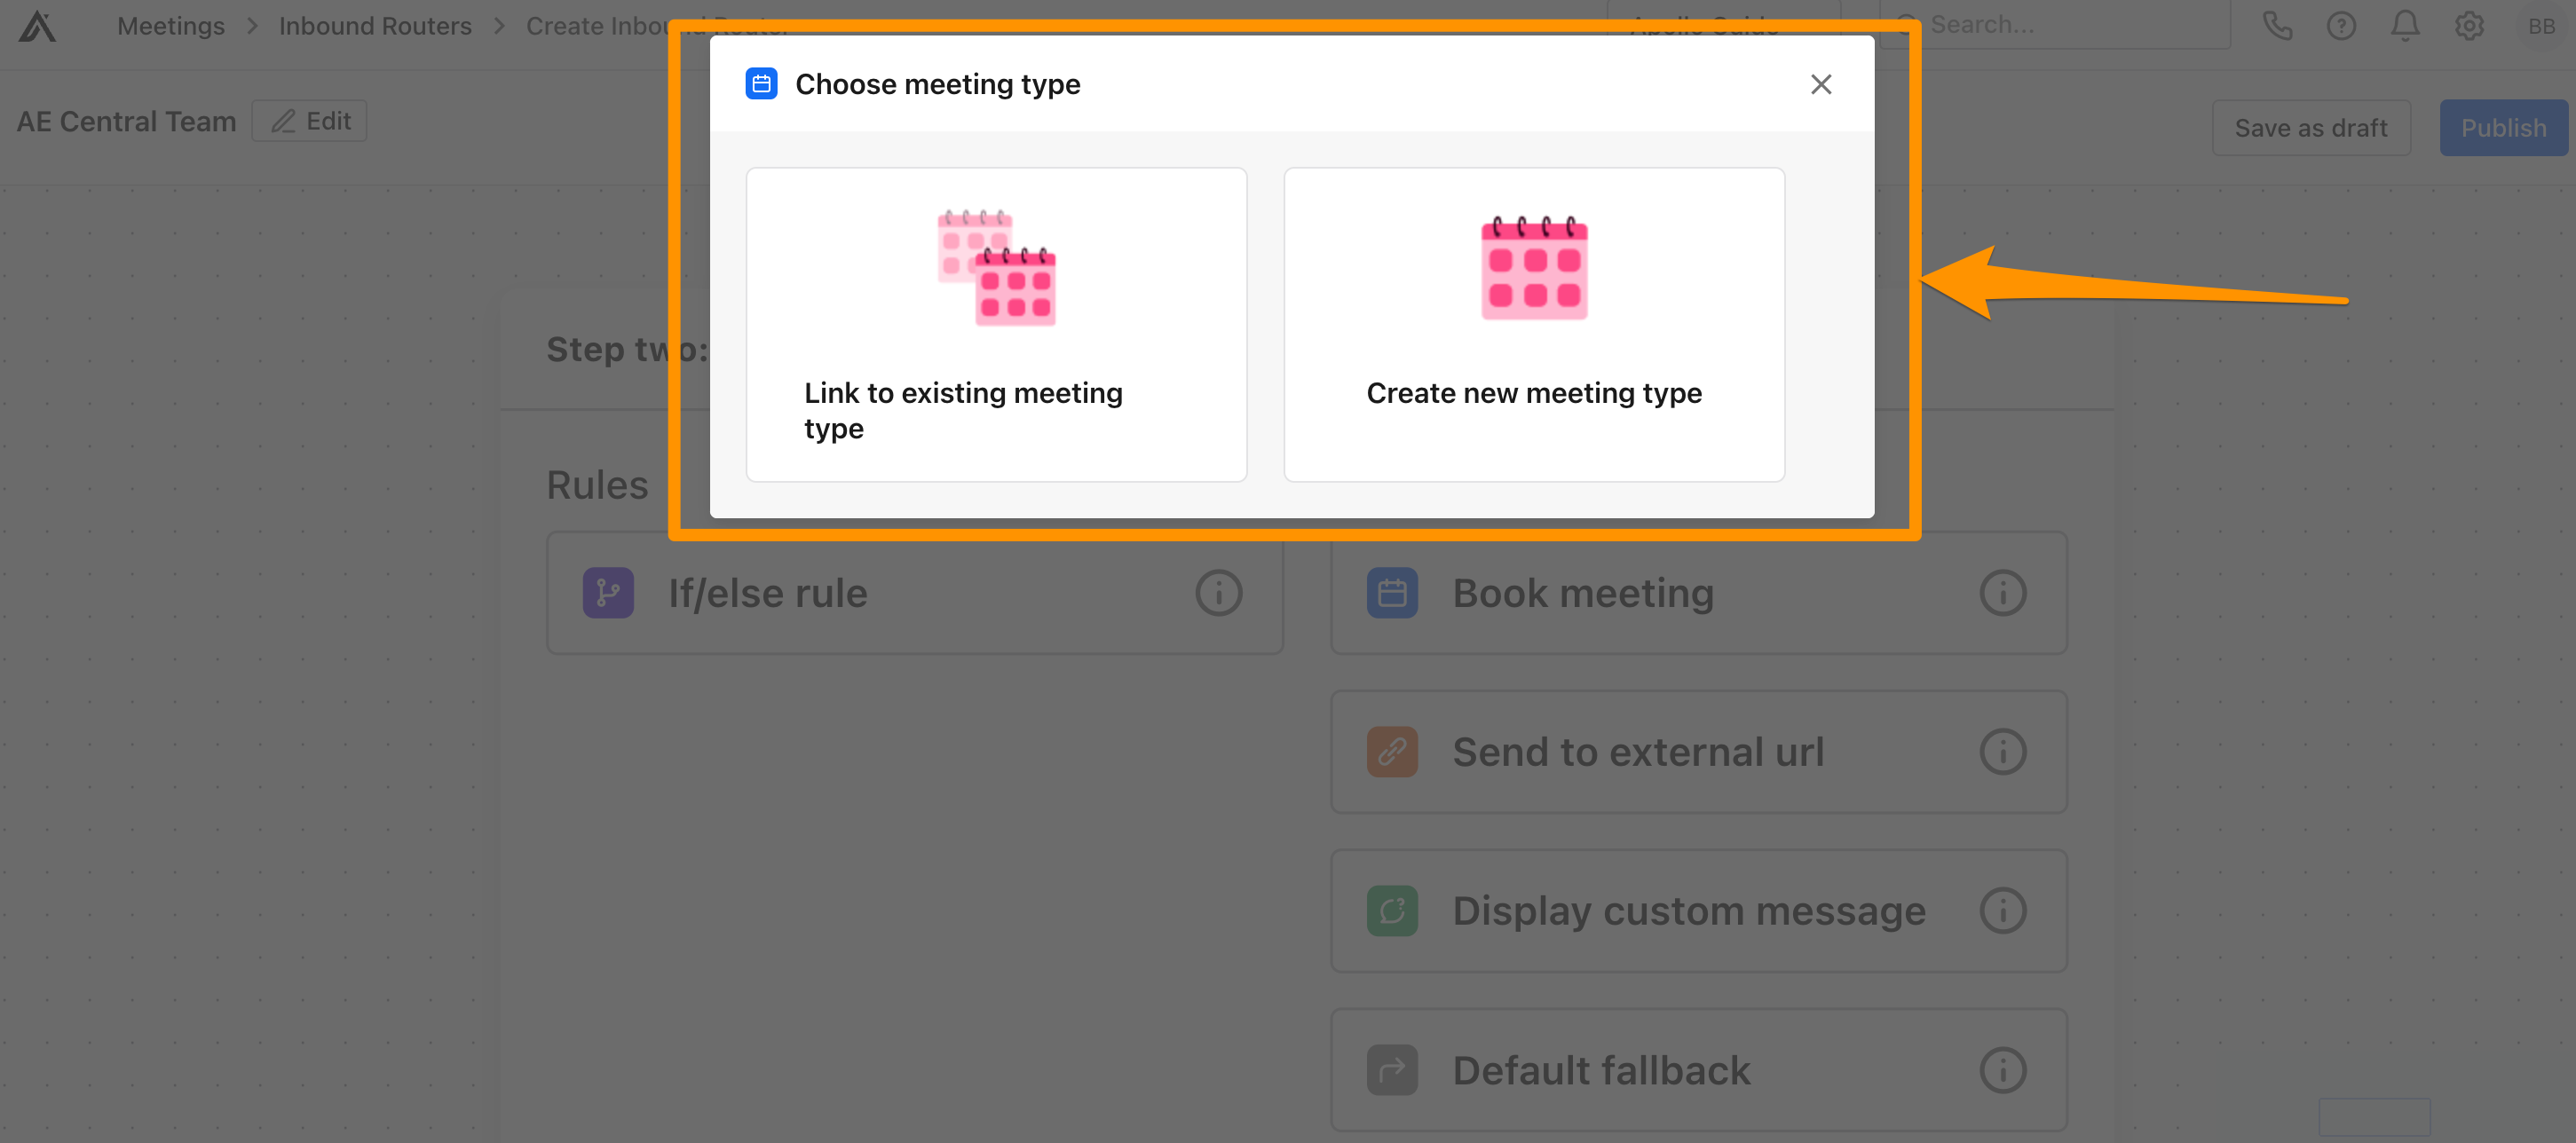
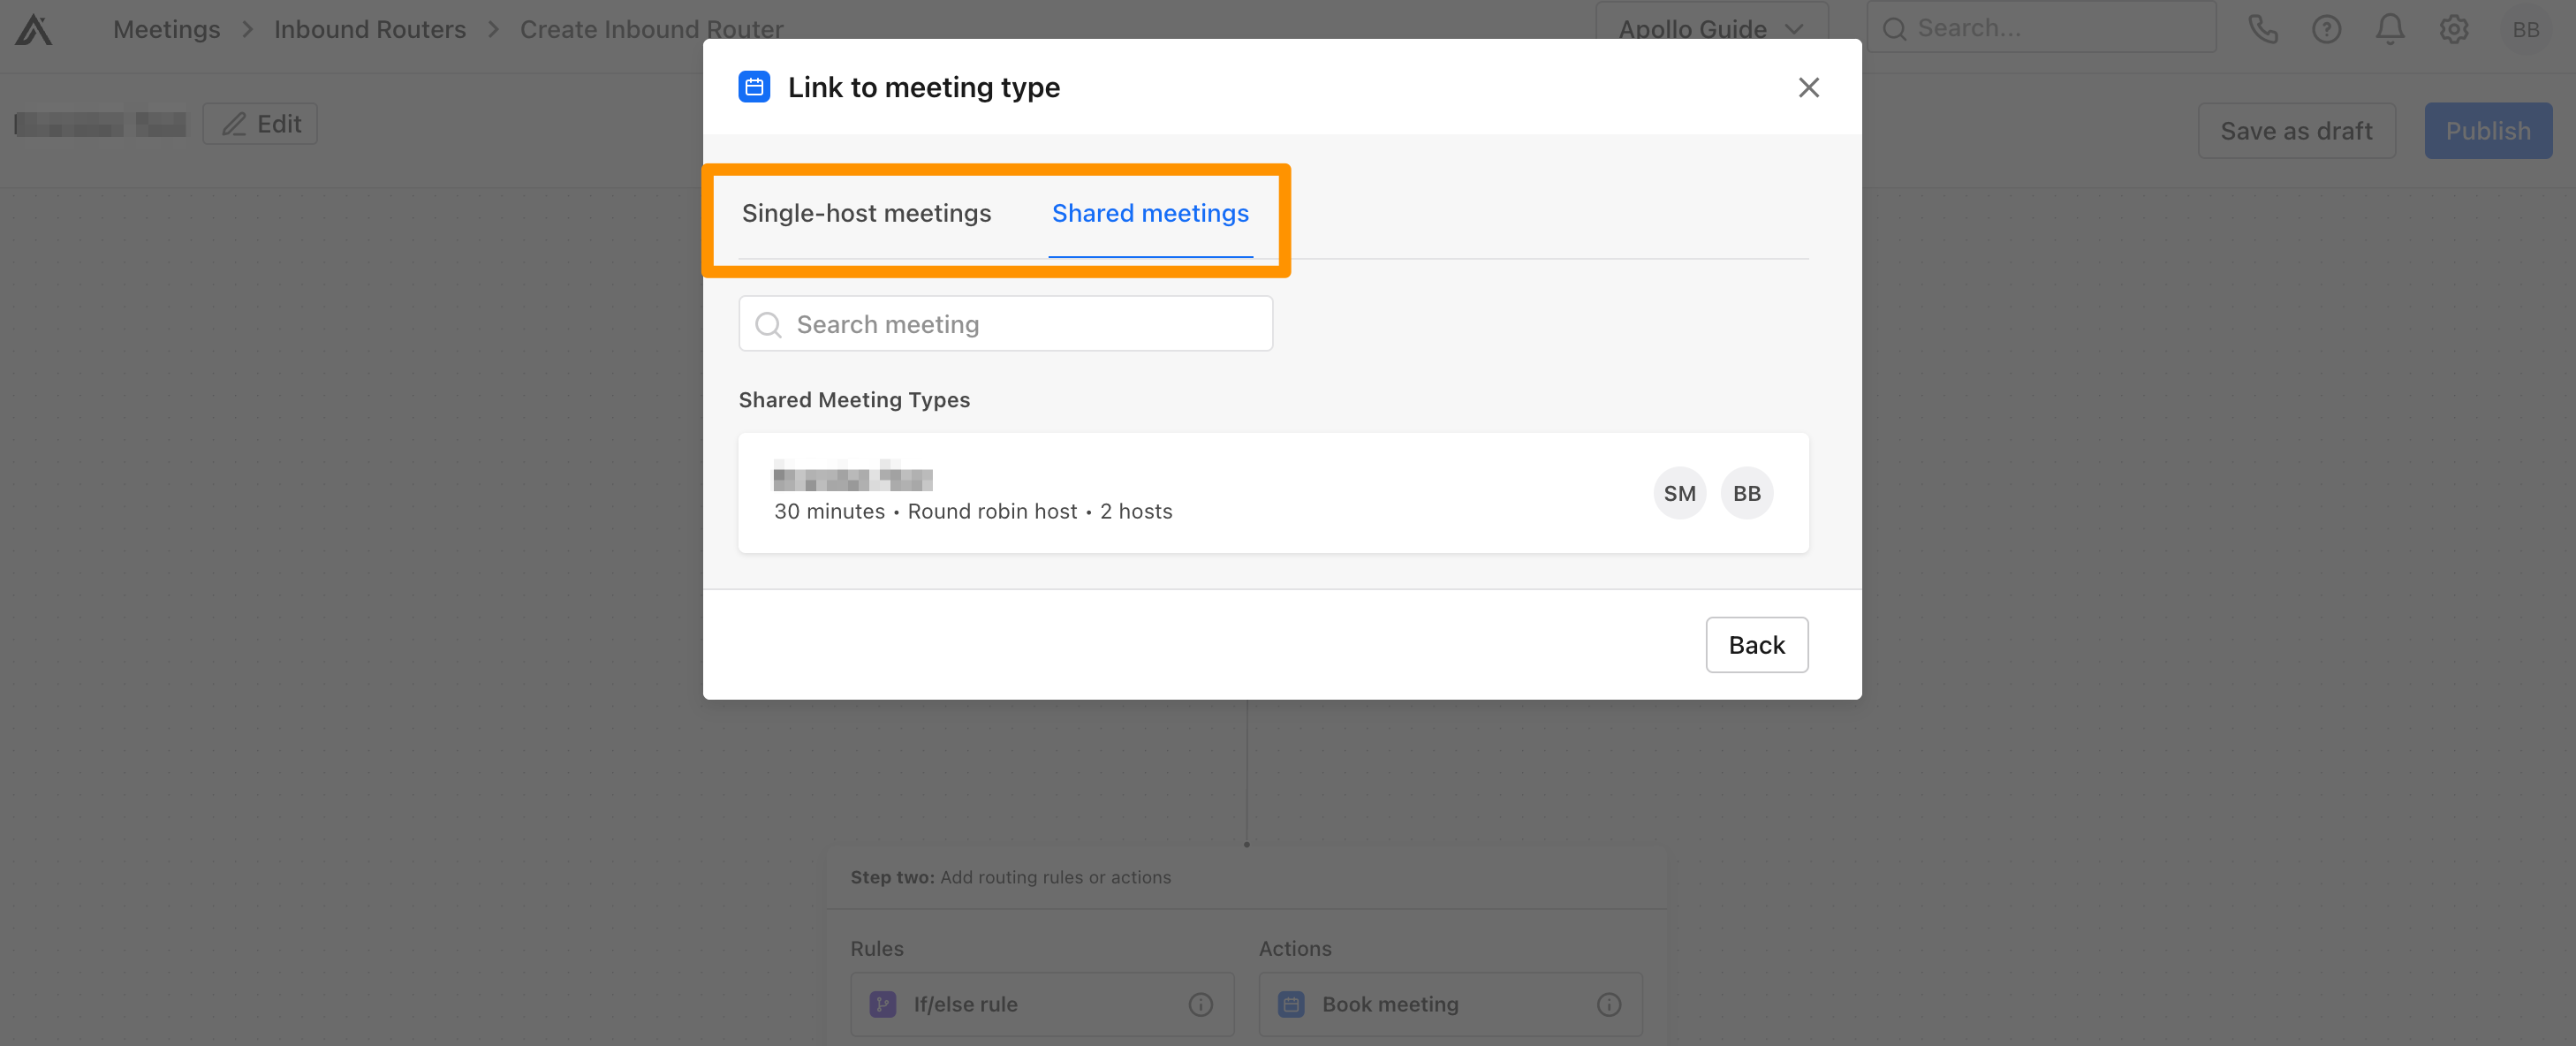
- Click the Single-host meetings tab if you want to send meetings to an individual. Click the Shared meetings tab to route to meetings with round robin or multi-host formats. Then, find and select the specific meeting type you want to use to schedule meetings.
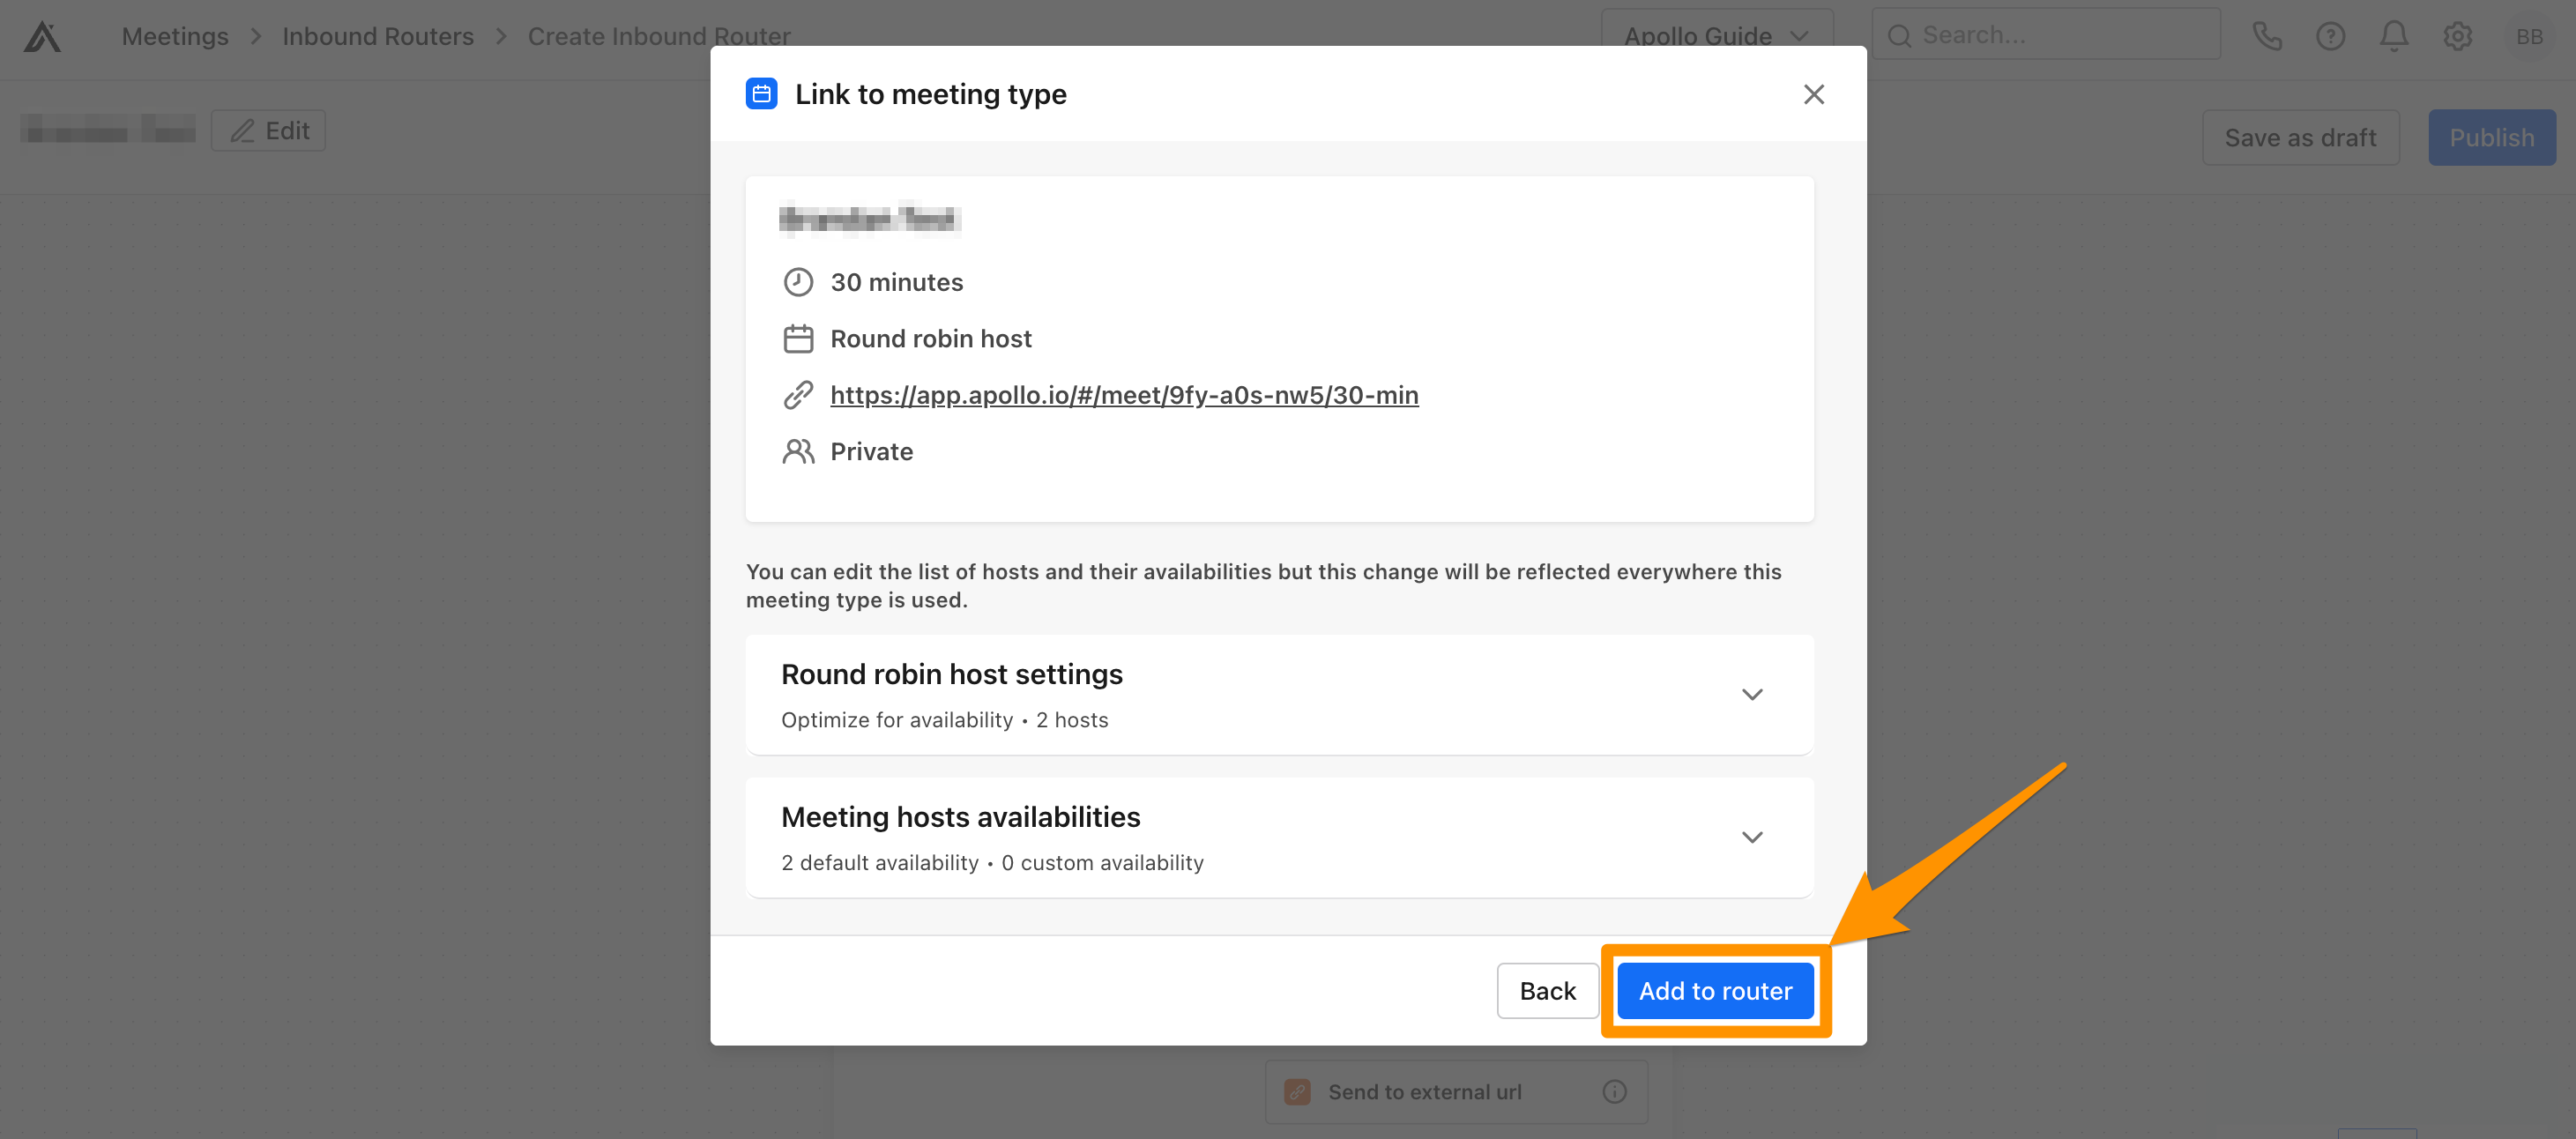
- Review the details of the meeting type. Then, click Add to router.
- Review your inbound router to ensure everything looks good. Then, click Publish to activate the router.

If/else Rule: Automate Your Meeting Routing
When creating inbound routers, the if/else rule is a powerful option that you can use to route prospects to different end actions based on their answers to the intake form questions.
The if/else rule creates yes/no paths, and you decide how each path ends based on whether a prospect's answers meet the criteria you set. For example, let's say you add the company size question to your intake form and you want to route prospects to different hosts based on their responses.
To do so:
- When you add rules and actions, click If/else rule.
- Click the respond type drop-down and choose Company size. Select an option from the value drop-down and decide whether your rule will match that value. Then, click Save.
For this example, Apollo selected is and 5000+. This means the yes path is for respondents that chose 5000+ as the answer and the no path is for everyone else.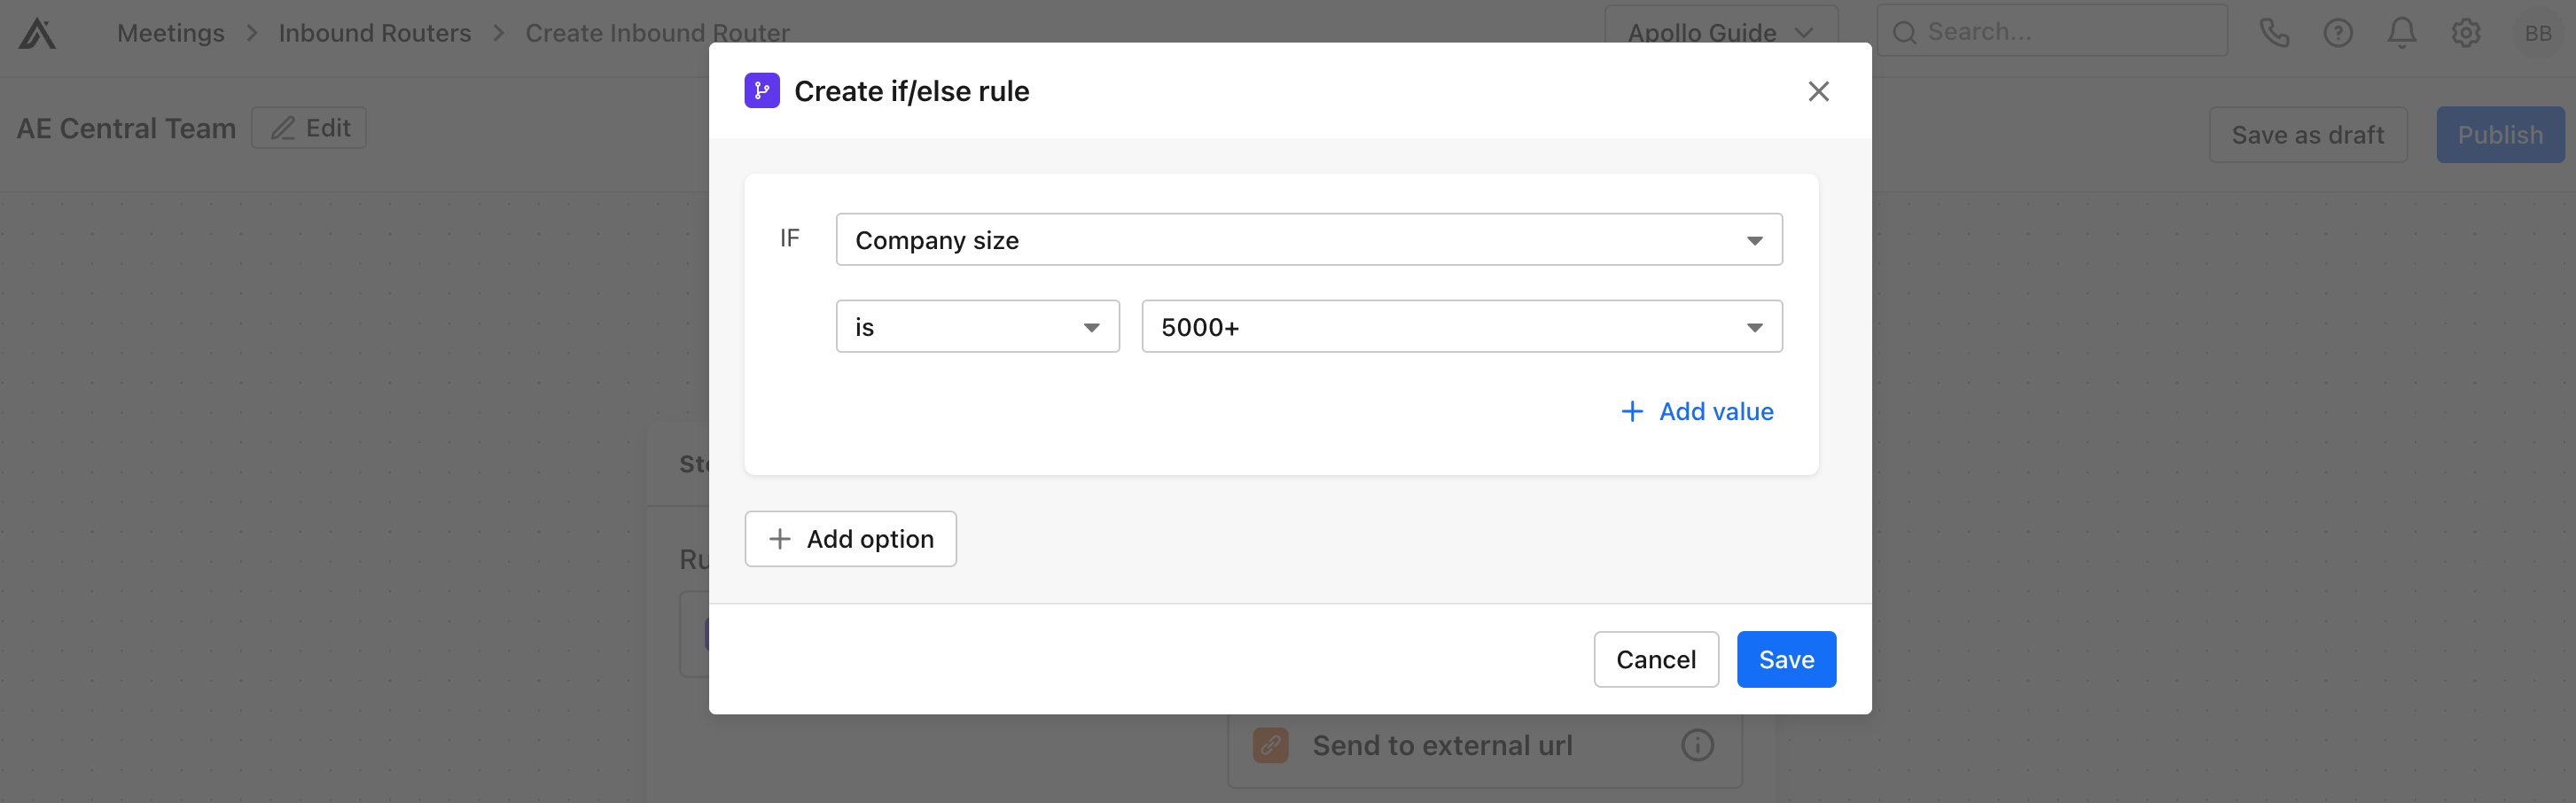
- To finish each of your paths, select Add rule/action. Choose from the routing options. If you want to create more yes/no paths, add another if/else rule.
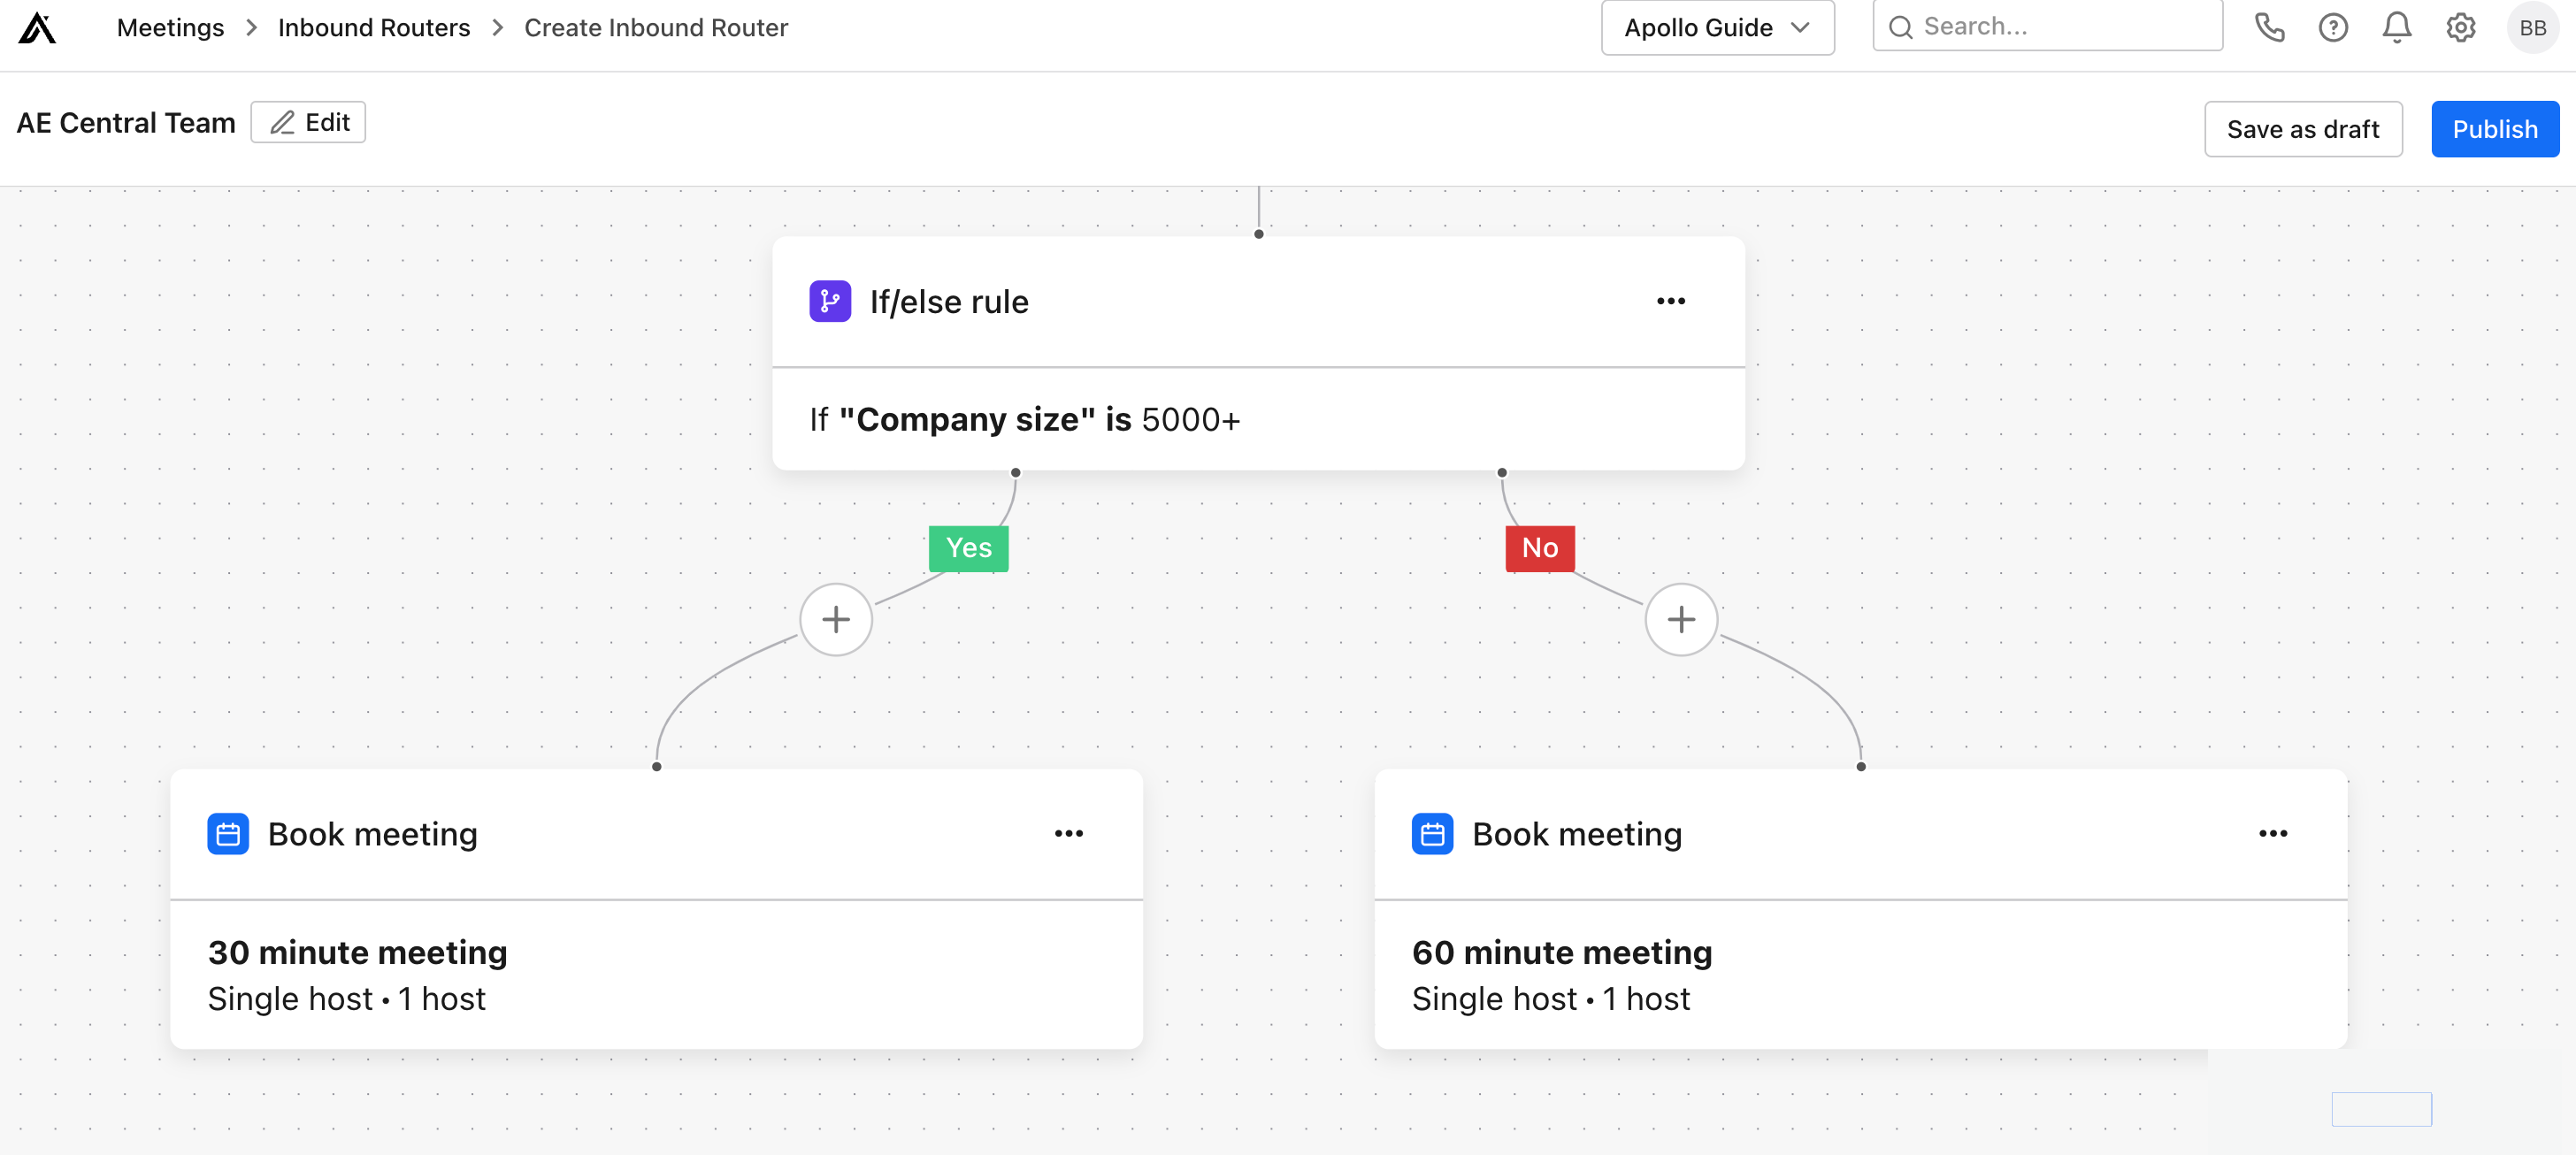
- Review your inbound router to ensure everything looks good. Then, click Publish to activate the router.
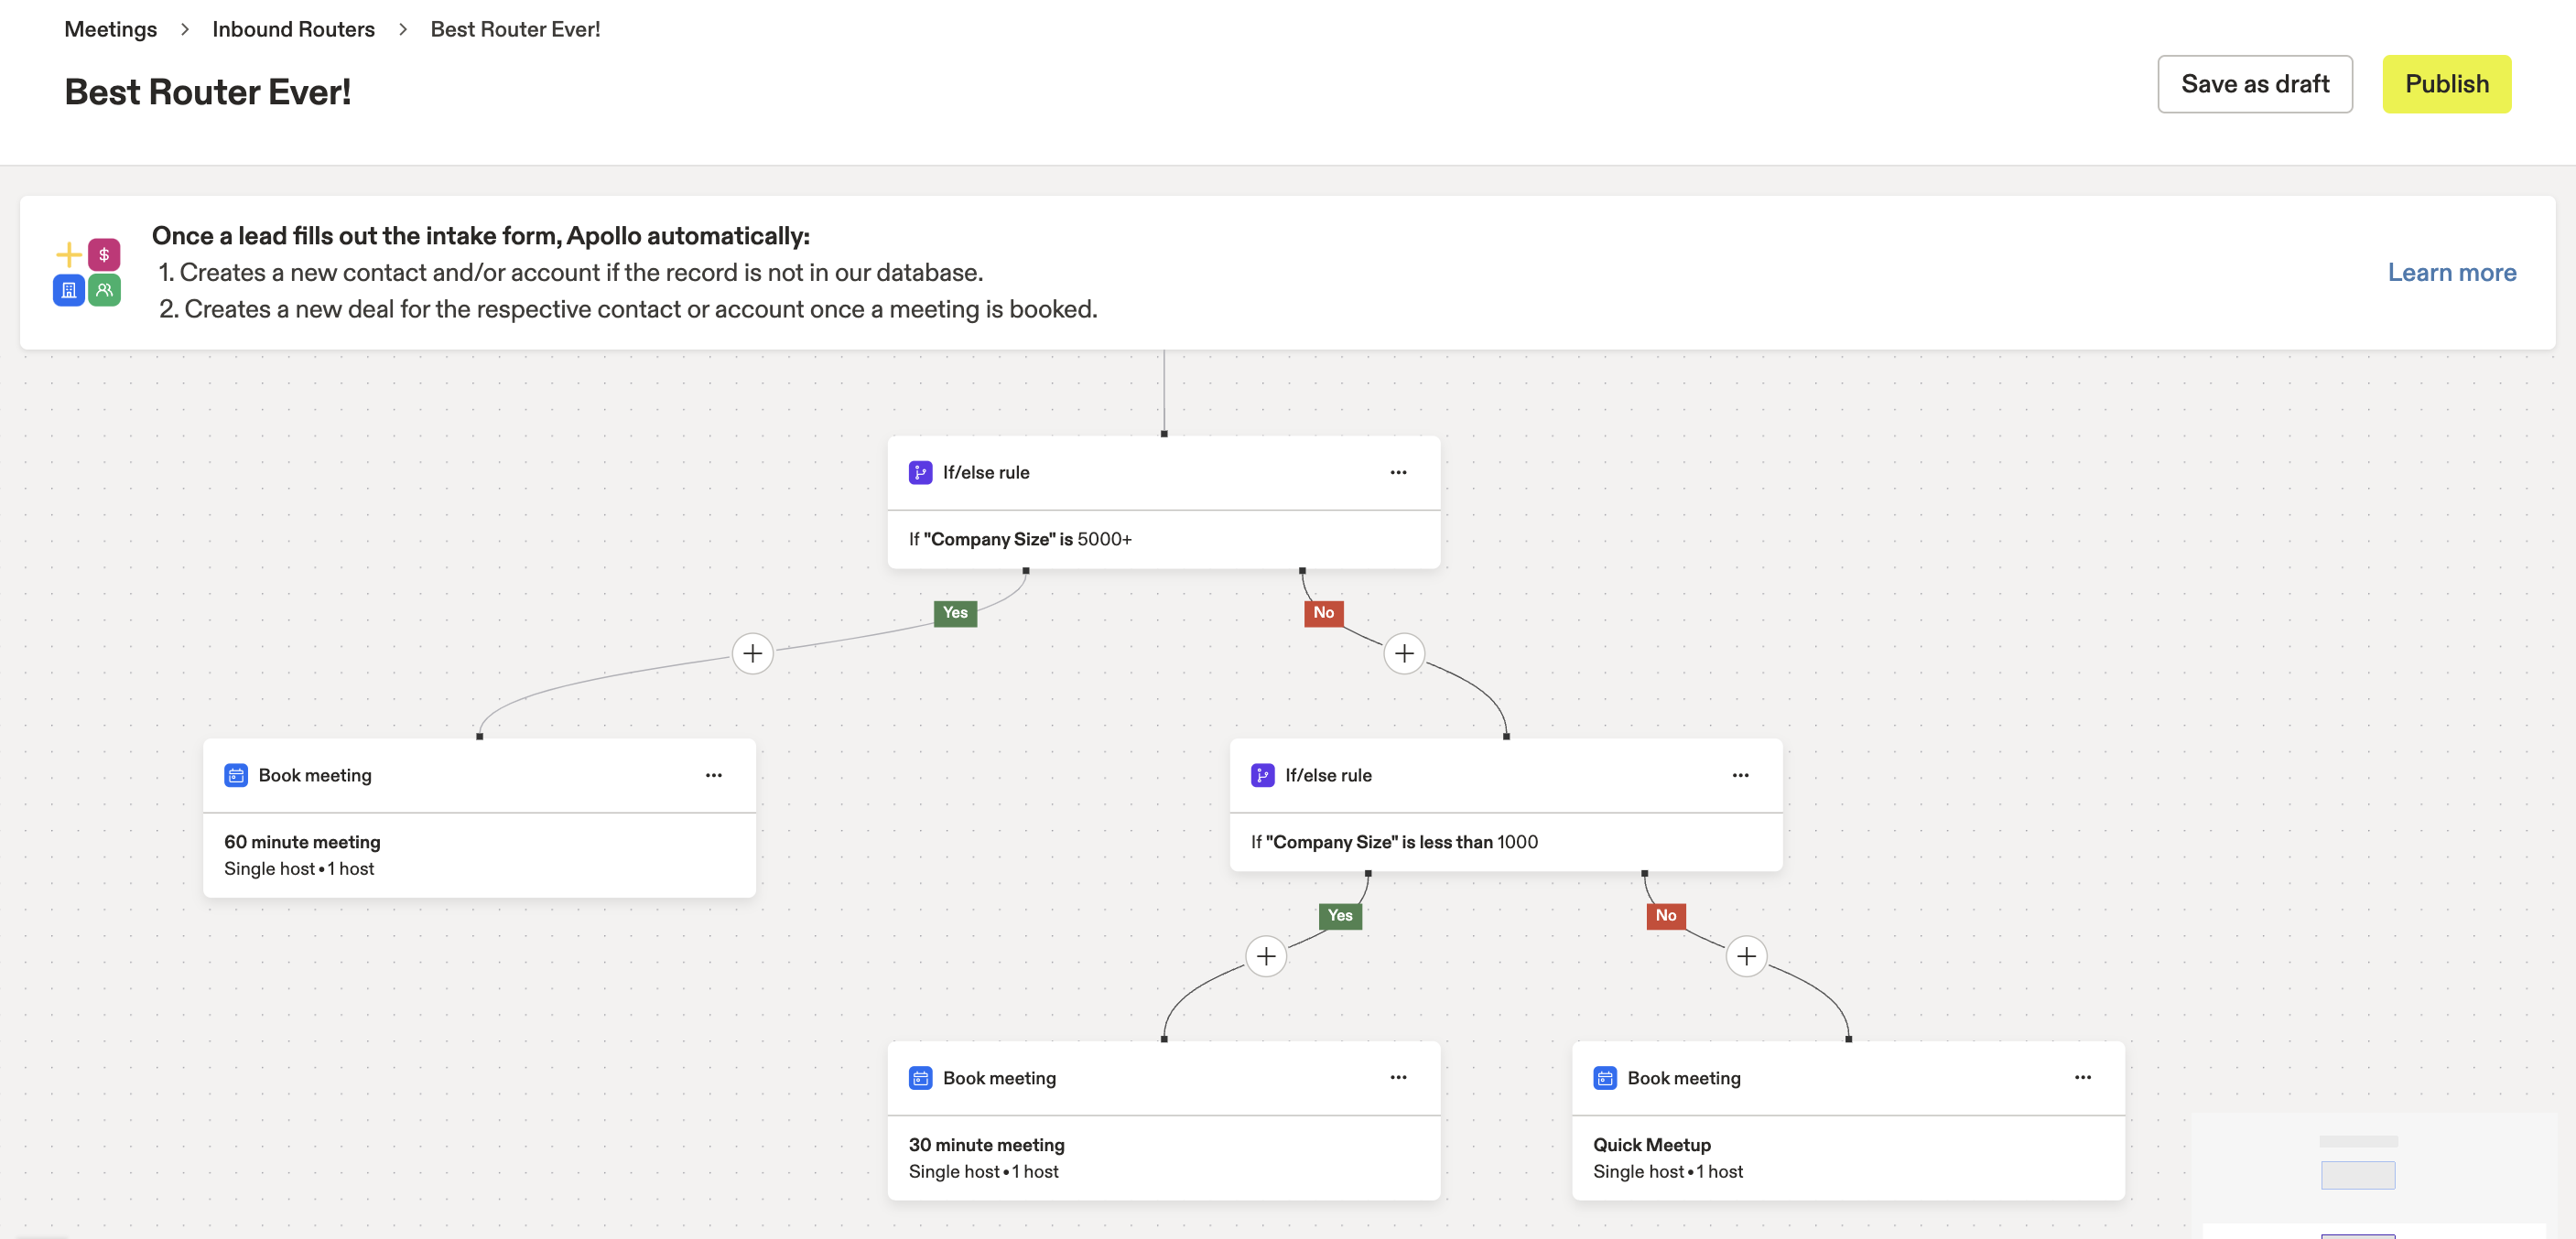
The if/else rule follows similar logic regardless of the input question. This means you can follow these steps to create inbound routers based on your needs. The following image shows what is possible when you add more paths.
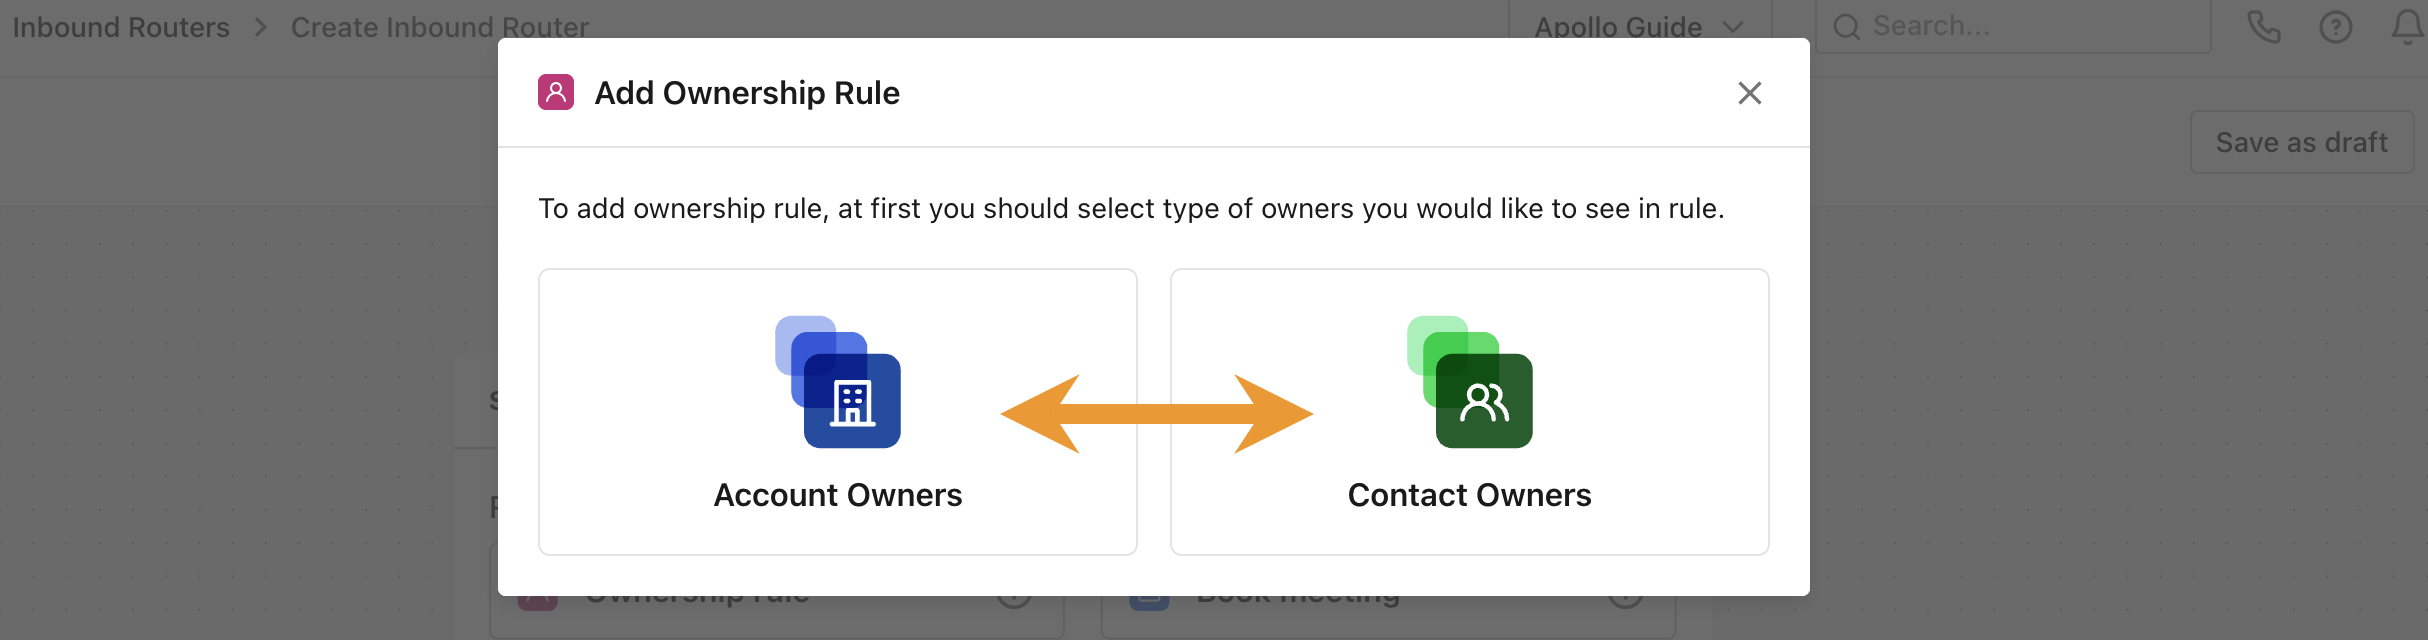
Ownership Rule: Route Prospects to Account/Contact Owners
The ownership rule enables you to route prospects to their existing account/contact owners in Apollo. Use this option to create a single yes/no path. The yes path always ends with the prospect scheduling a meeting with the appropriate account/contact owner.
With the ownership rule, Apollo checks the email address that a prospect enters in your intake form to determine the routing. If the email address is owned by an account/contact owner, the prospect follows the yes path and is able to book a meeting with that account/contact owner.
To use the ownership rule:
- When you add rules and actions, click Ownership rule.
- Choose either Account Owner or Contact Owner.
- (Optional) By default, all of your account/contact owners are added, which means prospects with a matching domain can book a meeting with them. If you don't want owners to be available via this path, toggle the slider off for them.

- (Optional) By default, Apollo sets the same standard meeting type for all account/contact owners under the ownership rule's yes path. The location of the meeting type (Zoom or Google Meet) is determined by the individual user's settings.
To change the details of standard meeting type for all owners, select the pencil icon in the default meeting type section. To instead set meeting types individually, select an option from the Meeting drop-down for each owner.
- Click Save. This creates your yes path. All prospects that are identified as matching an eligible account/contact owner will be able to schedule a meeting based on the options you selected.
- To finish your no path, select Add rule/action and choose from the routing options. If you want to create yes/no paths based on responses to the intake form, add an if/else rule.
- Review your inbound router to ensure everything looks good. Then, click Publish to activate the router.
Edit an Existing Inbound Router
To edit a published or in-progress inbound router, launch Apollo and click Meetings > Admin console. Click the inbound router, or click additional options (...) and then Edit.

Depending on where in the inbound router you edit, click the pencil icon or the ... button and click Edit. Then, make your changes and either save or publish your inbound router again.

You have now edited an inbound router in Apollo Meetings.
Delete an Inbound Router
To edit a published or in-progress inbound router, launch Apollo and click Meetings > Admin console. Click ..., then Delete.

In the warning pop-up, click Delete.
You have now deleted an inbound router in Apollo Meetings.