Overview
The Zoho integration is in beta and is only available to select users. Want early access? Reach out to Apollo support to join the beta.
If your team uses Zoho for a CRM, Apollo's integration with Zoho allows you to maintain data parity between both platforms. Use the integration to automatically sync contact and account data from your CRM, and choose when to sync data from Apollo to Zoho, reducing duplicative manual tasks and the risk of human error.
Check out the following sections to connect the Zoho integration.
Once connected, it can take some time for contacts and accounts to sync from Zoho to Apollo. The first record pull from Zoho takes about six hours. This gives your team time to configure integration settings.
You can only integrate one CRM with Apollo. If you already connected Salesforce or Hubspot, disconnect that integration before proceeding with Zoho.
Connect the Integration
You need permission to edit integration settings to configure integrations on Apollo. If you don't have permission, reach out to a team member for help.
To integrate Zoho with Apollo:
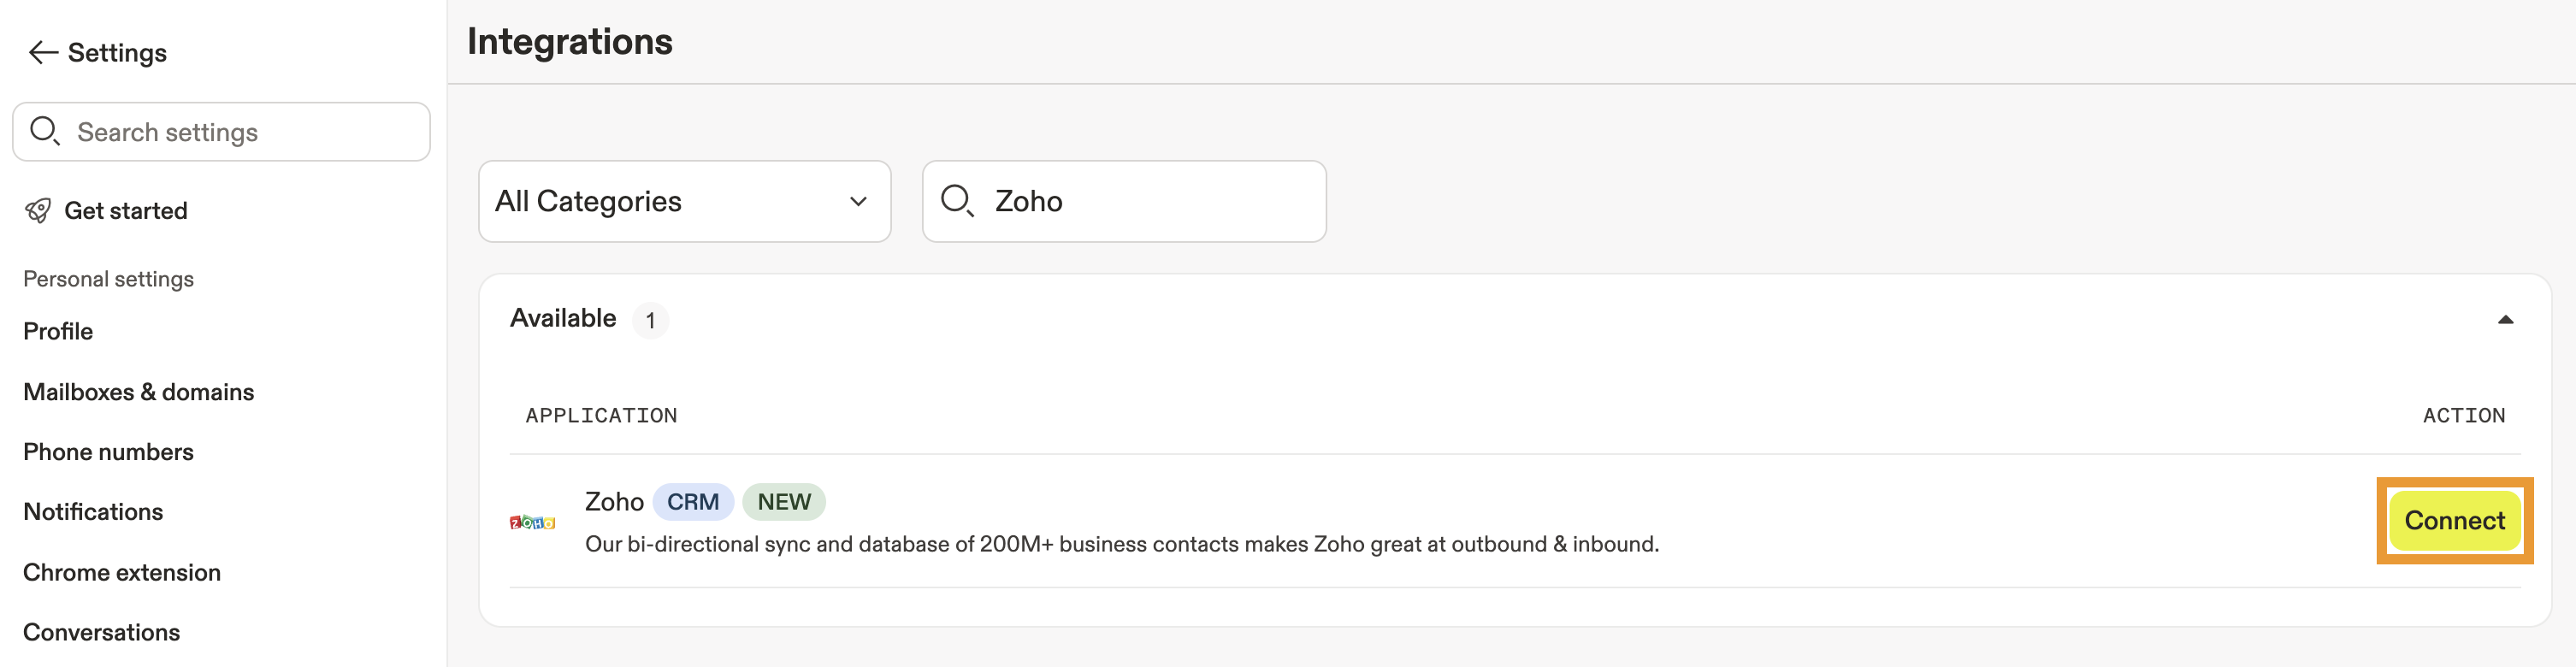
- Launch Apollo and click Settings > Integrations.
- Search for Zoho and click Connect.
- Review the account access and click Yes, Continue.
- If you haven't already, log in to your Zoho account. Review the permission settings, then click Accept.
You have now connected Zoho.
Next, map stages and fields and configure sync settings for the integration.
After connecting the integration, Apollo automatically pulls contacts and accounts from Zoho and de-duplicates them in Apollo. To control which records your team can view while prospecting in Apollo, configure record visibility in the sync settings.
Map Fields and Stages
Map fields and stages between Apollo and Zoho to ensure your data is represented correctly across both platforms.
Correctly mapping your fields allows you to sync data to Apollo to enrich your records. Fields left unmapped may not sync correctly.
When you connect your Zoho account, Apollo automatically syncs the following fields with Zoho by default:
| Sync type | Synced data |
|---|---|
| Apollo contact push |
|
| Apollo account push |
|
| Zoho contact pull |
|
| Zoho account pull |
|
Apollo auto-maps all the related fields found in Zoho, but you can make adjustments to the default field mapping, as well as map additional default and custom fields.
To map more fields:
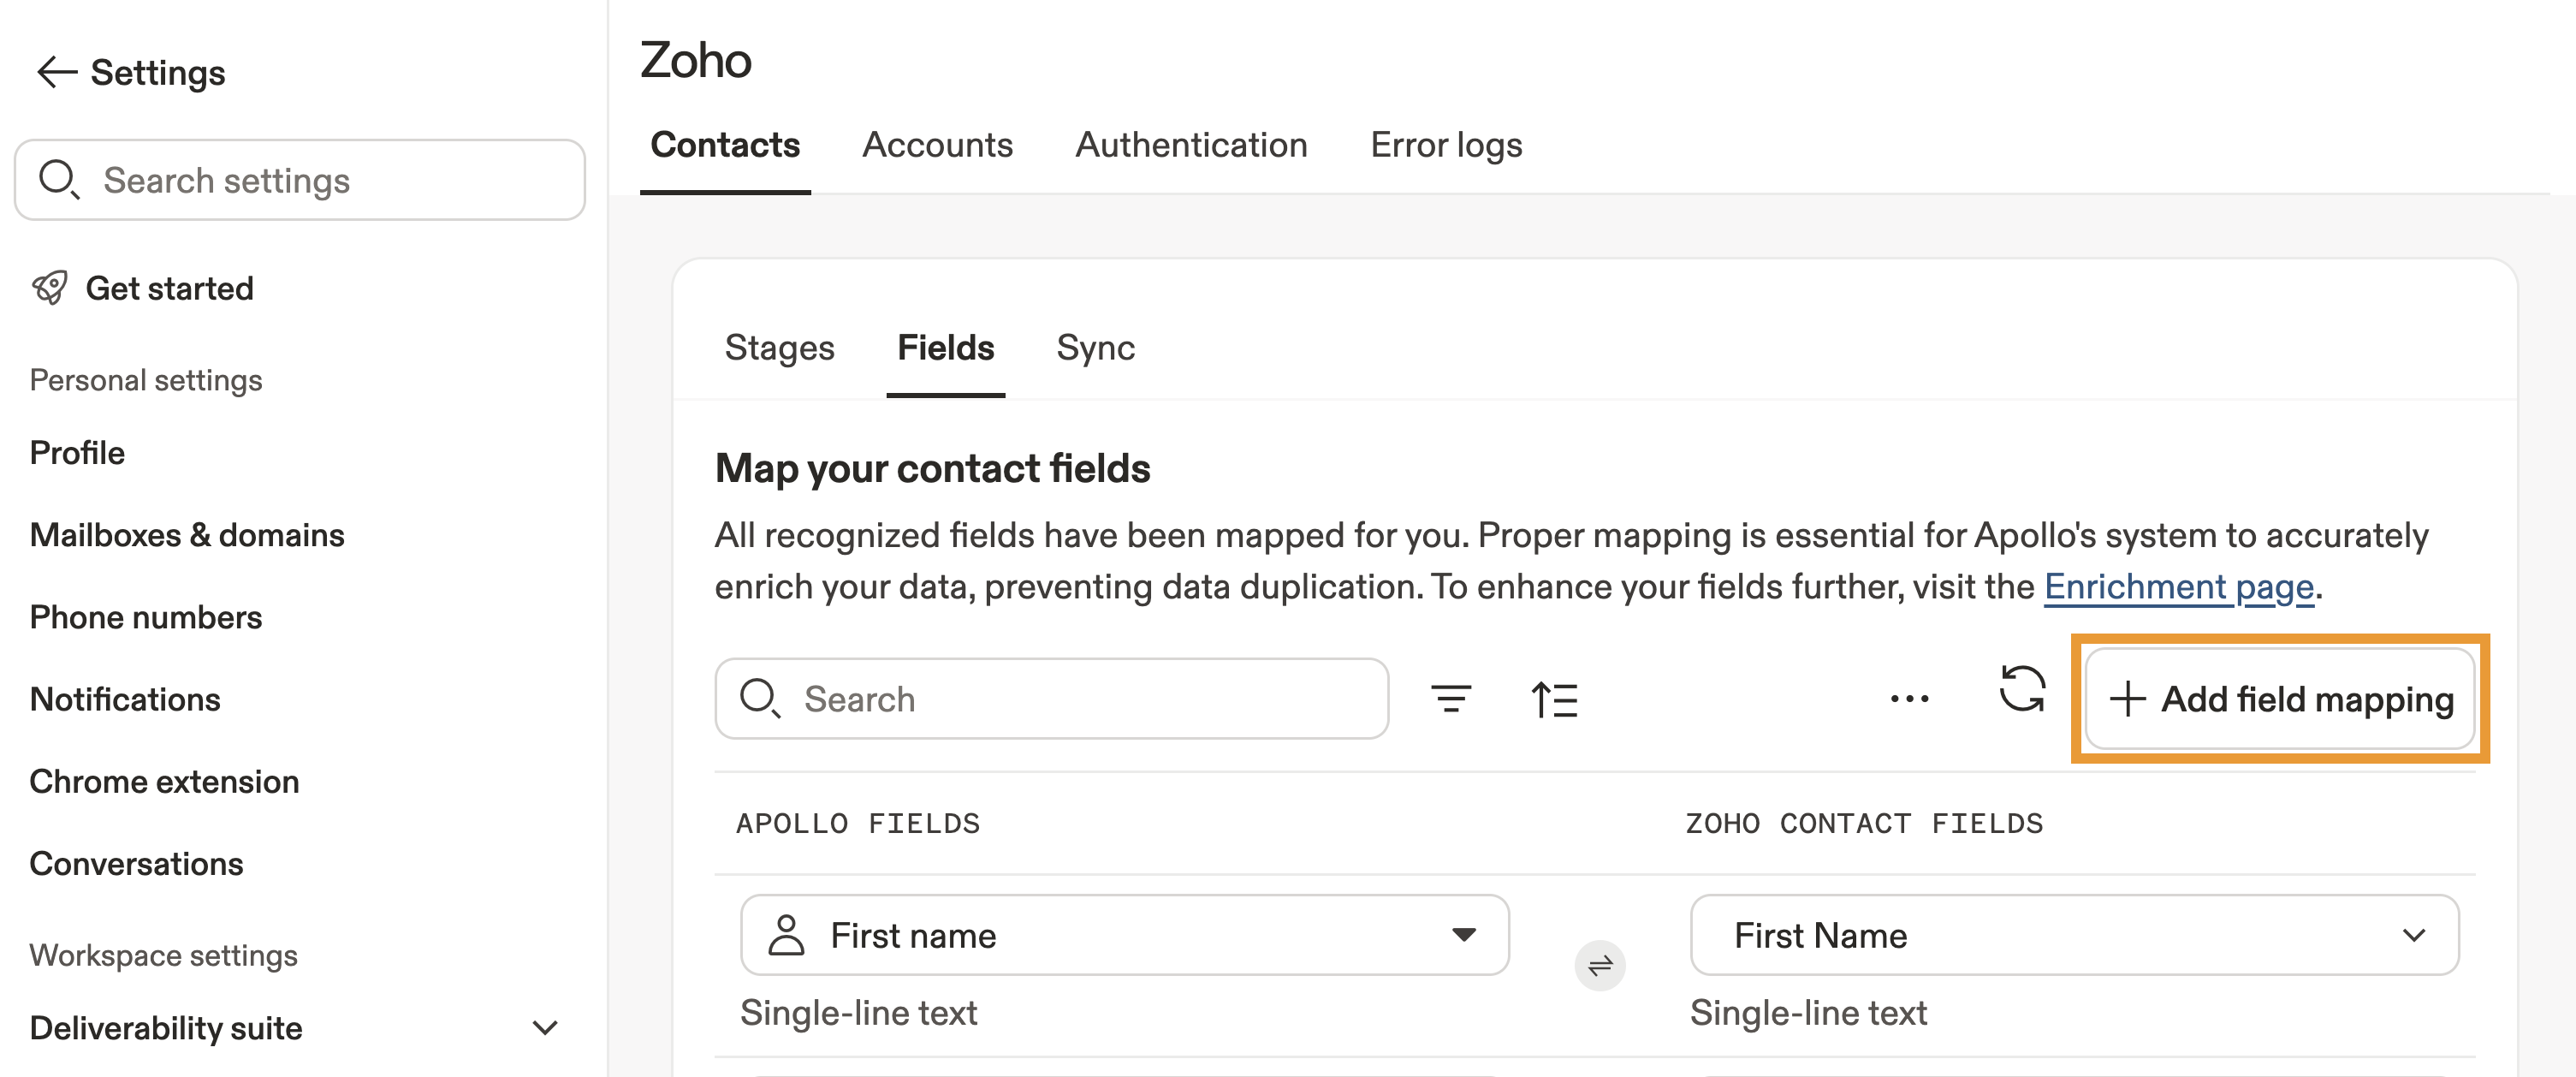
- Launch Apollo and click Settings > Integrations.
- Click View beside Zoho.
- Click Contacts or Accounts > Fields.
- Apollo automatically maps all recognized fields for you. Click Add field mapping to map additional fields, such as custom fields.
The do not call field syncs a contact's stored DNC status between Apollo and Zoho. To use this field, you must first enable DNC phone screening on Apollo.
Apollo only syncs the DNC status already stored for the contact. Apollo doesn't run a live DNC check during CRM sync.
- Check the Apollo or Zoho fields you want to map, then click Add fields.
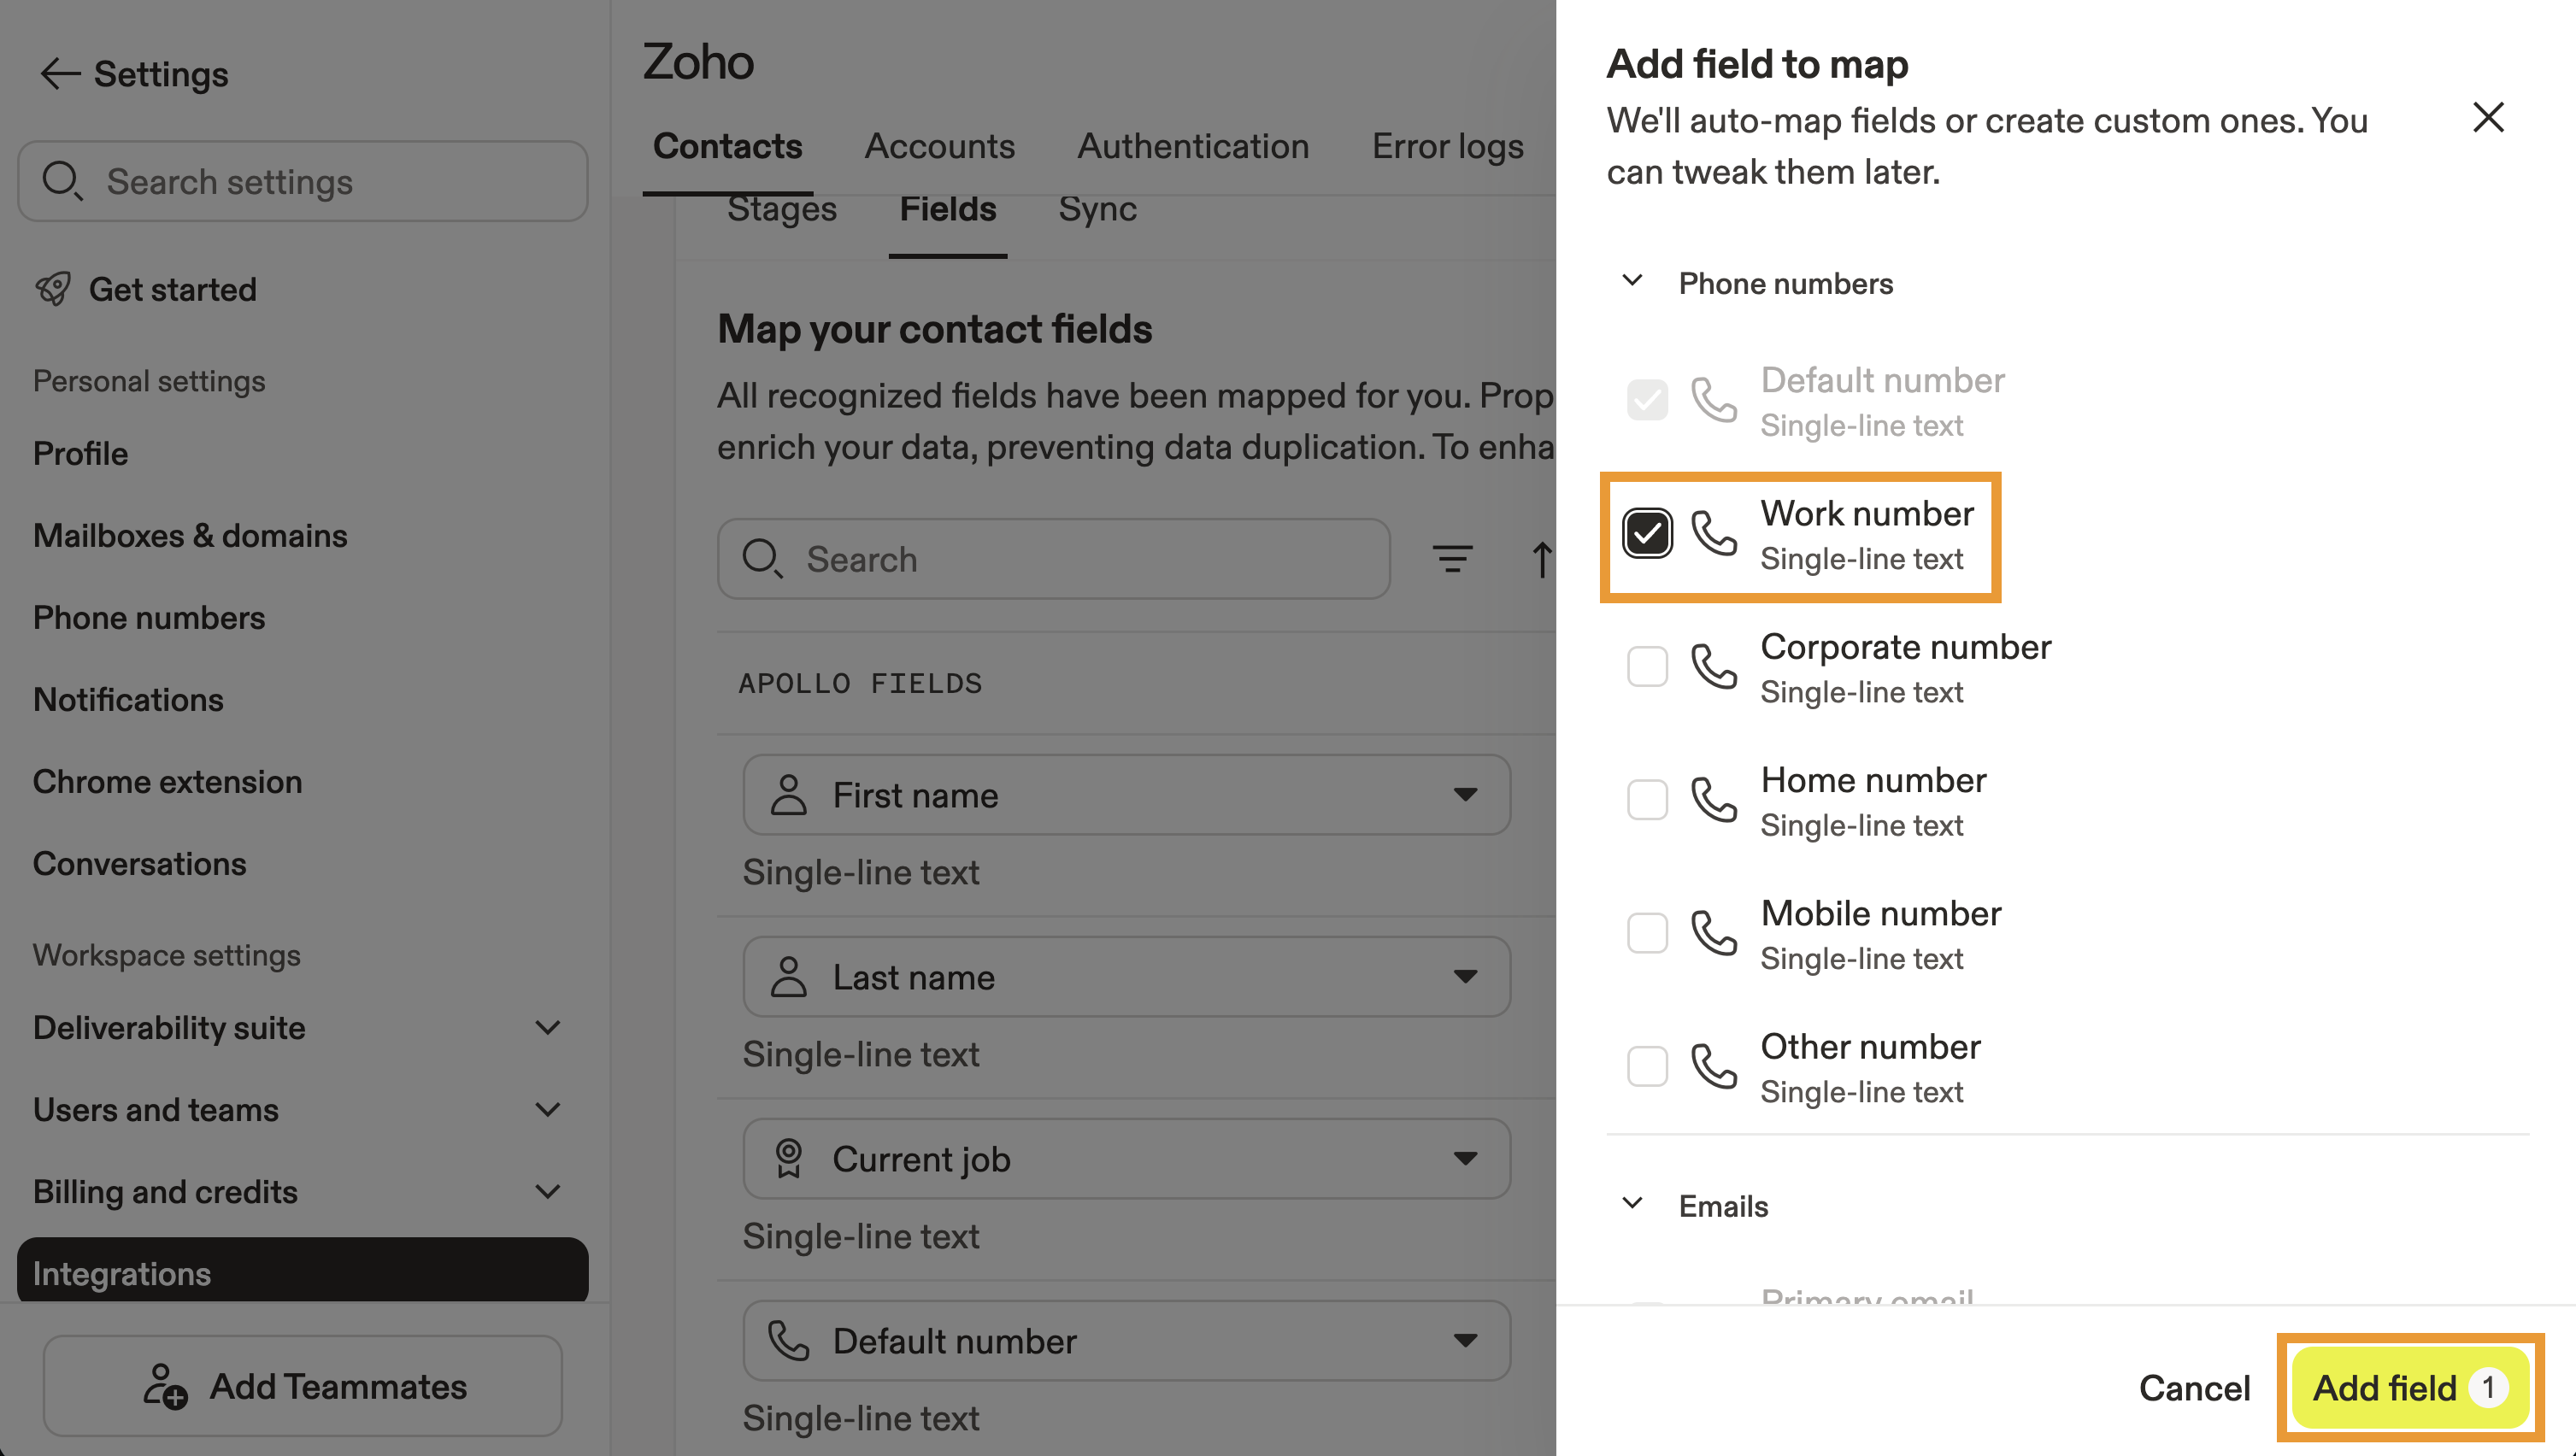
- Map the field to the corresponding Apollo or Zoho field.
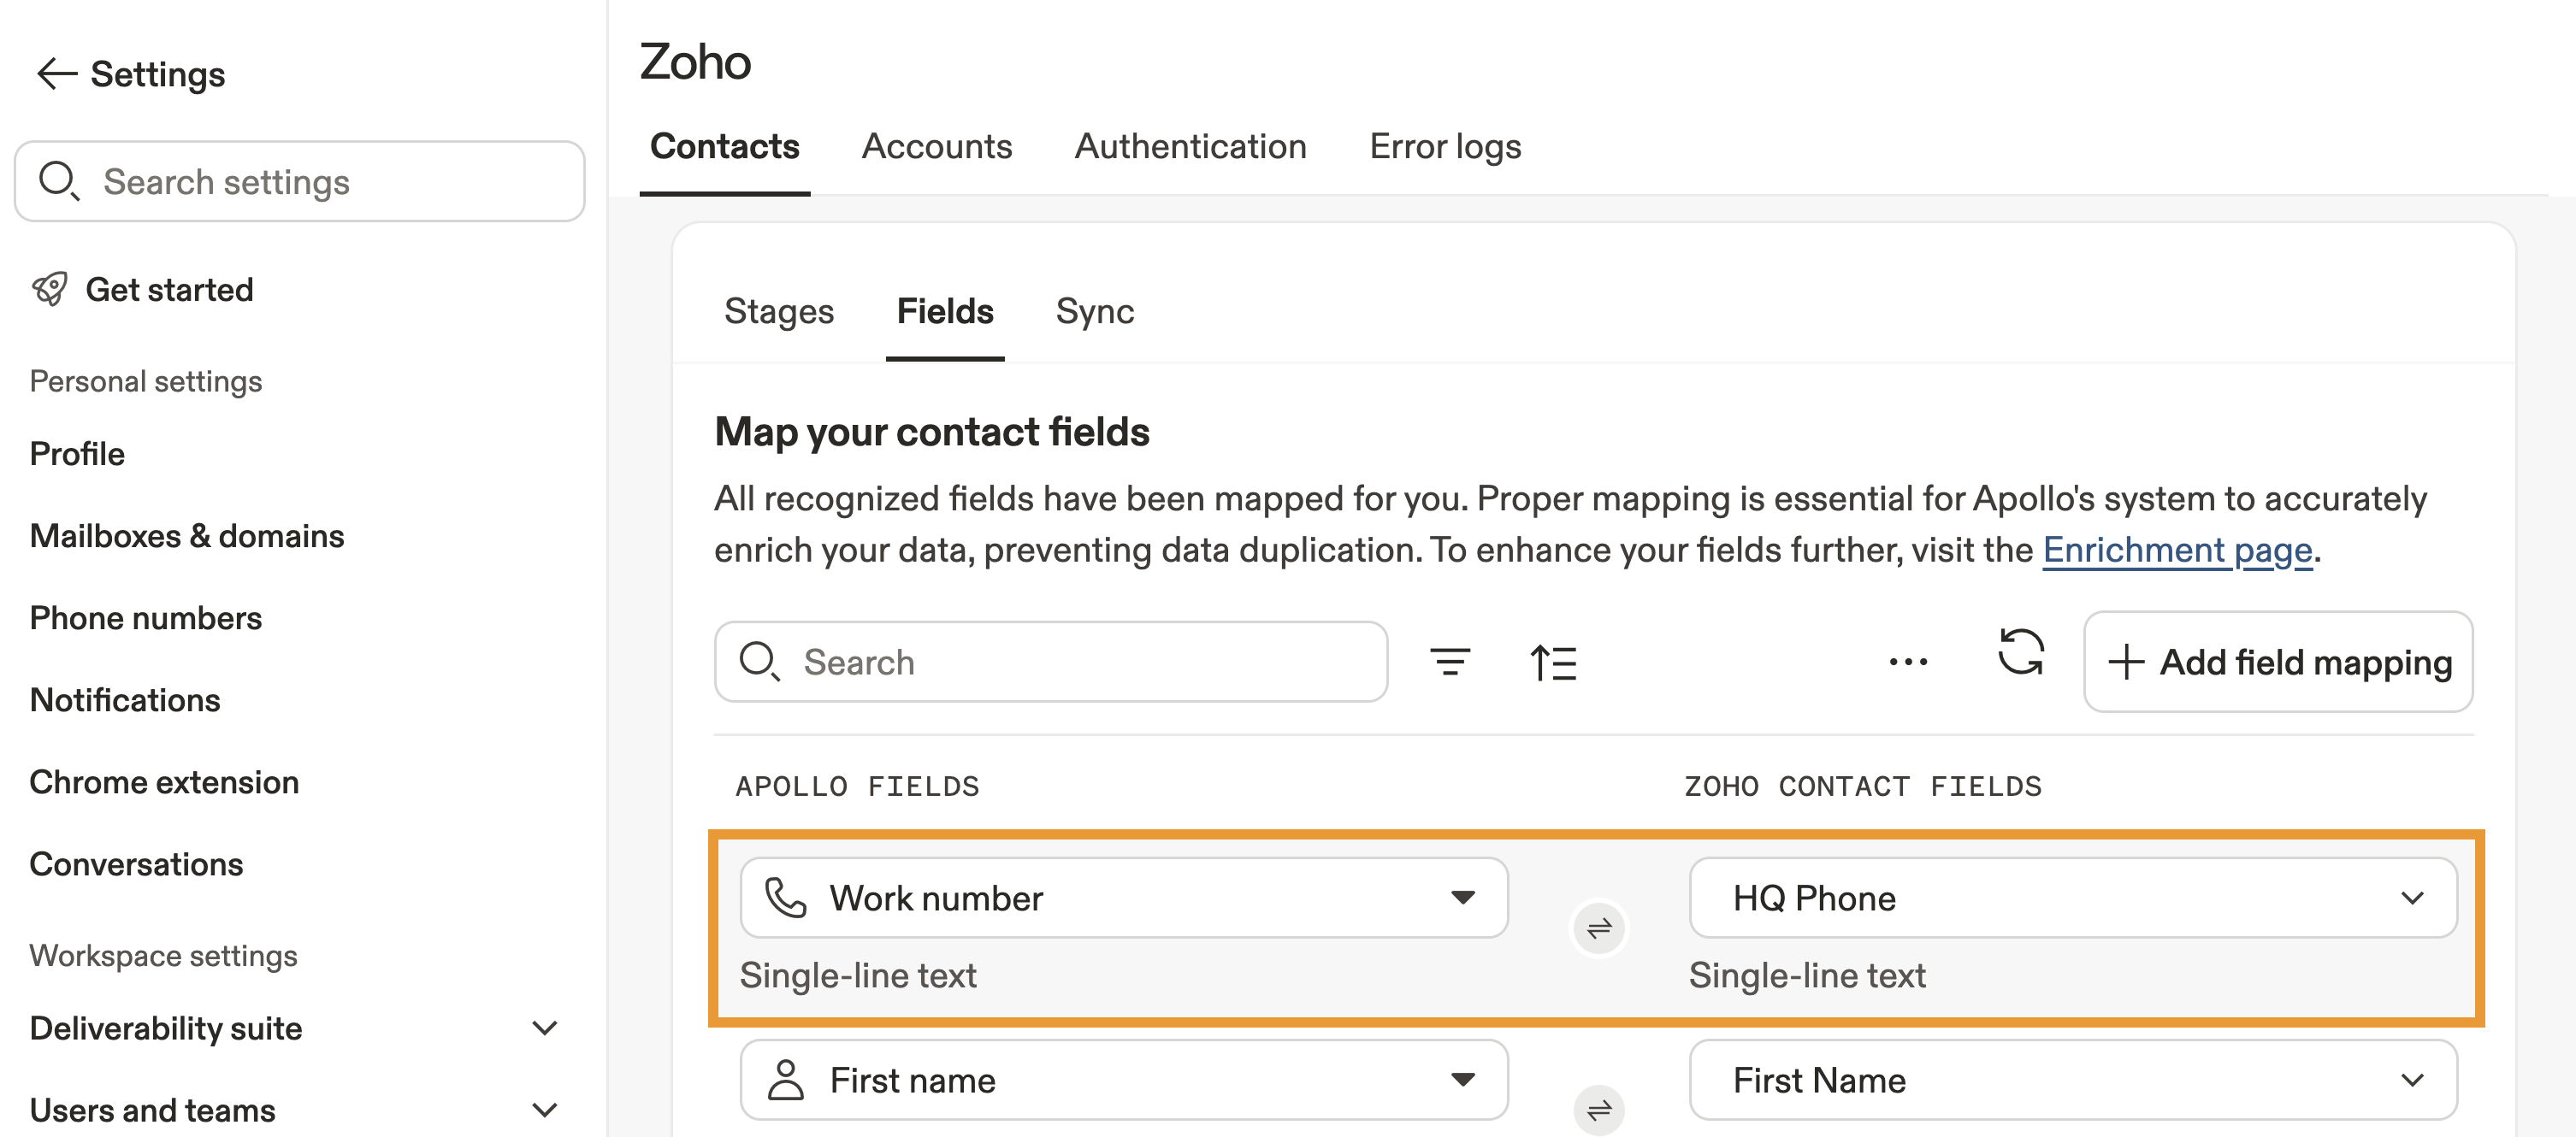
- Repeat this process for any other fields you want to map, then click Save.
You have now updated the field mapping for the Zoho integration.
Next, map stages for the integration.
Map Apollo stages to Zoho statuses to track where Zoho contacts or accounts are in your sales pipeline. Then you can reliably filter by stage when prospecting or engaging in Apollo.
Map stages automatically with auto-map, then make adjustments as necessary, or manually map all stages.
If an unmapped value from Zoho doesn't match a stage in Apollo, Apollo automatically creates a stage and maps the two together. If the value matches an existing stage, but that stage is already mapped to a different value, Apollo won't map the Zoho field to the existing stage and won't create a new stage to match the two since that would create a duplicate of an existing stage.
To map stages:
- Launch Apollo and click Settings > Integrations.
- Click View beside Zoho.
- Click Contacts or Accounts > Stages.
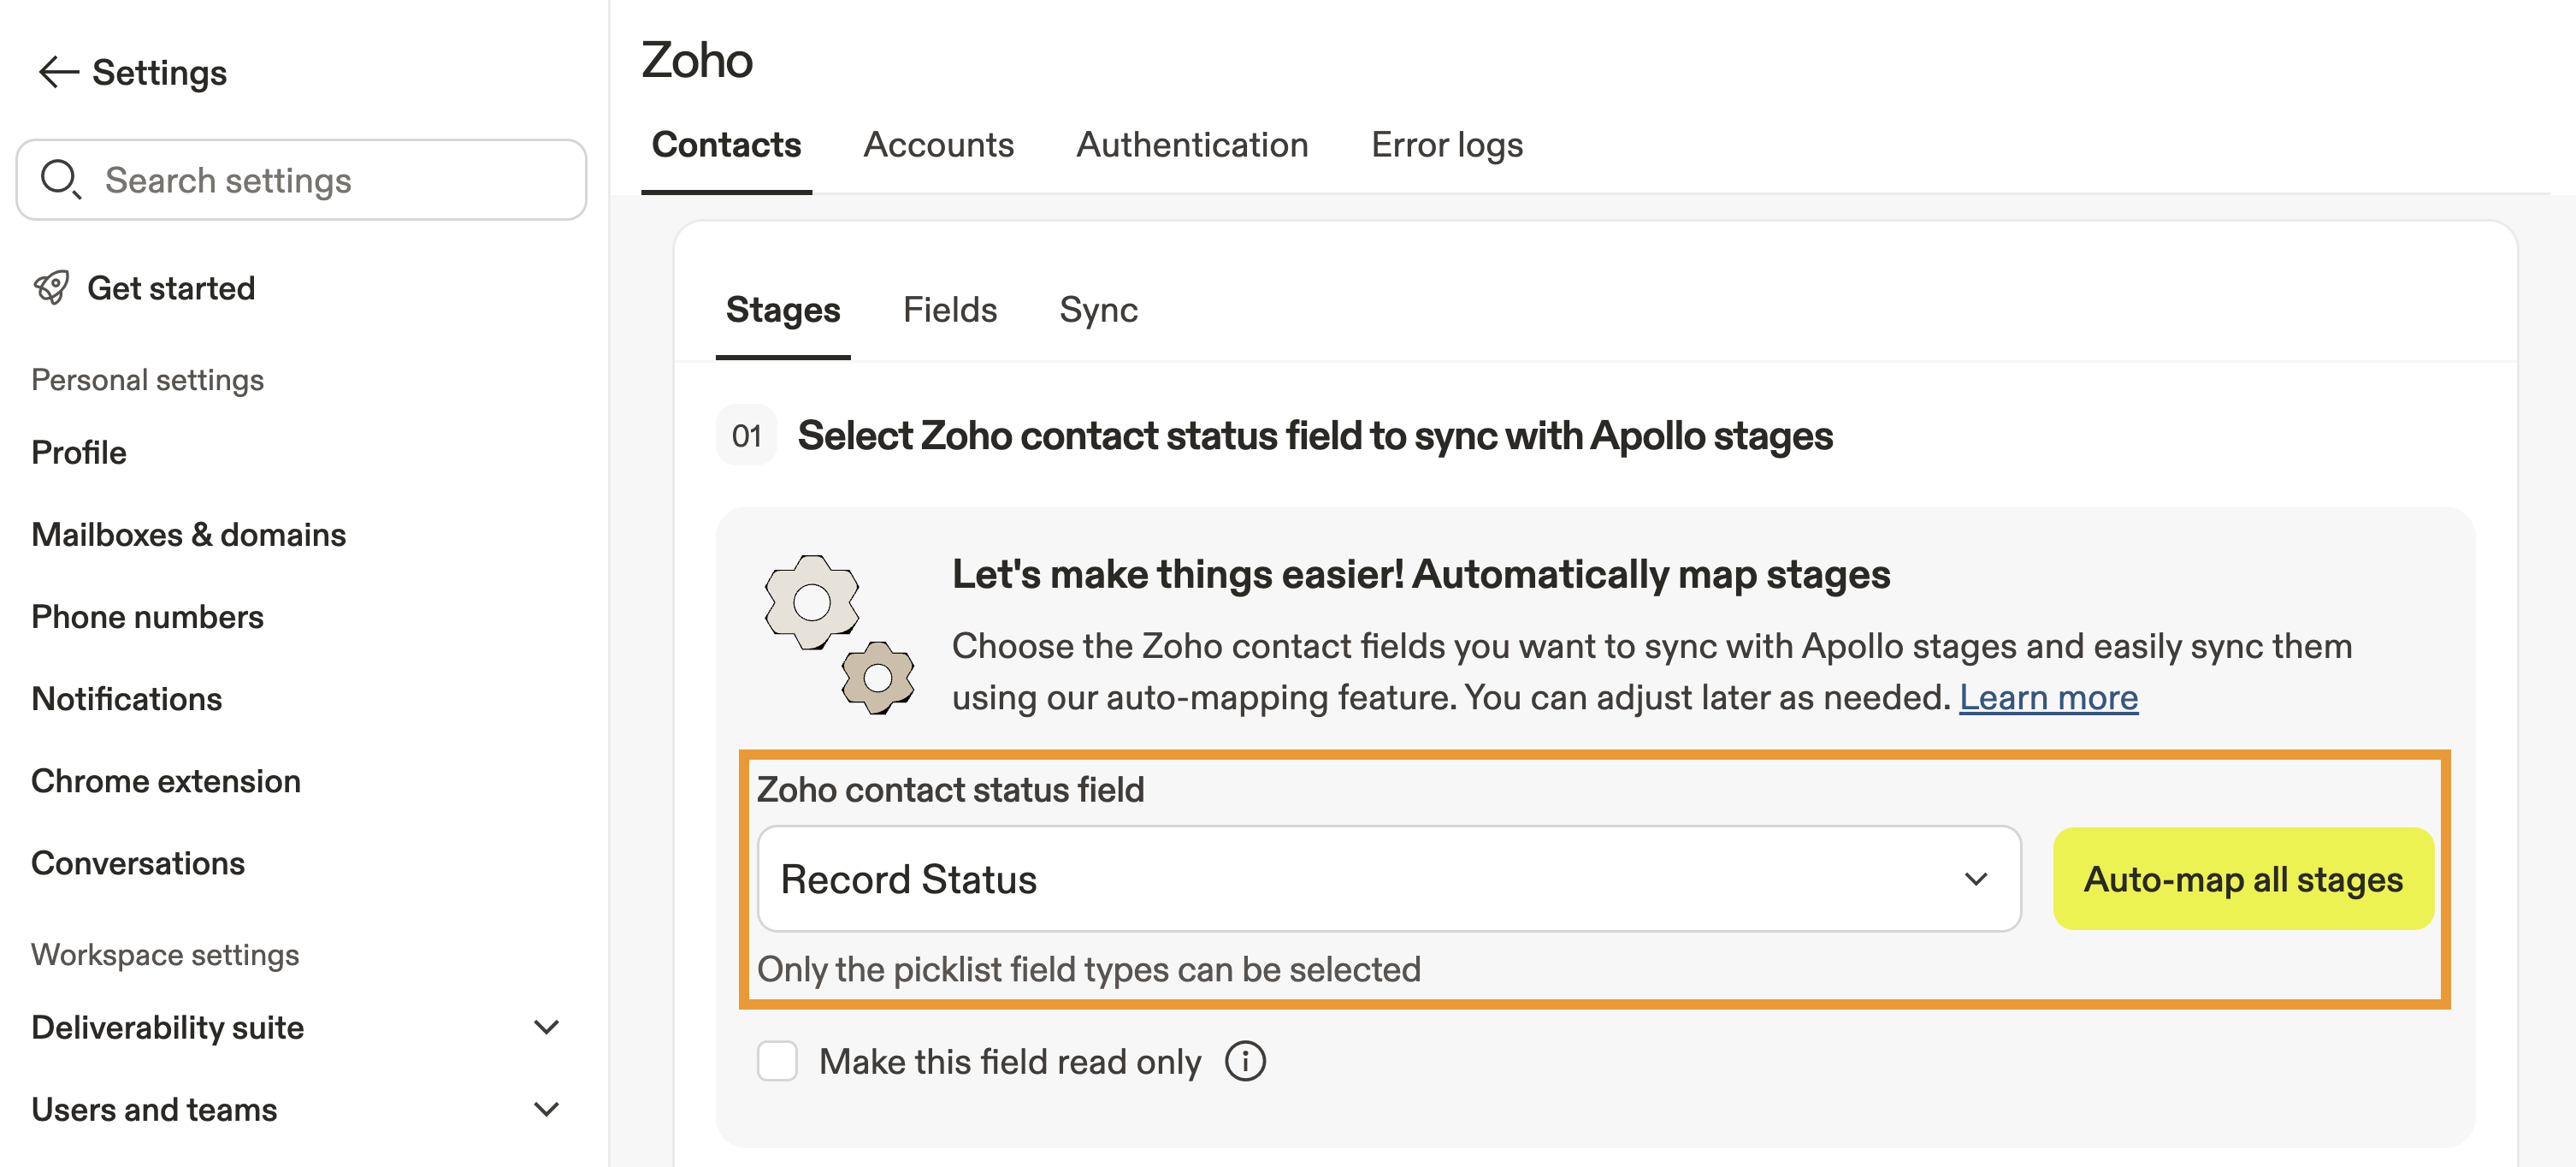
- Select a contact status field to sync with Apollo stages. Select a field from the dropdown, then click Auto-map all stages.
- Apollo automatically maps the status field you selected. Repeat this process for any additional mappings you want to create.
- Next, map contact stages manually by selecting a corresponding Zoho stage.
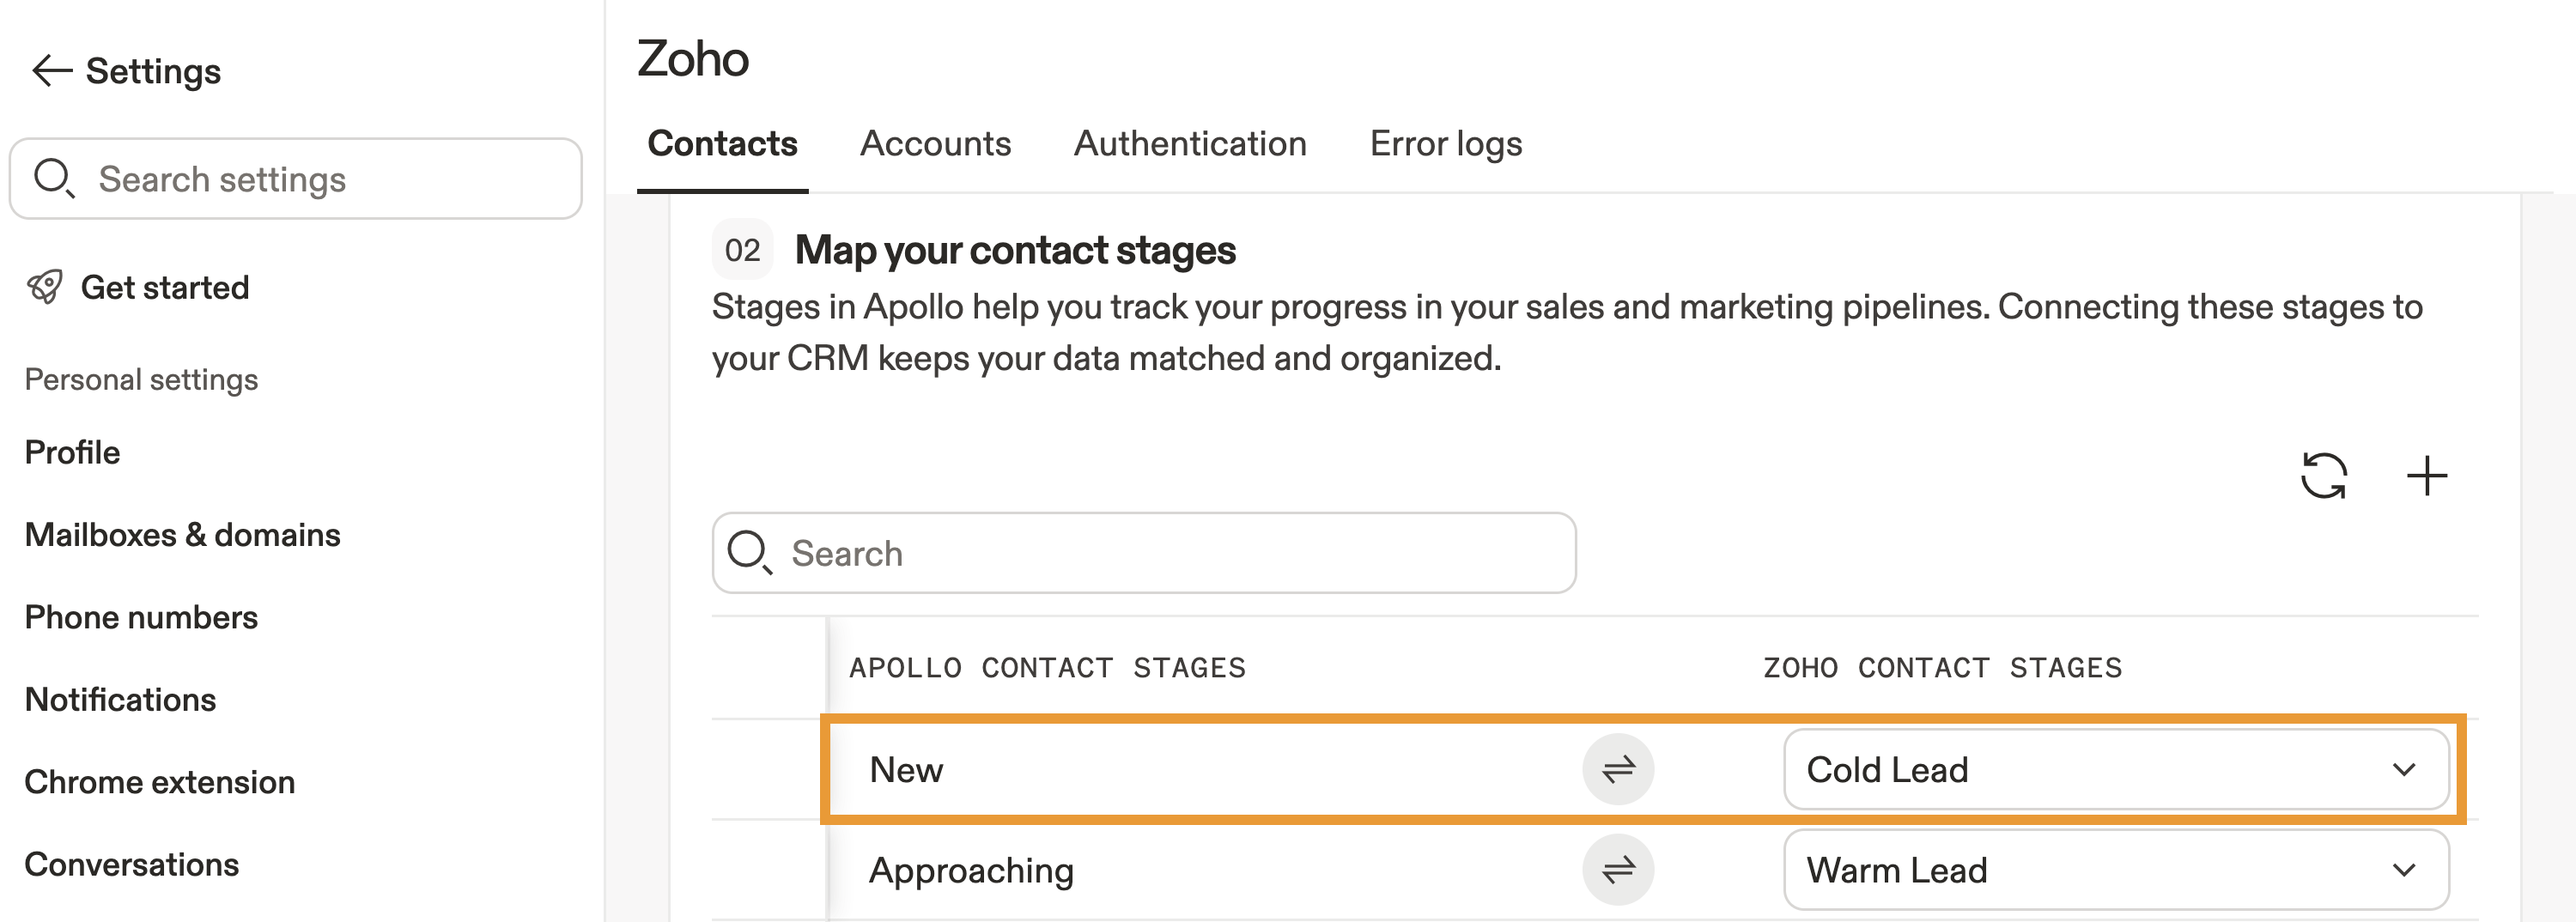
- Repeat this process for any other stages you want to map, then click Save.
Only map one Apollo stage to one Zoho status and vice versa. If you try to map the same Apollo stage to multiple Zoho statuses, or the same Zoho status to multiple Apollo stages, the integration may not function correctly and contacts could be assigned to unexpected stages.
After mapping stages, if you need to change the name of a Zoho status, delete a status, or add a new status, update your mapping in Apollo. If you delete a status in Zoho, delete the Apollo stage to which you mapped it and move the contact or accounts to an active stage.
You have now mapped stages for the Zoho integration.
Next, configure sync settings for the integration.
Configure Sync Settings
The first record pull from Zoho takes about six hours. This gives your team time to configure sync settings.
Apollo automatically pulls contacts and accounts from Zoho. You can configure when Apollo pushes data to Zoho and manage record visibility for contacts and accounts synced from Zoho.
To configure sync settings:
- Launch Apollo and click Settings > Integrations.
- Click View beside Zoho.
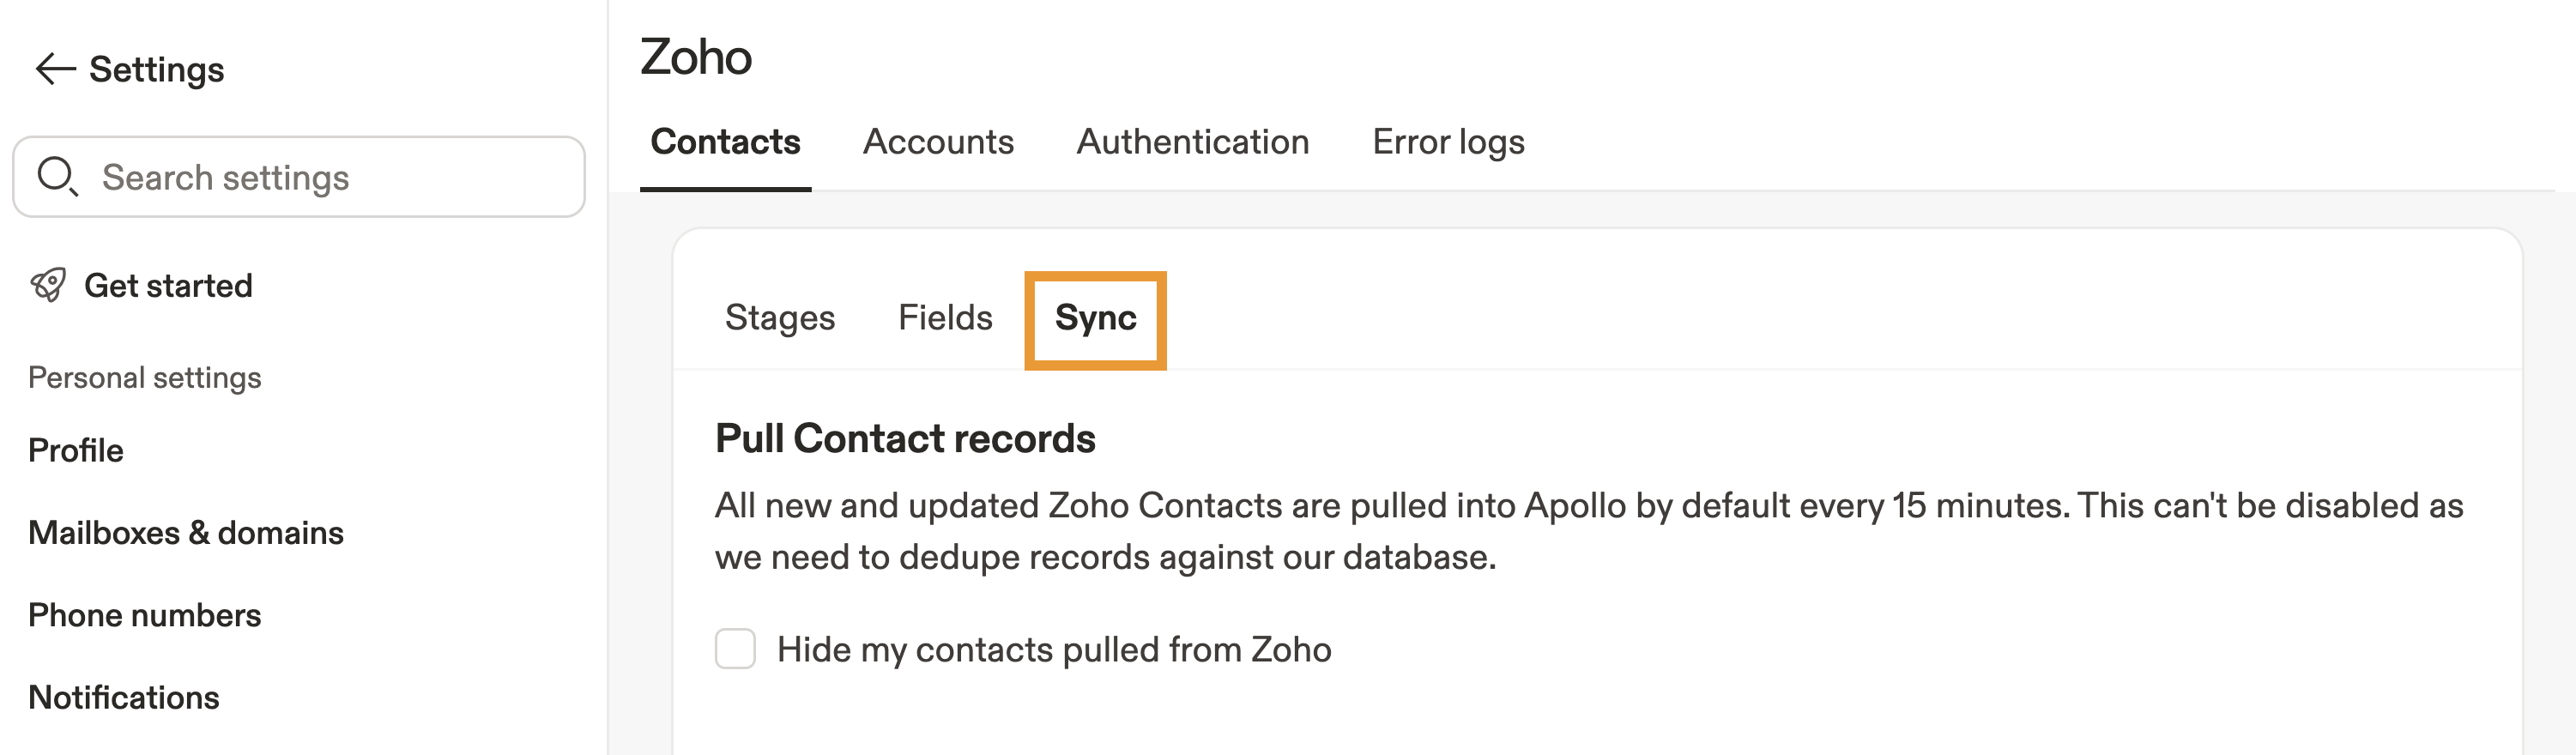
- Click Contacts or Accounts, then click Sync.
- Check Push Contacts or Push Accounts to automatically push newly created records to Zoho. This updates any contacts or accounts in Zoho whenever a field in Apollo changes. When Apollo pushes a contact, it also syncs the contact's account if it isn't already in Zoho.
With Push contacts or Push accounts unchecked, it isn't possible to manually push a prospect to Zoho.
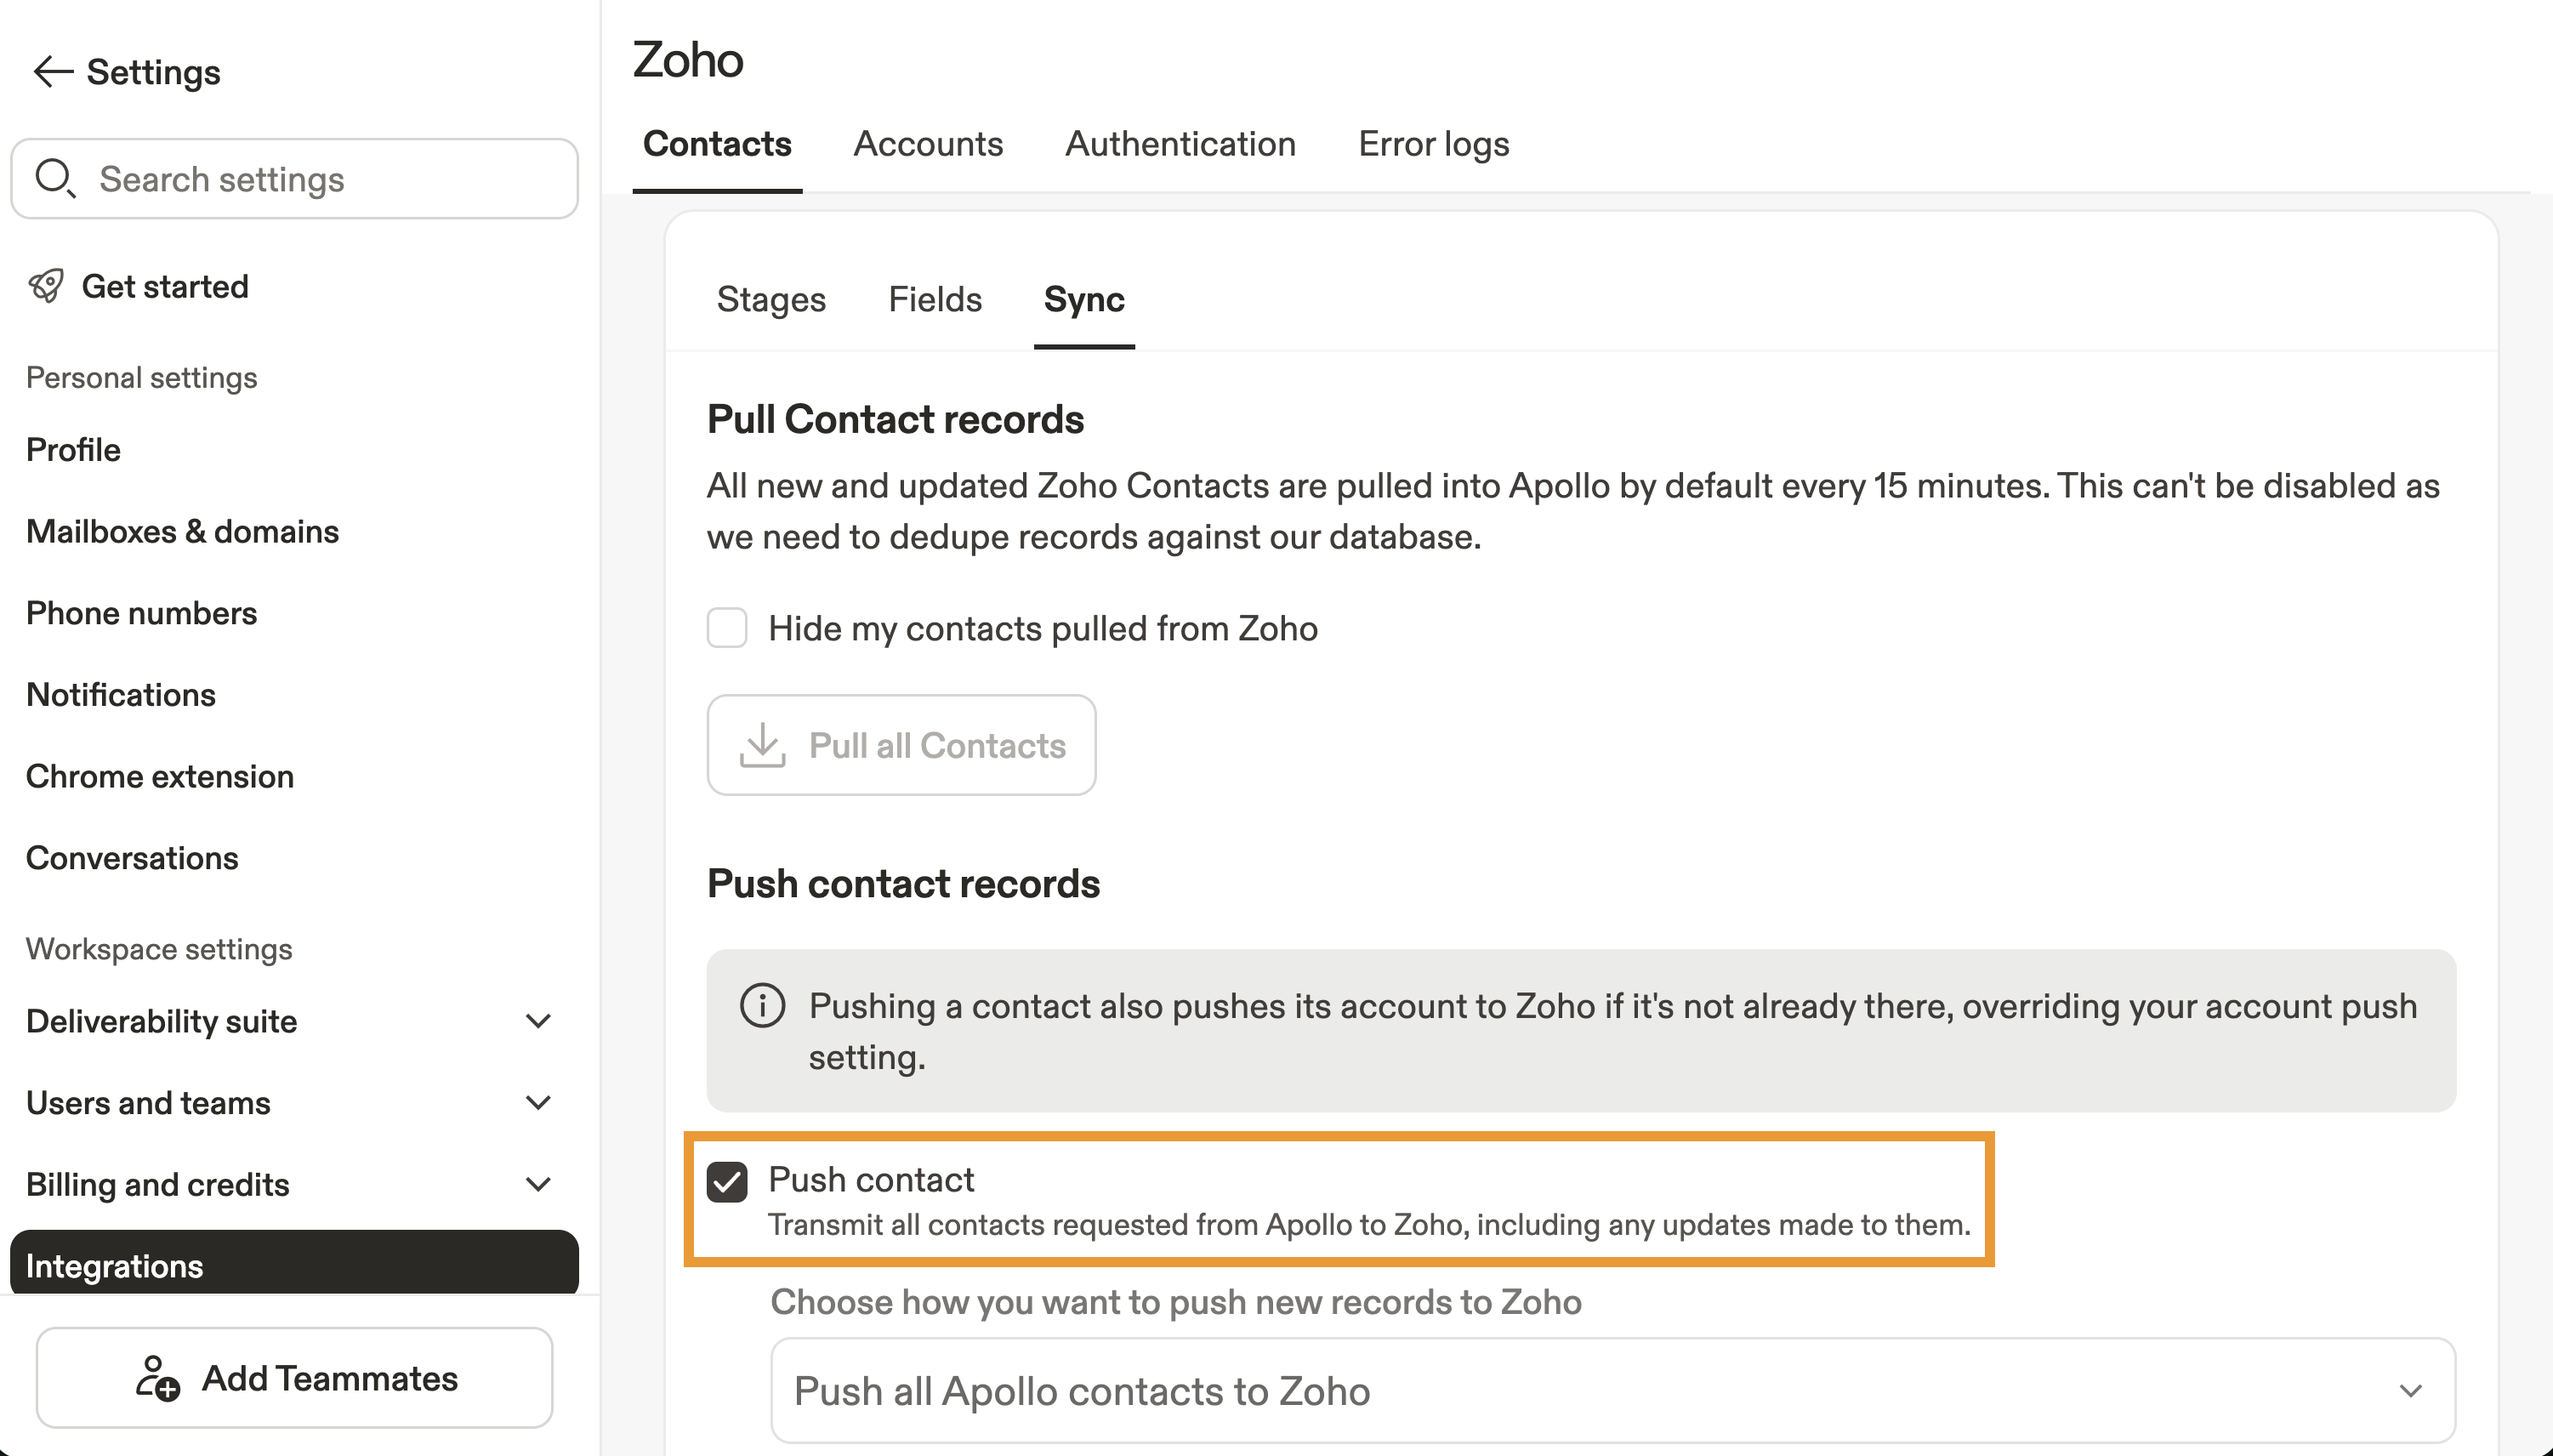
- (Optional) For contacts, choose from the dropdown whether to push all contacts or Only create contacts in Zoho if at certain stages, then select one or more stages. This means you only push contacts from Apollo on the stages you select. This may be useful for pushing interested or warm leads only, so you don't clutter up your CRM.
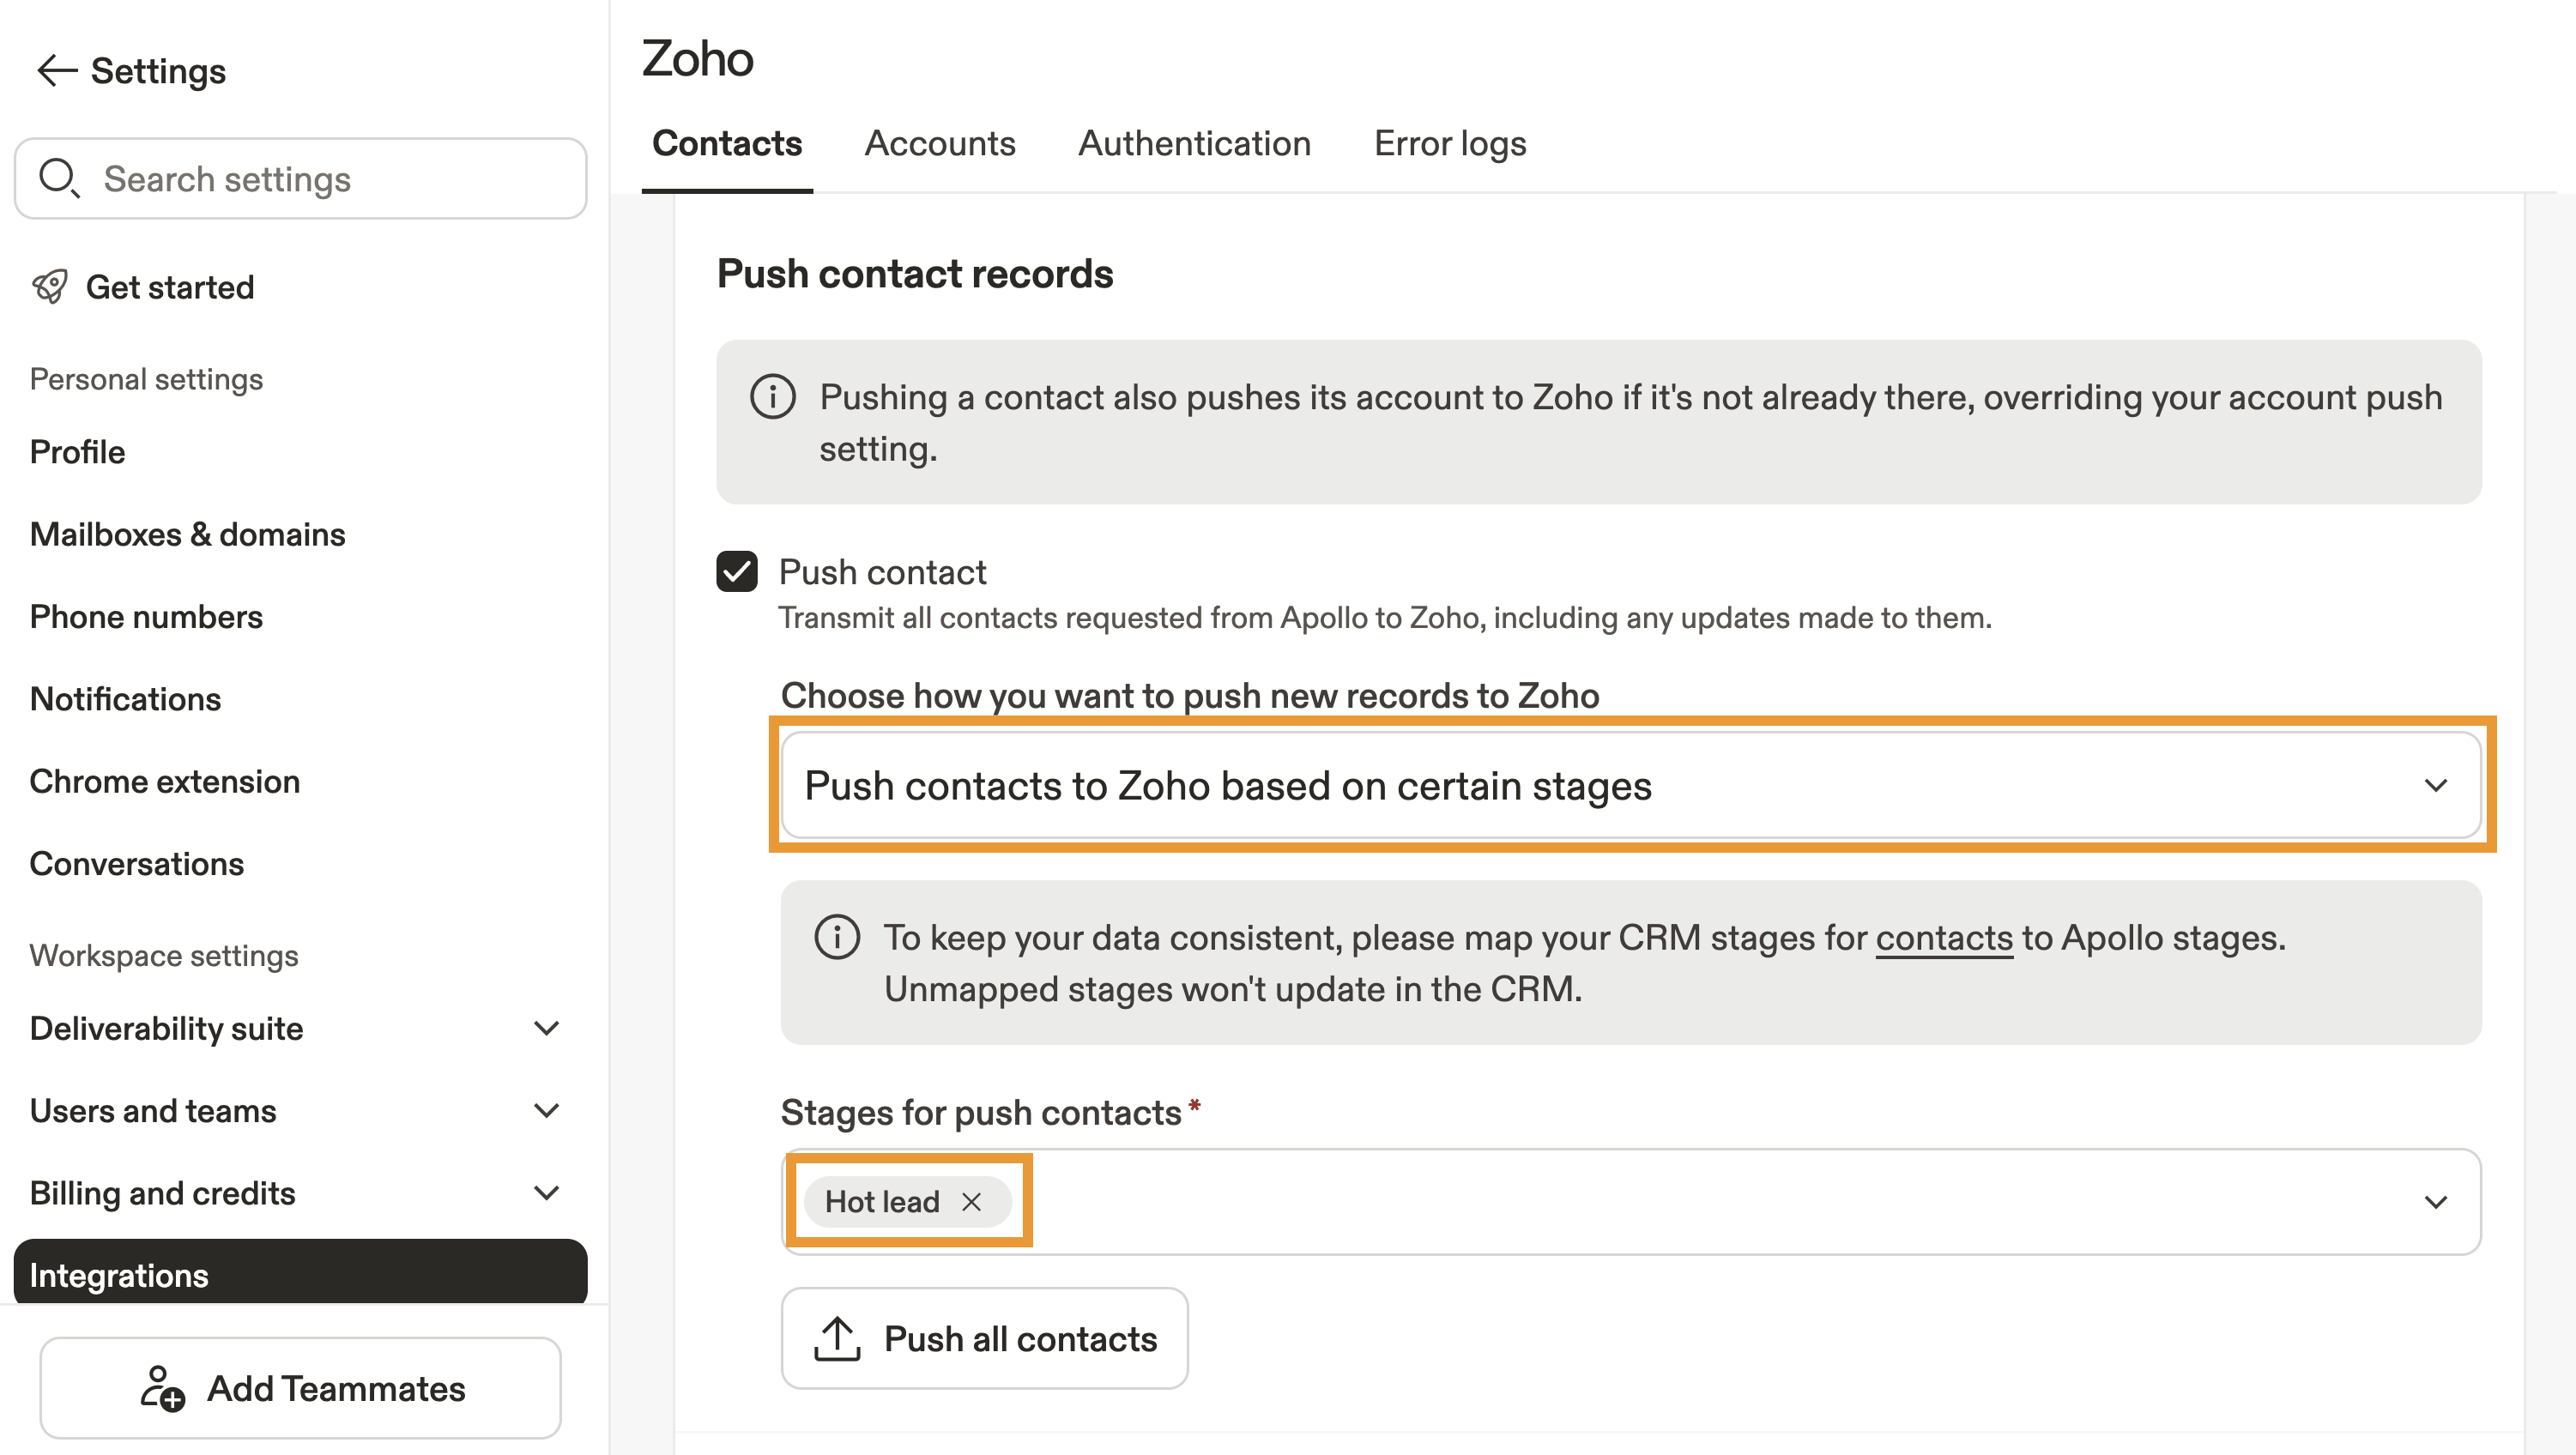
- When finished, click Save.
You have now configured push settings for the Zoho integration.
Record Visibility
Apollo enables record visibility by default so your team can search for and view Zoho records in Apollo. You can deactivate this setting if you don't want your team to view contacts and accounts synced from Zoho when prospecting in Apollo.
To update record visibility:
- Launch Apollo and click Settings > Integrations.
- Click View beside Zoho, then click > Contacts or Accounts > Sync.
- Check Hide my contacts pulled from Zoho, then click Save.
You have now configured record visibility for the Zoho integration.
Manually Sync from Zoho
The initial sync from Zoho can take a few hours. If a sync is in progress, starting manual sync restarts the process and delays completion time.
When you connect your account, Apollo automatically pulls contacts and accounts from Zoho. However, you can also manually sync your records from Zoho. This may be useful if you've made mapping or sync setting changes and want to retroactively apply the changes to all records.
To manually sync from Zoho:- Launch Apollo and click Integrations.
- Scroll to Zoho and click View.
- Click Contacts or Accounts > Sync.
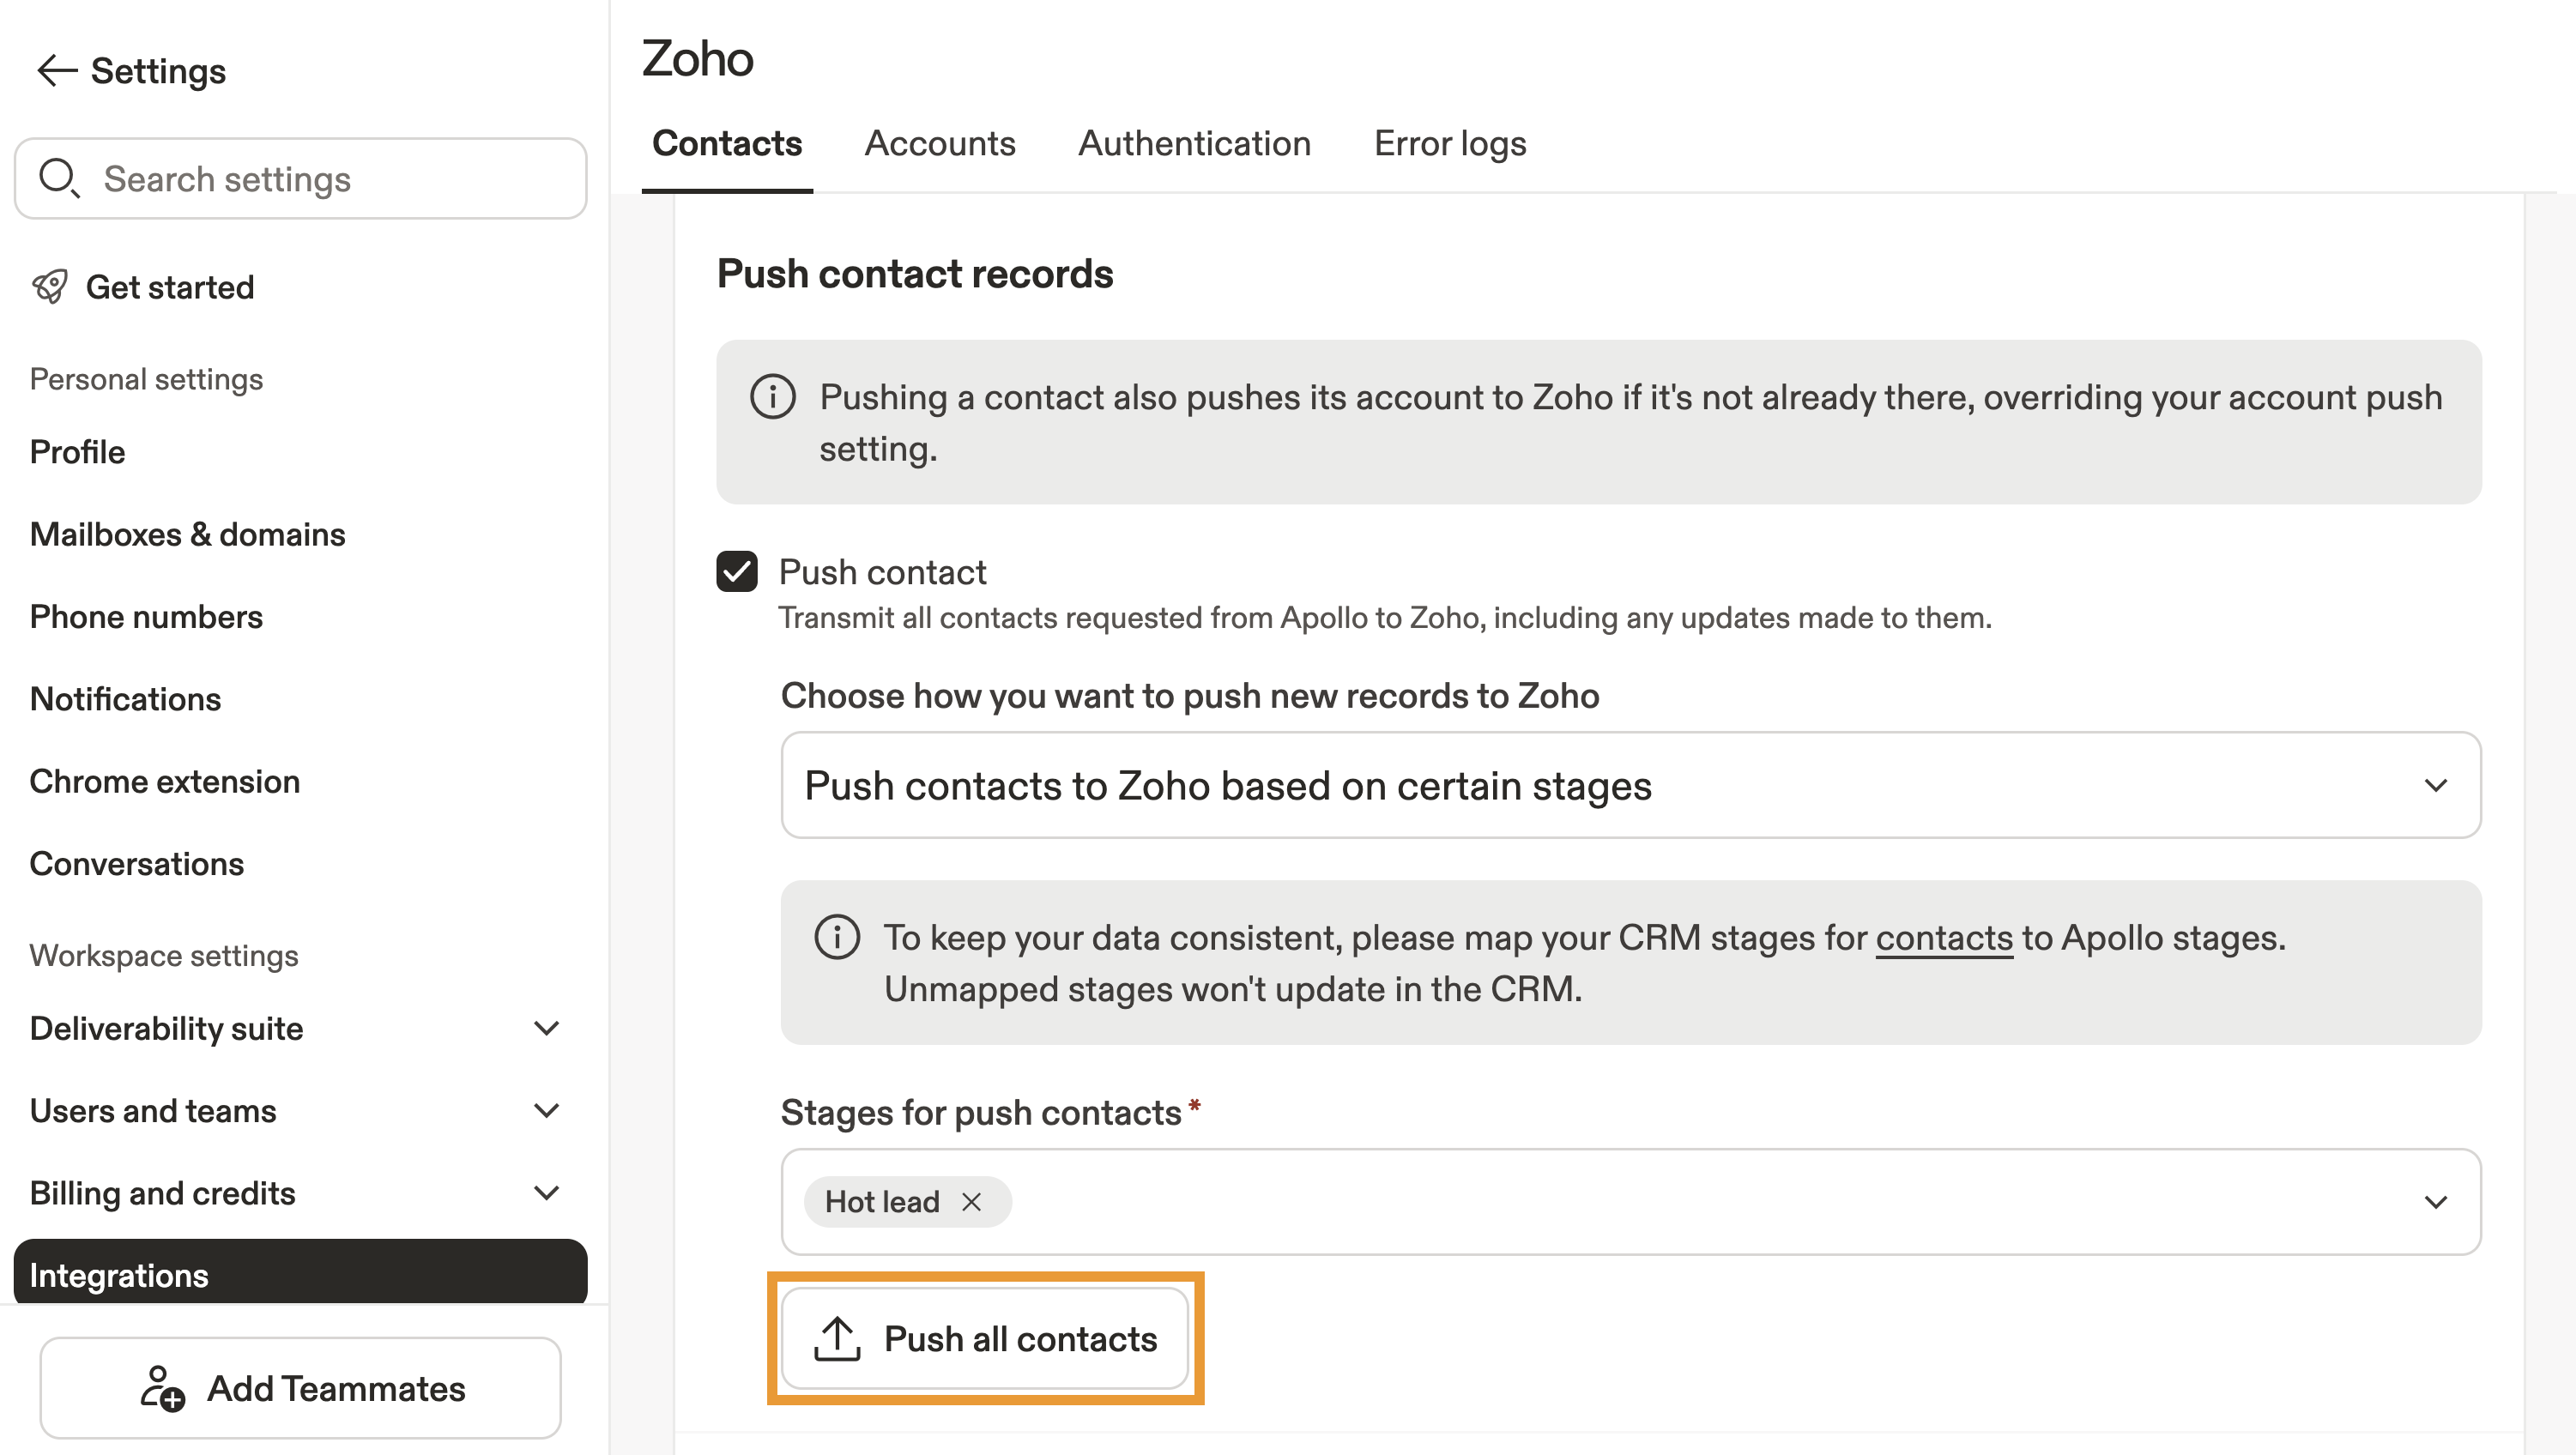
- Click Push all Apollo contacts / accounts to sync all contacts or accounts in Apollo to Zoho. Or click Pull all Zoho contacts / accounts to sync all contacts or accounts from Zoho to Apollo.
You have now manually synced records from Zoho.
FAQs
|
Frequently asked questions |
||
| How do I find records synced from Zoho? | How do I filter records by stage in Apollo? | How do I push an individual contact or account to Zoho? |
| How do I find records that I own? | ||
How do I find records synced from Zoho?
To filter prospects and view your records synced from Zoho:
- Launch Apollo and click People or Companies.
- Click Show filters > Source > Imported from CRM.
- Apollo displays the Zoho icon beside a contact's name.
You have now filtered prospects by records synced from Zoho.
Learn more about using the source filter.
How do I filter records by stage in Apollo?
To filter records by stage in Apollo:
- Launch Apollo and click People or Companies.
- Click Show filters > More filters, then click Stage.
- Check to include the contact or account stage you want to filter by.
- Click Apply filters and Apollo updates your search results with the filters you selected.
You have now filtered records by stage.
Learn more about using the stage filter.
How do I push an individual contact or account to Zoho?
First, ensure you've set sync settings to allow pushing contacts or accounts.
To push an individual contact or account from Apollo to Zoho:
- Launch Apollo and click People or Companies.
- Add search filters to find a person or company.
- Check one or more people or companies, then click Zoho > Push to Zoho.
You have now pushed a contact or account to Zoho.
How do I find records that I own?
To filter for synced records that you own:
- Launch Apollo and click People or Companies.
- Click Show filters > Owner, then select yourself as the contact or account owner from the dropdown.
You have now filtered for records that you own.
Learn more about using the owner filter.
Next Steps
Now that Zoho and Apollo are connected, here are a few practical next steps to keep your CRM clean and your pipeline moving.
| Search Filters Overview | Filter synced records to quickly find Zoho-imported contacts and focus outreach on the right stages to move deals forward. |
|---|---|
| Create and Assign Permission Profiles | Use permission profiles to restrict who can change integrations so your Zoho sync settings stay protected from accidental edits. |
| Create and Use a List | Start to organize synced contacts to build segmented lists your team can nurture with tailored sequences. |
| Use a Score Filter | Turn on apply scoring to highlight the Zoho records most likely to convert so your reps can prioritize outreach. |
| Save and Share a Search or Set a Search Alert | Use saved searches and alerts to get your team notified when new prospects enter your ideal segments. |