Overview
From Account Executives, to Sales Leaders, to RevOps professionals and beyond, your go-to-market team likely has many different roles and responsibilities. Based on their role, each user in Apollo will need varying levels of access.
With permission policies, admins have a robust set of controls to limit what each member of your team has access to in Apollo. This ensures that everyone on your team can succeed while also having the appropriate level of permissions based on their individual roles.
Refer to the steps below to learn how to create and assign permission profiles in Apollo.
Default Permission Profiles
Apollo provides the following default permission profiles:
- Admin
- Non-admin
- Billing and Seat Manager
- Call Assistant
Admin permission profile settings related to user management, billing, appearance, and interface are enabled by default and can't be turned off.
Create a New Permission Profile
Custom permission profiles are available for teams with an Organization or Custom plan. Need access? Upgrade your Apollo plan.
To create a new permission profile:
- Launch Apollo and click Settings > Users and teams > Permission profiles.
- Click New Profile.

- Enter a name for the new permission profile, then click Create.

- Apollo automatically opens settings for your new permission profile. Use the toggles to enable or deactivate across the Apollo platform for users assigned this profile.
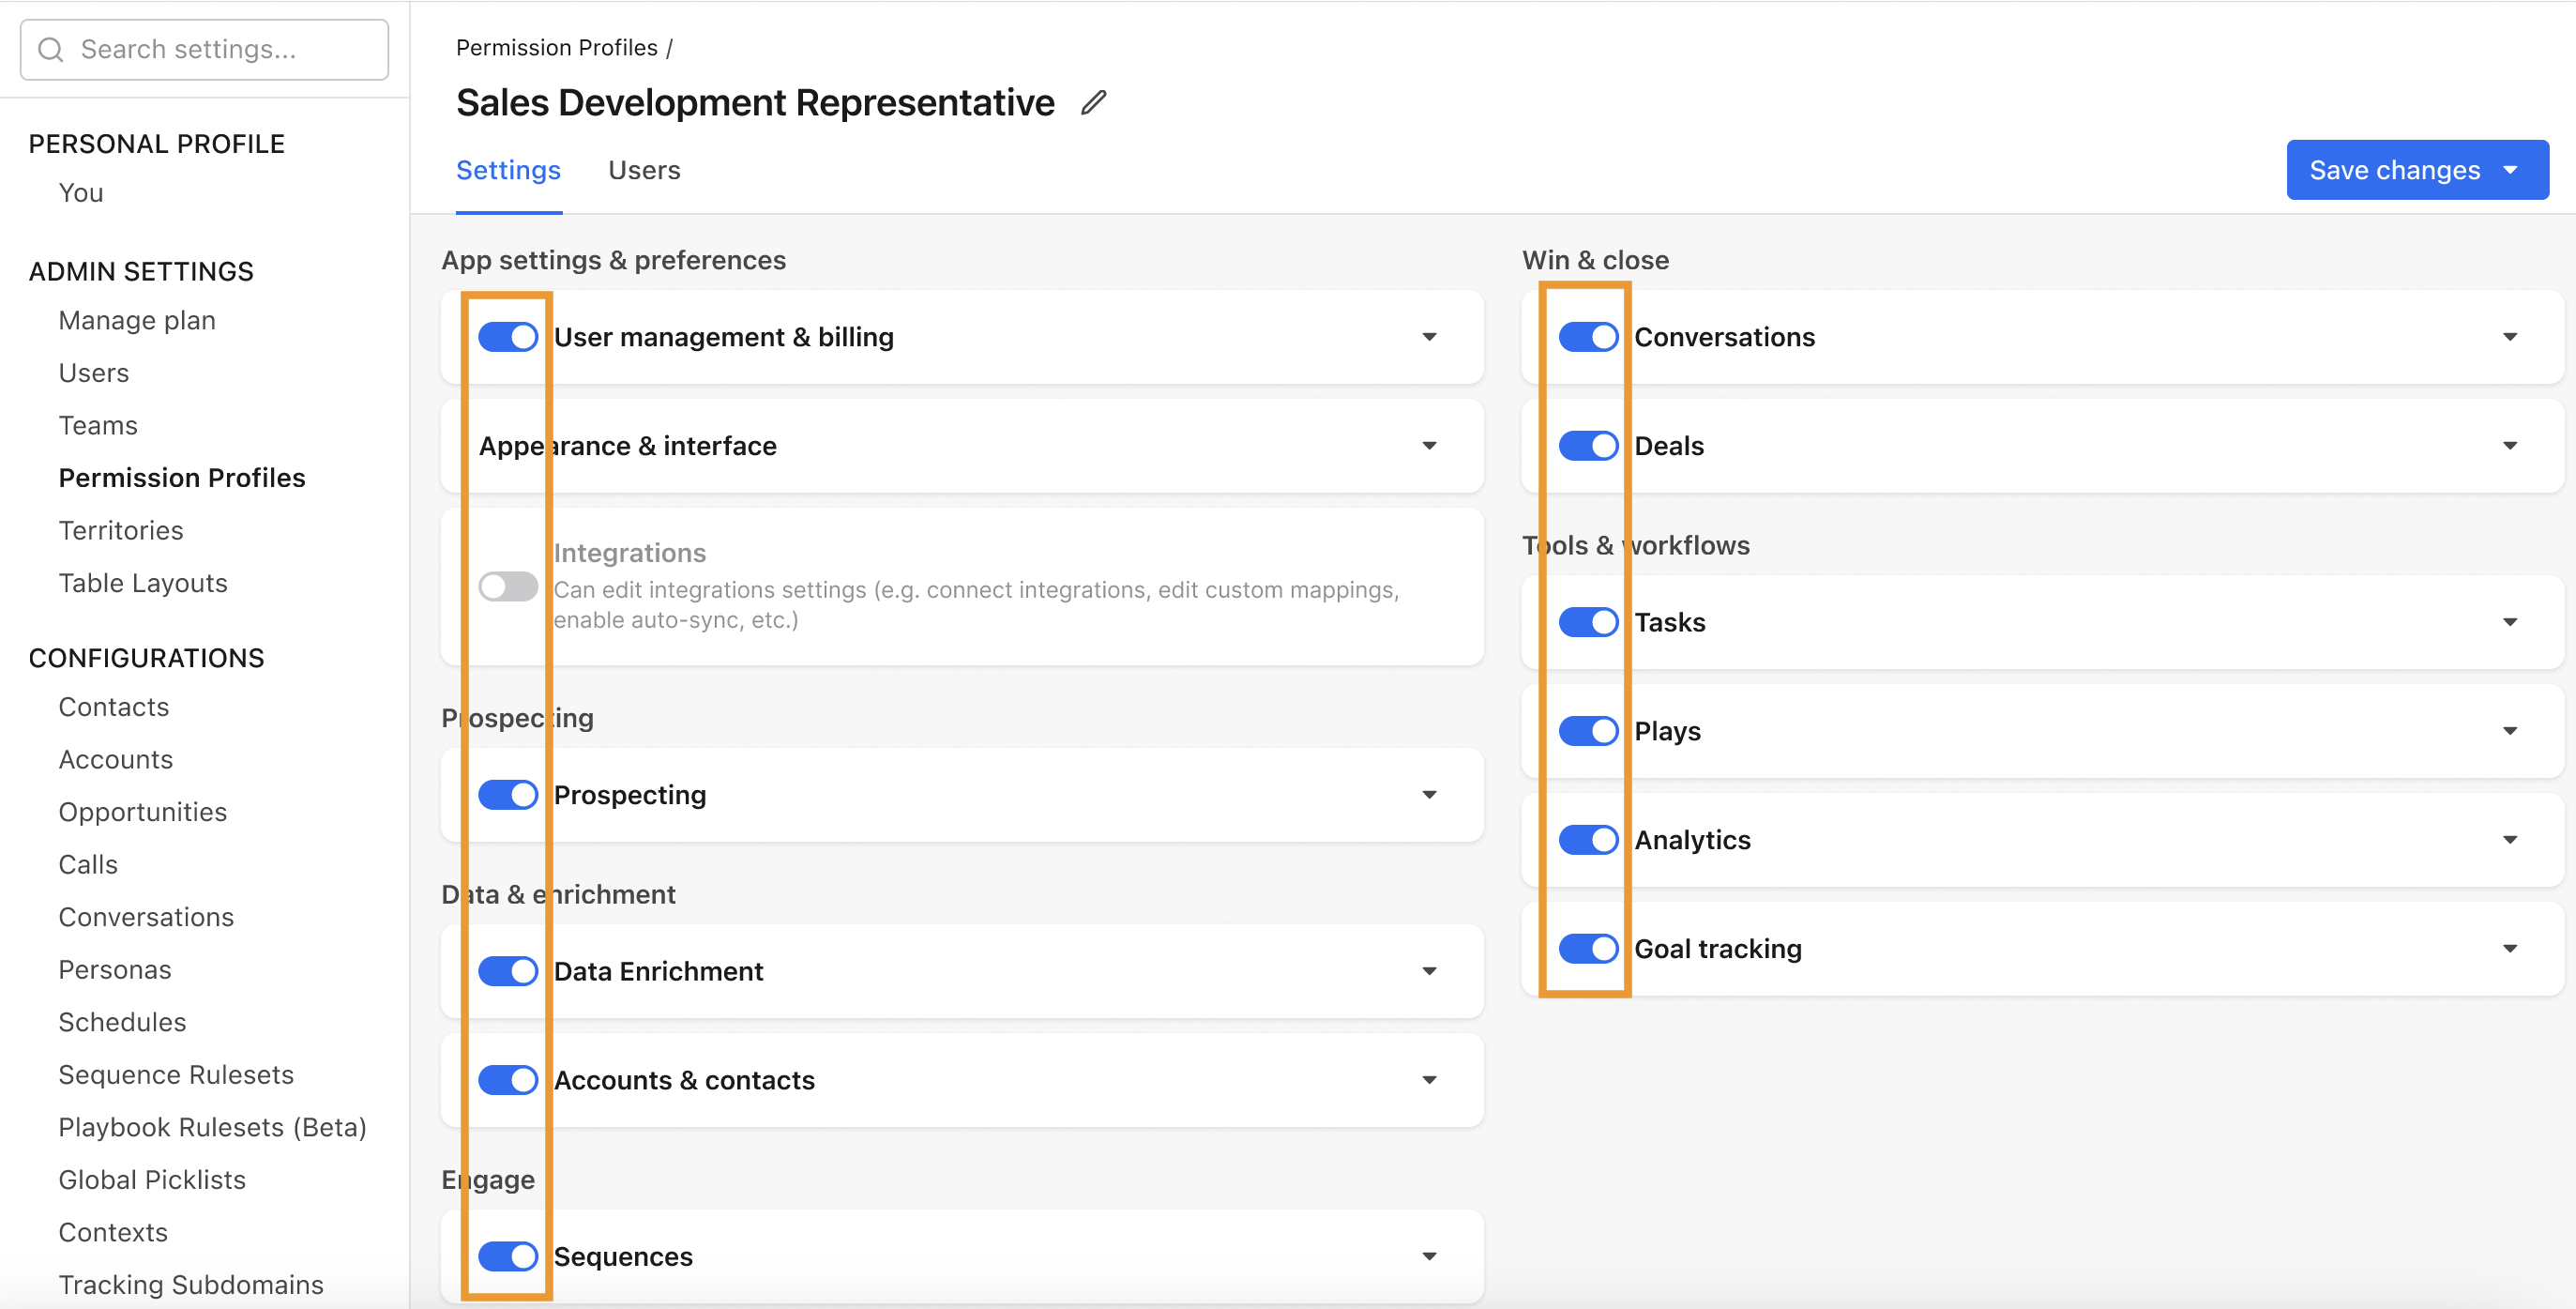
- To view and apply more granular feature permissions, click on a feature to expand it. Check each individual permission you want to enable for the related feature.

Apply the Email visibility setting in the Emails section with caution. If you select can see all emails from other users, all Apollo users within your organization have access to view every other user's email activity. This includes all the emails that Apollo imports from each user's connected mailbox, whether a user sends them through Apollo or not.
If you have a large team and are concerned about email confidentiality, Apollo recommends that you select the following checkbox instead: can see outbound emails sent within the Apollo platform and replies to those emails, but not other emails. This means that users can only see the emails sent and replied to through Apollo. They do not see any other emails from your users' connected mailboxes. And voila, you've kept your team's email privacy safe and sound!
- Click Save Changes.
You've now created a new permission profile. Repeat this process to create additional permission profiles as needed.
Admins can access all sequences and workflows created by users on their team.
Permission Profile Settings Glossary
Review the following sections to learn more about each of the settings you can configure for custom permission profiles:
| Permission Settings Categories | |
|---|---|
| App Settings & Preferences | Prospecting |
| Data & Enrichment | Engage |
| Win & Close | Tools & Automations |
App Settings & Preferences
| User Management & Billing | |
|---|---|
| Can access the credit usage page and check how much credit other users used | Gives users access to review team-wide credit usage across Apollo from Settings > Credits & AI usage > Current credit usage. |
| Can access and manage billing | Gives users access to view, manage, and update your team's billing information from Settings > Plan overview > Billing. |
| Can add, edit and delete users | Gives users access to add, edit, and deactivate users on your Apollo account from Settings > Users. |
| Can invite users to join subject to admin approval | Gives users the ability to invite new teammates to your Apollo account from Settings > Users. Invited users can only join your Apollo instance with an admin's approval. |
| Can manage permission profiles | Gives users the ability to create and customize your organization's permission profiles from Settings > Permission profiles. |
| Appearance & Interface | |
|---|---|
| Can assign views as default | Allows users to set a search view as the default view for their entire team when searching in Apollo. |
| Can manage table layouts | Allows users to edit table layouts and included fields on pages across Apollo. |
| Full Access Management | |
|---|---|
| Can view and edit all sequences, including private and read-only sequences | Can view, edit, and manage all sequences, workflows, and lists across Apollo, even those set to private by the owner. This permission is ideal for Apollo admins who require complete control over platform configurations and data management for your entire team. |
| Integrations | |
|---|---|
| Can edit integrations settings | Gives users the ability to connect new integrations and edit integration settings (such as field mapping or auto-sync options) from Settings > Integrations. |
| Can invite users from CRMs to the platform and configure settings for automatic invites | Allows users to invite their teammates to Apollo from a connected CRM and manage settings for automatic invites from Settings > Users. |
| Can authorize third-party apps/integrations via OAuth | Gives users the ability to authorize and connect third-party integrations via OAuth protocols. |
Prospecting
| Prospecting | |
|---|---|
| Can access the prospect searcher and add new leads to contacts | Gives users the ability to search for new prospects from People or Companies. |
| Can manage saved searches | Gives users the ability to create and manage saved search views. |
| Can modify team level context | Allows users to update team-level context fields from Settings > Context Settings. |
| Can add/edit persona | Allows users to create a persona or edit existing personas. |
| Can edit scoring models | Gives users the ability to create and manage custom scores. |
| Can edit and delete signals | Allows users to create and edit signals to filter for ideal prospects. |
| Can edit intent topics settings | Allows users to edit your team's buying intent topics from Settings > Ideal customer profile > Buying intent. |
| Can add or edit territories & territory rules | Allows users to create or edit prospecting territories from Settings > Rules of engagement > Territories. |
| Can prospect outside of assigned territories | Allows the user with this permission to prospect outside of their assigned territory when searching for new contacts. |
Data & Enrichment
| Waterfall Enrichment | |
|---|---|
| Click the toggle to enable waterfall enrichment for users with this permission profile. |
| Data Enrichment | |
|---|---|
| Can submit Enrich All, Push All, or Pull All actions from the CRM Enrichment and integrations settings pages | Allows users to enrich contacts in bulk from Data enrichment > CRM (for teams with access to CRM enrichment) or import and export records in bulk from your integrated CRM via Settings > Integrations. |
| Can submit multiple job changes or push actions at once from the Job Change Alerts and Search pages | Allows users to apply job changes to users in bulk during search or from Data enrichment > Job change alerts |
| Contacts and Accounts | |
|---|---|
| Can delete contacts owned by | Use the drop-down to select whether users with this permission profile can delete contacts owned by:
|
| Can change ownership for contacts owned by | Use the drop-down to select whether users with this permission profile can change ownership for contacts owned by:
|
| Can assign owner for contacts to | Use the drop-down to select whether users with this permission profile can assign contacts to:
|
| Can bulk import contacts via CSV | Allows users to import contacts in bulk from a CSV file. |
| Can add or edit contact roles | Allows users to edit a saved contact's job title or role from the contact profile page. |
| Can merge contacts | Gives users the ability to merge duplicate contact records. |
| Can delete accounts owned by | Use the drop-down to select whether users with this permission profile can delete accounts owned by:
|
| Can change ownership for accounts owned by | Use the drop-down to select whether users with this permission profile can change ownership for accounts owned by:
|
| Can assign owner for accounts to | Use the drop-down to select whether users with this permission profile can assign accounts to:
|
| Can bulk import accounts via CSV | Allows users to import accounts in bulk from a CSV file. |
| Can merge accounts | Gives users the ability to merge duplicate account records. |
| Can export contacts/accounts as CSV | Allows users to export contact or account records from Apollo to a CSV file. |
| Can add or edit contact stages and account stages | Allows users to create custom contact and account stages from Settings > Objects, fields, stages > Contact fields & stages or Account fields & stages. |
| Can add or edit definitions of custom fields | Allows users to create and edit custom contact fields and custom account fields. |
Engage
| Sequences | |
|---|---|
| Can add sequences | Allows users to create sequences from the Sequences page. |
| Can manage sequence rulesets | Gives users the ability to create and manage sequence rulesets from Settings > Sequences > Sequence rulesets. |
| Can edit email priority settings | Allows users to manage email priority settings for your entire team's sequences from Settings > Sequences > Priority settings. |
| Can add or edit email schedules | Allows users to create and manage sequence sending schedules from Settings > Sequences > Schedules. |
| Can add email snippets | Allows users to create snippets from Settings > Rules of engagement > Snippets. |
| Can edit snippets owned by | Allows users to edit existing snippets from Settings > Rules of engagement > Snippets. Select if users with this permission profile can edit snippets owned by:
|
| Can add email templates | Allows users to create email templates for sequences from Emails > Templates. |
| Can edit templates owned by | Allows users to edit existing email templates for sequences from Emails > Templates. Select if users with this permission profile can edit snippets owned by:
|
| Emails | |
|---|---|
| Email visibility | Configure the level of access users have to their teammates' emails in Apollo. Use the drop-down to select whether the user with this profile:
|
| Can send emails from | Configure the level of access users have to send sequence emails on behalf of other Apollo users. Use the drop-down to select whether the user with this permission profile can send emails from:
|
| Can send emails to contacts | Configure the level of access users have to send emails to contacts they don't own. Use the drop-down to select whether users with this permission profile can send emails to:
|
| Can send emails to accounts | Configure the level of access users have to send emails to accounts they don't own. Use the drop-down to select whether users with this permission profile can send emails to:
|
| User can adjust their own email sending limits | Allows users to edit the sending limits for their own mailbox from Settings > Mailboxes. |
| User can disable opt-out message | Allows users to manage or deactivate the opt-out message for their emails from Settings > Profile > Email settings. |
| Calls | |
|---|---|
| Can view and filter for active calls | Allows users to view and filter for live calls from the Calls page. |
| Join call mode | Configure the level of access users with this permission profile have to participate in live calls. Use the drop-drown to select one of the following modes:
|
| Can add or edit call dispositions / purposes | Allows users to manage your team's call purposes and dispositions from Settings > Team dialer > Dispositions or Purposes. |
| Can add, edit, and delete recording rules | Allows users to manage your team's call recording rules from Settings > Team dialer > Recording. |
Win & Close
| Conversations | |
|---|---|
| Can view recorded meetings hosted by | Configure the level of access users with this permission profile have to view their teammates' recorded meetings. Select whether users can see recordings from:
|
| Can edit settings in Configurations > Conversations | Allows users to manage conversation settings from Settings > Conversations > Recording settings. |
| Can edit converstation scorecards | Gives users the ability to manage your team's conversation scorecards from Settings > Team conversations > Scorecards. |
| Deals | |
|---|---|
| Can access & view deals data | Gives users access to view your team's deals from the Deals page. |
| Can delete deals owned by | Configure the level of access users with this permission profile have to delete deals owned by other Apollo users. Use the drop-down to set whether users can delete deals owned by:
|
| Can change ownership for deals owned by | Configure the level of access users with this permission profile have to update ownership of their teammates' deals. Use the drop-down to set whether users can change ownership for deals owned by:
|
| Can assign owner for deals to | Configure the level of access users with this permission profile have to assign deals to other users. Use the drop-down to set whether users can assign deals to:
|
| Can edit the default currency | Gives users the ability to update your team's default currency from Settings > Objects, fields, stages > Deal fields & stages > Currency. |
| Meetings | |
|---|---|
| Can manage inbound router | Allows users to create and manage inbound routers from Meetings > Admin console > Inbound router. |
| Can manage round robin meetings | Gives users the ability to create and manage your team's round robin meetings. |
| Can manage meeting intake forms | Allows users to manage your team's intake forms from Meetings > Admin console > Intake forms. |
| Calendar events visibility | Configure the level of access users with this permission profile have to view calendar events owned by other teammates. Use the drop-down to select whether this user:
|
Tools & Automations
| Tasks | |
|---|---|
| Can complete, skip, or modify tasks owned by other users | Allows users to manage tasks owned by other Apollo users from the Tasks page. |
| Workflows | |
|---|---|
| Can view workflows | Gives users the ability to access workflows from the Workflows page. |
| Workflows super admin access | Gives users full access to view, edit, and share all workflows created by your team. |
Edit Permission Profiles
Only teams with an Organization or Custom plan can edit default or custom permission profiles. Need access? Upgrade your Apollo plan.
You can edit your permission profiles to customize each profile's level of access to various activities in Apollo.
To edit an existing permission profile:
- Go to Settings > Users and teams > Permission profiles.
- Find the permission profile you want to edit, then click ... > Edit.

- Update this permission profile's settings as needed, then click Save Changes.

Assign Permission Profiles
Add New Users
When you add a new user in Apollo, you'll select their permission profile before sending them an invite.
Learn more about adding new users to Apollo.
If you want to add more users but don't have enough seats, you can customize your existing Apollo plan to access more seats. Have questions about plan upgrades? Check out Customize and Manage Your Apollo Plan to learn more or reach out to Apollo support for assistance.
Reassign Existing Users
Your teammates might change roles or require different permissions after you've added them to Apollo. As an admin, you can reassign their permission profile at any time to accommodate these changes.
To assign a different permission profile to existing users:
- Launch Apollo and go to Settings > Users and teams > Users.
- Check each user you want to reassign, then click Edit permission profiles.

- Select a permission profile, then click Save.

You've assigned a new permission profile to your teammate.
Going forward, we recommend you assign admin permissions to at least two Apollo users to ensure you don't lose access if one admin leaves. Learn more about common user management questions here.
Next Steps
Dive into these additional resources to learn more about managing users and access settings in Apollo:
| Add, Manage, and Deactivate Users | Add and manage users to ensure your entire sales team has access to Apollo. |
|---|---|
| Organize Users Into Teams | Group users into teams to apply targeted settings and filter analytics for better performance tracking. |
| Admin Settings Overview | Review admin-level settings to ensure your team is set up for success in Apollo. |
| Assign Billing and Seat Managers as Collaborators on Your Team | Invite billing and seat managers to give collaborators or leadership team members access to only the key administrative features they need in Apollo. |