Overview
Contact and account stages in Apollo help you track progress on sales and marketing pipelines. Stages associate a progress tag with each account or contact for quick insights into your pipeline health.
Check out the following sections to learn how to set up contact and account stages.
If you integrated Apollo with your CRM, map each stage 1:1 between Apollo and your CRM to avoid any disparities. Check out these articles to learn how to map stages:
Default Stages
Apollo creates some default contact and account stages for you.
Default Contact Stages
These are the default contact stages on Apollo:
| Stage name | Description |
|---|---|
| Cold | This is a new contact that you haven't emailed, called, or reached out to before. |
| Approaching | You have sent the contact at least one message or have called them. |
| Replied | This contact has replied to your email. |
| Interested | Your contact is interested in a meeting. Apollo updates the contact to the Interested stage automatically if your contact's email is detected in a Gmail calendar invitation. This only works when you have your Gmail account linked and you use Google Calendar. To move contacts to this stage based on call activity, set up call triggers. |
| Not Interested | The contact responded that they are not interested. You can try to re-engage with the contact at a later date if they fit your buyer profile. |
| Unresponsive | Apollo marks a contact as Unresponsive if they never reply or engage with your messaging. If you want to amend the default number of days in which Apollo marks a contact as unresponsive, refer to Create Sequence Rulesets. You might want to re-engage these leads every 30-90 days as different positioning, more education about your product, a change in a contact's role, or better timing could still lead to a sale. |
| Do Not Contact | Apollo automatically assigns a contact to the Do Not Contact stage if a contact actively unsubscribes from your emails. You can also configure contact triggers in the settings if you want to set up additional automation. For one-off cases, such as when a contact personally requests for you to stop reaching out, or for competitors, you can manually assign saved contacts to the Do Not Contact stage from search. |
| Bad Data | The prospect's email bounced because the email was incorrect. |
| Changed Job | Apollo informs you when a contact changes jobs so you can email them as they settle into their new role. |
You can create custom contact stages as well.
Default Account Stages
These are the default account stages on Apollo:
| Stage name | Description |
|---|---|
| Cold | This is a new account you have never engaged with. |
| Current Client | You are actively doing business with these accounts. |
| Active Opportunity | This is a prospective account that someone in your team is currently working on closing. |
| Dead Opportunity | This is an account that your team was unable to close, and you are no longer actively engaging. |
| Do Not Prospect | This is an account that you want to blocklist from your engagement efforts. You can manually assign saved accounts to the Do Not Prospect stage from search. |
You can create custom account stages as well.
Create Custom Stages
Add custom stages to identify specific statuses for your contacts and accounts. Custom stages help you sync information between Apollo and your CRM. You can create custom contact or account stages:
When creating custom stages, make sure to overwrite or delete existing stages that could leverage their current mappings to the triggers that run the automated stage changes. For example, when a contact replies, the contact is automatically updated to the replied contact stage. Review Apollo recommendations for more details.
Create a new contact stage
To create a new stage for your contacts:
- Launch Apollo and go to Settings > Objects, fields, stages > Contact fields & stages.
- Click Add Stage.

- Enter a name for your contact stage. Then, click Create Stage.

Tip: Check out Apollo's recommendations for contact stages.
- (Optional) If you connected a CRM integration, choose a field in your CRM to sync with your new Apollo contact stage. Then select the status that displays in your synced CRM field.
You have now created a new contact stage.
Contact stage recommendations
The following table outlines Apollo's recommended custom stages alongside the default stages you may wish to override. You don't have to follow these recommendations.
| Default stage | Custom stage | Category | 'Do Not Override' checked? |
|---|---|---|---|
| Nurturing | — | No Category | No |
| Approaching | — | In Progress | No |
| Replied | — | In Progress | No |
| — | Meeting Set | Succeeded | Yes |
| Interested | — | Succeeded | Yes |
| — | SQO | Succeeded | Yes |
| — | Active Evaluator | Succeeded | Yes |
| — | Current Client | Succeeded | Yes |
| — | Closed: Check Back Quarterly | Not Succeeded | Yes |
| Unresponsive | Closed: Unresponsive | Not Succeeded | No |
| — | Closed: Referred Elsewhere | No Category | Yes |
| Not Interested | Closed: Not Interested | Not Succeeded | Yes |
| — | Closed: Bad Fit | Not Succeeded | Yes |
| Do Not Contact | Closed: Do Not Contact | Not Succeeded | Yes |
| — | Closed: Bad Data | Not Succeeded | Yes |
| — | Closed: Changed Job | Not Succeeded | Yes |
| Bad Data | — | No Category | Yes |
| Changed Job | — | No Category | Yes |
Tip: Check out Apollo's recommendations for account stages.
Create a new account stage
To create a new stage for your accounts:
- Launch Apollo and go to Settings > Objects, fields, stages > Account fields & stages.
- Click Add Stage.

- Enter a name for your contact stage. Then click Create Stage.

- (Optional)If you connected a CRM integration, choose a field in your CRM to sync with your new Apollo contact stage. Then select the status that displays in your synced CRM field.
You have now created a new account stage.
Account stage recommendations
The following table outlines Apollo's recommended custom stages alongside the default stages you may wish to override. You don't have to follow these recommendations.
| Default stage | Custom stage | Category |
|---|---|---|
| Nurturing | — | No Category |
| — | Working | In Progress |
| — | Engaged / Hot | In Progress |
| — | Meeting Set | Succeeded |
| Active Opportunity | — | Succeeded |
| Current Client | — | Succeeded |
| Dead Opportunity | — | Not Succeeded |
| — | Churned | Not Succeeded |
| — | Bad Fit | Not Succeeded |
| — | Nurture - Timing | Not Succeeded |
| — | Nurture - Not Interested | Not Succeeded |
| — | Nurture - Unresponsive | Not Succeeded |
| — | Closed | Not Succeeded |
| Do Not Prospect | — | Not Succeeded |
Triggers Based on Stages
Account and contact stages are associated with triggers that automate responses in a sequence. Triggers can be edited for each stage. You can use triggers on contacts or accounts.
To customize contact stage triggers:
- Launch Apollo and go to Settings > Objects, fields, stages > Contact fields & stages.
- Click Triggers.
- For each of the email and call triggers, choose a contact stage to set when the trigger occurs.

- Click Save.
You have now customized contact stage triggers.
Check out Use Stage Triggers to learn more about stage triggers.
To customize account stage triggers:
- Launch Apollo and go to Settings > Objects, fields, stages > Account fields & stages.
- Click Triggers.
- Choose an account stage to set when the trigger occurs. You can also add account stages that deliver warnings to your team during their searches.

- Click Save.
You have now customized account stage triggers.
Check out Use Stage Triggers to learn more about stage triggers.
Change Stages for Contacts or Accounts
To manually change the stage for a contact or account:
- Use search filters to narrow your results.
- Check one or more companies, then click Edit > Set stage.
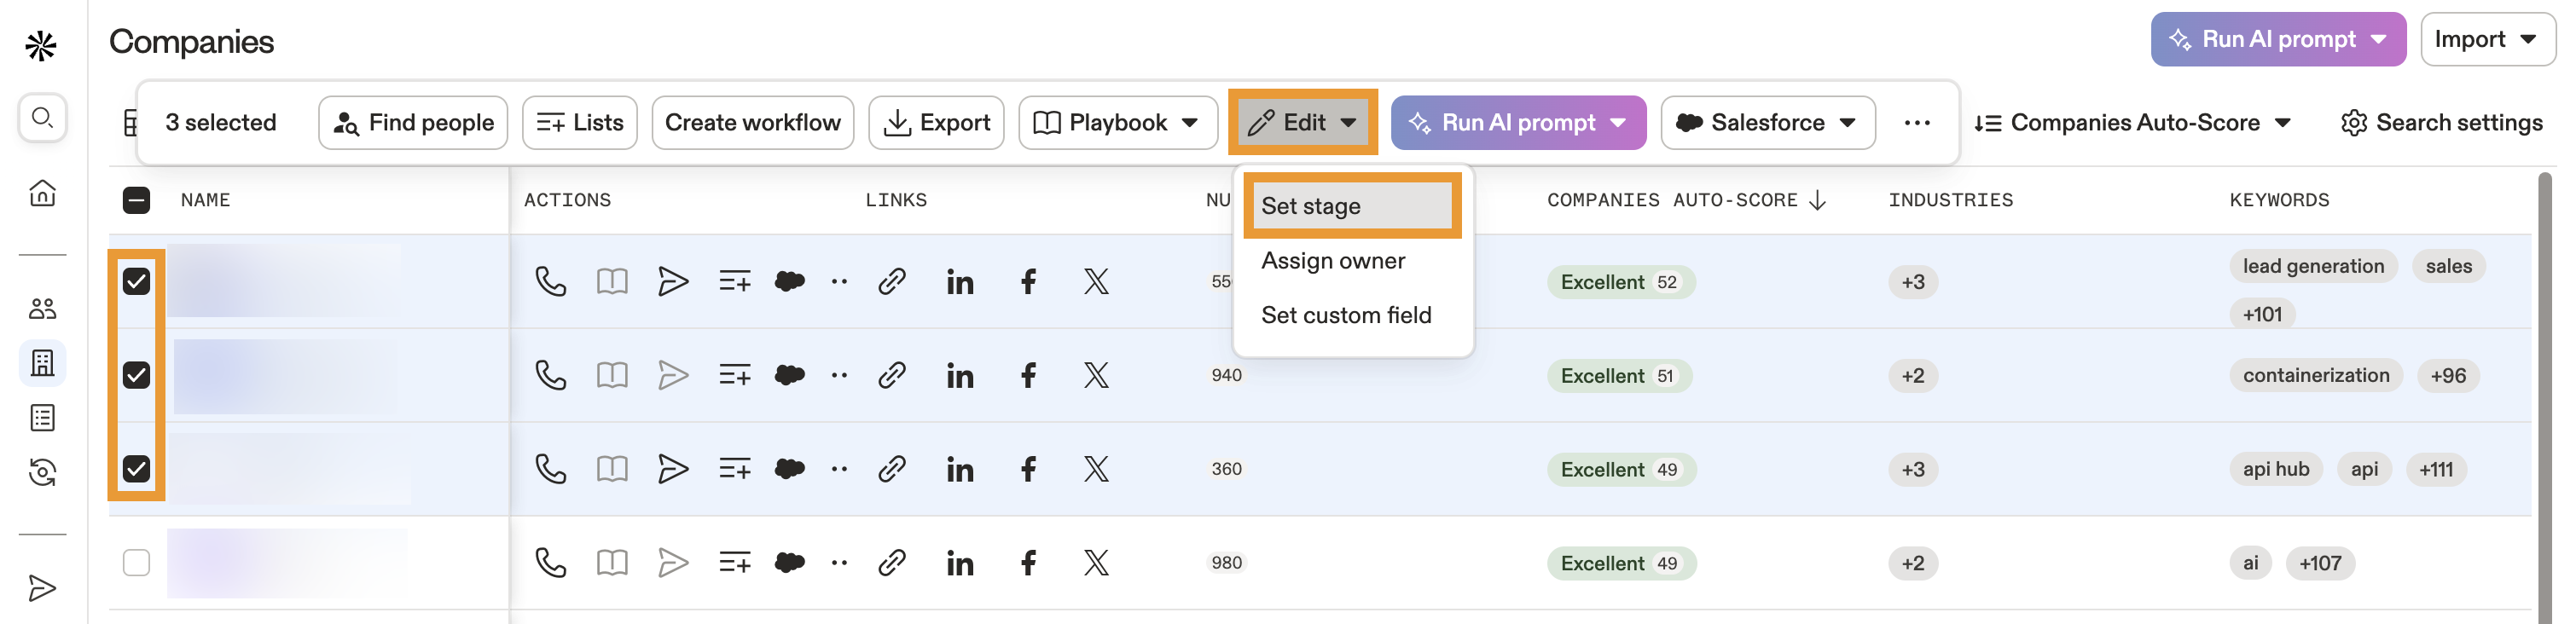
- Select the stage you want to assign.
- When finished, click Set stage.
You have now changed account stages.
- Click Saved to access saved contacts, then use search filters to narrow your results.
- Check one or more people, then click ... > Set stage.
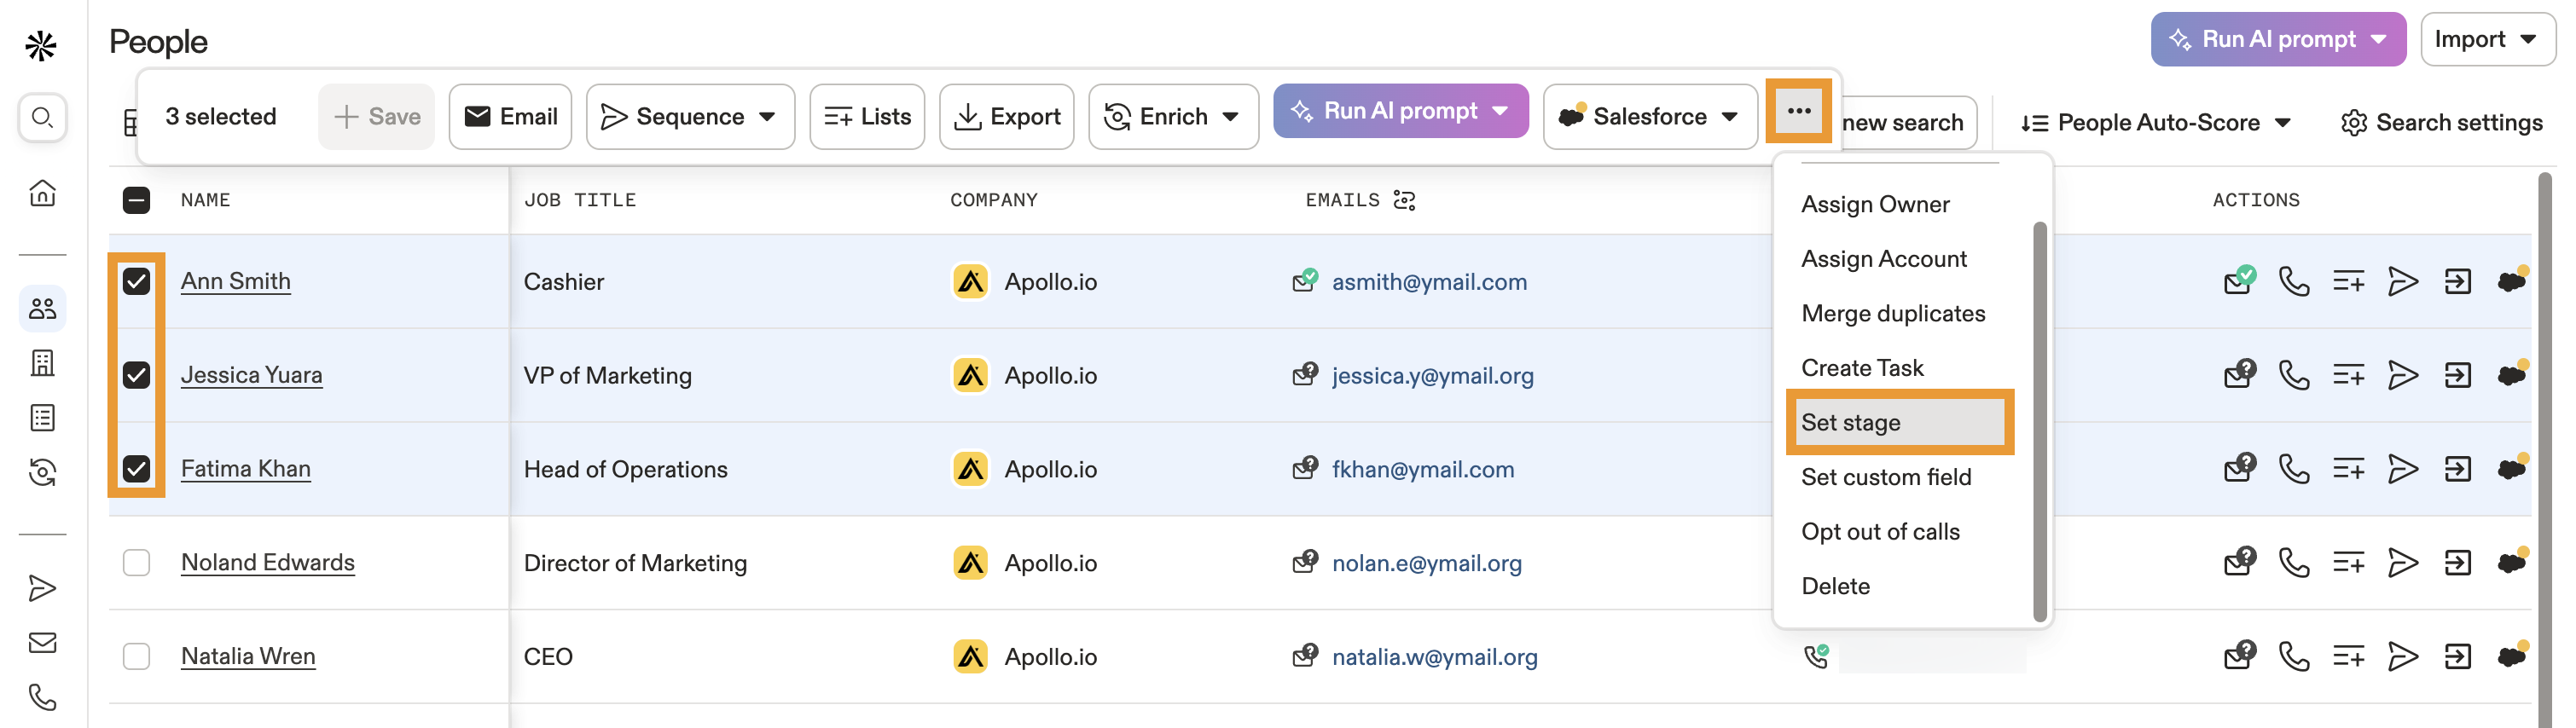
- Select the stage you want to assign.
- When finished, click Set stage.
You have now changed contact stages.
- Select a list to access saved contacts, then check one or more people.
- Click ... > Set stage.
- Select the stage you want to assign.
- When finished, click Set stage.
You have now changed contact stages on a list.
Next Steps
Ready to level up how you use stages? Check out these handy resources:
| Use Stage Triggers in a Sequence | Map stage triggers to automate when contacts move between stages and keep your pipeline flowing. |
|---|---|
| Manage Sequence Rulesets | Configure sequence rulesets to halt sends for unwanted stages and maintain targeted outreach. |
| Auto-Map Stages Between Salesforce and Apollo | Auto-map stages to sync your Salesforce and Apollo pipelines without manual setup. |
| Set Up the Pipedrive Integration | Push contacts at specific stages to ensure Pipedrive only receives your most qualified leads. |
| Report on Sequences | View sequence reports to measure how each stage drives engagement and conversion. |