
Overview
Sheets is currently in beta and is only available to select people. Apollo automatically enrolls users as the feature becomes available.
Exporting is how a sheet writes data out. Until you export, a sheet stays a sandbox: you can import records and transform them with columns without touching your Apollo records, your CRM, or your sales engagement platform.
You can export a sheet as a CSV, to another sheet, to a sequence, to a list, as saved contacts or companies in Apollo, to Salesforce, HubSpot, or Zoho, or to Outreach or Salesloft. Every export except a CSV download creates a column in your sheet, so you can set it to run automatically, on a schedule, or only for the rows that meet your criteria.
A sheet row can hold any data you choose, but Apollo stores its own data as Contacts, Accounts, or Deals. When you add rows to a sequence, add them to a list, or export them to Apollo, you map your sheet's columns to Apollo's fields so Apollo knows which record type each row represents.
Check out the following sections to export your data and automate your sheet.
Export Your Data
To export your data:
- Launch Apollo and click Sheets.
- Open a sheet, then click Export data.
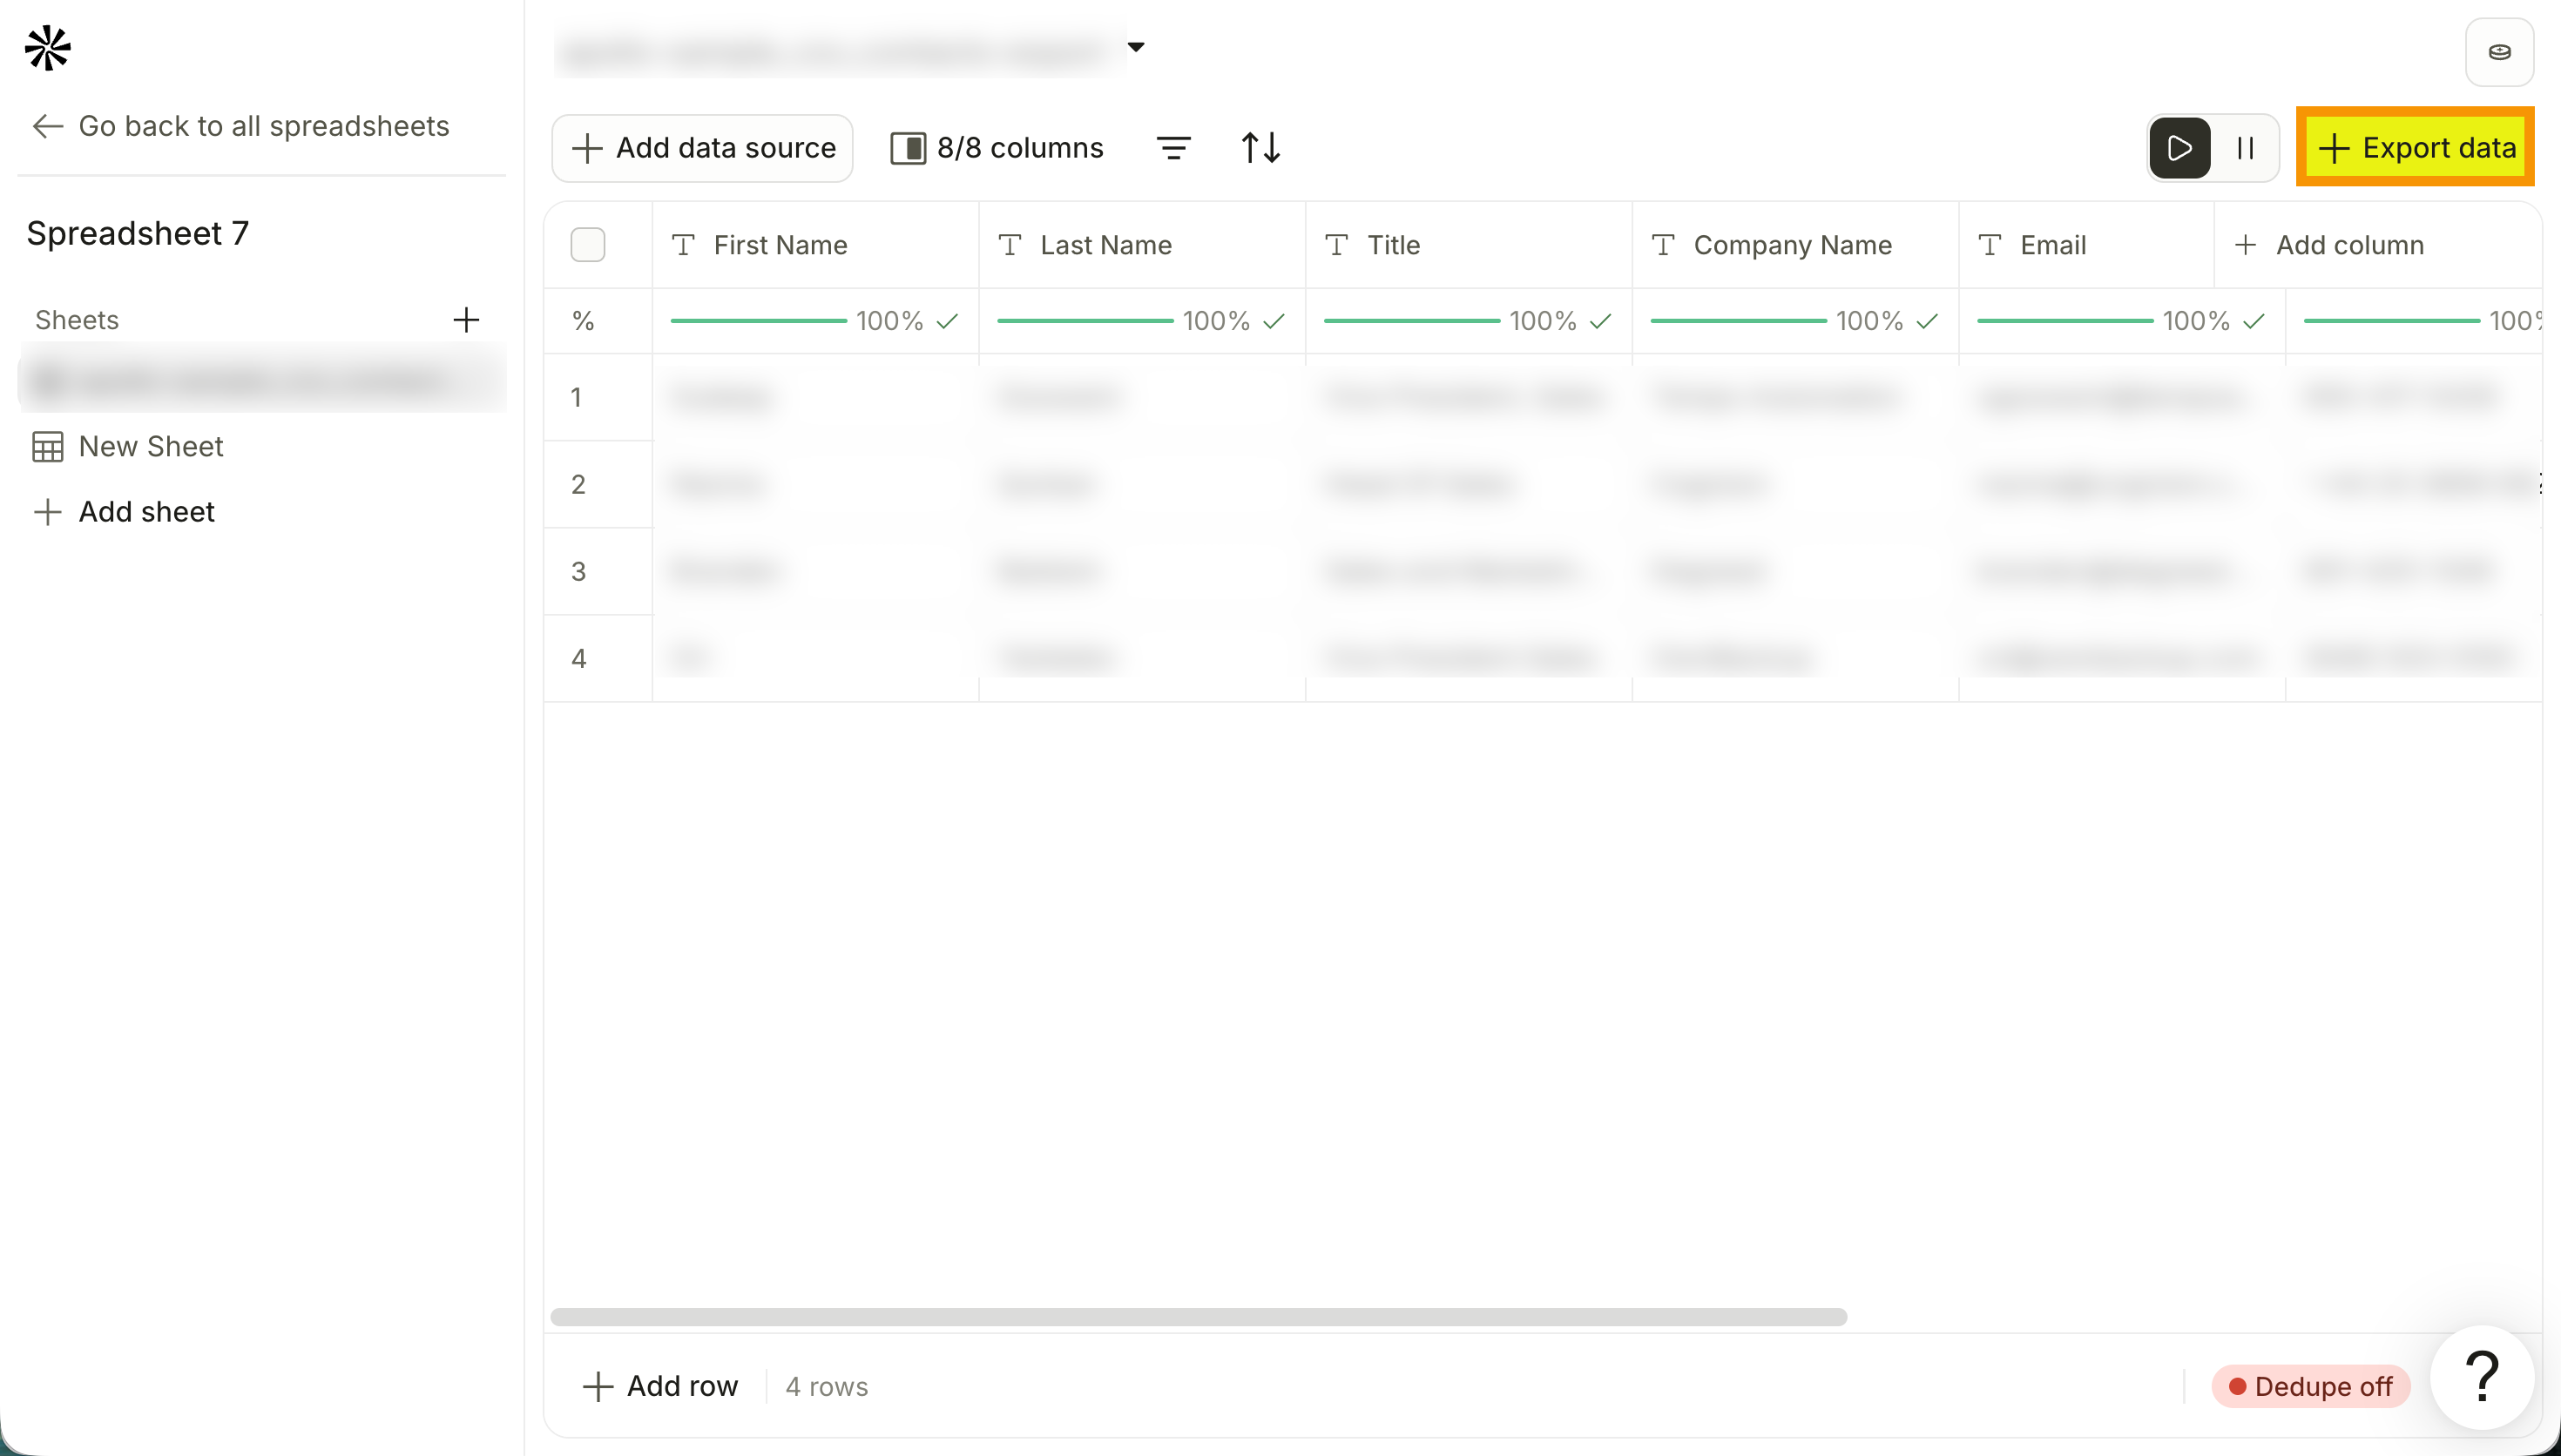
Exporting is the only action that writes sheet data into Apollo saved contacts, your CRM, or your sales engagement platform. Check your column mapping before you run an export, because a mismatched field writes the wrong value to a live record.
Download as CSV
Save the current sheet data as a CSV file on your device.
- Click Download as CSV. Apollo downloads the current sheet data as a CSV file.
Send data to another sheet
Create rows in another sheet using data from the current sheet.
- Click Send data to sheet.
- Select an export destination:
- Send to existing sheet to send your data to an existing sheet in your current spreadsheet. Select your preferred sheet from the dropdown, then enter a column name.
- Create new sheet to create a new sheet in your current spreadsheet. Enter a column name.
- (Optional) Toggle on Only run when condition is met to set criteria for running the export, then enter your criteria. Type
{{to add columns or use formulas. - Click Continue. Apollo lists every field it sends to the target sheet by default.
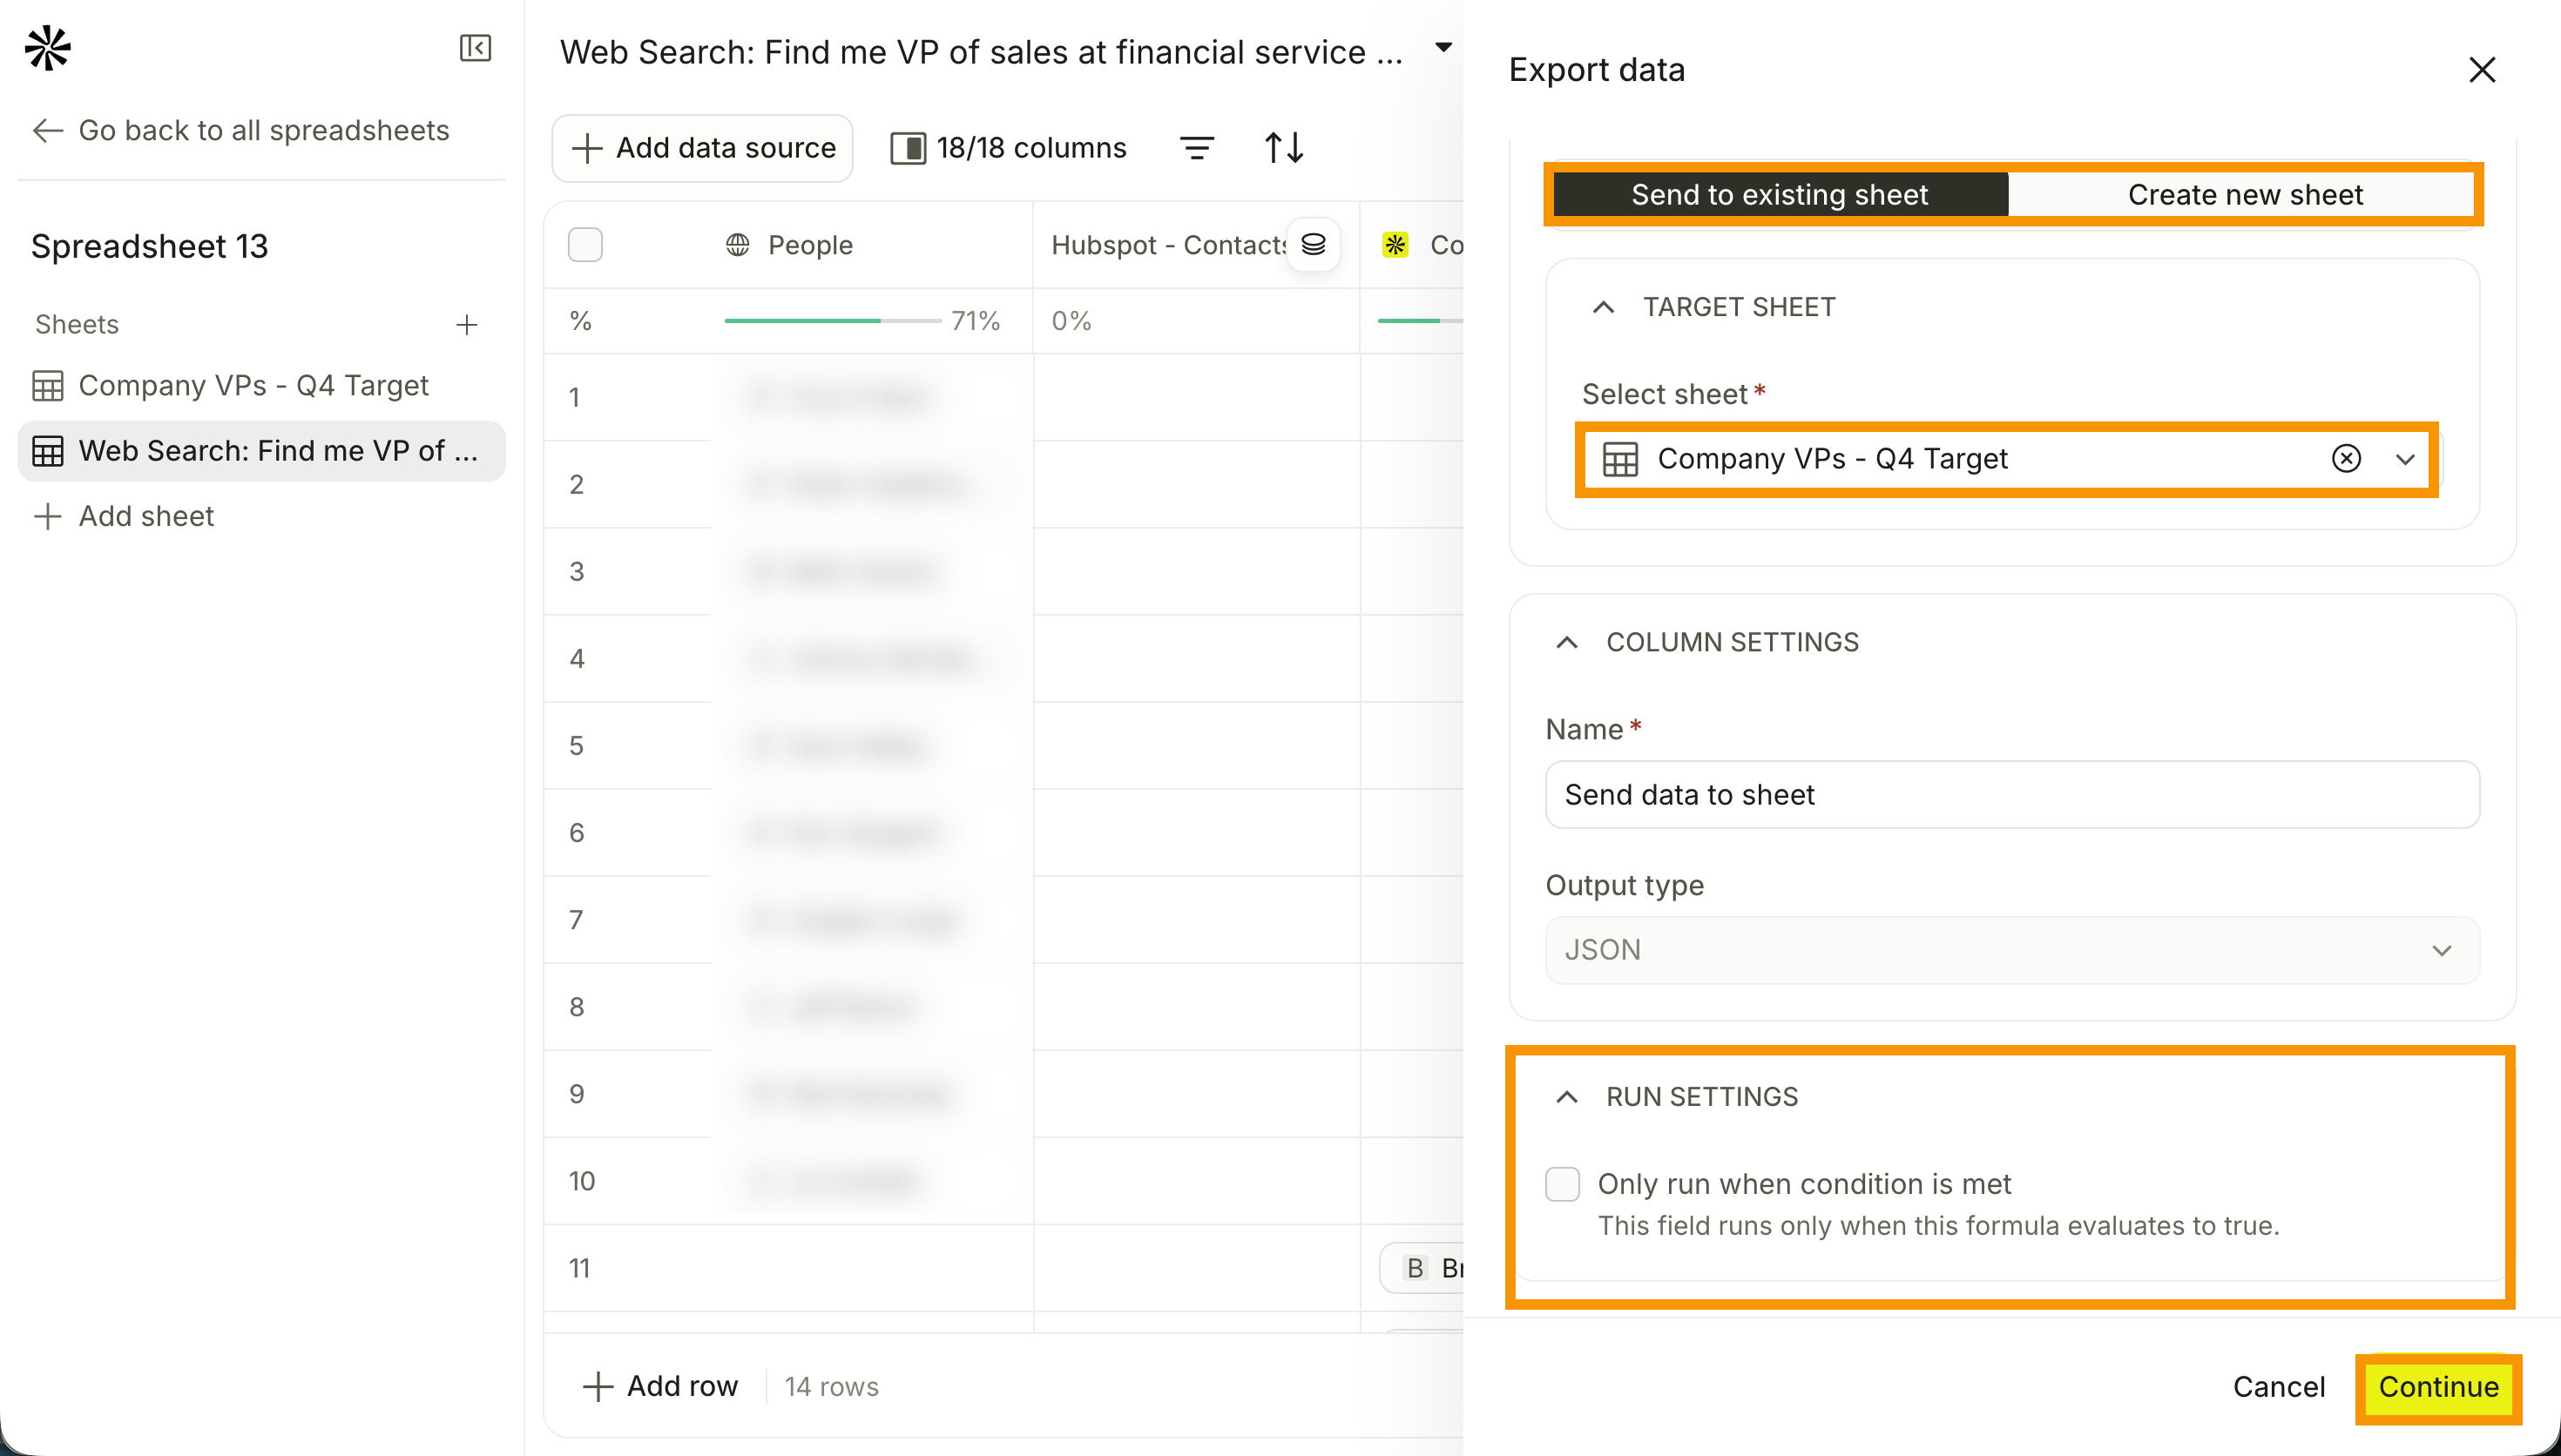
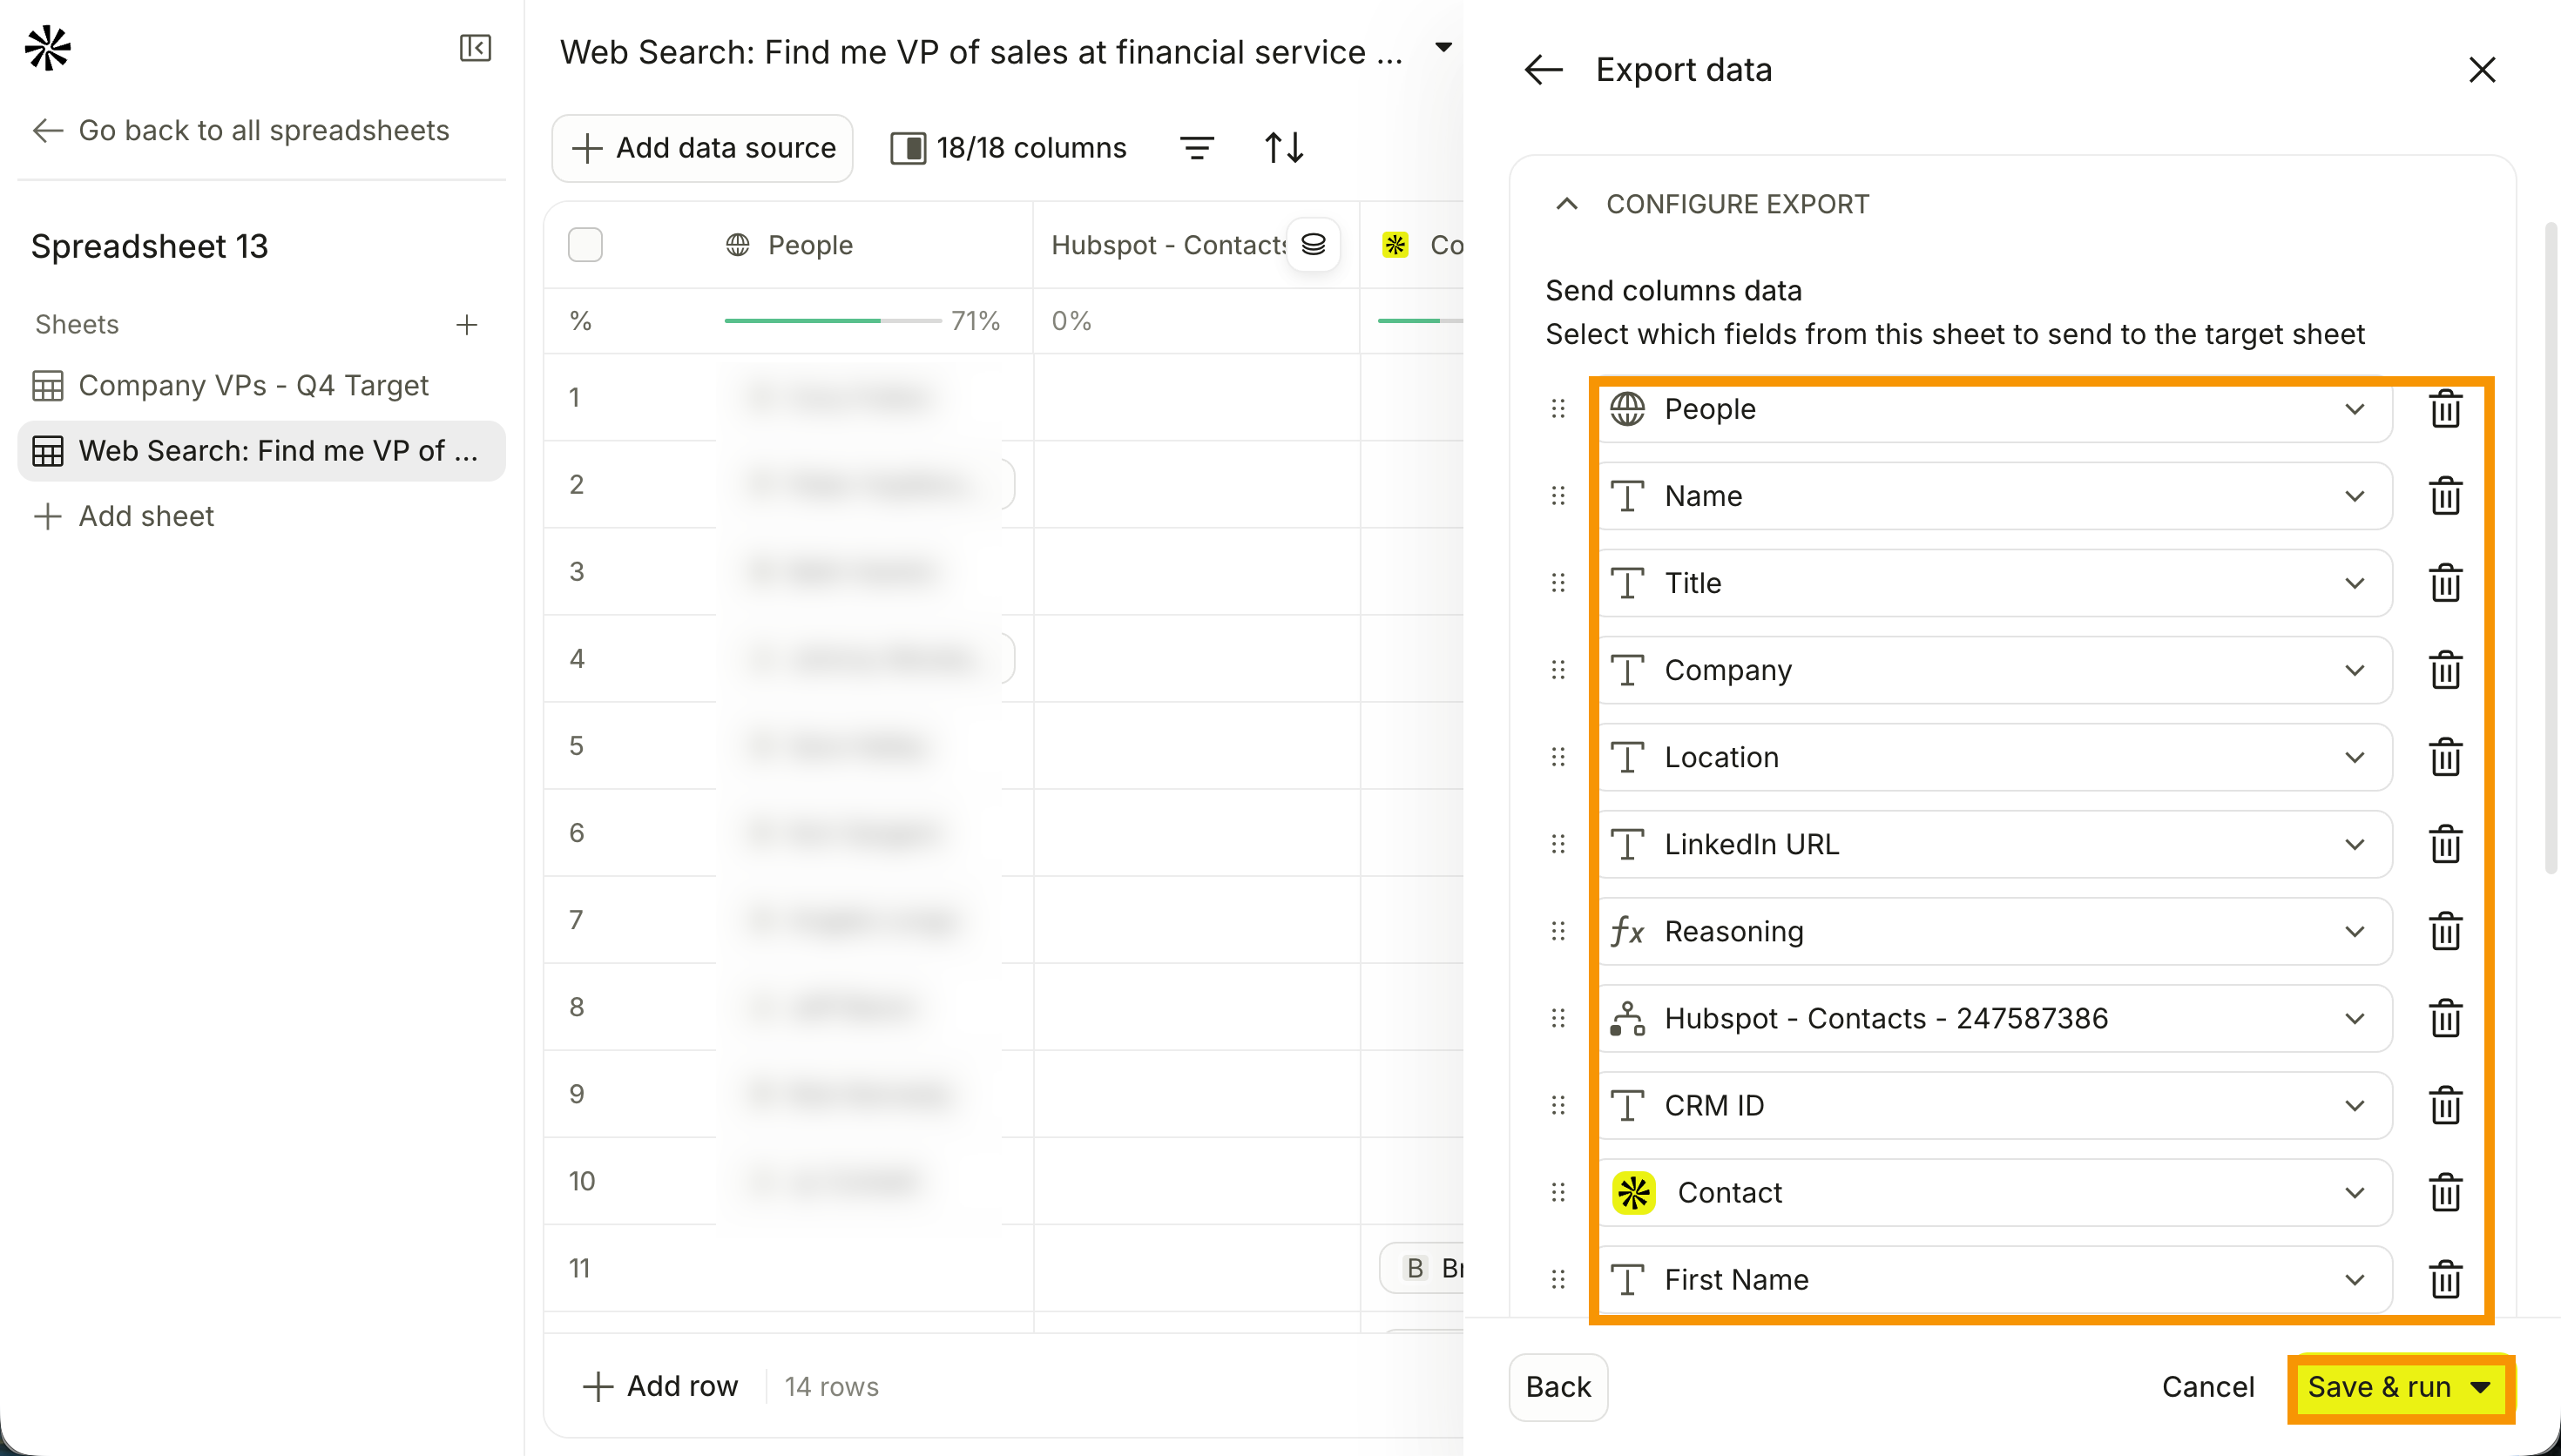
- Click Add column to add a column, then select a column from the list. Alternatively, click Remove column to delete a column.
- Click Save & run to save the export and run it. Alternatively, click ▾, then click Save & run first ten rows to run only the first ten rows, Save & run all rows to run every row, or Save & don't run to save without running.
After the export runs, Apollo adds the rows to your destination sheet. Click a row to review its full details.
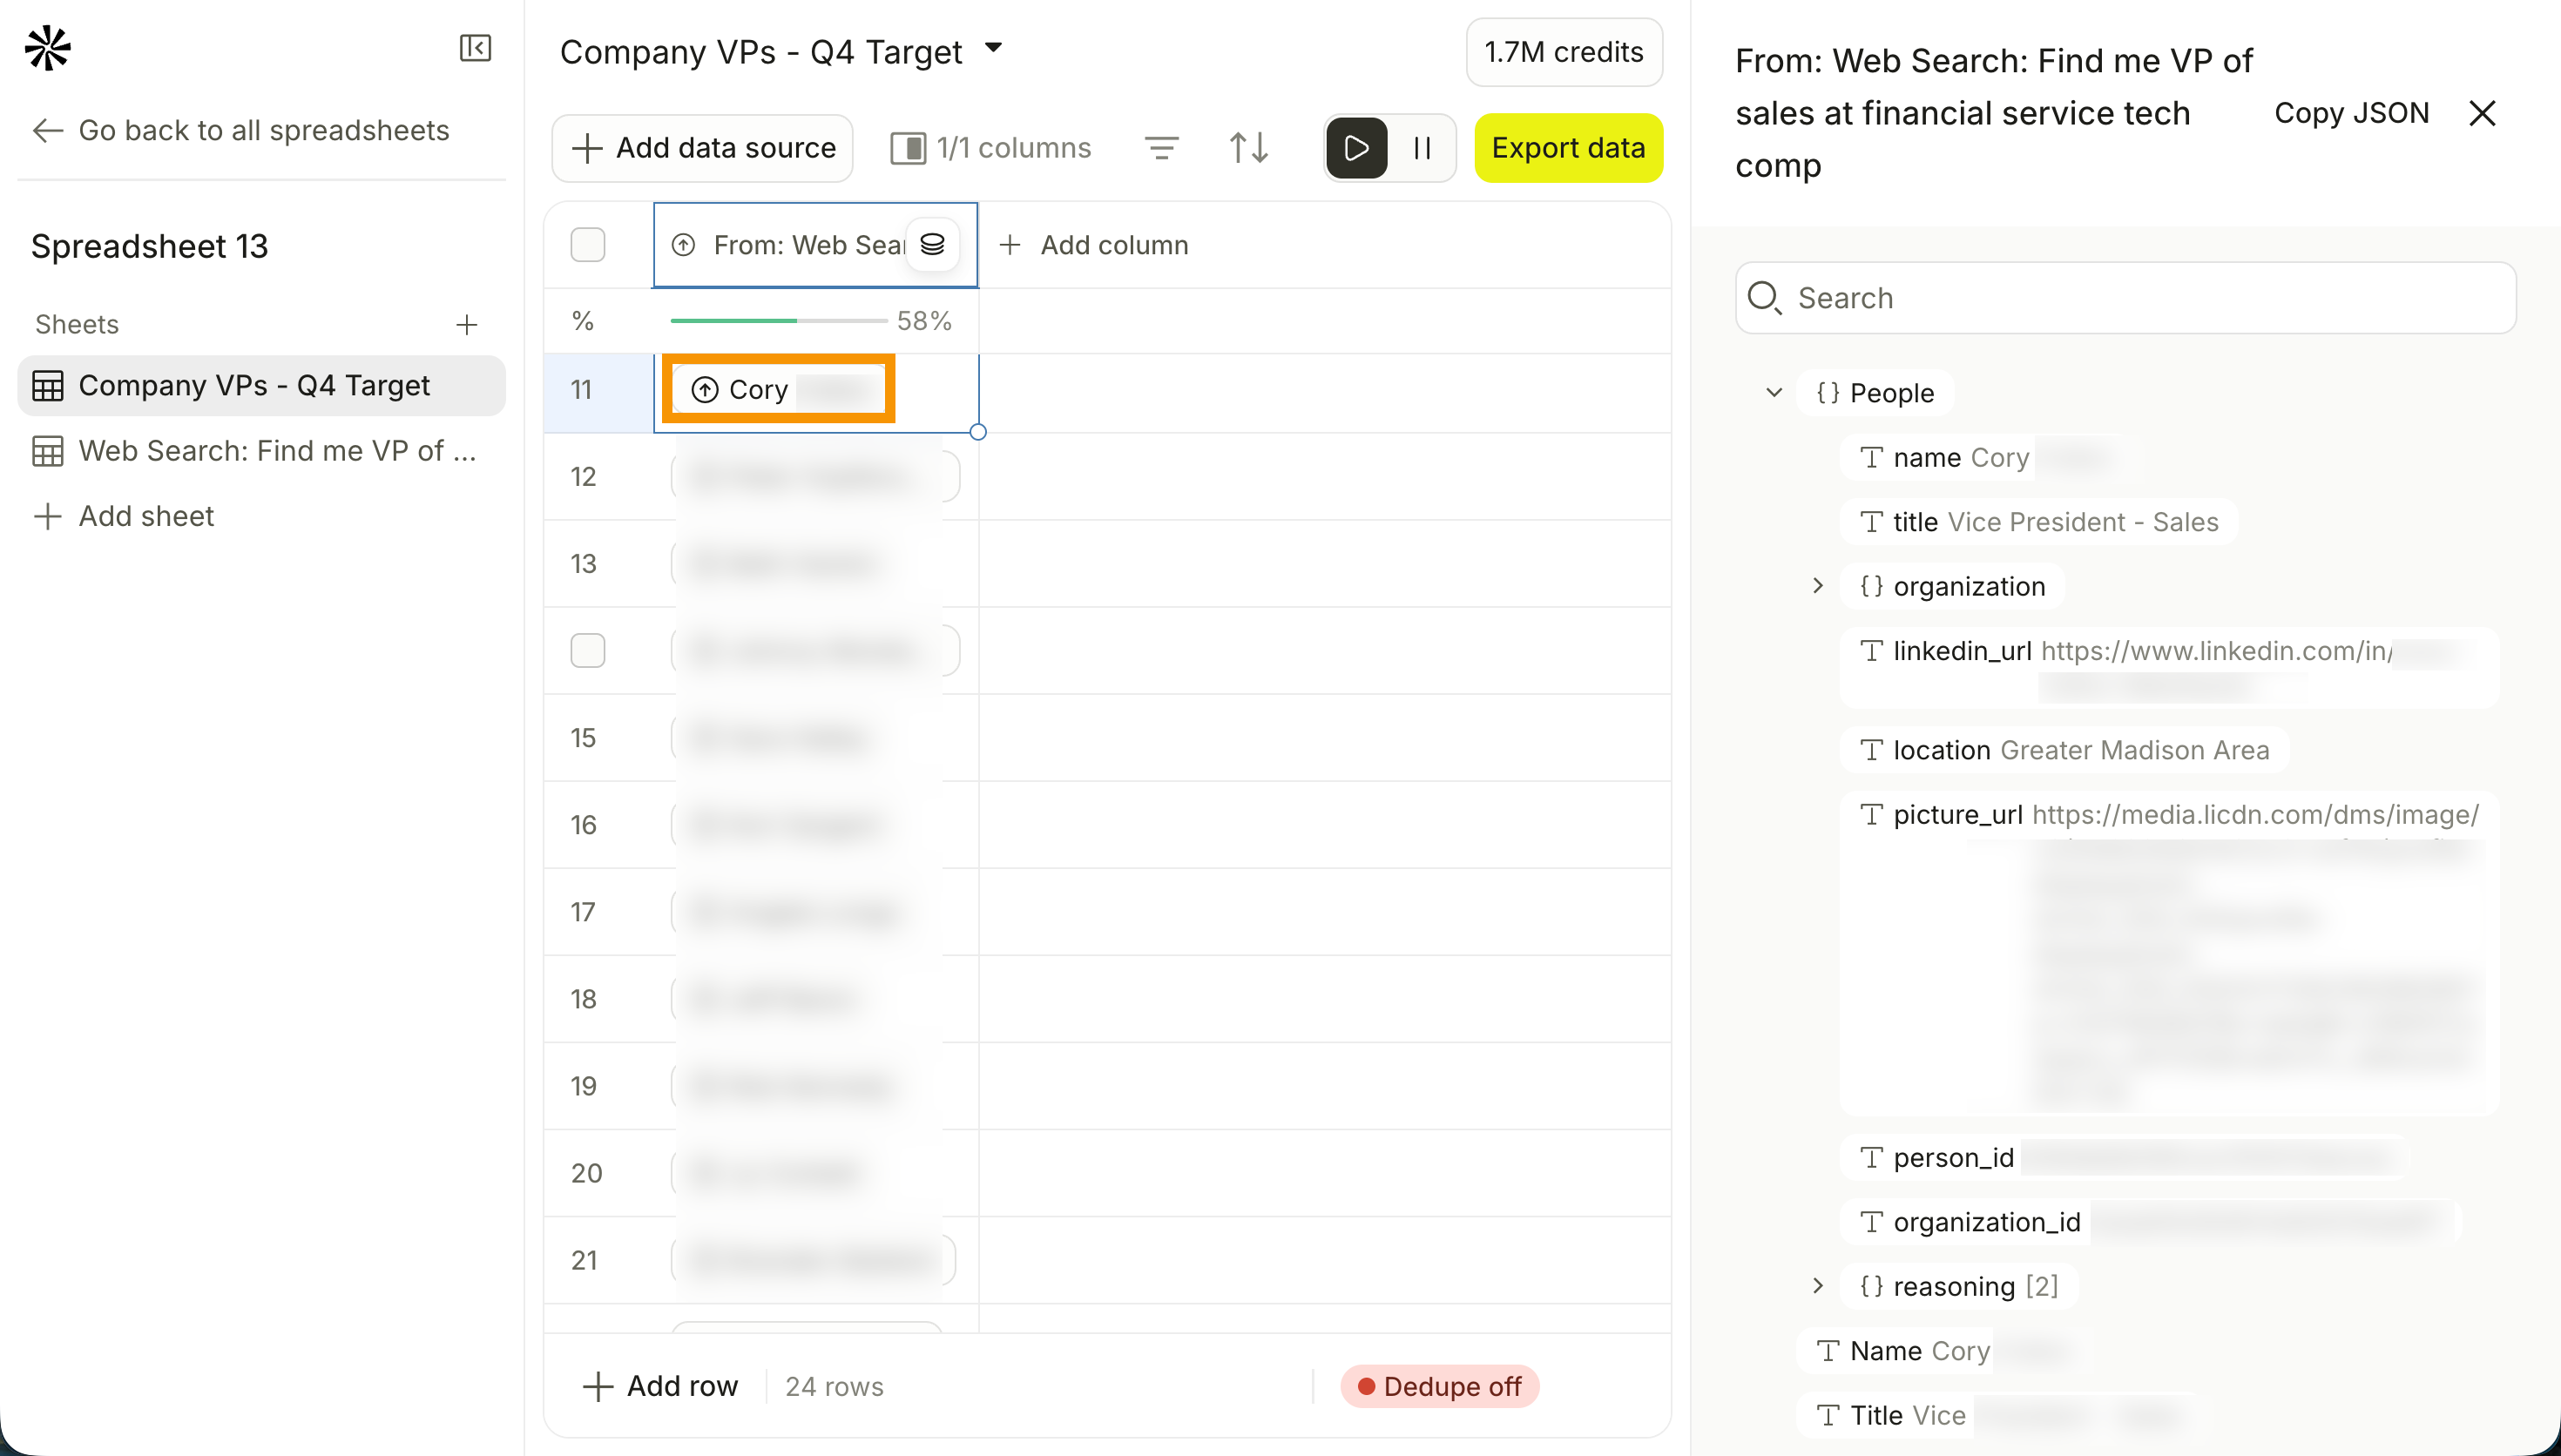
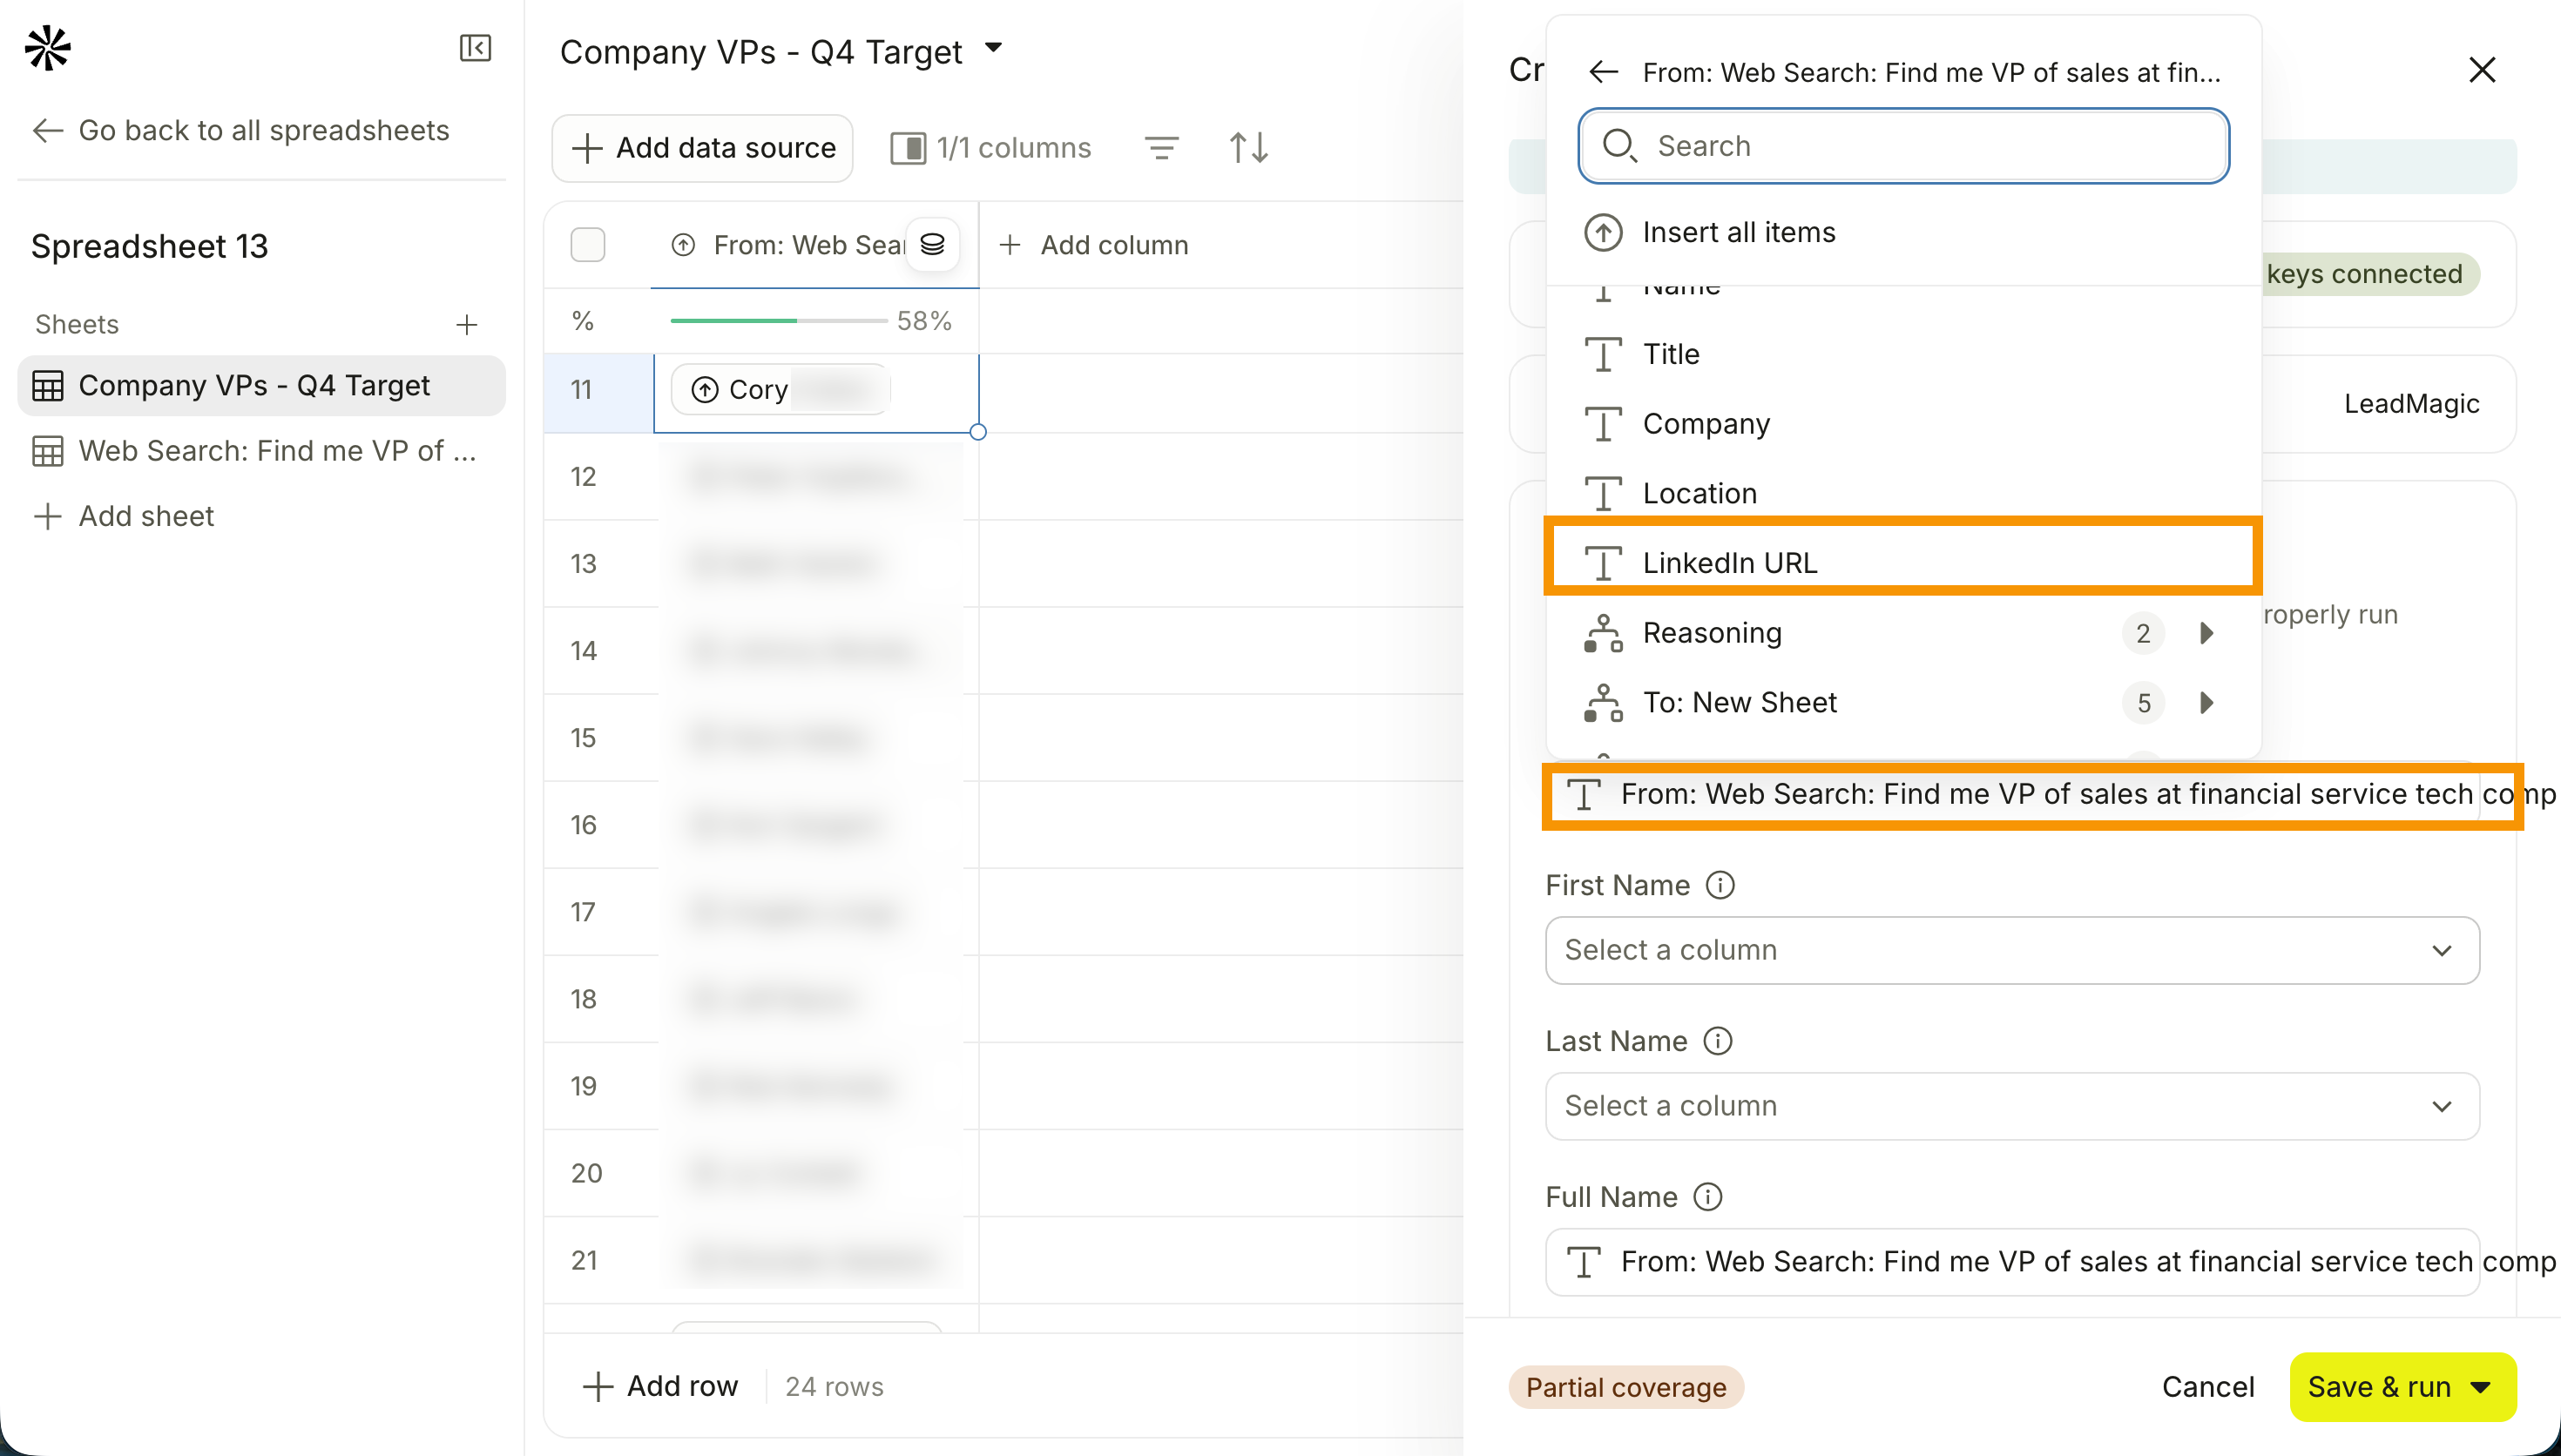
You can treat these rows like any other data in the destination sheet. For example, if a row includes a LinkedIn URL from the source sheet, you can use it to run an email enrichment column in the destination sheet.
Add to a sequence
Add the people in your sheet to an Apollo sequence.
- Click Add to sequence.
- Select an export destination:
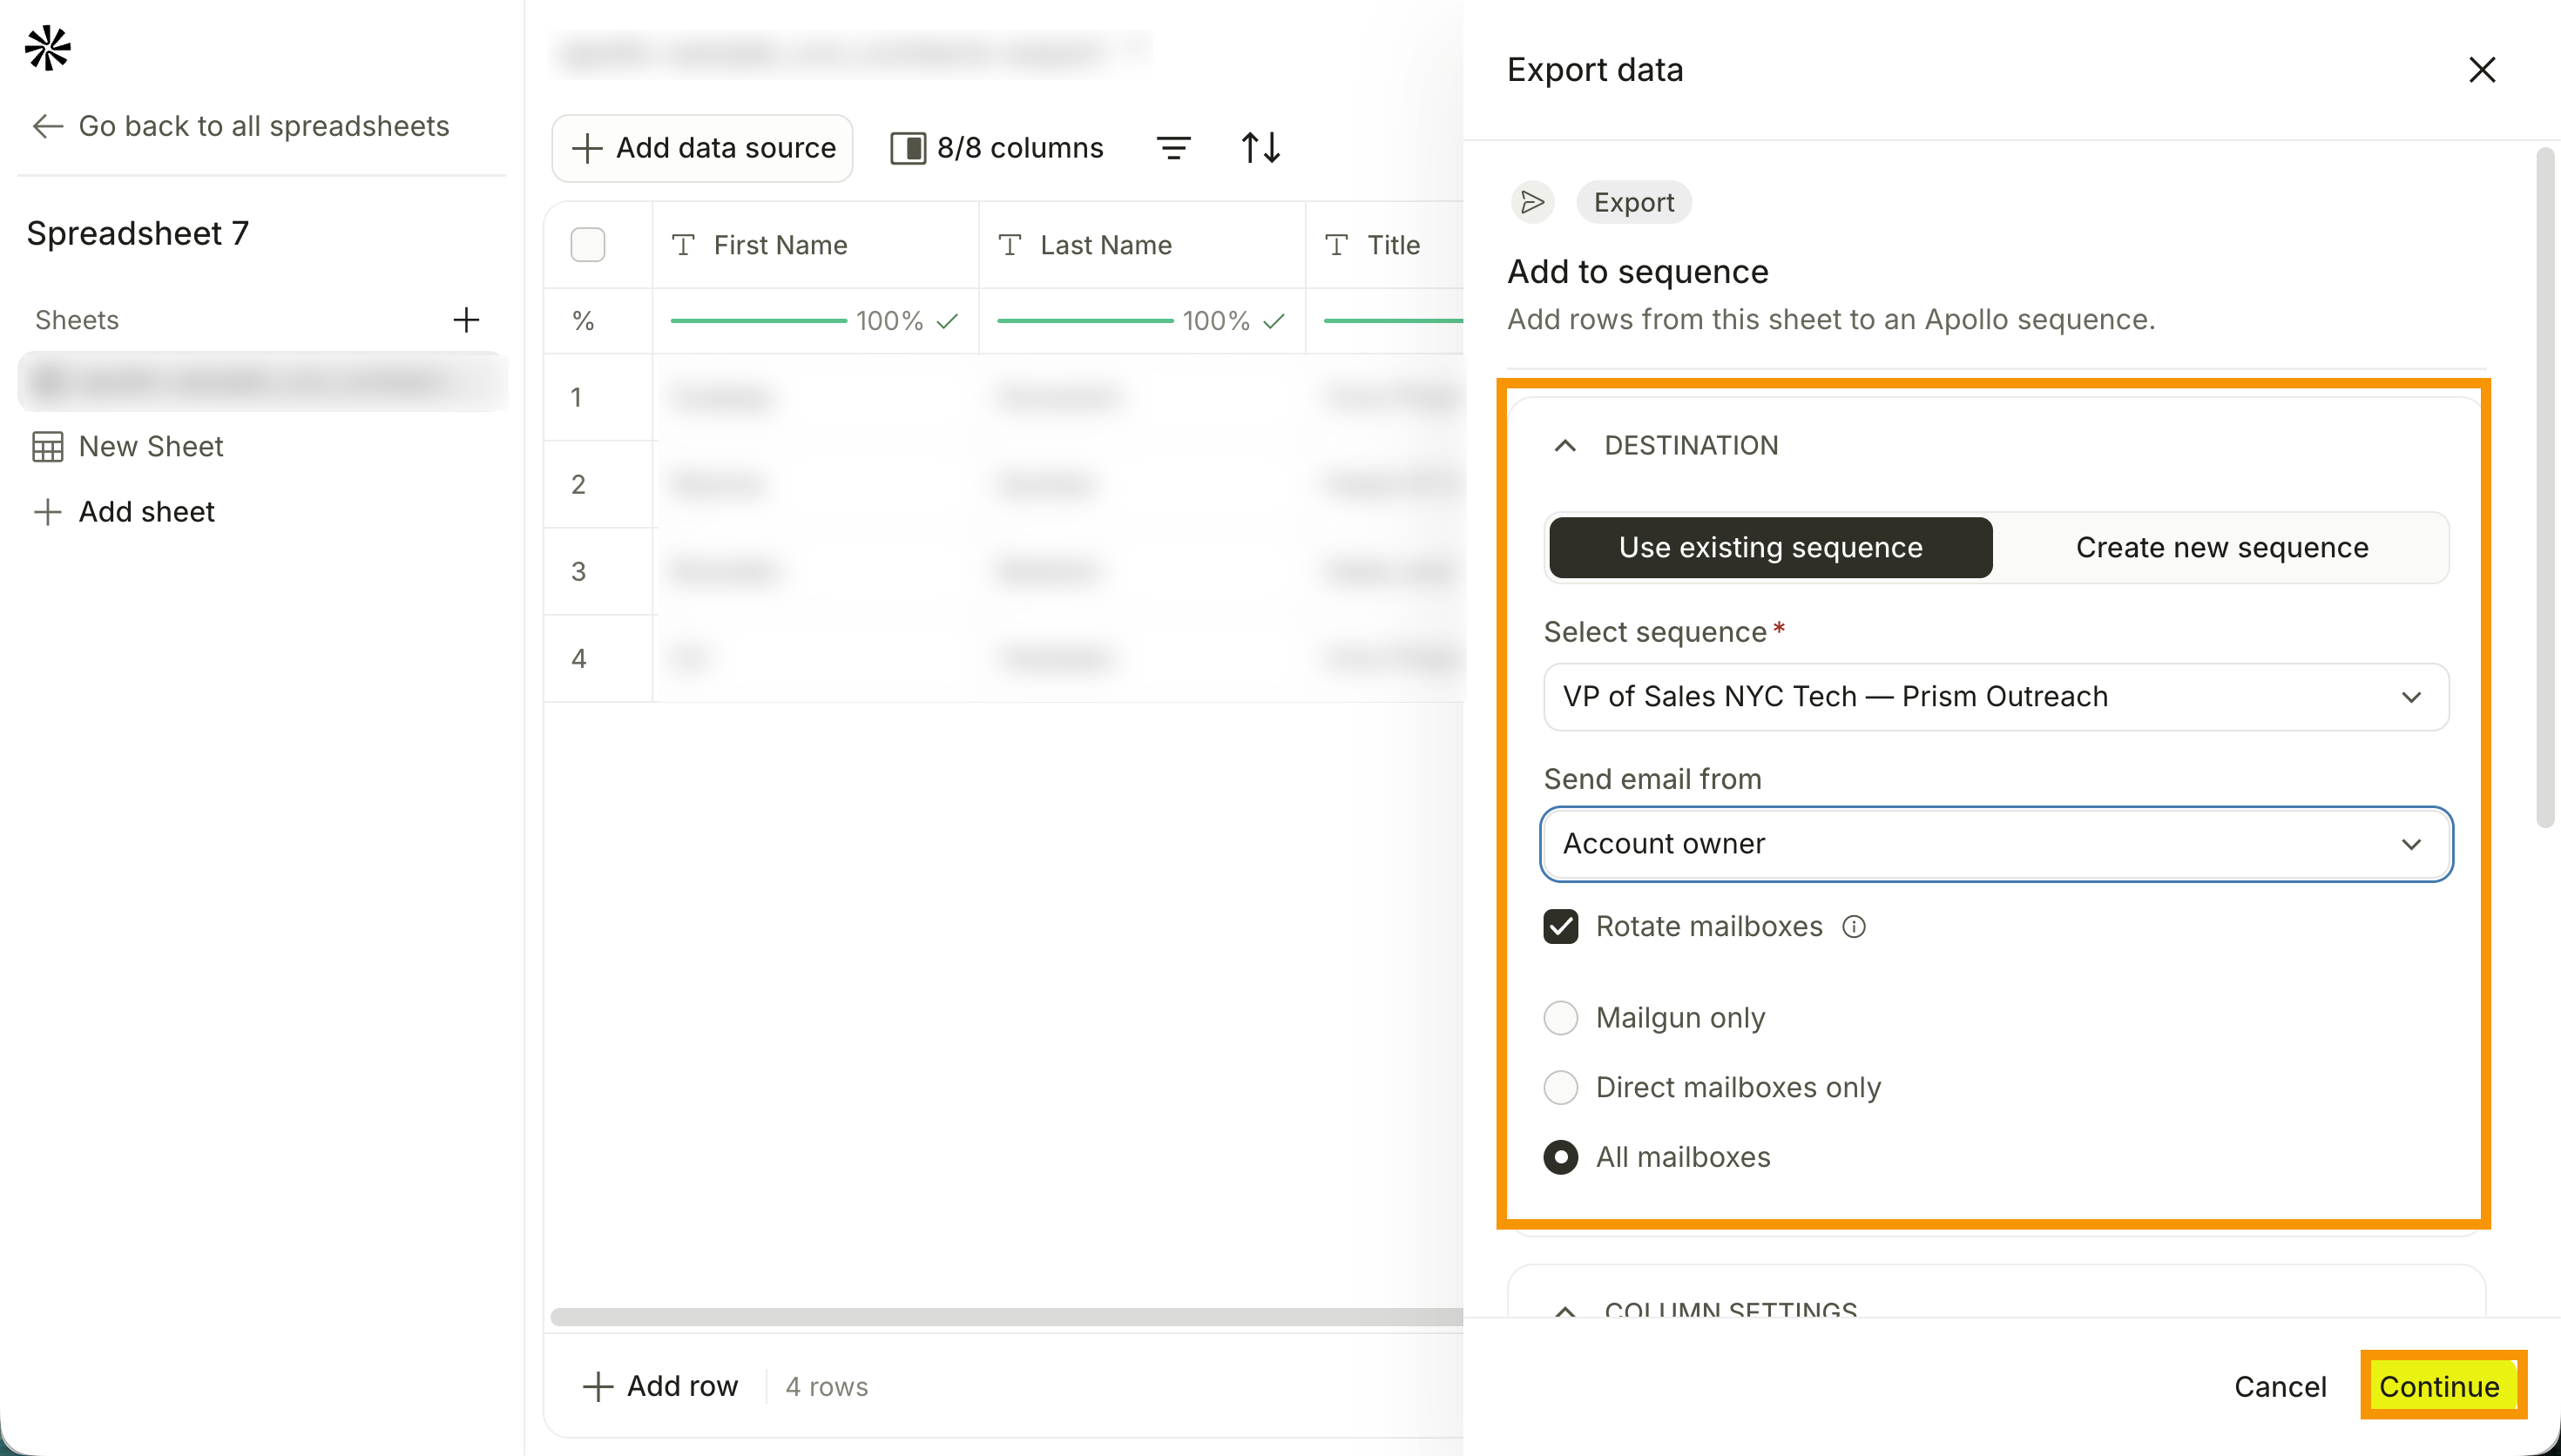
- Use existing sequence to add your data to a sequence that already exists, using its current messaging.
- Create new sequence to build a new sequence and populate its messaging directly from your sheet's columns.
Use existing sequence
- Select a target sequence.
- Select a sending email option:
- Specific user: Send emails from a specific user. Select the user from the dropdown.
- Account owner: Send emails from each contact's assigned account owner.
- Contact owner: Send emails from each contact's assigned contact owner.
- Mailbox from column: Send emails from the mailbox address listed in a column you select.
- User ID column: Send emails from the user whose ID appears in a column you select.
- Round robin: Rotate sending across a set of users you select from the dropdown.
- Toggle on Rotate mailboxes to rotate the sending email address across your selected mailboxes. Apollo dynamically assigns a mailbox based on each mailbox's sending limit, prioritizing sending speed over using one specific mailbox.
- Enter a column name.
- (Optional) Toggle on Auto-run column to run the export automatically when new rows are added or a value changes.
- (Optional) Toggle on Schedule run, then enter your preferred cadence and time.
- (Optional) Toggle on Only run when condition is met to set criteria for running the export, then enter your criteria. Type
{{to add columns or use formulas. - Click Continue. Apollo suggests mapped columns for you.
 From Row to Record
A sheet row can contain any data, but when you add rows to a sequence, add them to a list, or export them to Apollo, Apollo needs to know what each row represents.
Field mapping tells Apollo which sheet columns correspond to Apollo fields, such as name, email, LinkedIn URL, company name, or domain. For people and companies, Apollo can use the selected match fields and duplicate-handling option to update existing records or create new ones. Deals are created as new records.
- Map your columns to your fields. Click Add mapping to map more fields, or Remove mapping to delete a mapping.
- Click Save & run to save the export and run it. Alternatively, click ▾, then click Save & run first ten rows to run only the first ten rows, Save & run all rows to run every row, or Save & don't run to save without running.
Create new sequence
- Select a target sequence.
- Select a sending email option:
- Specific user: Send emails from a specific user. Select the user from the dropdown.
- Account owner: Send emails from each contact's assigned account owner.
- Contact owner: Send emails from each contact's assigned contact owner.
- Mailbox from column: Send emails from the mailbox address listed in a column you select.
- User ID column: Send emails from the user whose ID appears in a column you select.
- Round robin: Rotate sending across a set of users you select from the dropdown.
- Toggle on Rotate mailboxes to rotate the sending email address across your selected mailboxes. Apollo dynamically assigns a mailbox based on each mailbox's sending limit, prioritizing sending speed over using one specific mailbox.
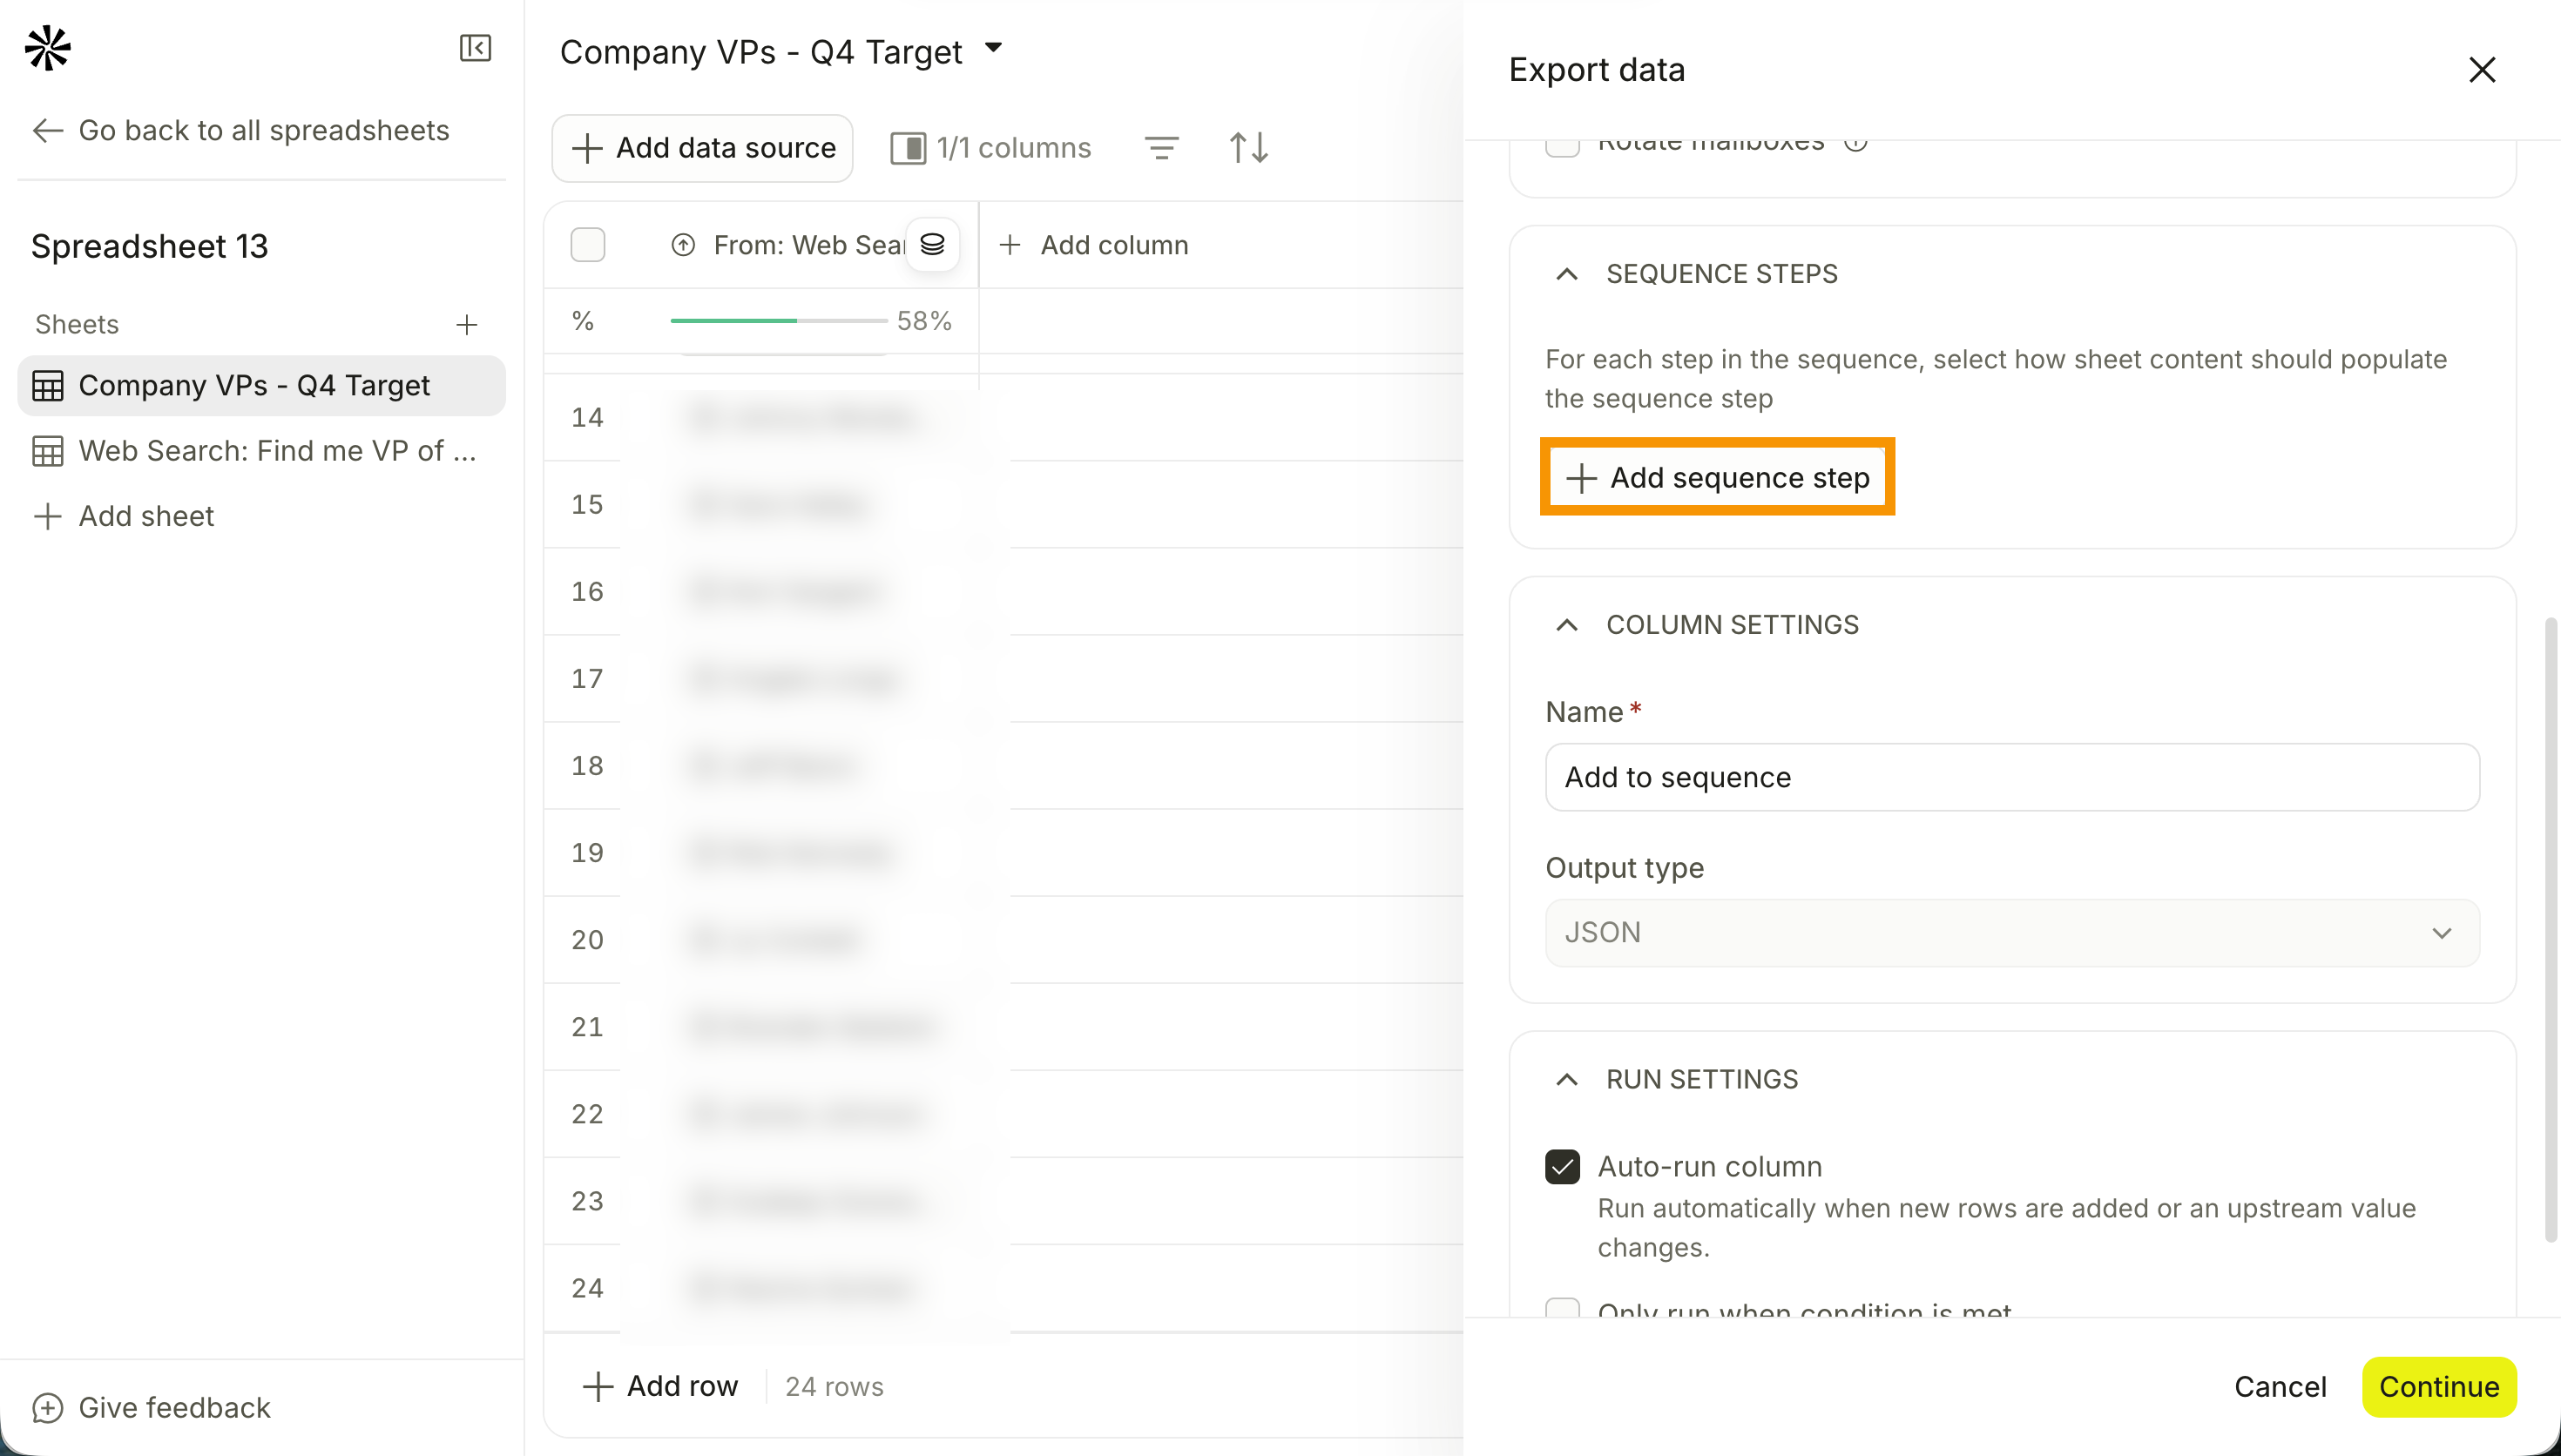
- Click Add sequence step, then choose a sequence step. You can mix and match sequence steps to tailor your approach to your target audience and run a multichannel outreach campaign.
 Personalize Every Step
In any sequence step, type
{{to insert a value from one of your sheet's columns.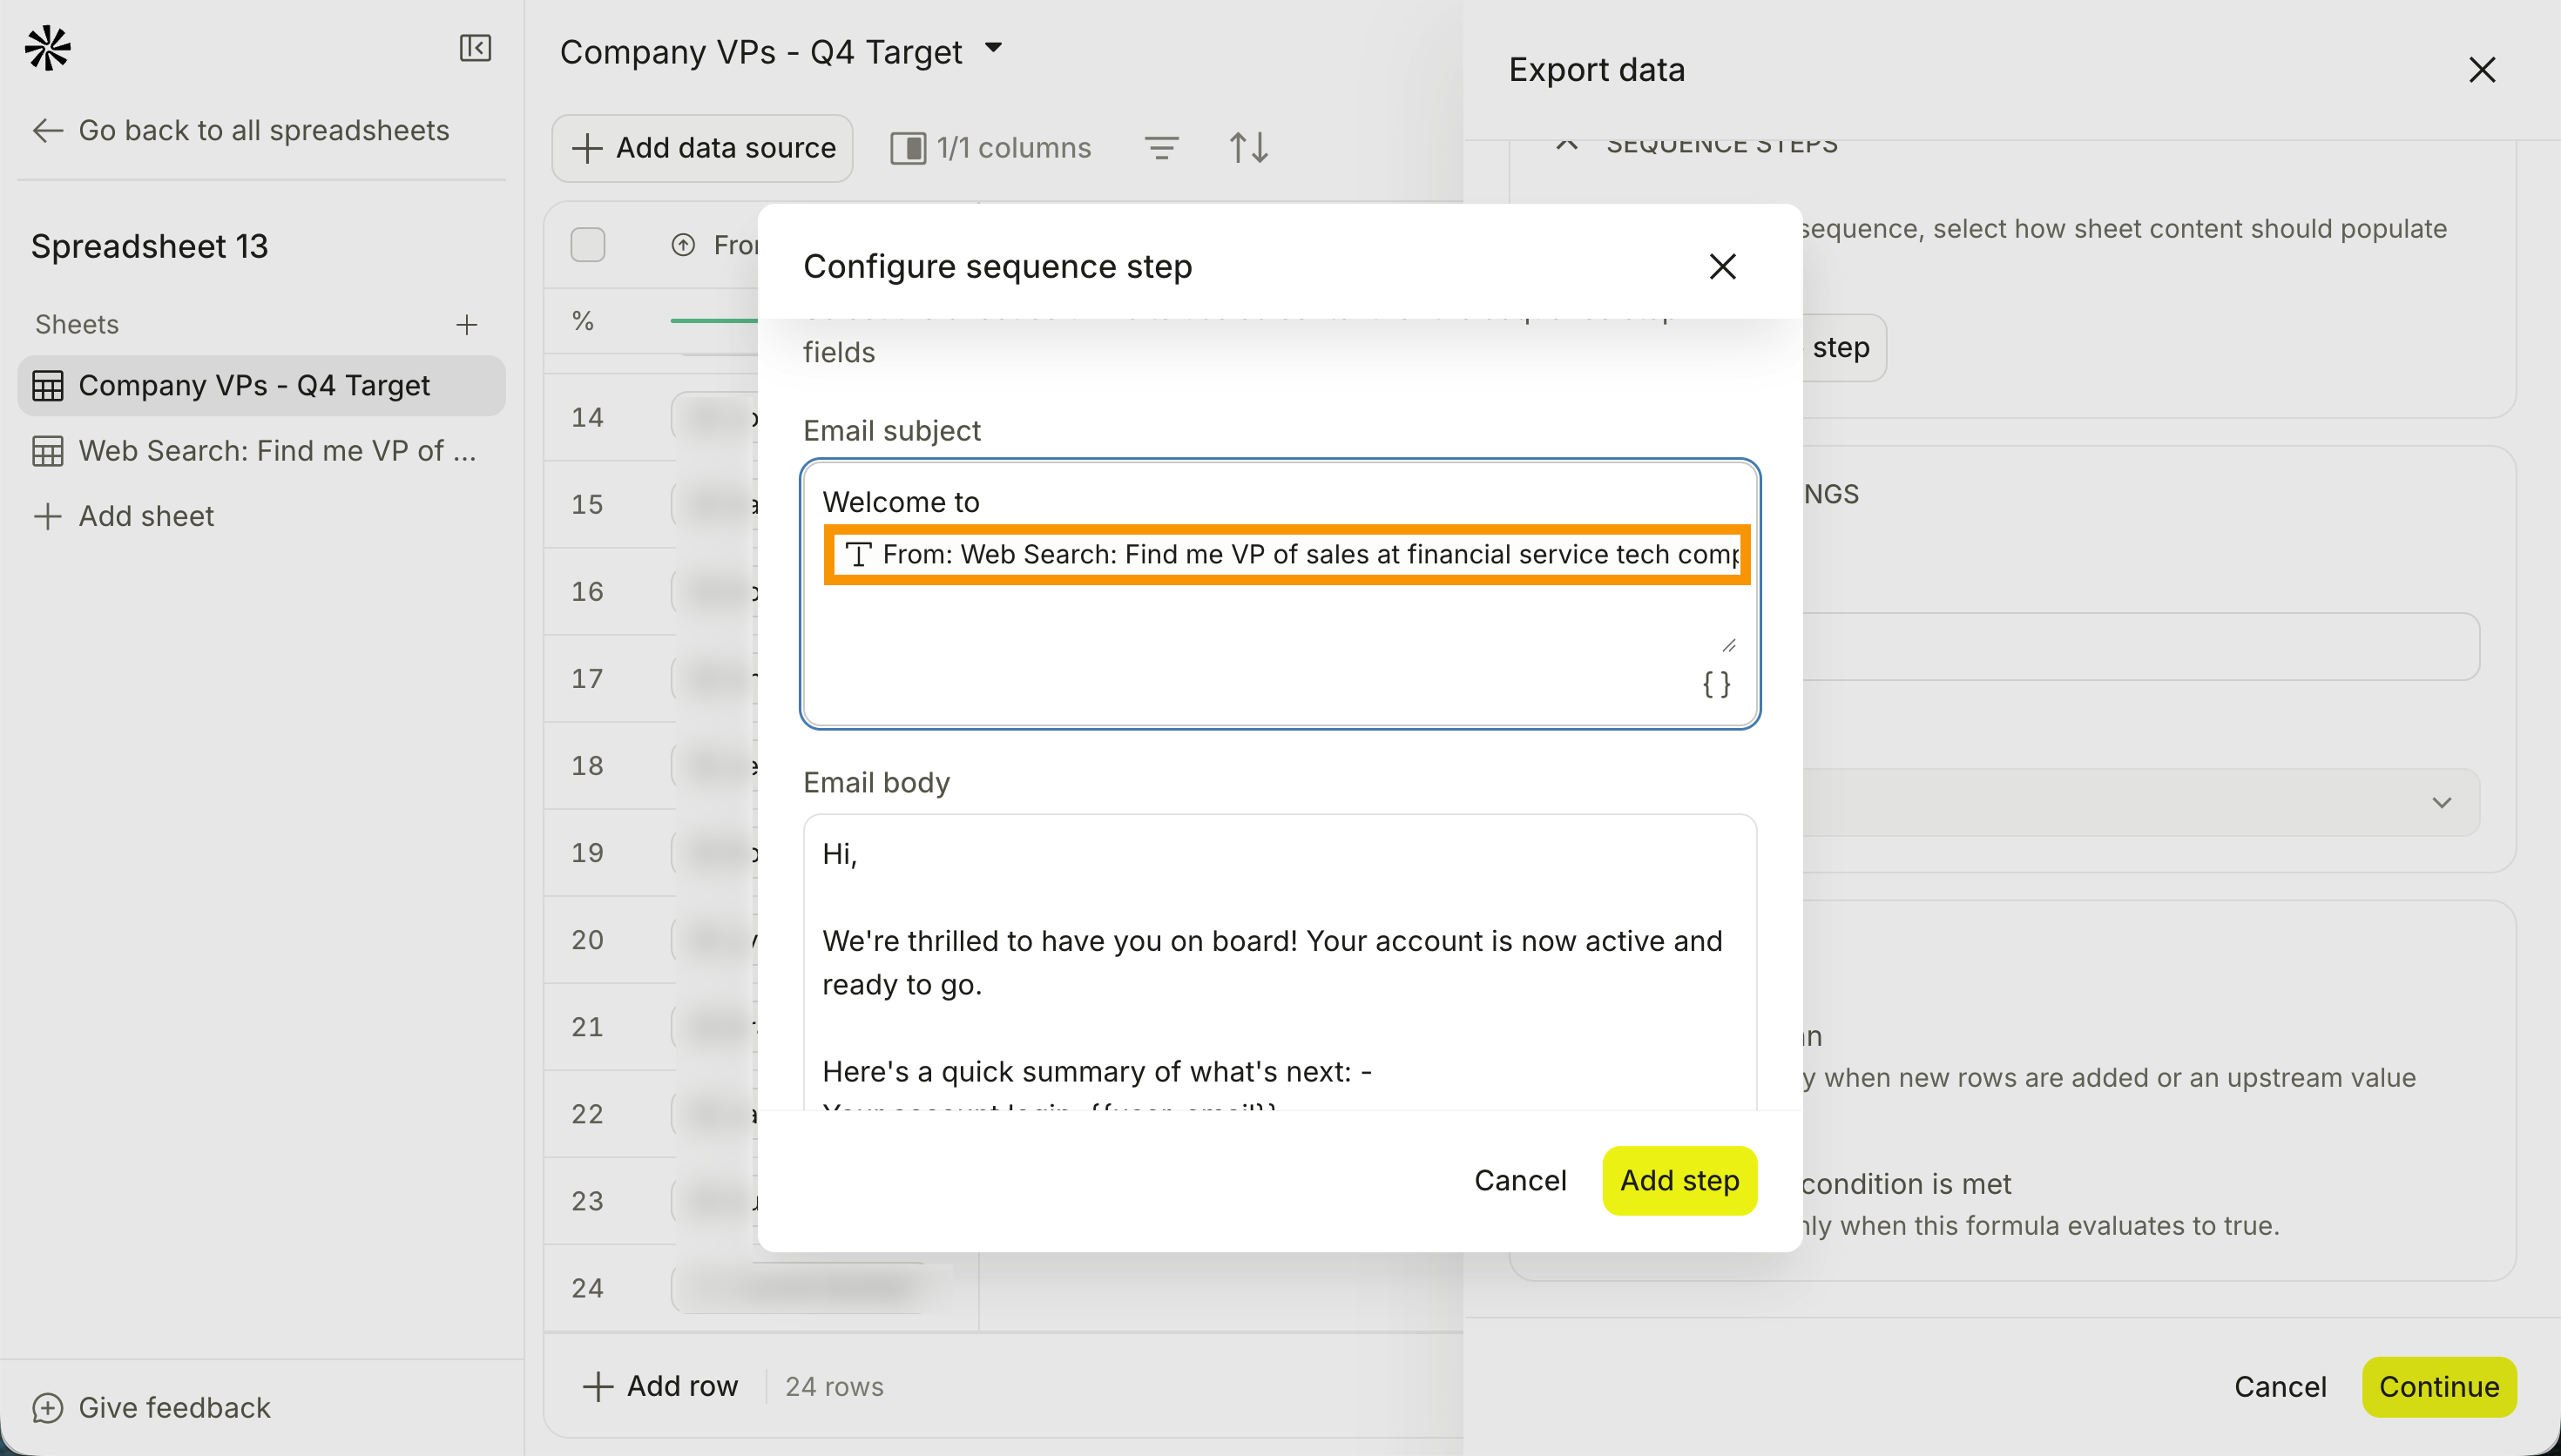
Apollo fills in that row's value for each contact. Check out Transform Data with Columns for more on how column references work.
The following sequence steps are available:
Automatic email Create emails that you send automatically to reduce manual lift. Manual email Create manual email tasks and write the email from scratch. Phone call Create tasks to call prospects. You can use the dialer in Apollo to reach out without switching apps. Action items Create tasks to perform custom actions, like sending a gift or a handwritten note. LinkedIn ▸ Connection request Create personalized invitations to connect with contacts. LinkedIn ▸ Send message Send personalized direct messages to contacts to build relationships. LinkedIn ▸ View profile View a contact's profile to gather key information for engagement. LinkedIn ▸ View posts View and interact with a contact's recent posts to foster engagement and visibility. - Enter a column name.
- (Optional) Toggle on Auto-run column to run the export automatically when new rows are added or a value changes.
- (Optional) Toggle on Schedule run, then enter your preferred cadence and time.
- (Optional) Toggle on Only run when condition is met to set criteria for running the export, then enter your criteria. Type
{{to add columns or use formulas. - Click Continue. Apollo suggests mapped columns for you.
From Row to RecordA sheet row can contain any data, but when you add rows to a sequence, add them to a list, or export them to Apollo, Apollo needs to know what each row represents.
Field mapping tells Apollo which sheet columns correspond to Apollo fields, such as name, email, LinkedIn URL, company name, or domain. For people and companies, Apollo can use the selected match fields and duplicate-handling option to update existing records or create new ones. Deals are created as new records.
- Map your columns to your fields. Click Add mapping to map more fields, or Remove mapping to delete a mapping.
- Click Save & run to save the export and run it. Alternatively, click ▾, then click Save & run first ten rows to run only the first ten rows, Save & run all rows to run every row, or Save & don't run to save without running.
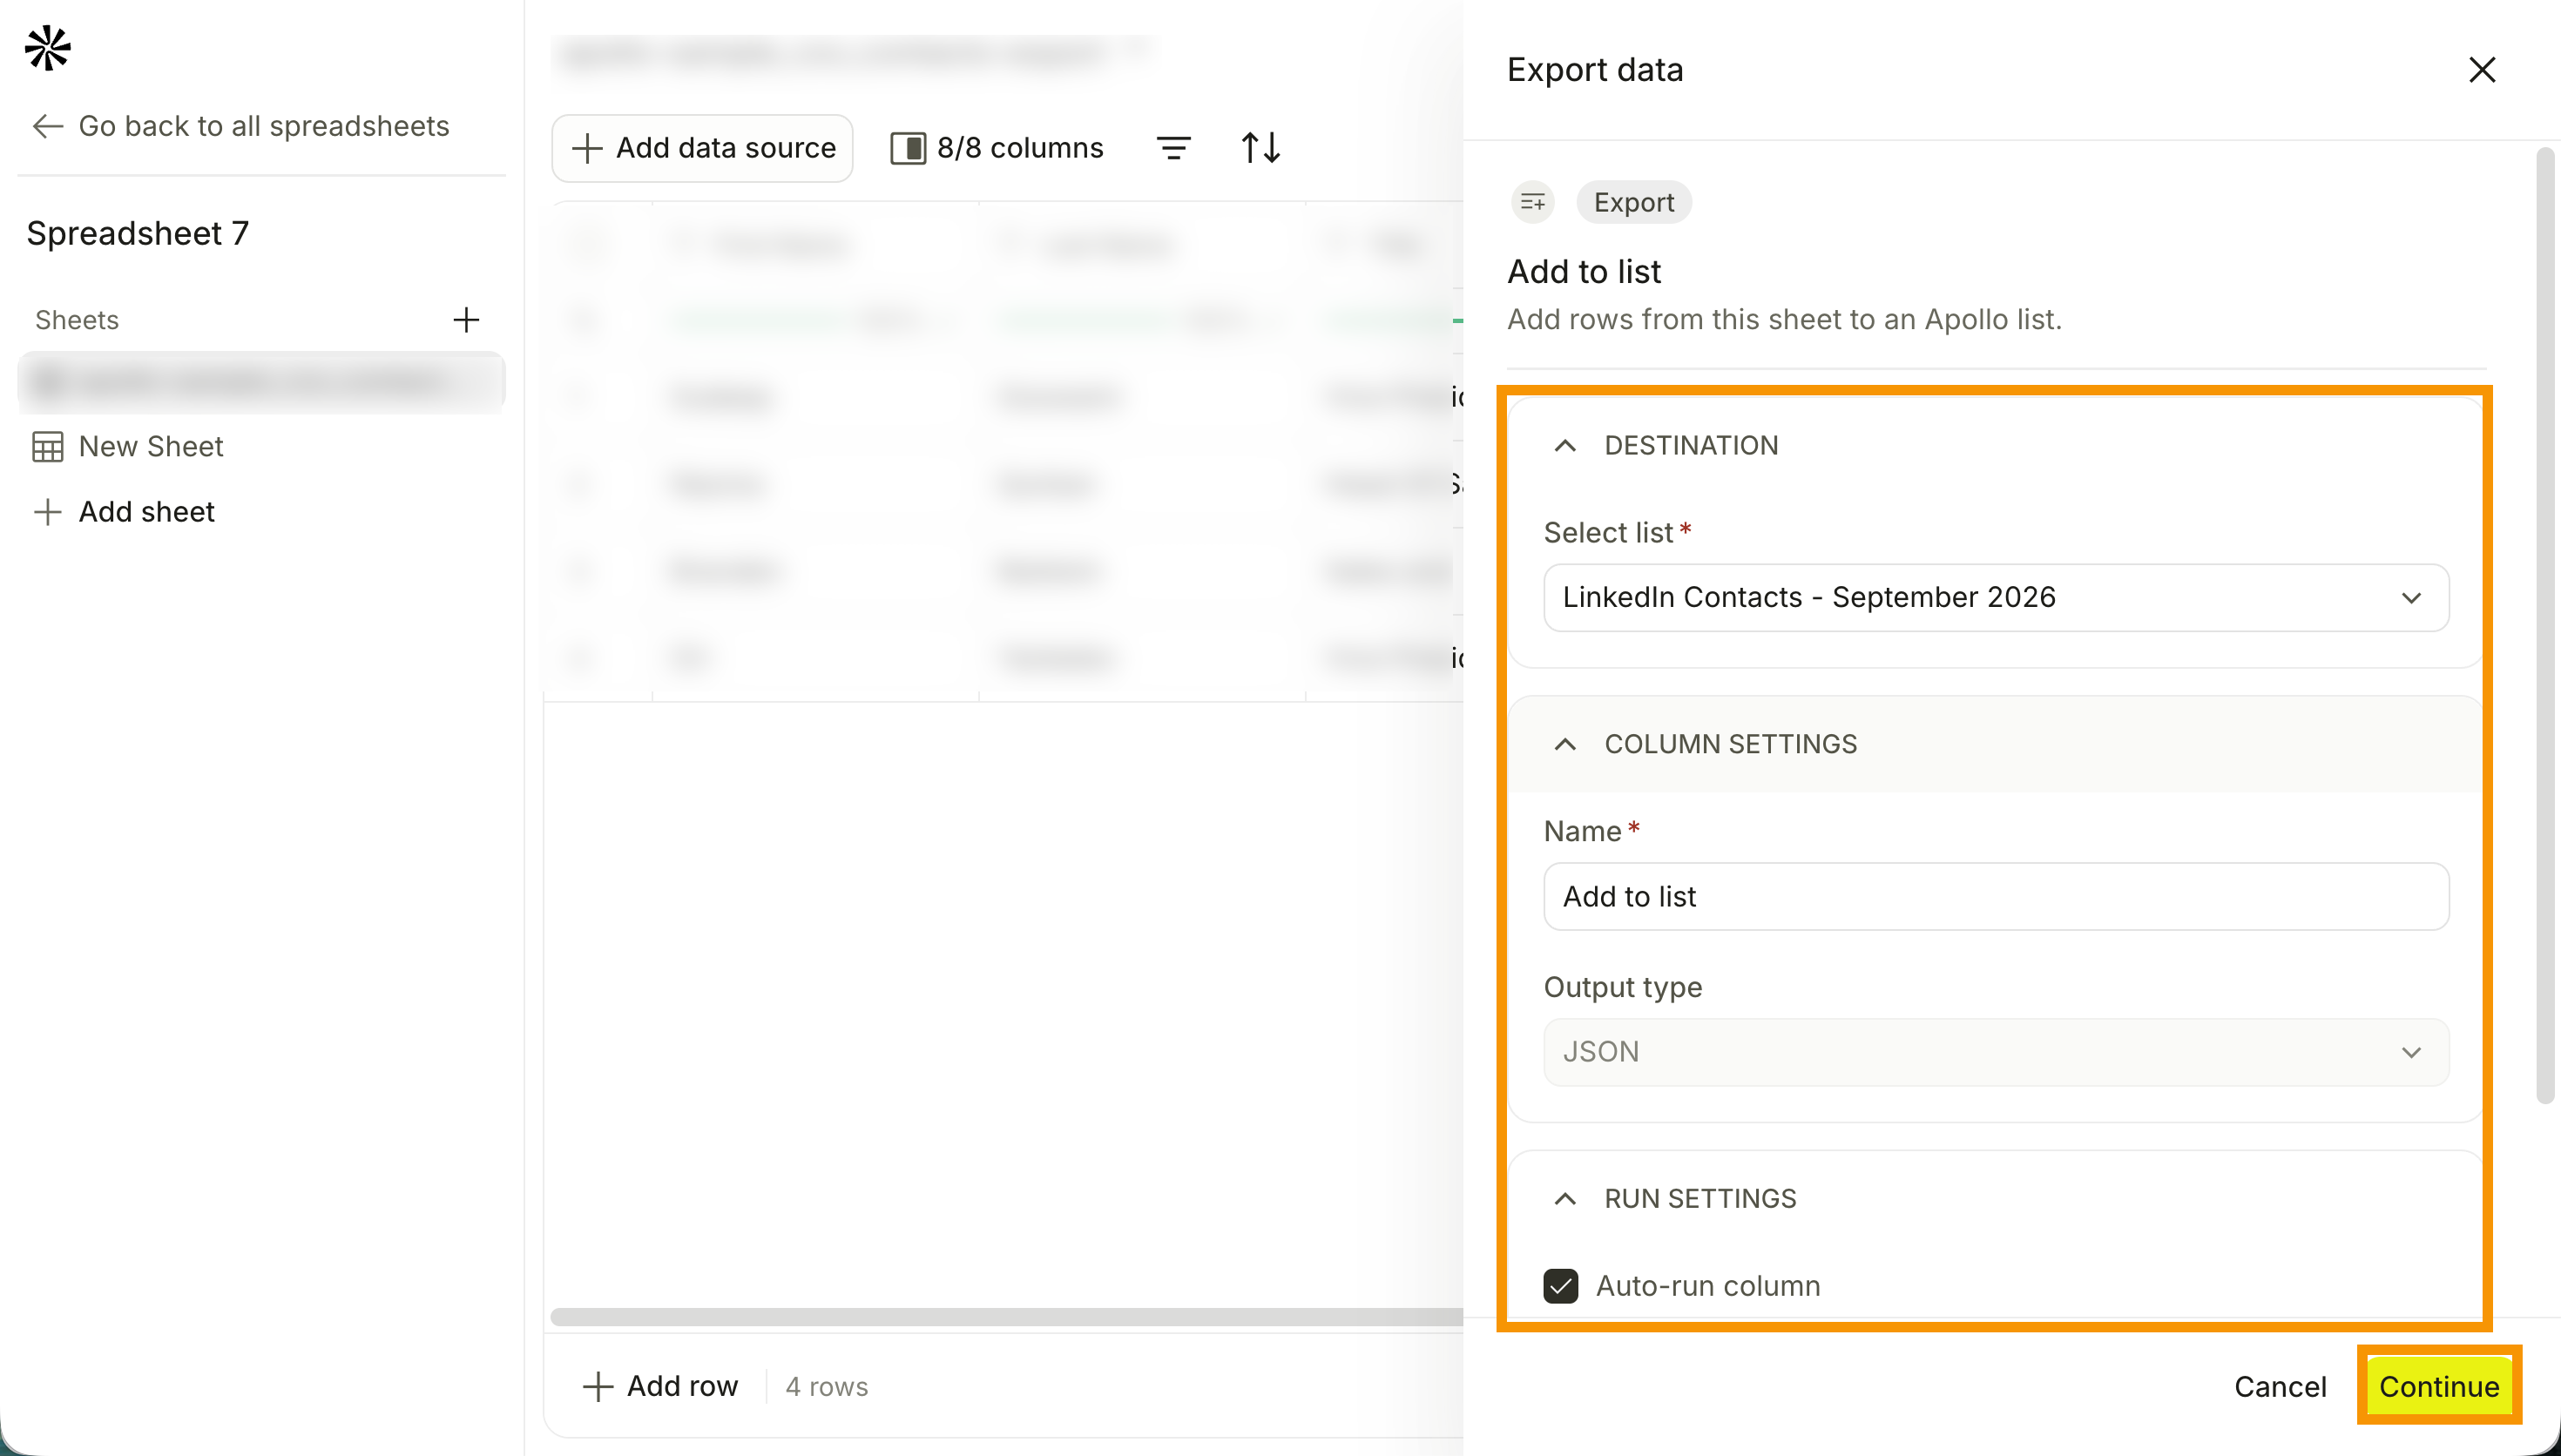
Add to a list
Add the records in your sheet to an Apollo list.
- Click Add to list.
- Select a list from the dropdown.
- Enter a column name.
- (Optional) Toggle on Auto-run column to run the export automatically when new rows are added or a value changes.
- (Optional) Toggle on Schedule run, then enter your preferred cadence and time.
- (Optional) Toggle on Only run when condition is met to set criteria for running the export, then enter your criteria. Type
{{to add columns or use formulas. - Click Continue.
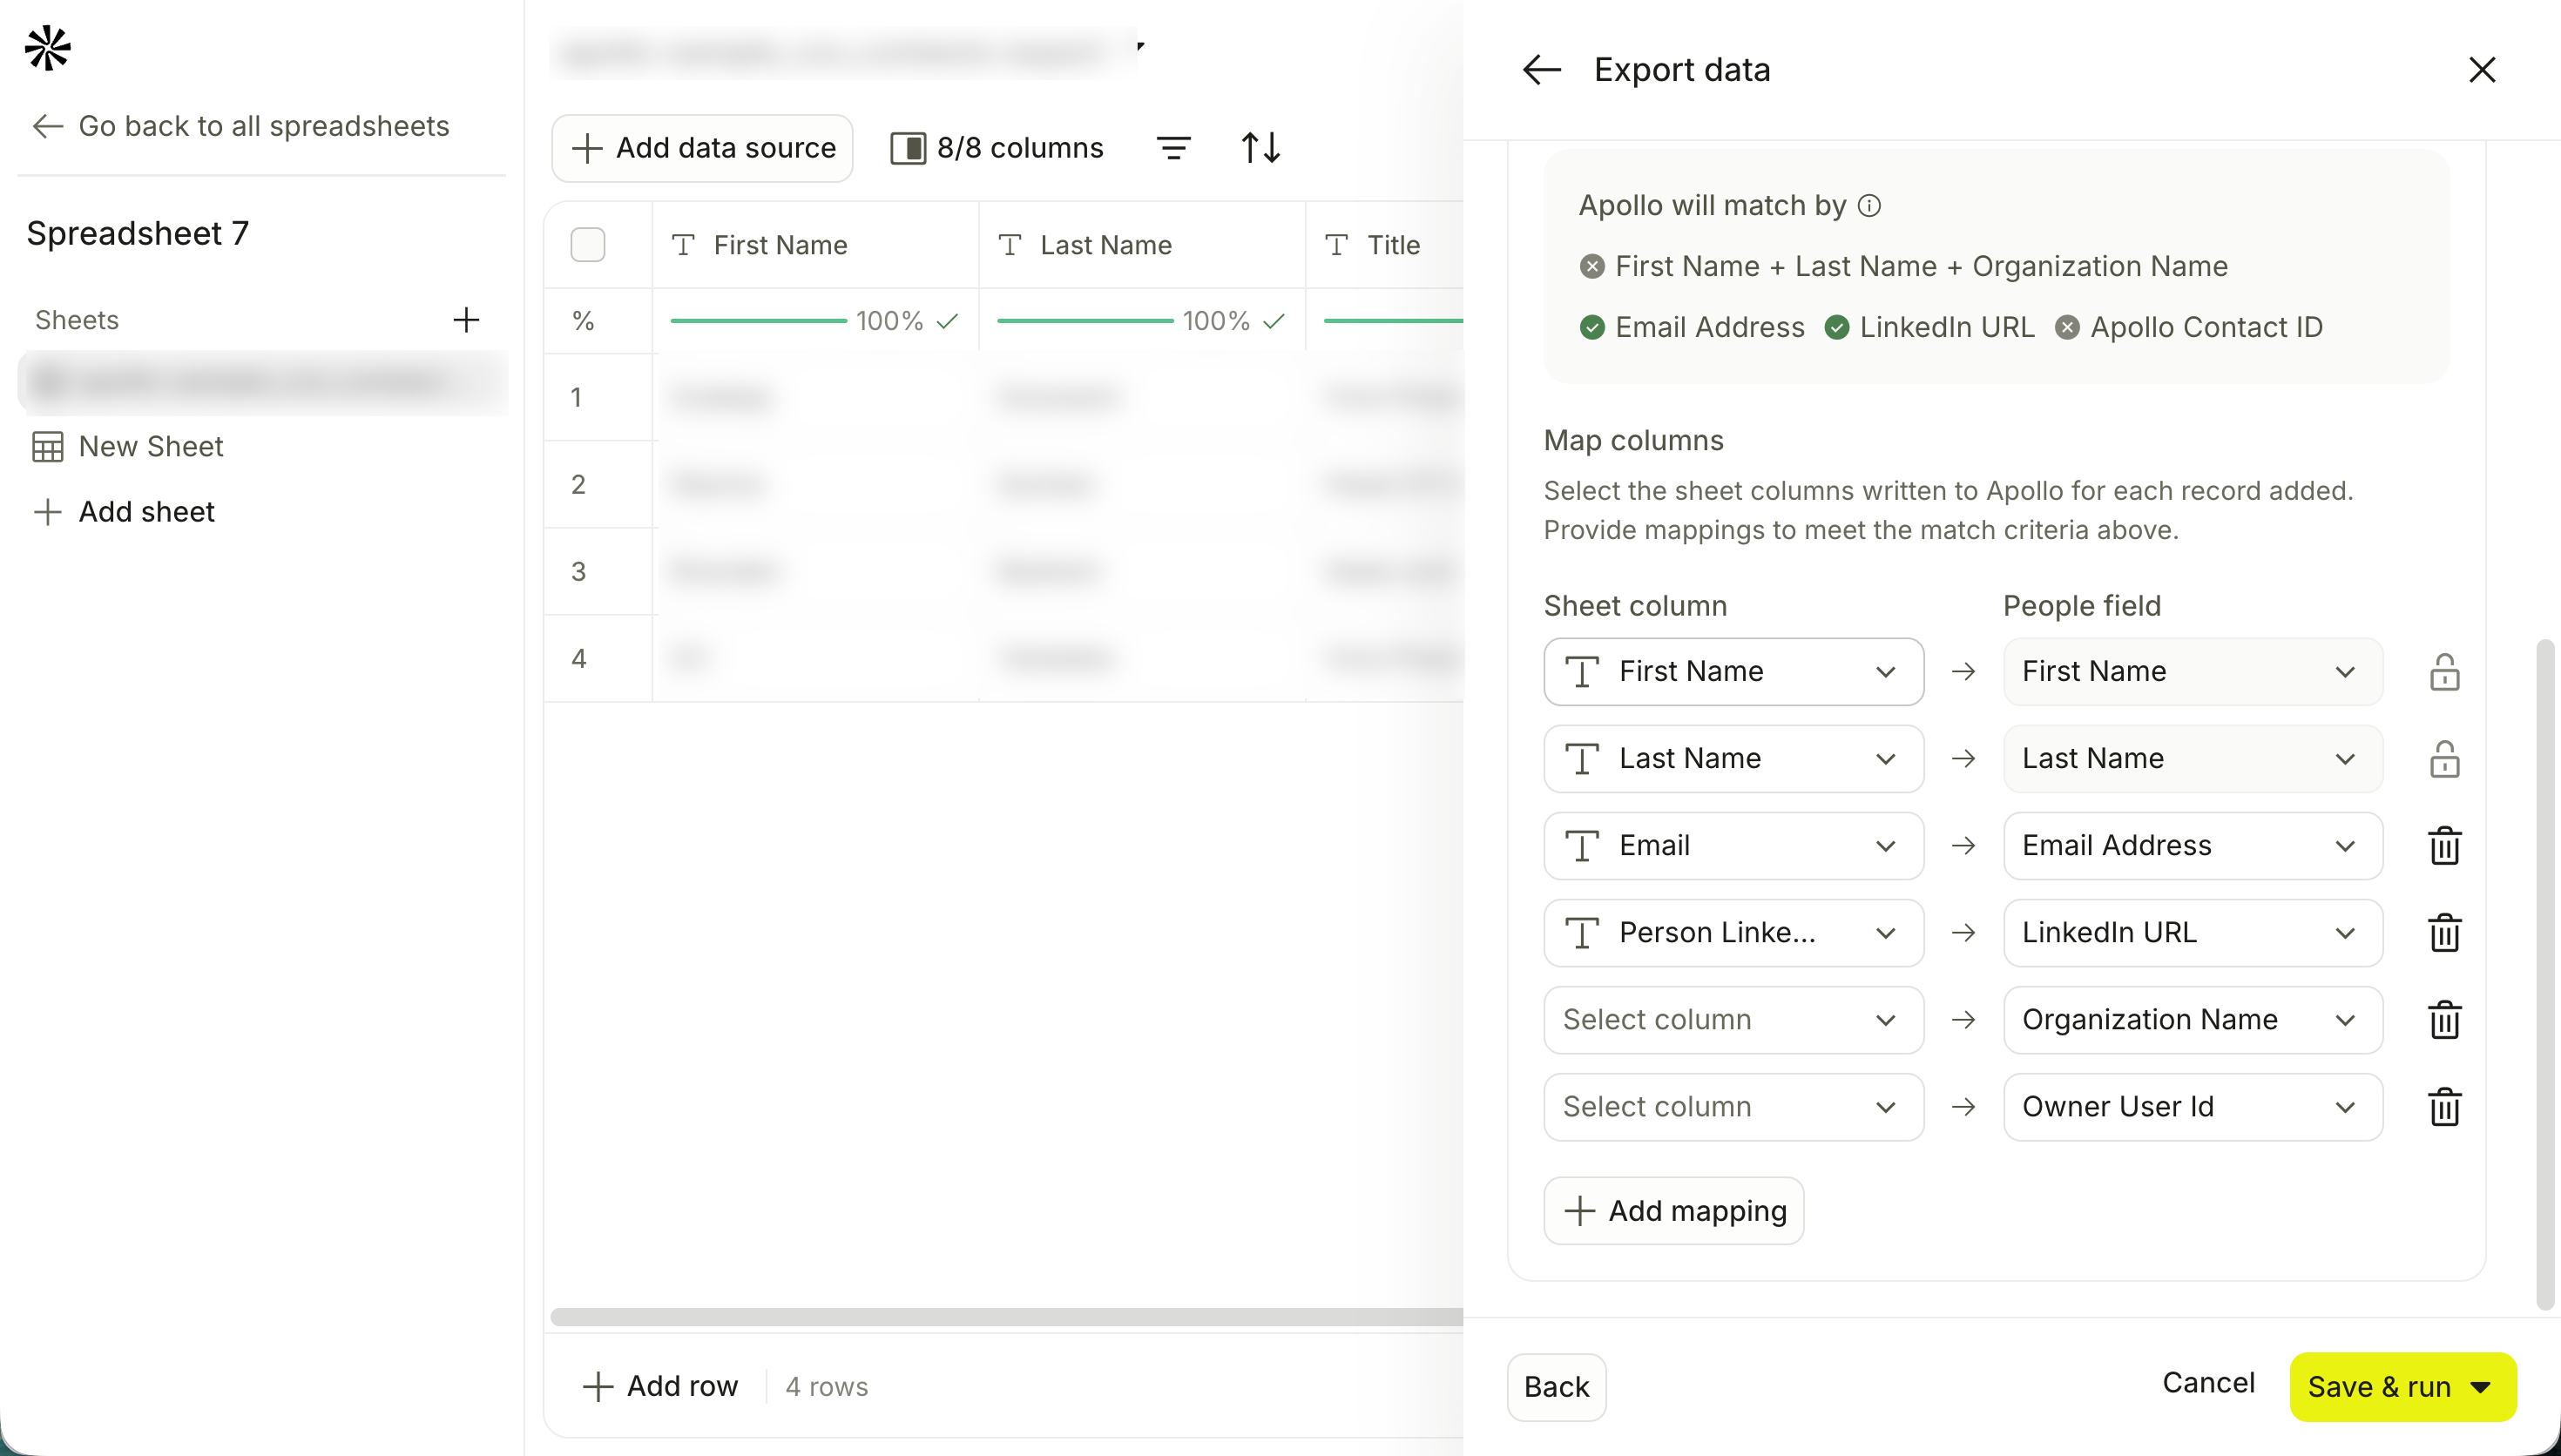
- Select whether to Update and create to update matched records and create new ones when no match exists, or Only create new records to create new records only.
- Map your columns to your fields. Apollo maps what it can for you, and mapping more fields improves your match rate. Click Add mapping to map more fields, or Remove mapping to delete a mapping.
A sheet row can contain any data, but when you add rows to a sequence, add them to a list, or export them to Apollo, Apollo needs to know what each row represents.
Field mapping tells Apollo which sheet columns correspond to Apollo fields, such as name, email, LinkedIn URL, company name, or domain. For people and companies, Apollo can use the selected match fields and duplicate-handling option to update existing records or create new ones. Deals are created as new records.
- Click Save & run to save the export and run it. Alternatively, click ▾, then click Save & run first ten rows to run only the first ten rows, Save & run all rows to run every row, or Save & don't run to save without running.
Export rows to Apollo
Write the rows in your sheet to your saved Apollo records.
- Click Export rows to Apollo.
- Select a destination object: people, companies, or deals.
- Enter a column name.
- (Optional) Toggle on Auto-run column to run the export automatically when new rows are added or a value changes.
- (Optional) Toggle on Schedule run, then enter your preferred cadence and time.
- (Optional) Toggle on Only run when condition is met to set criteria for running the export, then enter your criteria. Type
{{to add columns or use formulas. - Click Continue.
- Select whether to Update and create to update matched records and create new ones when no match exists, or Only create new records to create new records only.
- Map your columns to your fields. Apollo maps what it can for you, and mapping more fields improves your match rate. Click Add mapping to map more fields, or Remove mapping to delete a mapping.
A sheet row can contain any data, but when you add rows to a sequence, add them to a list, or export them to Apollo, Apollo needs to know what each row represents.
Field mapping tells Apollo which sheet columns correspond to Apollo fields, such as name, email, LinkedIn URL, company name, or domain. For people and companies, Apollo can use the selected match fields and duplicate-handling option to update existing records or create new ones. Deals are created as new records.
- Click Save & run to save the export and run it. Alternatively, click ▾, then click Save & run first ten rows to run only the first ten rows, Save & run all rows to run every row, or Save & don't run to save without running.
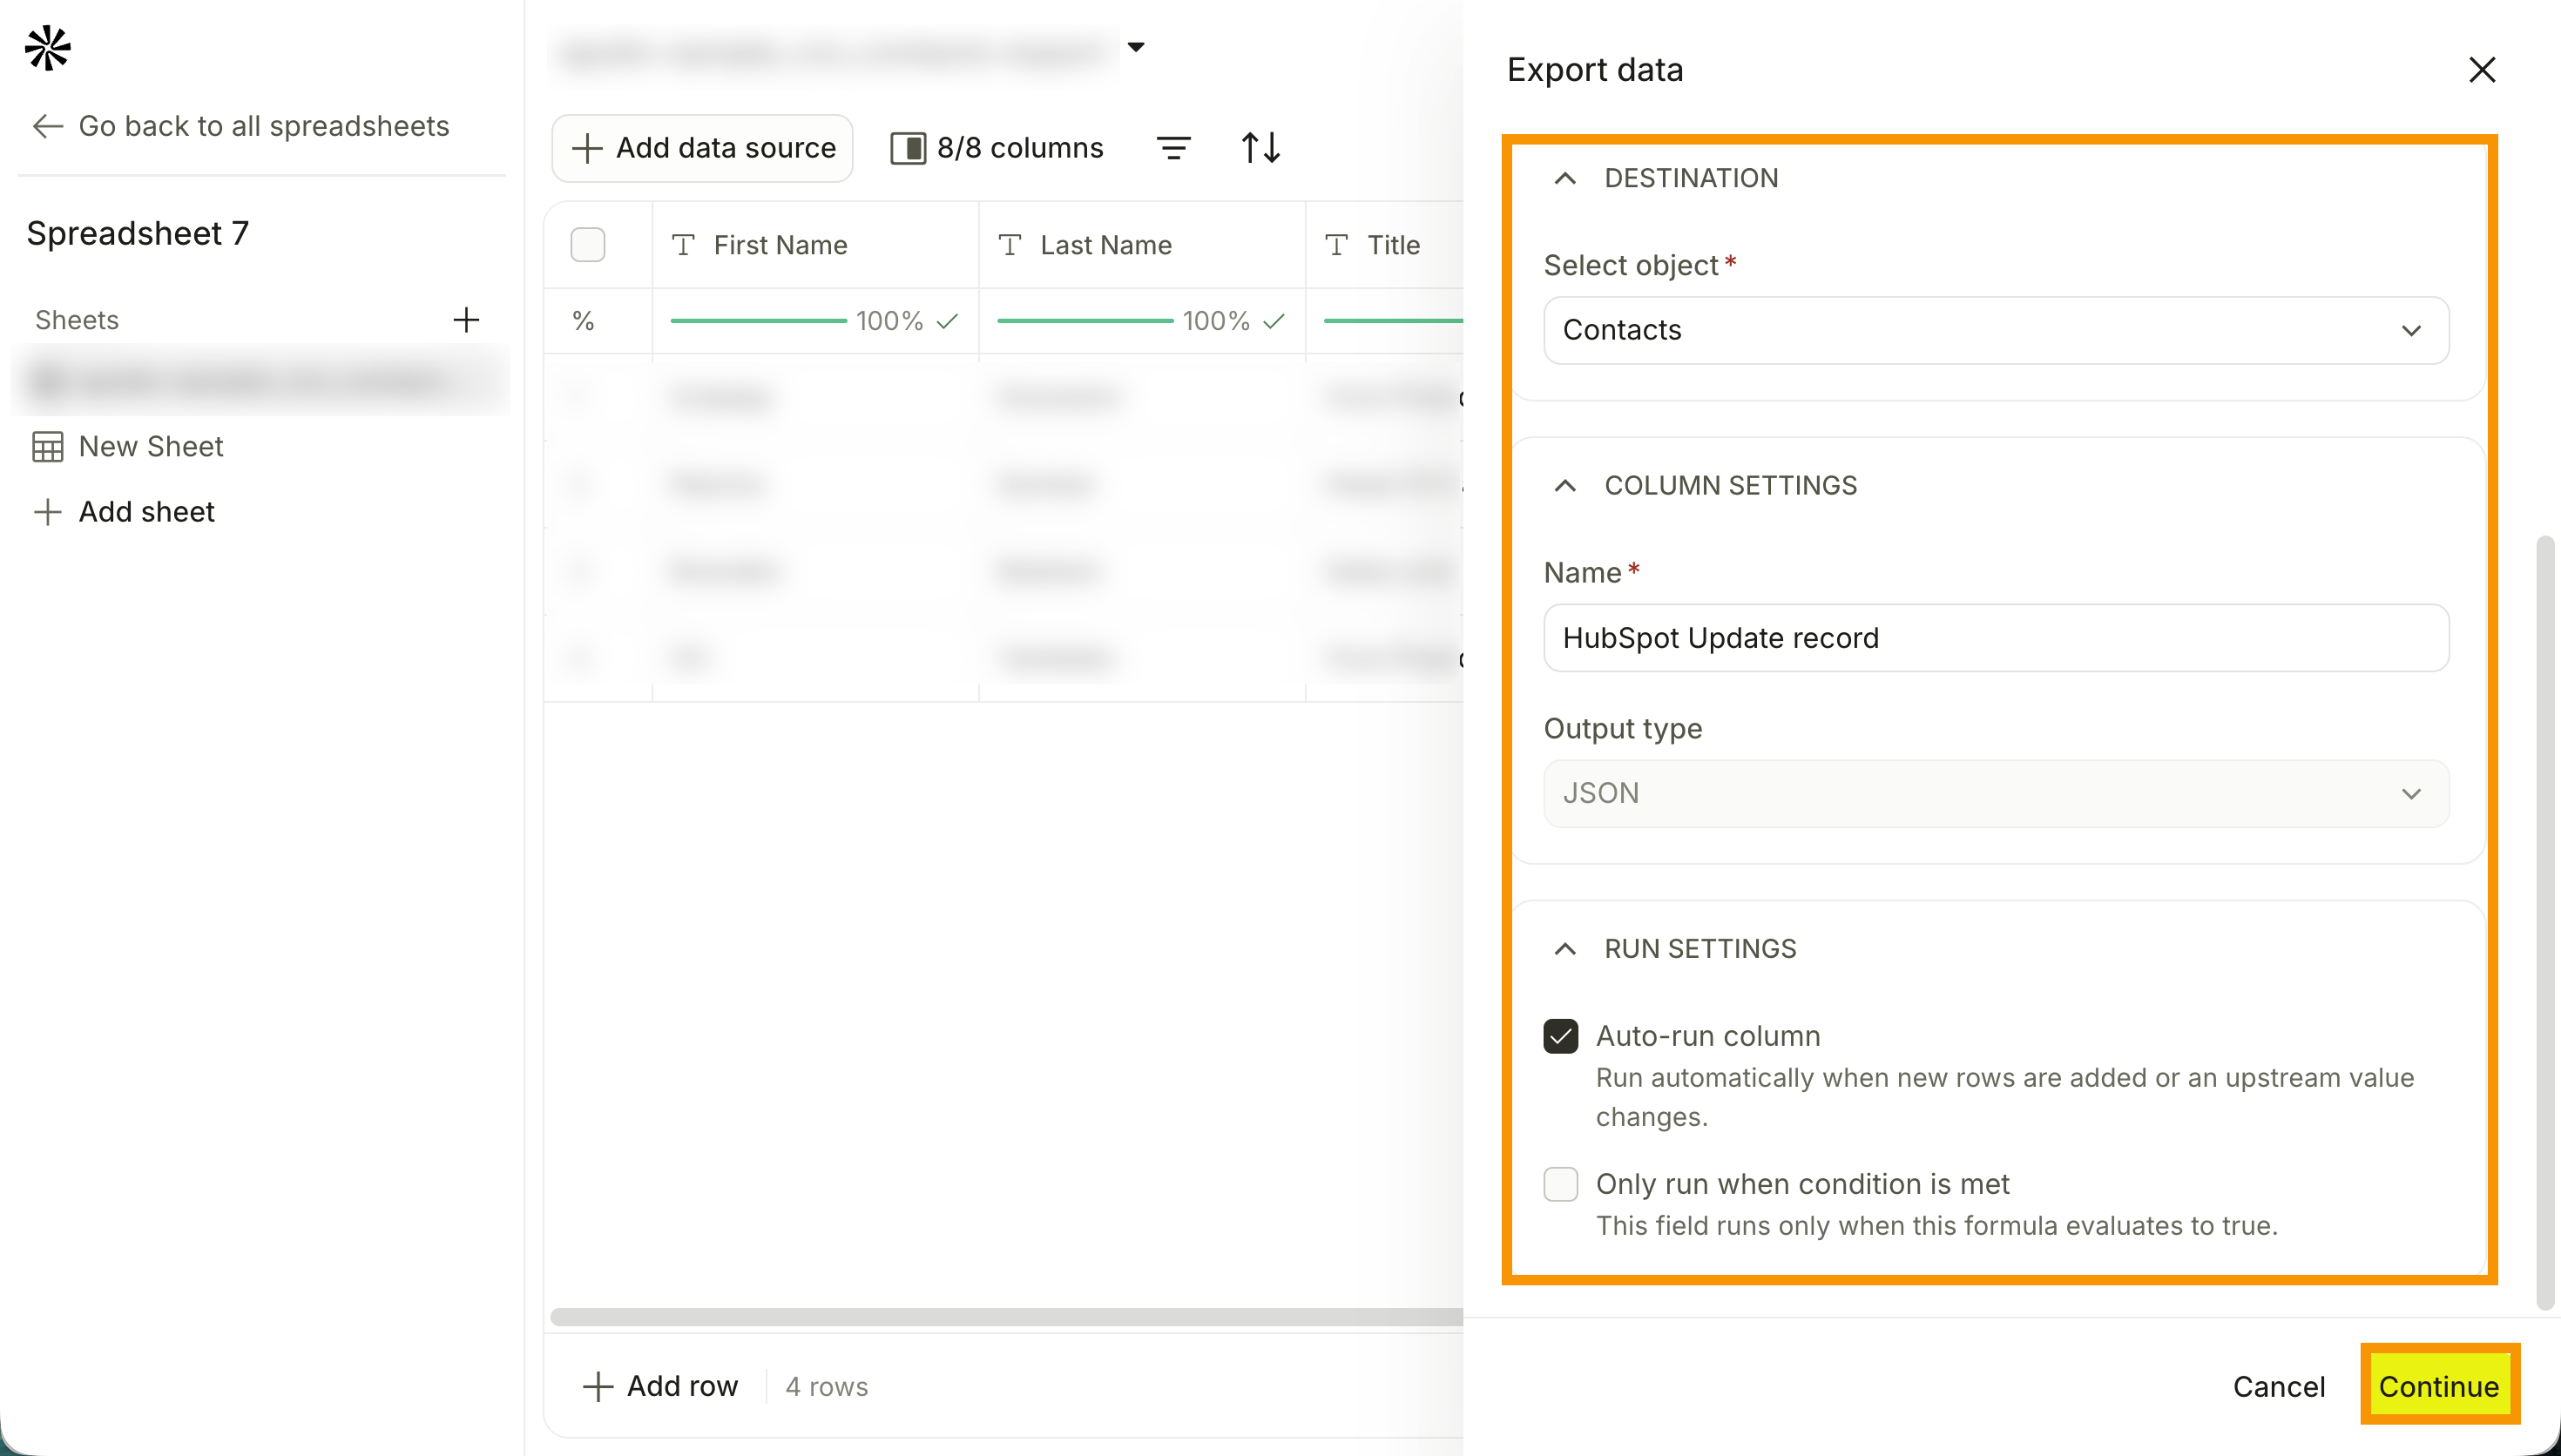
Export to Salesforce, HubSpot, or Zoho
The export flow is the same for Salesforce, HubSpot, and Zoho.
- Click your CRM.
- Select your account, or click Add account to connect one.
- Click Create record or Update record.
- Select a target object from your account.
- Enter a column name.
- (Optional) Toggle on Auto-run column to run the export automatically when new rows are added or a value changes.
- (Optional) Toggle on Schedule run, then enter your preferred cadence and time.
- (Optional) Toggle on Only run when condition is met to set criteria for running the export, then enter your criteria. Type
{{to add columns or use formulas. - Click Continue. Apollo suggests mapped columns for you.
- Map your columns to your CRM fields. Click Add mapping to map more fields, or Remove mapping to delete a mapping.
- Click Save & run to save the export and run it. Alternatively, click ▾, then click Save & run first ten rows to run only the first ten rows, or Save & don't run to save without running.
Export to Outreach
Send the people in your sheet to Outreach as sequence members or as prospect records.
Add to a Sequence
- Click Outreach > Add to sequence.
- In Connection, select an Outreach account. If no connection exists, click Connect Outreach and complete the OAuth sign-in.
- In Sequence, search for and select the Outreach sequence you want to add people to. This field is required.
- In Mailbox, search for and select the mailbox to send from. This field appears after you select a sequence and is required.
- Enter a column name.
- (Optional) In Run settings, toggle on Autorun to run the export automatically when new rows are added.
- (Optional) Toggle on Run-if to set criteria for which rows run, then enter your criteria.
- Click Continue.
- In Map columns, map your sheet columns to your Outreach fields. Email is required. First name, last name, company domain, and job title are optional.
- Click Save & run to save the export and run it on every row. Alternatively, click ▾, then click Save & run first ten rows to run only the first ten rows, or Save & don't run to save without running.
Upsert a Contact
- Click Outreach > Upsert contact.
- In Connection, select an Outreach account. If no connection exists, click Connect Outreach and complete the OAuth sign-in.
- In Map columns, map your sheet columns to your Outreach fields. Email is required and matches existing prospects. First name, last name, company domain, and job title are optional.
- Enter a column name.
- (Optional) In Run settings, toggle on Autorun to run the export automatically when new rows are added.
- (Optional) Toggle on Run-if to set criteria for which rows run, then enter your criteria.
- Click Save & run to save the export and run it on every row. Alternatively, click ▾, then click Save & run first ten rows to run only the first ten rows, or Save & don't run to save without running.
Export to Salesloft
Send the people in your sheet to Salesloft as cadence members or as contact records.
Add to a Cadence
- Click Salesloft > Add to cadence.
- Select a Salesloft account, or click Add account to connect one.
- In Cadence, search for and select the Salesloft cadence you want to add people to. This field is optional. Leave it blank to save the person as a Salesloft contact without adding them to a cadence.
- In Salesloft User, search for and select the Salesloft user to send on behalf of. This field appears after you select a cadence and is optional.
- Enter a column name.
- (Optional) In Run settings, toggle on Autorun to run the export automatically when new rows are added.
- (Optional) Toggle on Run-if to set criteria for which rows run, then enter your criteria.
- Click Continue.
- In Map columns, map your sheet columns to your Salesloft fields. Email is required. First name, last name, job title, phone, and company are optional.
- Click Save & run to save the export and run it on every row. Alternatively, click ▾, then click Save & run first ten rows to run only the first ten rows, or Save & don't run to save without running.
Upsert a Contact
- Click Salesloft > Upsert contact.
- In Connection, select a Salesloft account. If no connection exists, click Connect Salesloft and complete the OAuth sign-in.
- In Map columns, map your sheet columns to your Salesloft fields. Email is required and matches existing contacts. First name, last name, job title, phone, and company are optional.
- Enter a column name.
- (Optional) In Run settings, toggle on Autorun to run the export automatically when new rows are added.
- (Optional) Toggle on Run-if to set criteria for which rows run, then enter your criteria.
- Click Save & run to save the export and run it on every row. Alternatively, click ▾, then click Save & run first ten rows to run only the first ten rows, or Save & don't run to save without running.
You have now exported your data.
Automate Your Sheet
Every export except a CSV download creates a column in your sheet. That column carries run settings, so your export can repeat on its own instead of waiting for you to click through it again.
You set run settings when you create the export column:
| Run setting | What it does |
|---|---|
| Auto-run column | Runs the export when new rows are added or a value changes. |
| Schedule run | Runs the export on the cadence and time you set. |
| Only run when condition is met | Runs the export only for the rows that match your criteria. |
Outreach and Salesloft label these settings Autorun and Run-if.
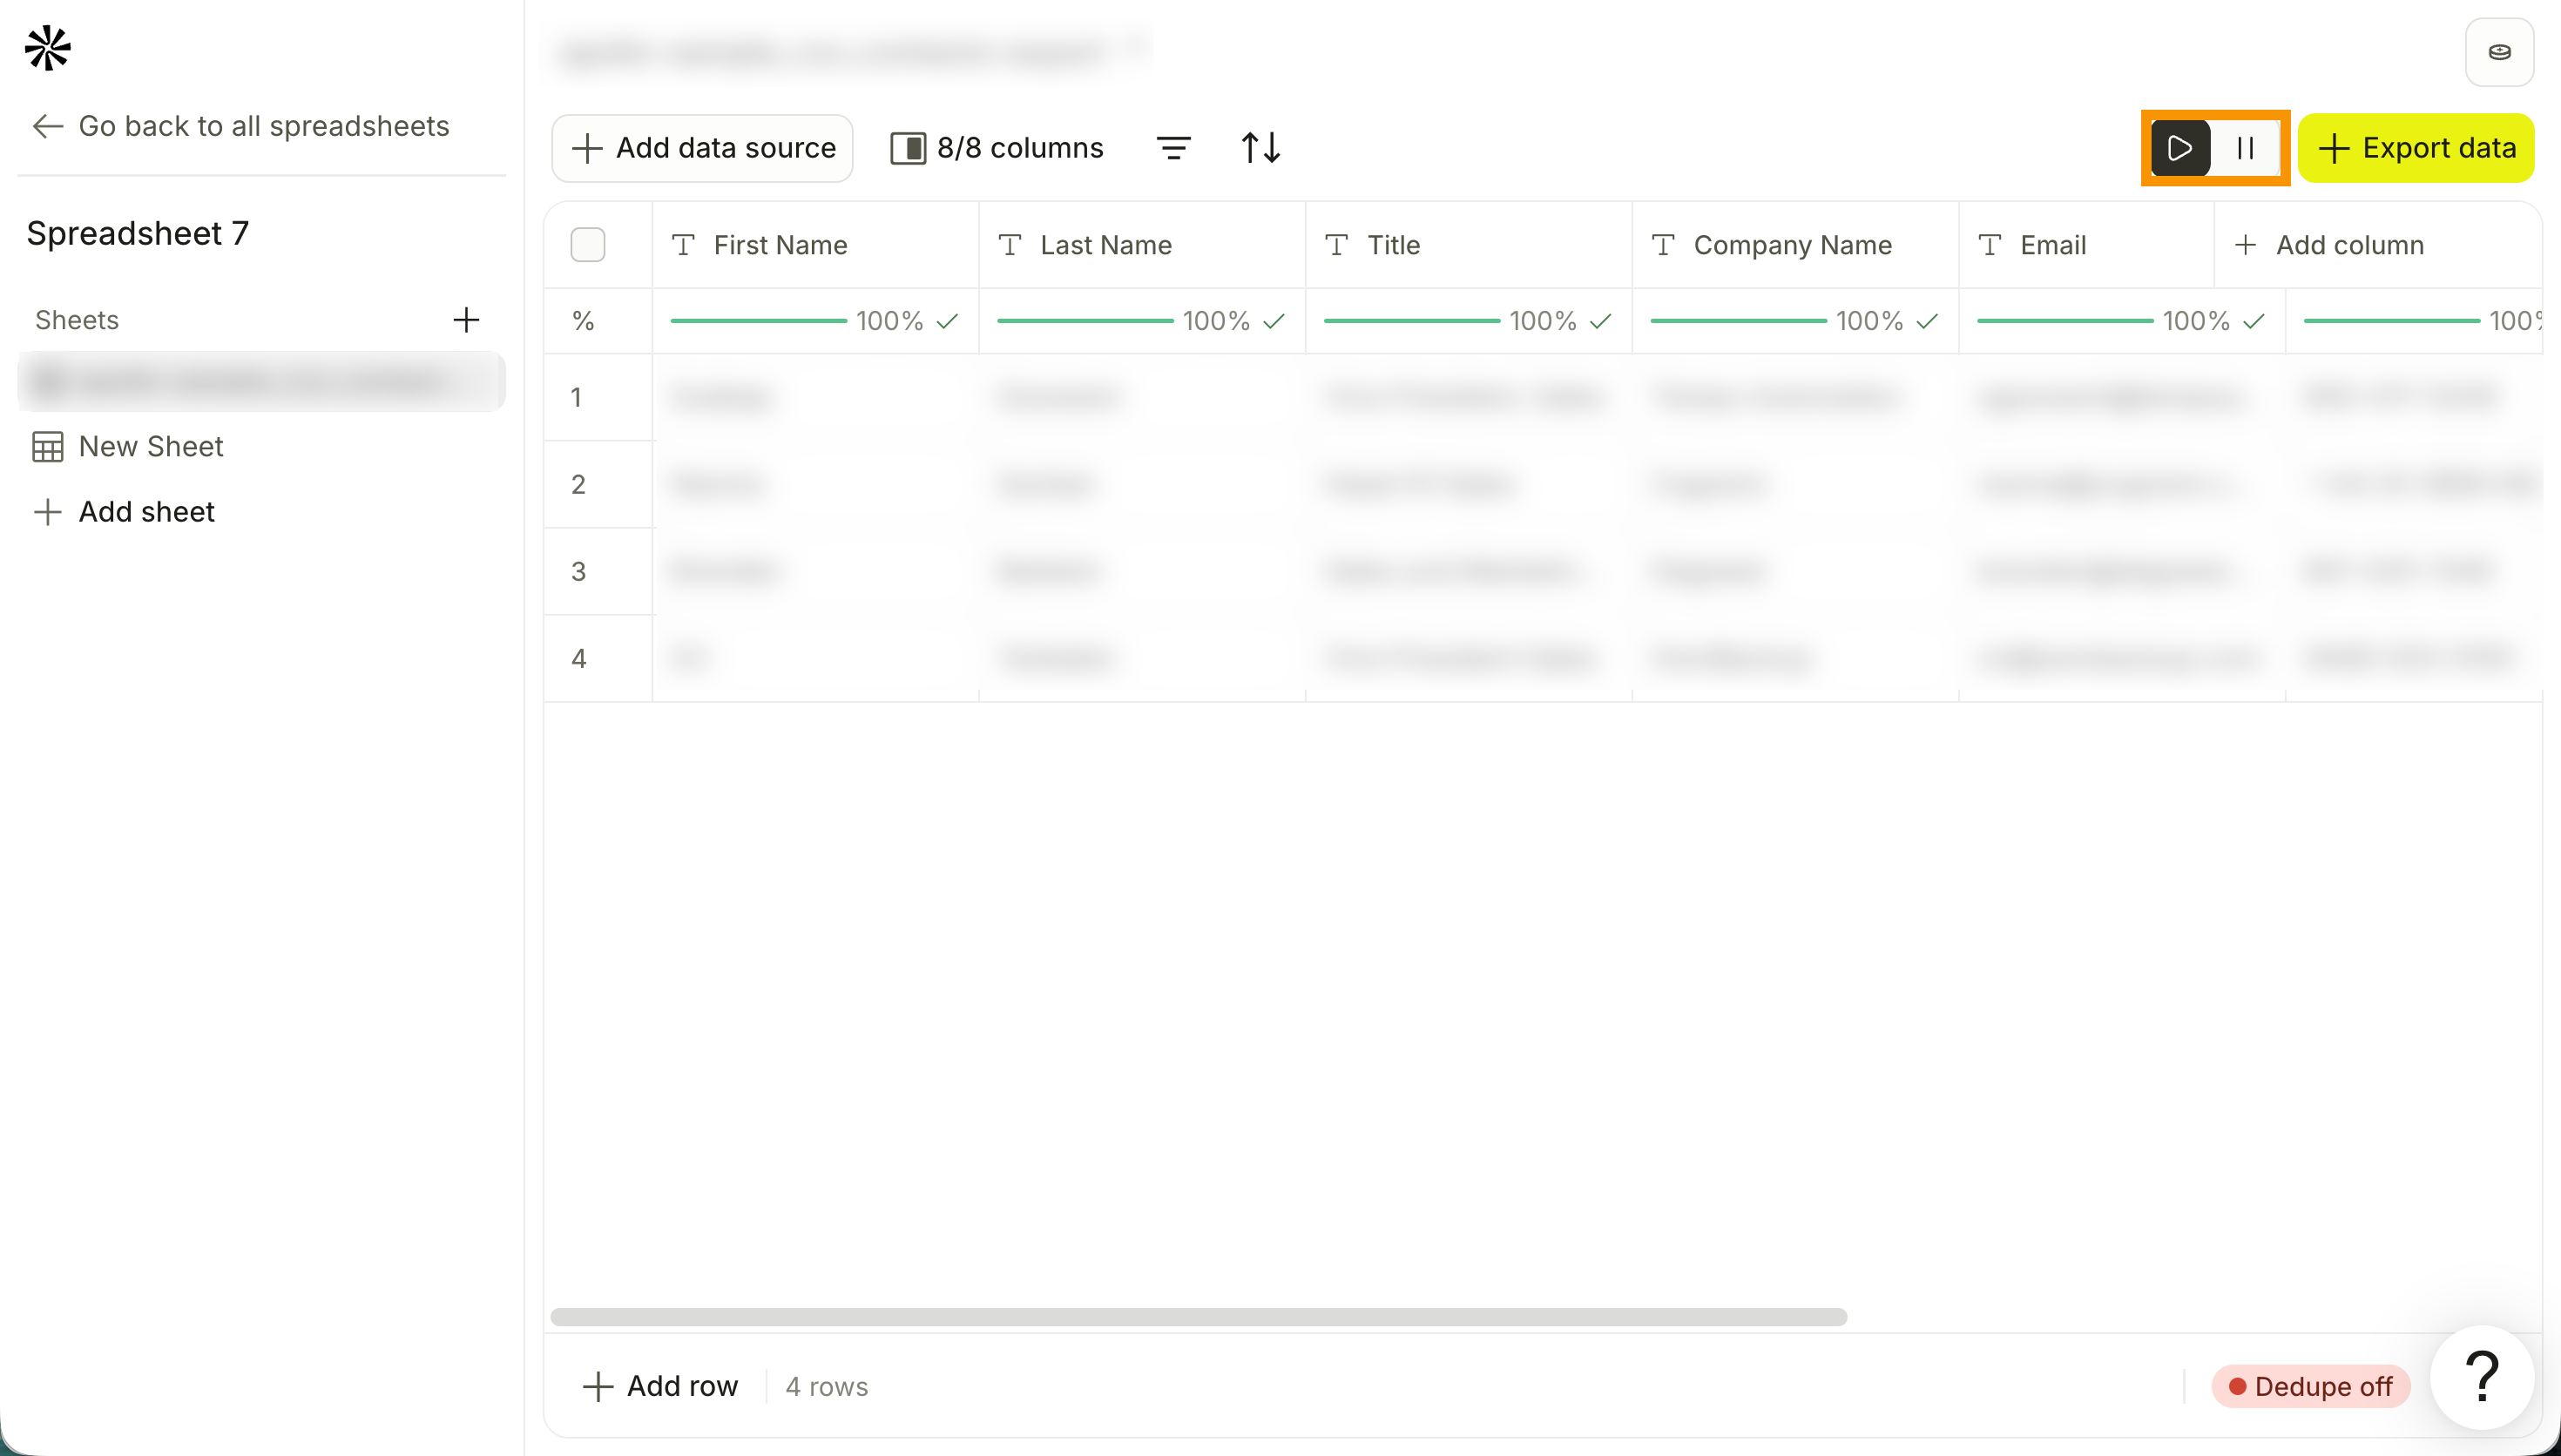
Activate or Pause an Export Column
- Click Play to activate auto-runs and schedules at the column level.
- Click Pause to deactivate auto-runs and schedules at the column level.
Downloading a CSV is a one-time action rather than a column, so it carries no run settings. Run it again whenever you need a fresh file.
When your import, your columns, and your export all run on their own, your sheet becomes a repeatable workflow: new records land in the sheet, your columns enrich them, and your export sends them where they need to go. Check out Transform Data with Columns to set run settings on the columns that feed your export.
You have now automated your sheet.
Next Steps
Now that your data is out of your sheet and running on its own, here's where to go next.
| AI Sheets Overview | Get the big picture on AI Sheets to see how pulling in, transforming, exporting, and scheduling data fit together. |
|---|---|
| Transform Data with Columns | Add AI, formula, lookup, and enrichment columns to sharpen your records before you export them. |
| Create a Sheet and Import Data | Pull more records into your sheet from an Apollo search, a CSV, a webhook, or a connected integration. |
| Sequences Overview | See how sequences work before you send the people in your sheet into one. |
| Create and Use a List | Set up the lists you export into so your sheet records land somewhere your team already works. |
| Waterfall Enrichment Overview | See how waterfall enrichment works to fill the gaps in your records before they reach your CRM. |