Overview
Apollo helps you identify when saved contacts change jobs. Use job change data to enrich contacts when they've changed employment, helping you stay up-to-date with the correct information and ensure your outreach remains successful.
Job change enrichment is only available to paid Apollo plans. To get access, upgrade your plan or reach out to the Apollo sales team for help.
Check out the following sections to learn how to update contacts based on job changes.
Configure Job Change Settings
If you're an Apollo admin, you need to configure your team's job change settings before they get started with enrichment or creating enrichment schedules.
Launch Apollo and go to Settings > Rules of engagement > Prospecting config. Toggle on the settings under Job Change Alerts to enable them.

Enrich Contacts with Job Changes
Use the Job Change filter in People or Lists to quickly locate and enrich saved contacts who have available job change data. You can choose to update your existing contact records with new job change data or create a brand new record for contacts who’ve changed jobs.
Job change enrichment requires credits, regardless of whether you update existing contact records or create new contact records. Learn more about enrichment credit costs in Apollo.
To enrich contacts with job changes:
- Launch Apollo and go to People or Lists.
- On the People page, click Saved to open saved contacts. On the Lists page, select the list with contacts you want to enrich.
- Open the Job Change filter, then select Contacts who have changed jobs. Apply any additional filters you need to refine search results.

- Use the checkboxes to select the contacts you want to enrich, then click Enrich > Enrich job change.
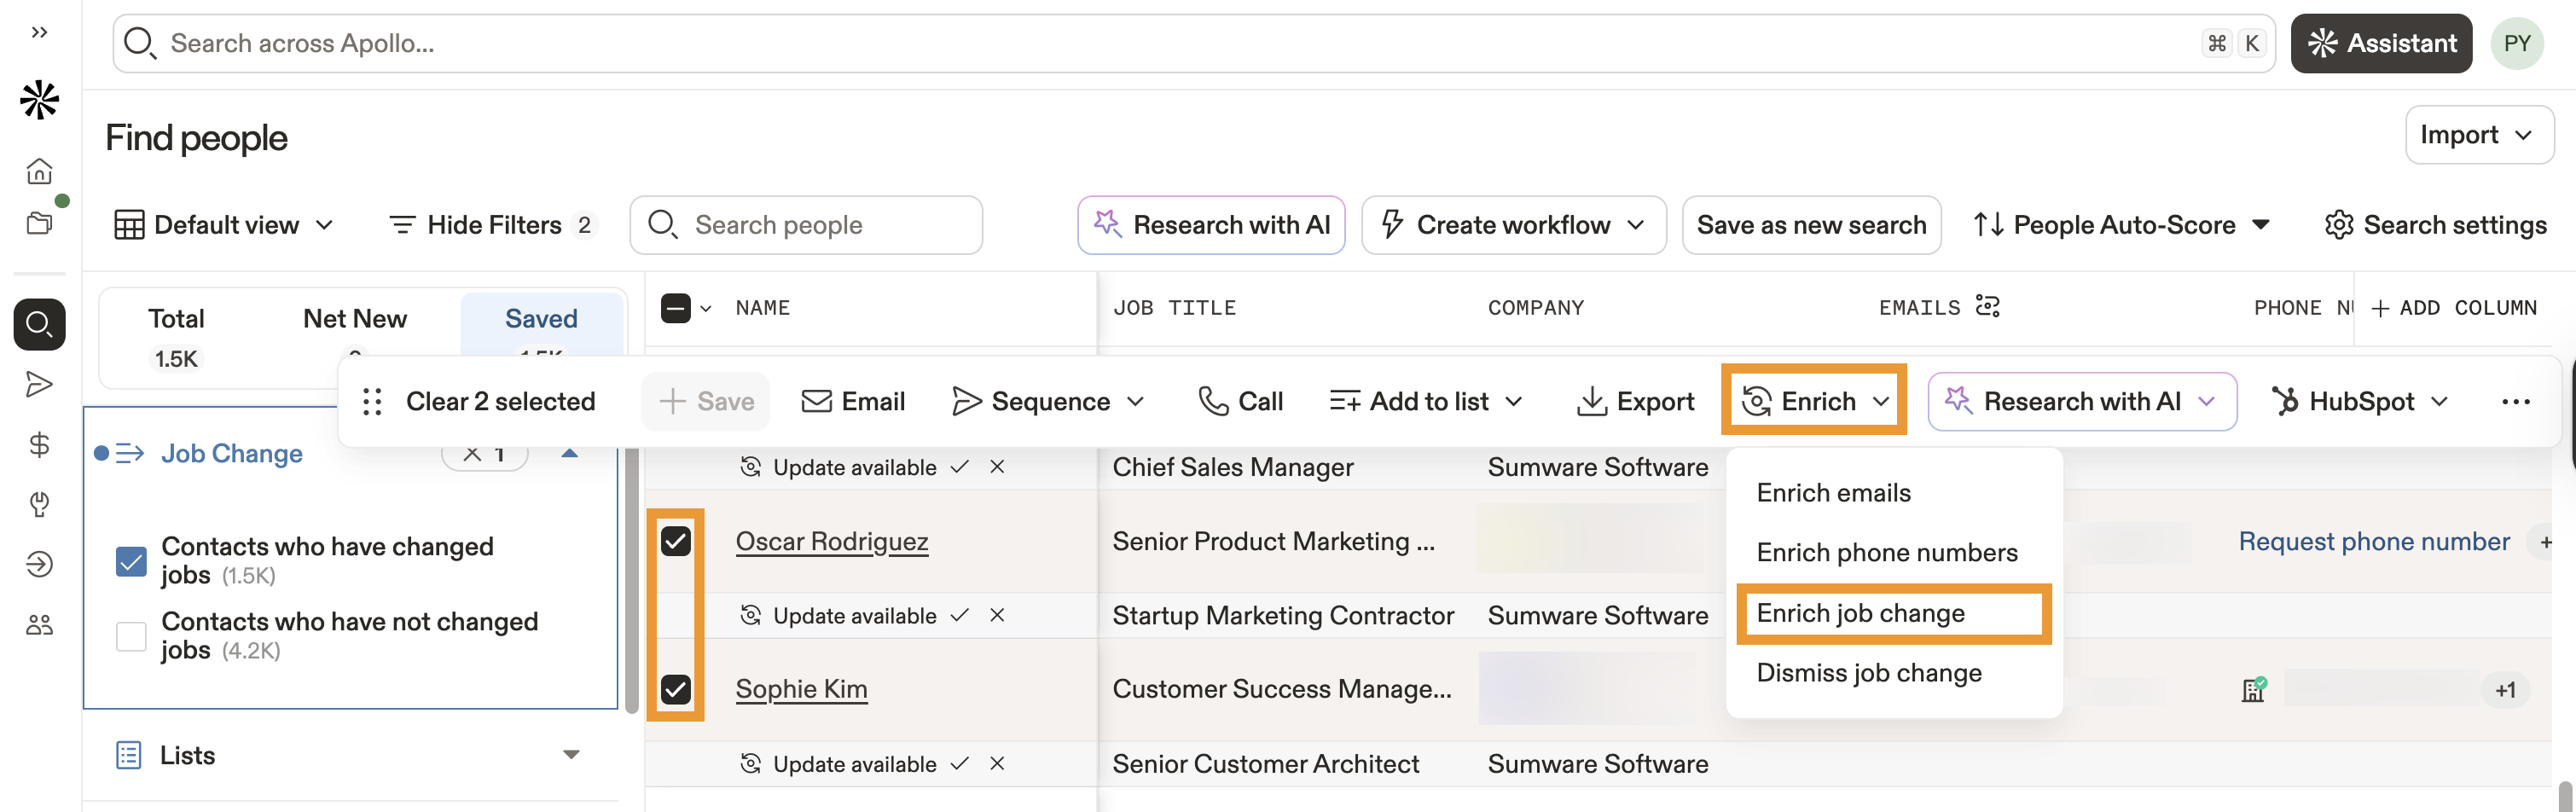
- Preview available job change data for your selected contacts. Apollo searches for new emails, job titles, and company names to verify if a contact has changed roles.
- By default, job change enrichment uses waterfall enrichment to help you find new emails for contacts who have changed jobs. If Apollo doesn't find an email, waterfall enrichment searches other third-party data sources until one is found.
Apollo provides credit usage estimates before you begin enrichment. Toggle off Find data via Waterfall for selected records to use Apollo data only to enrich your selected contacts.

Waterfall enrichment uses Apollo data and a series of other data sources to enrich contacts, giving you broader data coverage. If Apollo doesn't find the data you need, waterfall enrichment pulls data from connected third-party data sources, in the order you define, until you have complete contact information.
Waterfall enrichment is enabled by default for job change enrichment. However, you have full control over each enrichment run and can deactivate waterfall enrichment on a case-by-case basis if you prefer to use only Apollo data. Learn more.
- Next, choose whether to update your existing contacts or create new contact records with job change data:
- Update existing contact: Update the existing contact record with new job data.
- Create new contact record: Create a new contact record with new job data.
- If you chose to create new contact records with job change data, tell Apollo how to manage the existing records:
- Assign the outdated contact record to another stage (required).
- Assign a new contact owner (optional).
- Add to a sequence or list (optional).
- Mark outdated contacts as finished in any current sequences (optional).
- Click Yes, Update to begin enriching your selected contacts.

You've now enriched your saved contacts with job changes. Repeat these steps to manually enrich specific contacts or set up a job change enrichment schedule to automate enrichment from the Data Health Center.
You can also use the Job changes widget in the Data Health Center to quickly access and filter for contacts with available job changes. To do this:
- Launch Apollo and go to Data enrichment > Data health center.
- Under Job changes, click View contacts to review contacts with job changes.

Apollo redirects you to People and automatically applies the Job changes filter, showing you all saved contacts with available job change data. Follow steps 4-9 outlined above to complete enrichment.
Schedule Job Change Enrichment
Create enrichment schedules in the Data Health Center to automate job change enrichment. Enrichment schedules ensure your team regularly runs job change updates on a set cadence, helping you keep contact data fresh.
To create job change enrichment schedules:
- Launch Apollo and go to Data enrichment > Data health center.
- Under Job changes, click Schedule. Apollo opens the builder for a new enrichment schedule.

- Click Define object to enrich, then select Contacts. Click Save object.

- Click Select enrichment type, then select Job changes.

- By default, job change enrichment schedules also use waterfall enrichment to enrich emails for contacts who have changed jobs. Apollo estimates the credit cost per record for waterfall enrichment on job change data.
Review this estimate to decide whether to use waterfall enrichment each time this schedule runs. Toggle off Find data via Waterfall to use only Apollo data during enrichment.

If you're an Apollo admin, you can update your team's waterfall enrichment settings and connected data sources at any time. This gives you full control over when and how waterfall enrichment works throughout the Apollo platform. Learn how to configure waterfall enrichment settings.
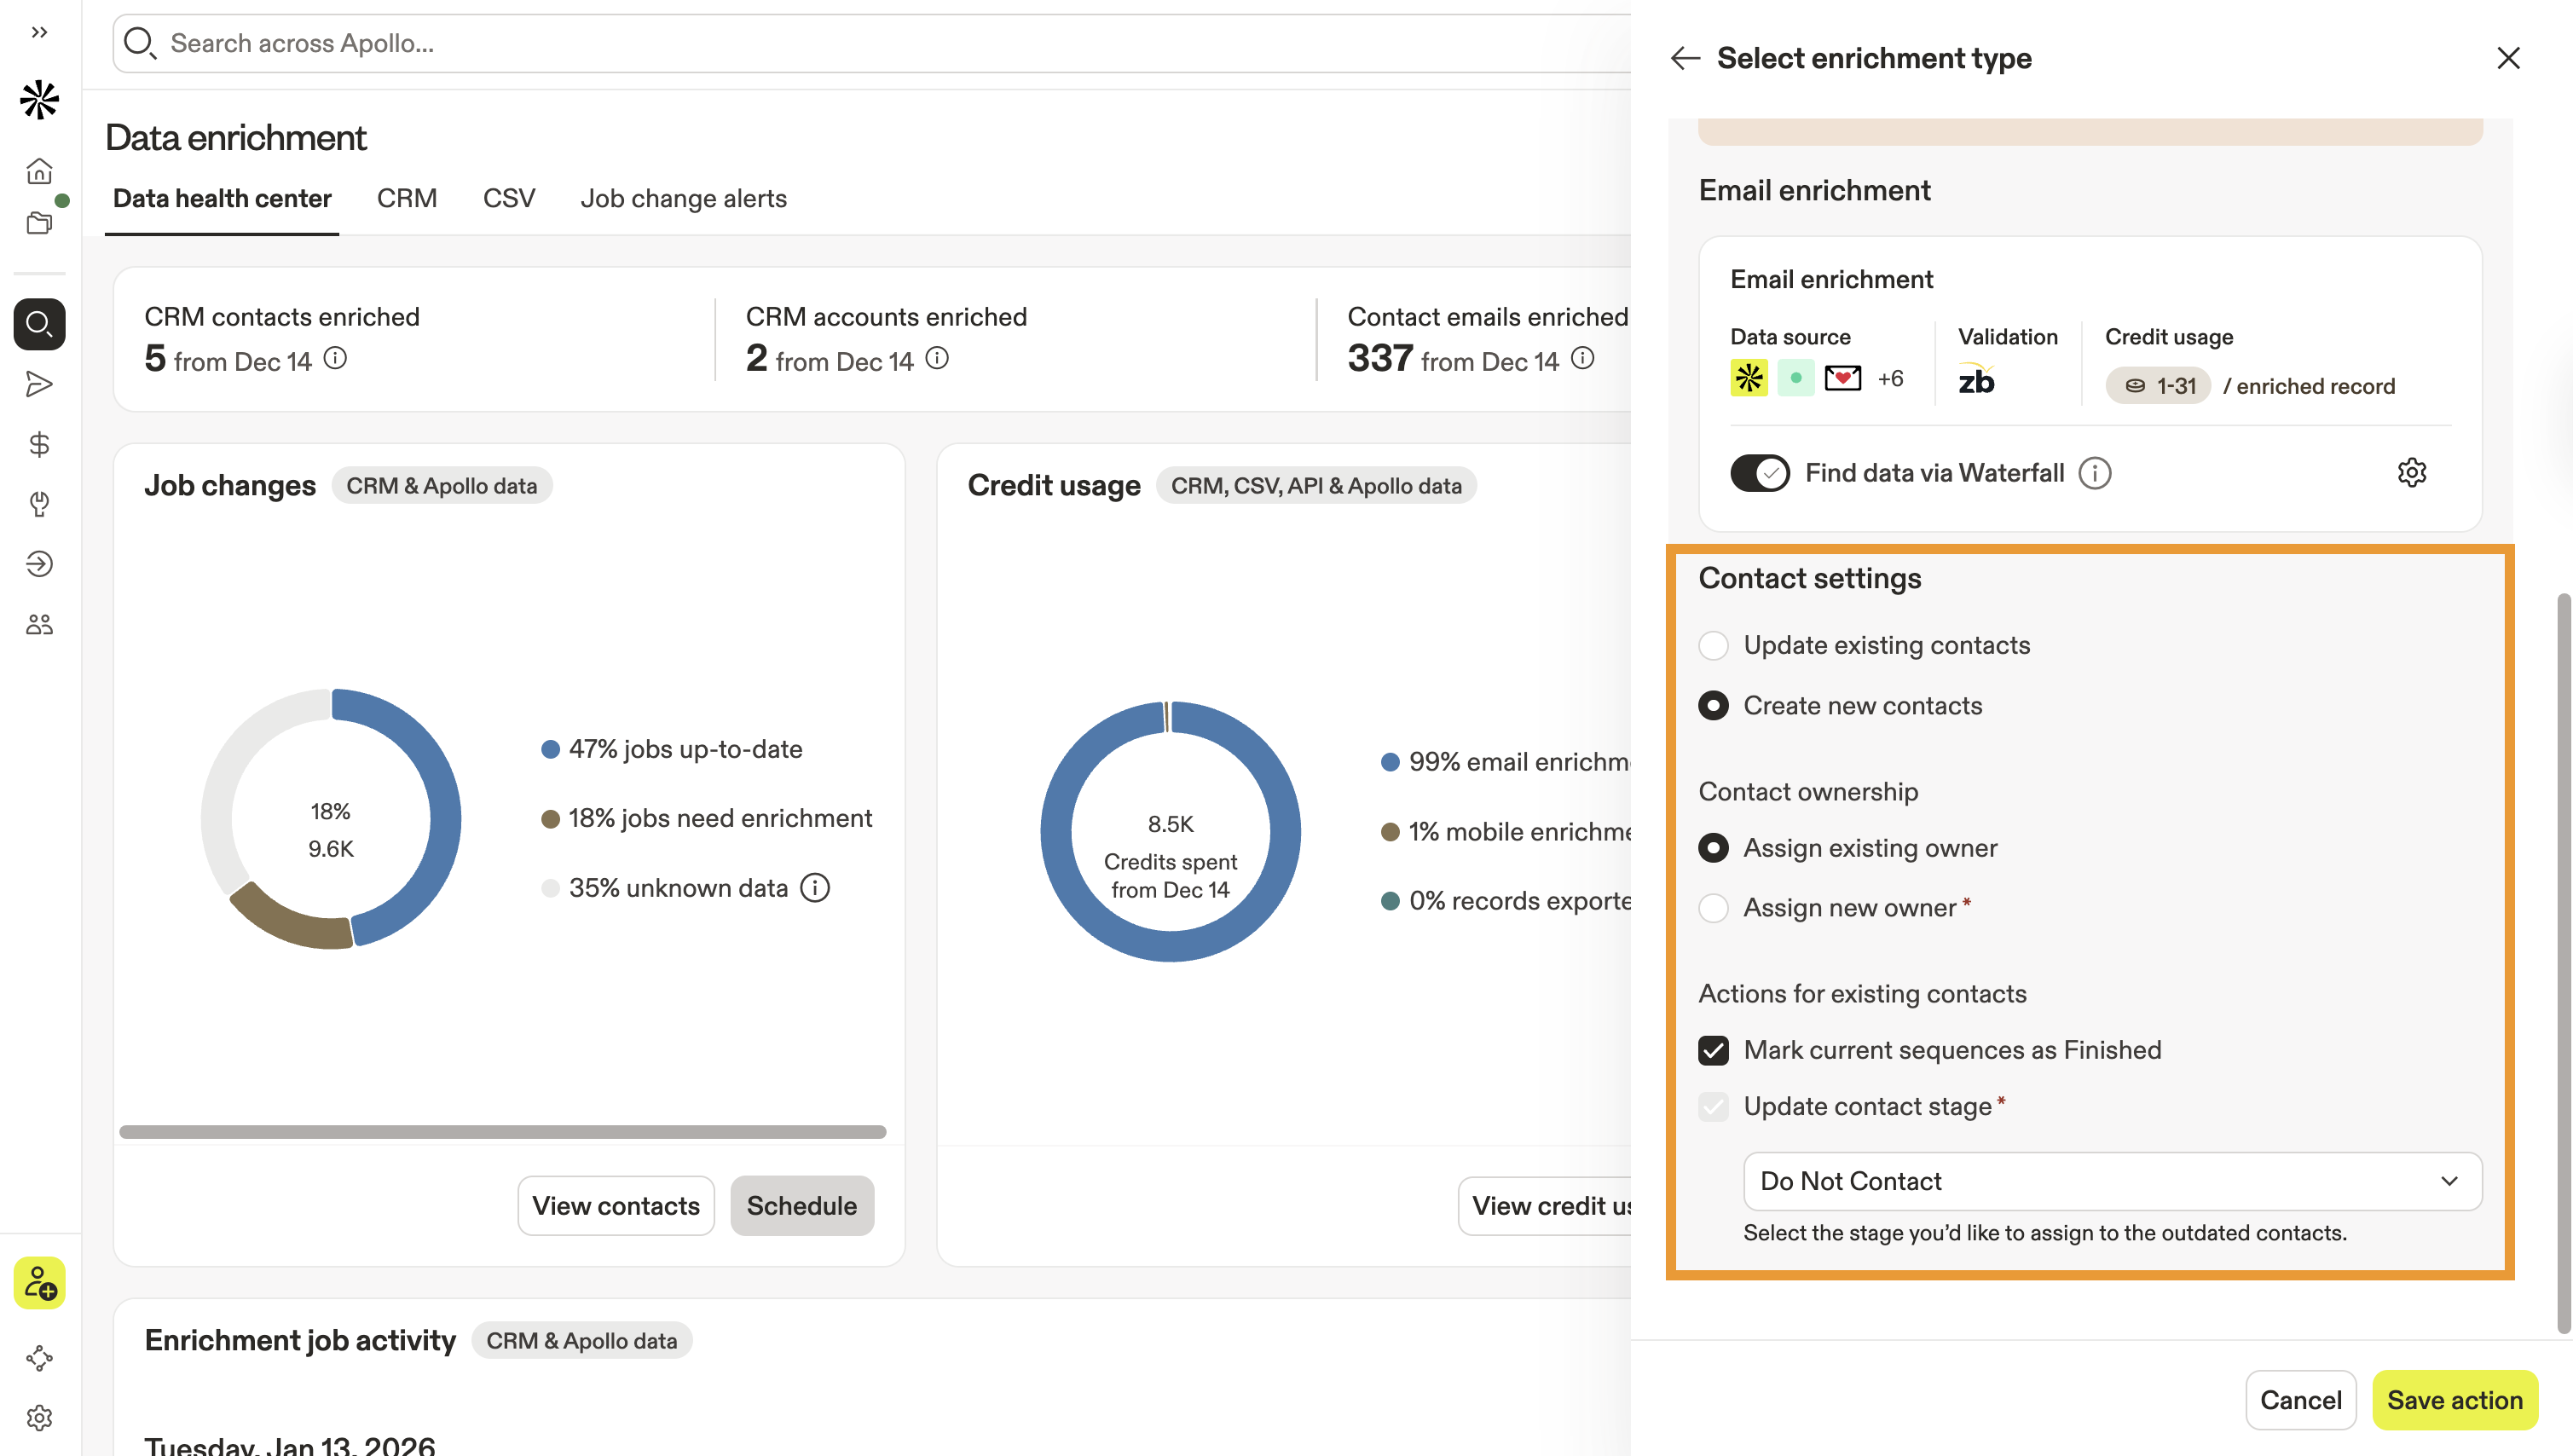
- Select whether to update your existing contacts or create new contact records during job change enrichment:
- Update existing contacts: Update the existing contact record with new job data.
- Create new contacts: Create a new contact record with new job data. If you choose this option, configure required settings to define how Apollo manages outdated contact records.
- Click Save action.
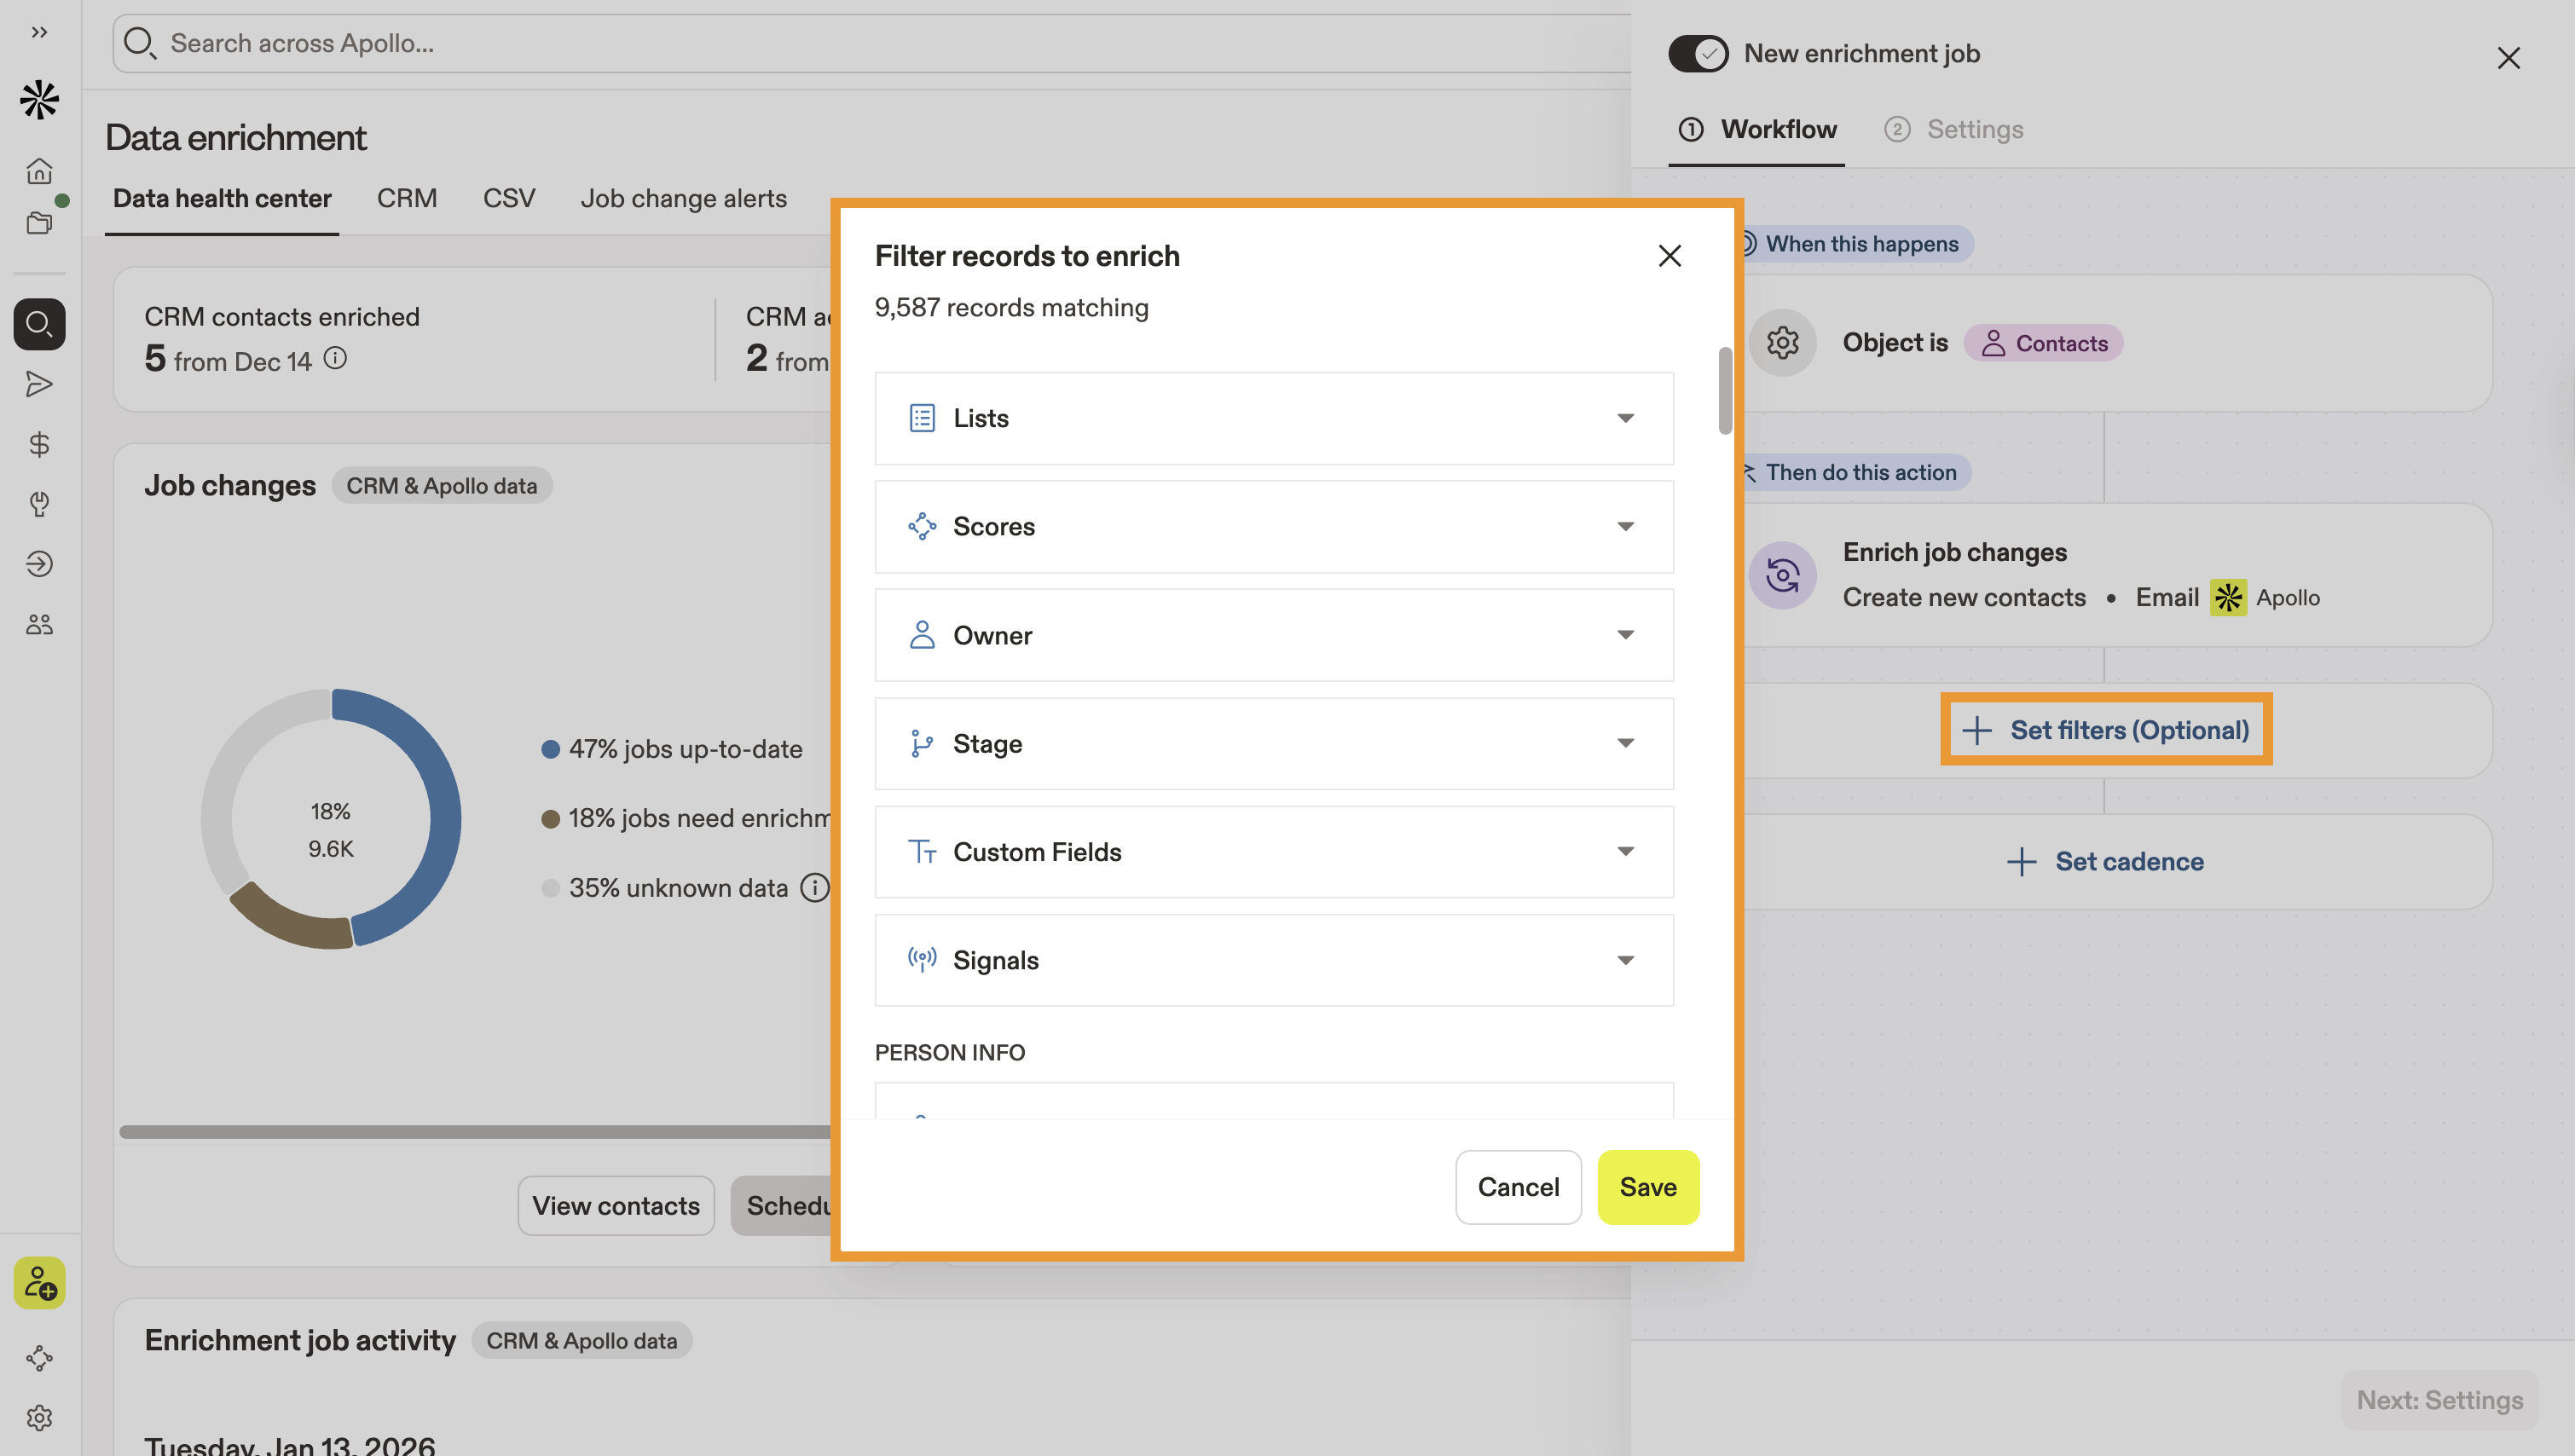
- (Optional) Click Set filters to apply filters to your job change enrichment schedule. This helps you control which contacts will be included each time the enrichment schedule runs. For example, you can apply filters to automate job change enrichment only for contacts from a specific list or stage.
- Click Set cadence to configure how often your enrichment schedule runs and set a record limit for each run. Each scheduled enrichment runs on the cadence you set, and enrichment stops once you hit your record limit.
- Click Save cadence.

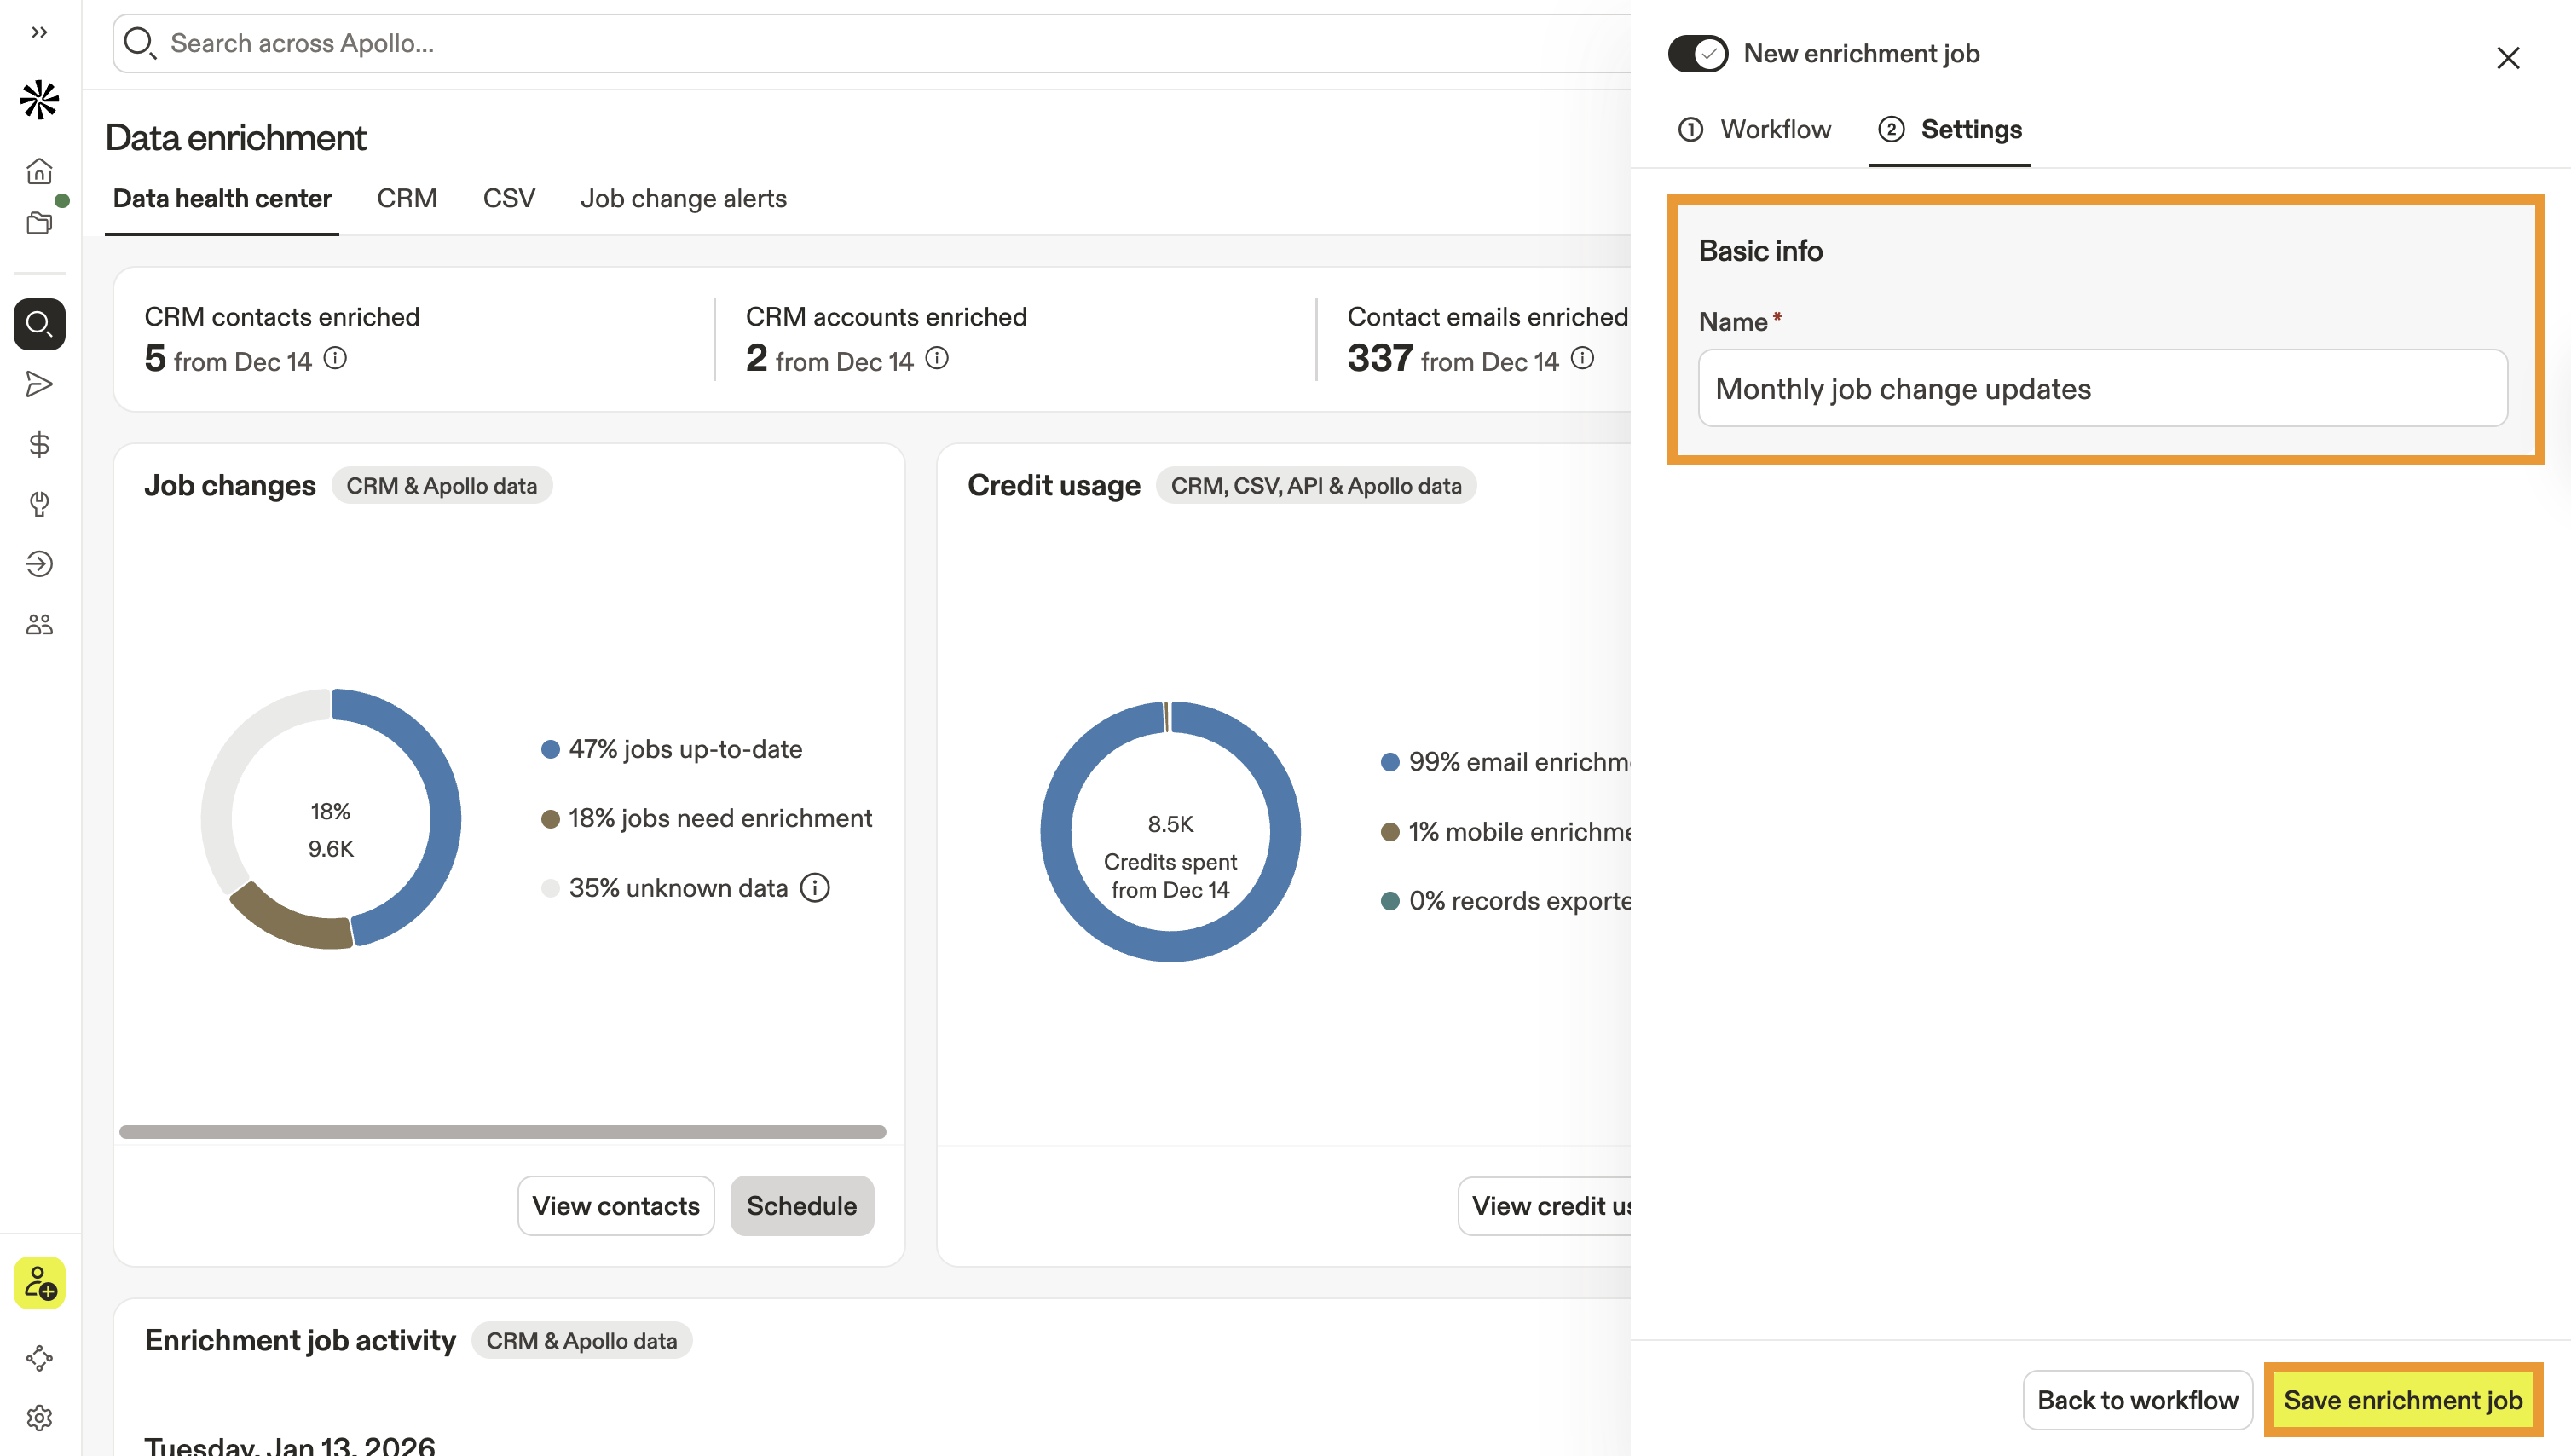
- Click Next: Settings, then give your new enrichment schedule a descriptive name.
- Click Save enrichment job.
You've successfully set up a job change enrichment schedule. Job change enrichment runs automatically based on the cadence and credit limits you set. Click View scheduled jobs to review and edit your scheduled enrichments at any time.
Sync Job Change Updates to Your CRM
If you’ve connected Salesforce, HubSpot, or Pipedrive to Apollo and mapped contact email, job title, and company fields, new job change data syncs automatically to your CRM.
An Apollo admin needs to complete field mapping and configure sync rules in order for Apollo to push job changes to your CRM. Check out the following guides to learn more:
- Configure Salesforce Push Settings
- Map Default Apollo Fields to Salesforce
- Configure HubSpot Sync Settings
- Configure HubSpot Data Mapping
- Set Up the Pipedrive Integration
Review Job Change Enrichment History
Monitor your team's job change enrichment activity from the system activity report. This report provides a granular look into your team's completed job change updates, separating your report by manual and automated job change requests.
To access your job change enrichment report:
- Launch Apollo and go to Settings > System activity > Data requests. Then, click theJob change tab.
- Select 1 of the following:
- Manual: Review job change enrichment completed manually by users on your team.
- Automated: Review job change enrichment completed by Apollo via scheduled enrichment jobs.
- You can also take action on contacts from your enrichment report. For each row in the report:
- Click ... > Add to Sequence to add enriched contact records from that row to a sequence.
- Click ... > Export to CSV to download a CSV file with enriched contact data.
- Click ... > View contacts to see more details about the enriched contacts in a particular row.

Next Steps
Check out these additional resources to learn more about enrichment in Apollo:
| Enrichment Overview | Get a closer look at the types of enrichment available in Apollo to help keep your contact and account data fresh. |
|---|---|
| Waterfall Enrichment Overview | Learn more about waterfall enrichment and get access to common FAQs. |
| Use Waterfall Enrichment | Learn how to configure and run waterfall enrichment across a number of activities in Apollo. |
| Data Health Center Overview | Use the Data Health Center to monitor the health of your team's contact and account data, spot trends, fix issues fast, and run enrichment. |