Overview
Once you connect Salesforce to Apollo, you can configure how Apollo pushes data from Apollo into Salesforce.
Once push sync is enabled, your records will be pushed in real-time as soon as they're requested from Apollo or whenever your saved records are updated.
Check out the following sections to configure push settings for the Salesforce integration.
Configure Push Settings
Did you know? After you enable the Salesforce integration on a paid Apollo plan, there's a 6-hour window to configure push and pull settings and map fields. This gives you time to properly configure the integration. During this time, you can't manually pull records. After 6 hours, Apollo automatically enables syncing.
To configure the Salesforce integration push settings:
- Launch Apollo and click Settings > Integrations > Salesforce.
- Click Contacts, Leads, Accounts, Deals, or Activities, then click Sync.
Contacts and Leads
Salesforce integration push settings only affect net new contacts saved in Apollo or imported to Apollo from a CSV file. Apollo pushes any updates to your existing contacts automatically, regardless of push settings.
If you use leads in Salesforce, you can only associate contacts with leads and not accounts. However, you can let Apollo infer accounts for you in pull settings, as well as push all Apollo contacts to Salesforce leads at any time.
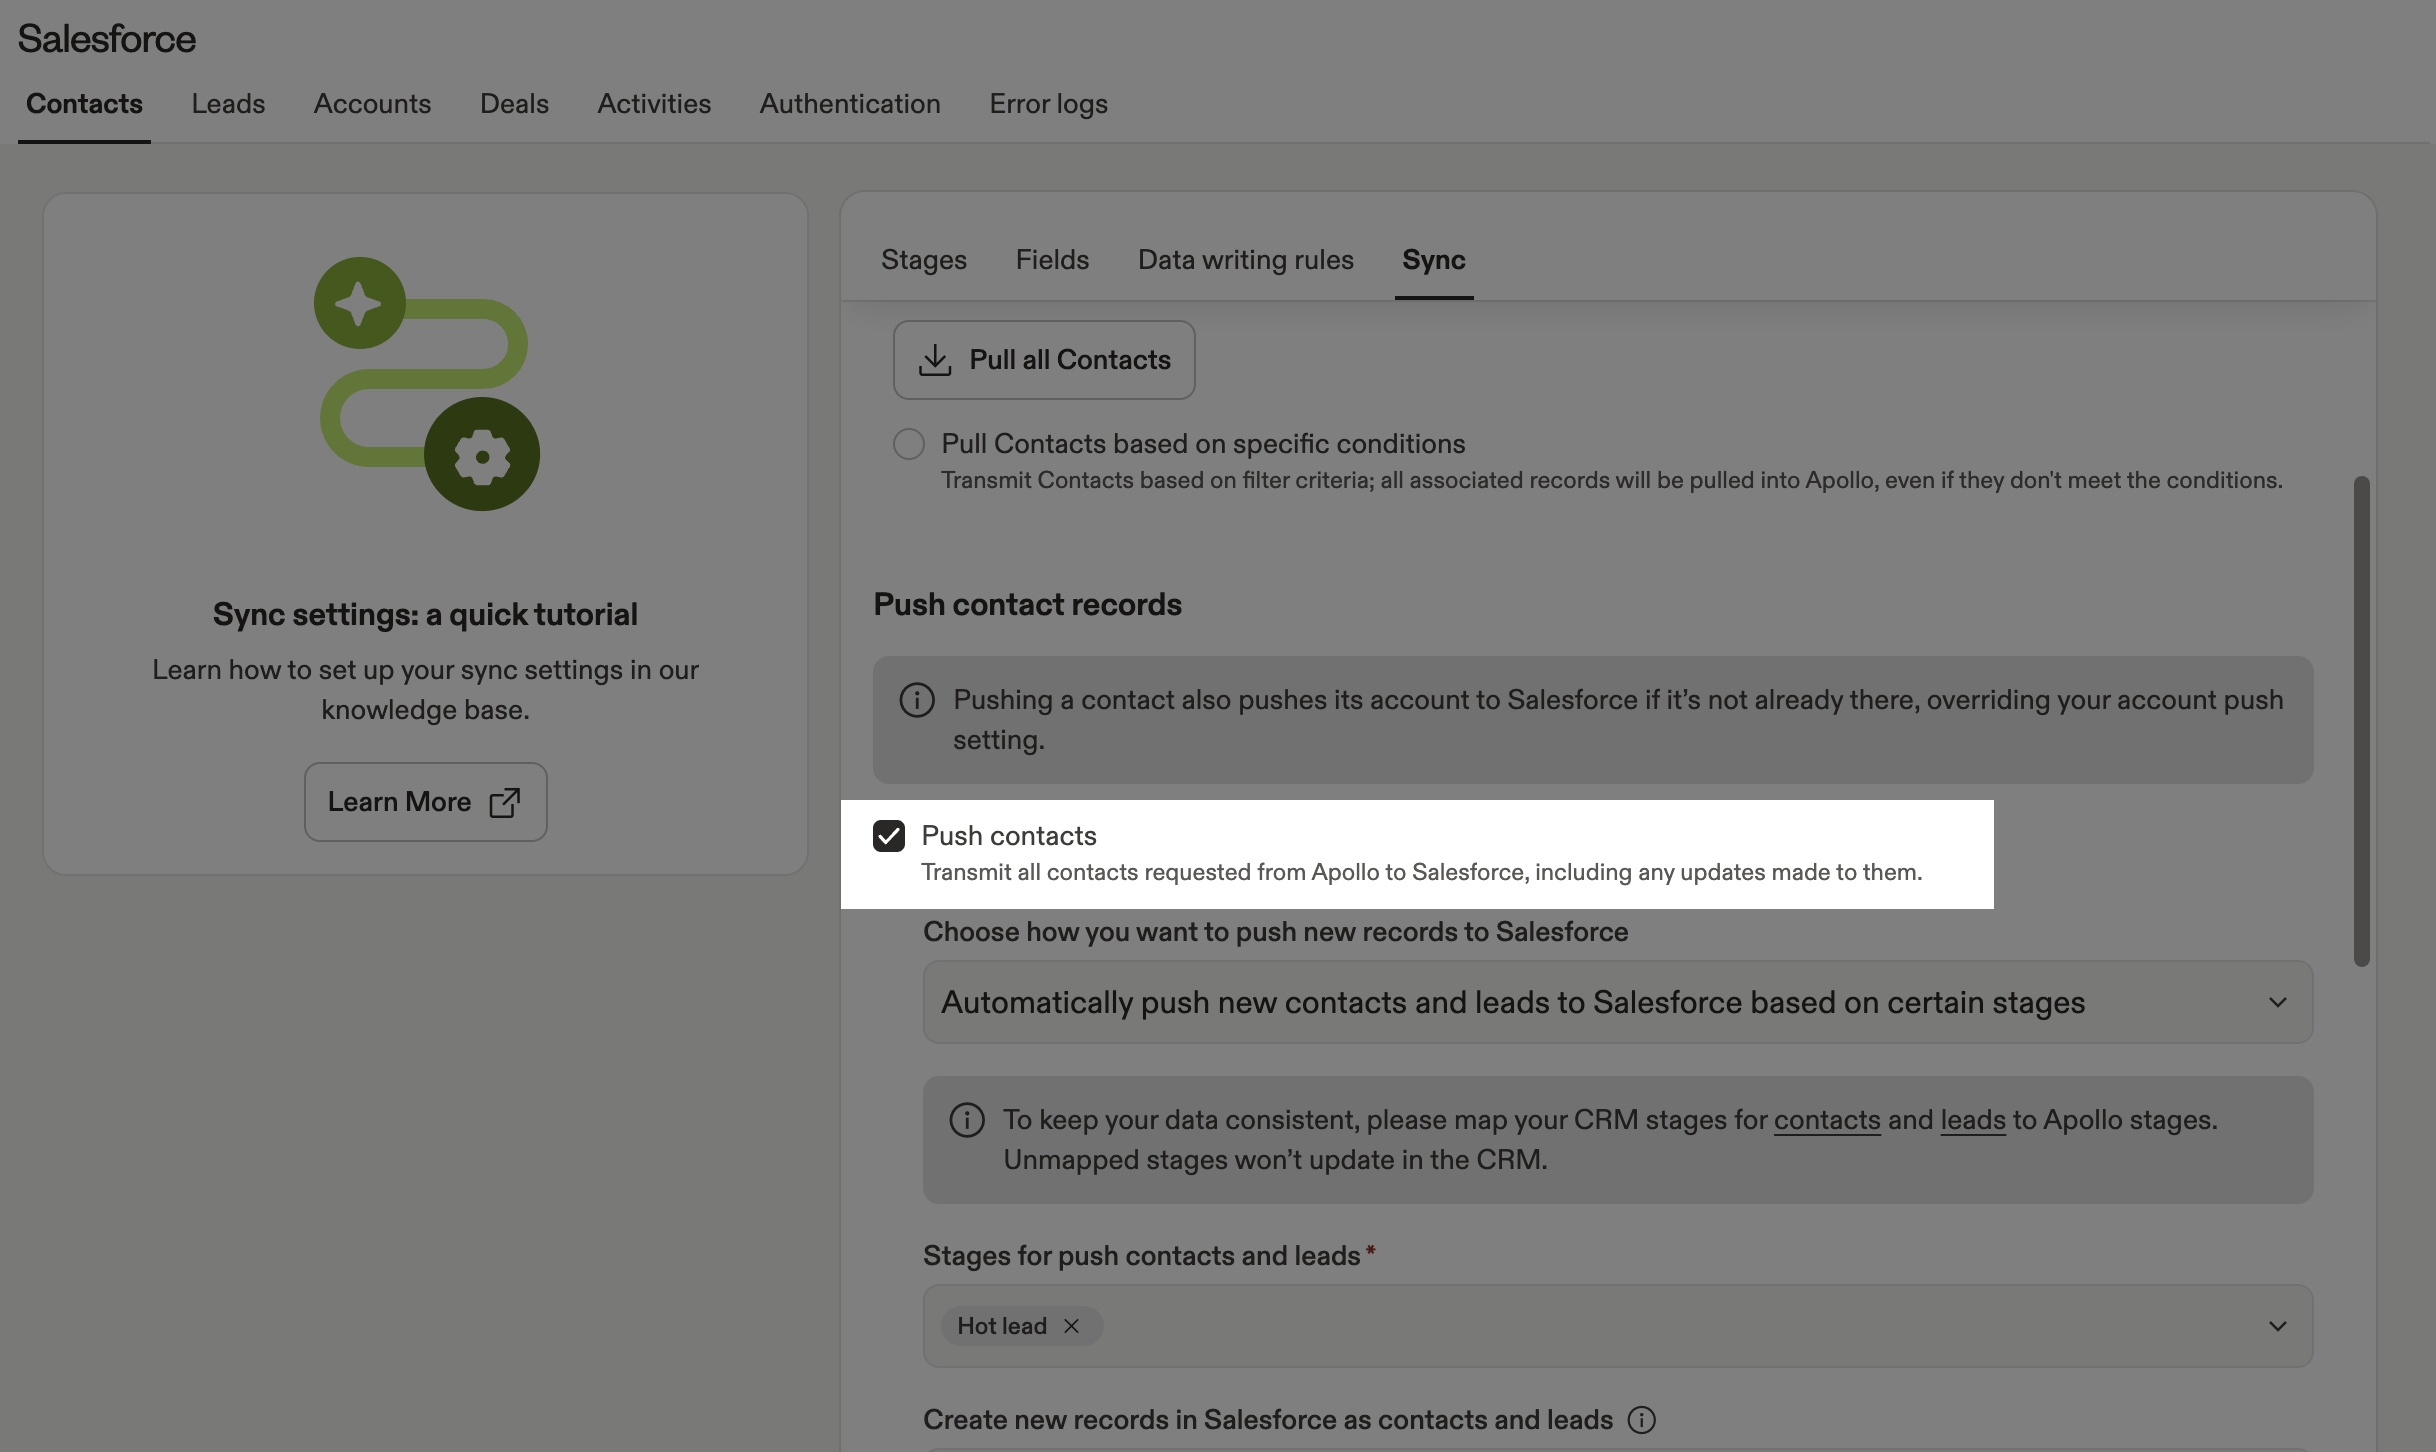
- Check Push contacts to push any newly created or updated contacts to Salesforce. When you push a new or updated contact, Apollo also pushes its account, if it isn't already in Salesforce. After enabling, click Push all Apollo contacts to push all your existing contacts.
When you request a net new contact in Apollo and push it to Salesforce:
- If the associated account isn't already in Salesforce, Apollo pushes the account too. This overrides your account push settings.
- If the contact matches multiple existing accounts in Salesforce, Apollo randomly chooses which account to sync the contact to. For example, if you save John Smith from Cloud Cave, Inc. as a contact in Apollo, but Salesforce has multiple Cloud Cave, Inc. accounts, Apollo randomly assigns John Smith to one of the accounts.
- Choose how you want to push new records. You can automatically push all contacts, or push new contacts based on certain stages. If you choose to push at certain stages, select the stages.

- Next, select whether to create contacts as contacts or leads in Salesforce.

- Set a source for contacts synced from Apollo to Salesforce. The default source is Apollo. You can search for a source in the dropdown. If the source field you select is a picklist field, select a value for the field.

- (Optional) Check Push contacts and leads with guessed emails to push contacts with guessed emails to Salesforce. Contacts in Apollo may have verified, guessed, or unavailable email addresses. This setting only affects pushing a contact's email — not the contact itself.
- If you've already synced duplicate records from Salesforce to Apollo, there are two sync settings to remove them:
- Contacts deletion sync: Check to delete duplicate records in either Apollo or Salesforce. When enabled, Apollo automatically deletes any Apollo records linked to deleted Salesforce records, and vice versa.
- Contacts merge sync: Check to merge duplicate records in Salesforce. When enabled, Apollo automatically merges any Apollo records linked to merged records in Salesforce.

- When finished, click Save.
You have now configured Salesforce integration push settings for contacts or leads.
Accounts
- By default, Apollo pushes new accounts to Salesforce. Uncheck Push accounts to change this setting.

- Choose how you want to push new records. You can automatically push all new accounts, or push new accounts based on certain stages. If you choose to push at certain stages, select the stages.

- Select a source field for accounts, and enter a value. The default value is Apollo.

- If you've already synced duplicate records from Salesforce to Apollo, there are two sync settings to remove them:
- Account deletion sync: Check to delete duplicate records in either Apollo or Salesforce. When enabled, Apollo automatically deletes any Apollo records linked to deleted Salesforce records, and vice versa.
- Account merge sync: Check to merge duplicate records in Salesforce. When enabled, Apollo automatically merges any Apollo records linked to merged records in Salesforce.

- When finished, click Save.
You have now configured Salesforce integration push settings for accounts.
Deals
To configure push settings for deals:
- Check Sync Salesforce deals with Apollo to actively sync pipeline and deal information bidirectionally when Apollo detects a change in either platform.
- When enabled, Apollo pulls all Salesforce deal information and uses Salesforce as the source of truth for any previously synced deals.
- If you deactivate this setting at any point, Salesforce deal information remains in Apollo, but Apollo no longer actively syncs with Salesforce.
- (Optional) If you prefer not to use bidirectional sync, check only Pull opportunities to sync only Salesforce opportunities into Apollo.
- (Optional) If you prefer not to use bidirectional sync, check only Push deals to only push new and updated deals from Apollo to Salesforce.

- (Optional) Check Hide my deals to hide deals pulled from Salesforce to Apollo. When enabled, synced deals won't appear in Apollo, but automations could still update deals in Salesforce.
- When finished, click Save.
You have now configured push settings for deals.
Activities
You can push the following activities from Apollo to Salesforce:
Use caution with Push emails even if the sender or recipient doesn't exist, Push all calendar events, or customizing title templates for push events. Enabling these features may result in the creation of contacts in Salesforce that you don't expect to see.
Emails
- Check Push emails then select the type of email to push:
- Push outgoing emails sent within Apollo
- Push outgoing emails not sent within Apollo
- Push incoming emails that are replies to emails sent within Apollo
- Push incoming emails from all other sources
- Push internal emails
- Push emails even if sender or recipient doesn't exist in Salesforce
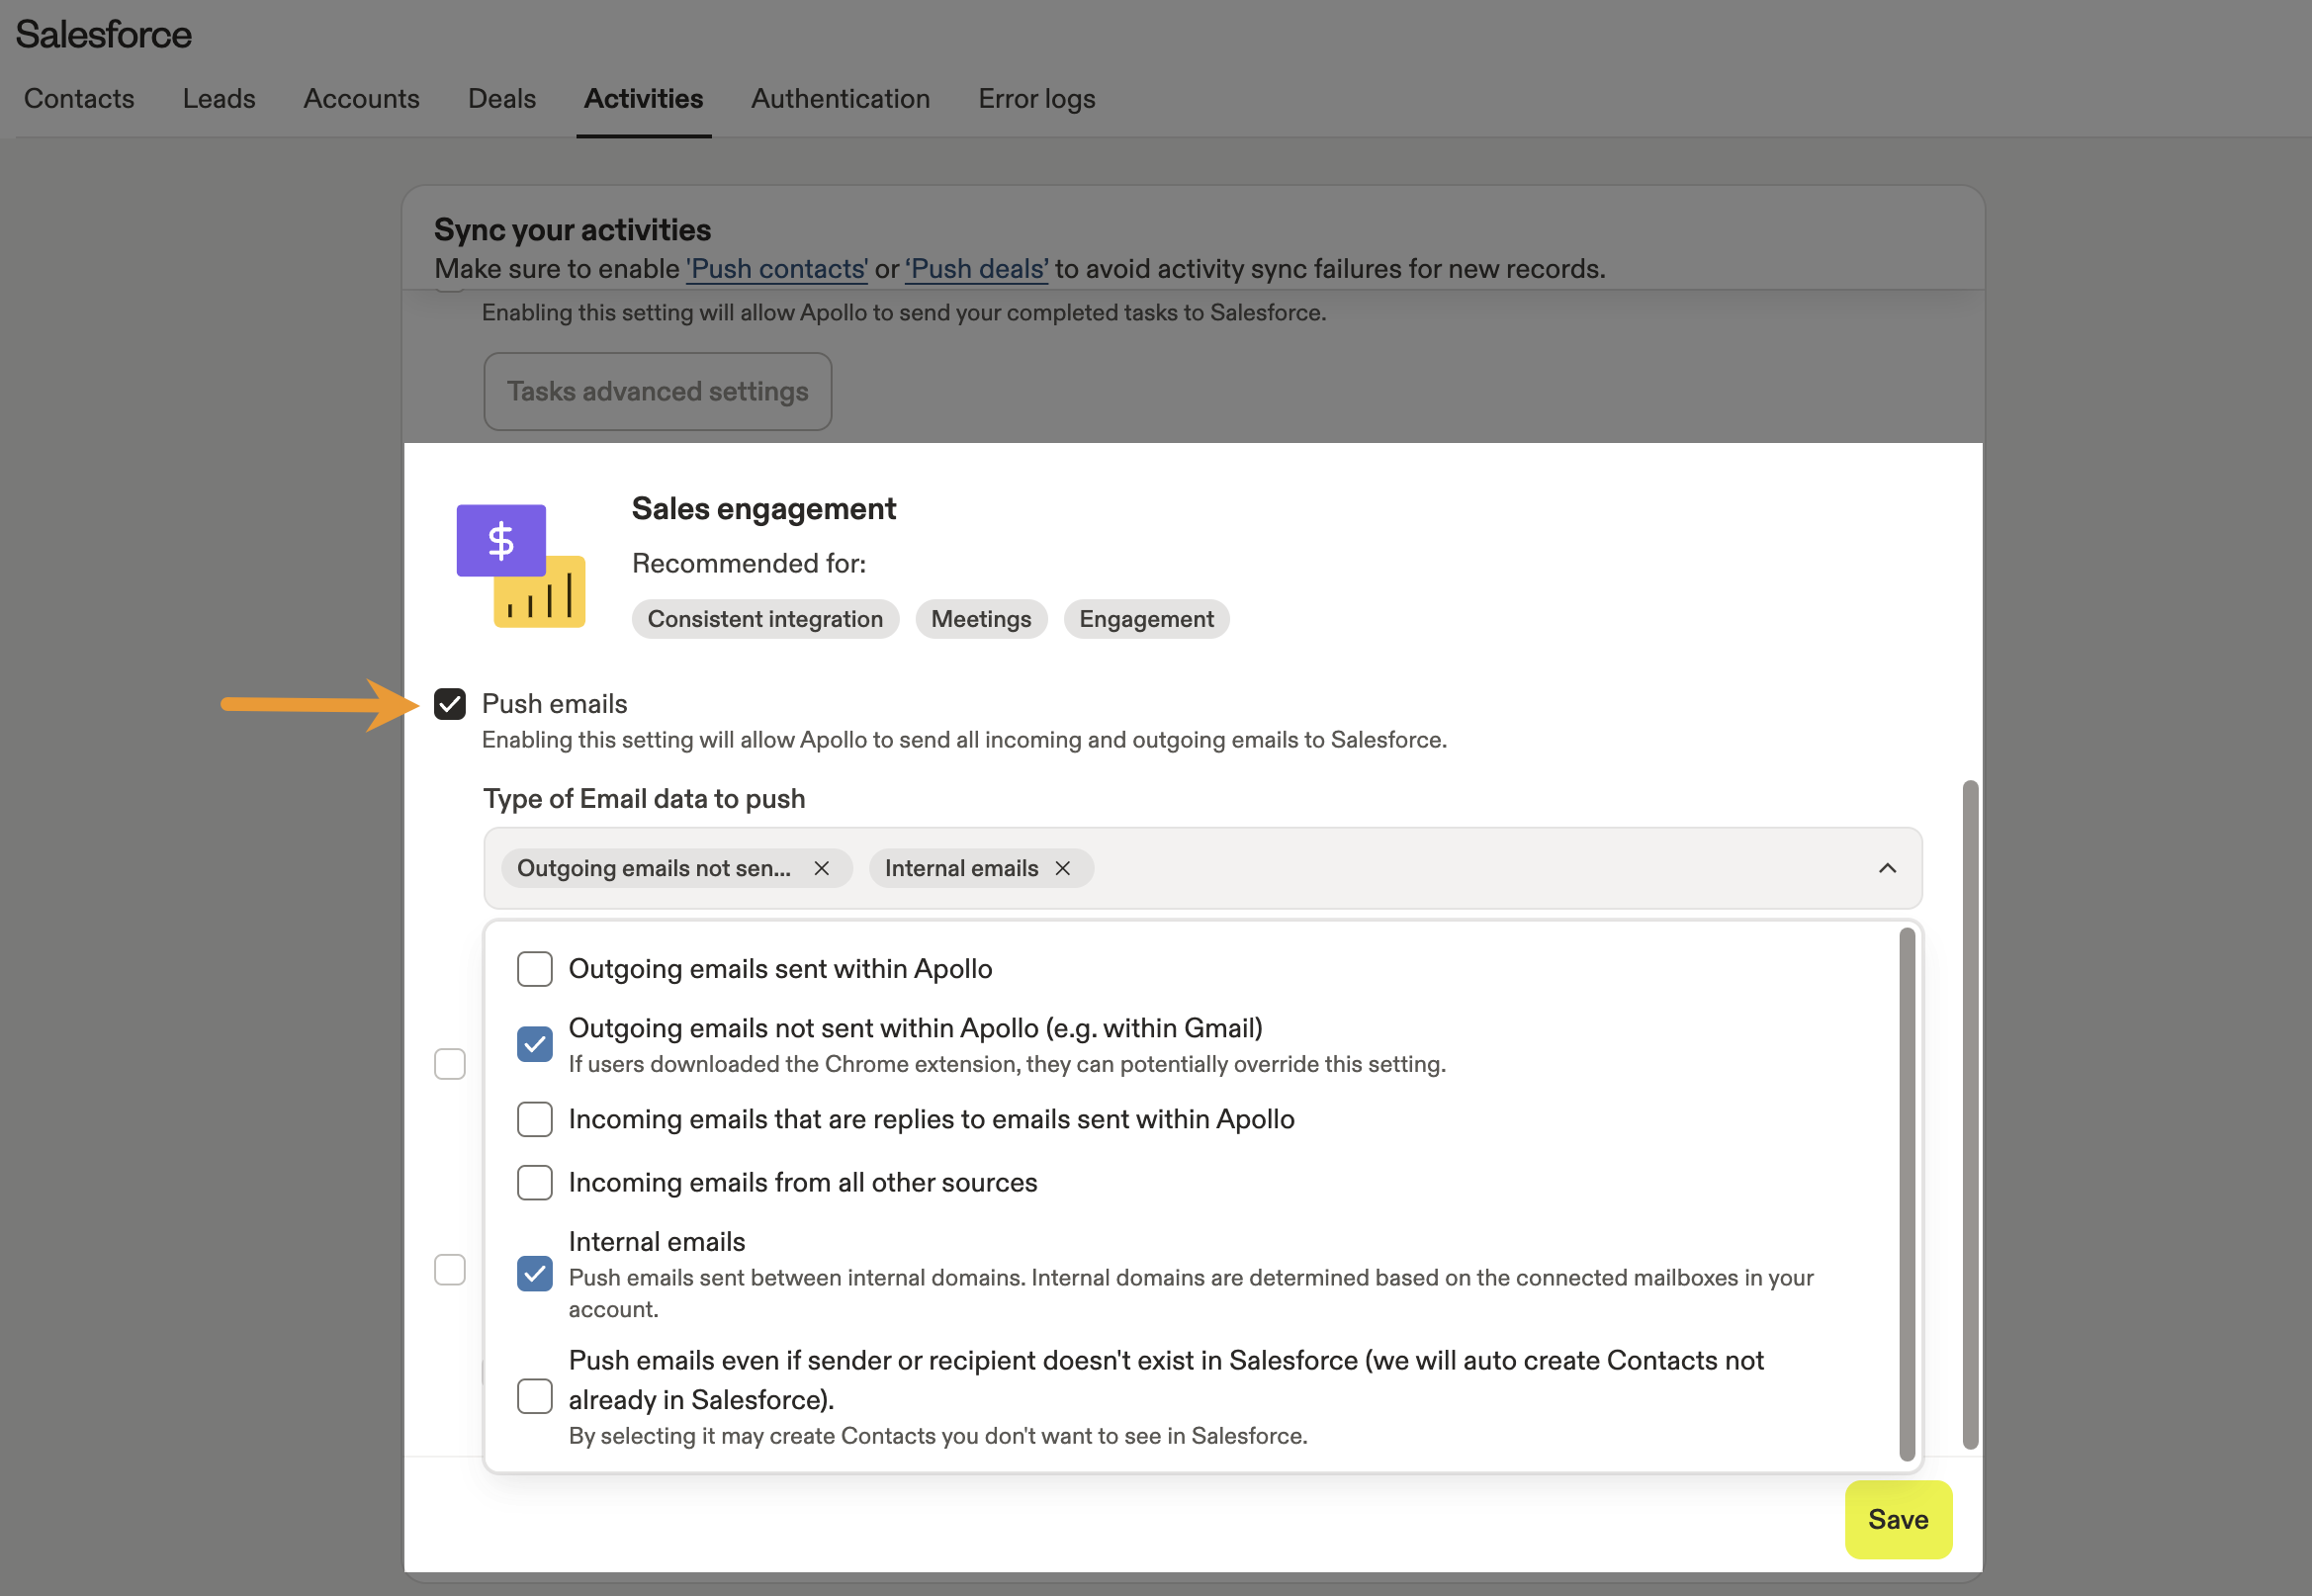
What's an internal email? Internal emails are communications between the domains of the connected mailboxes on your Apollo account. Non-corporate domains, such as gmail.com, aren't considered to be internal.
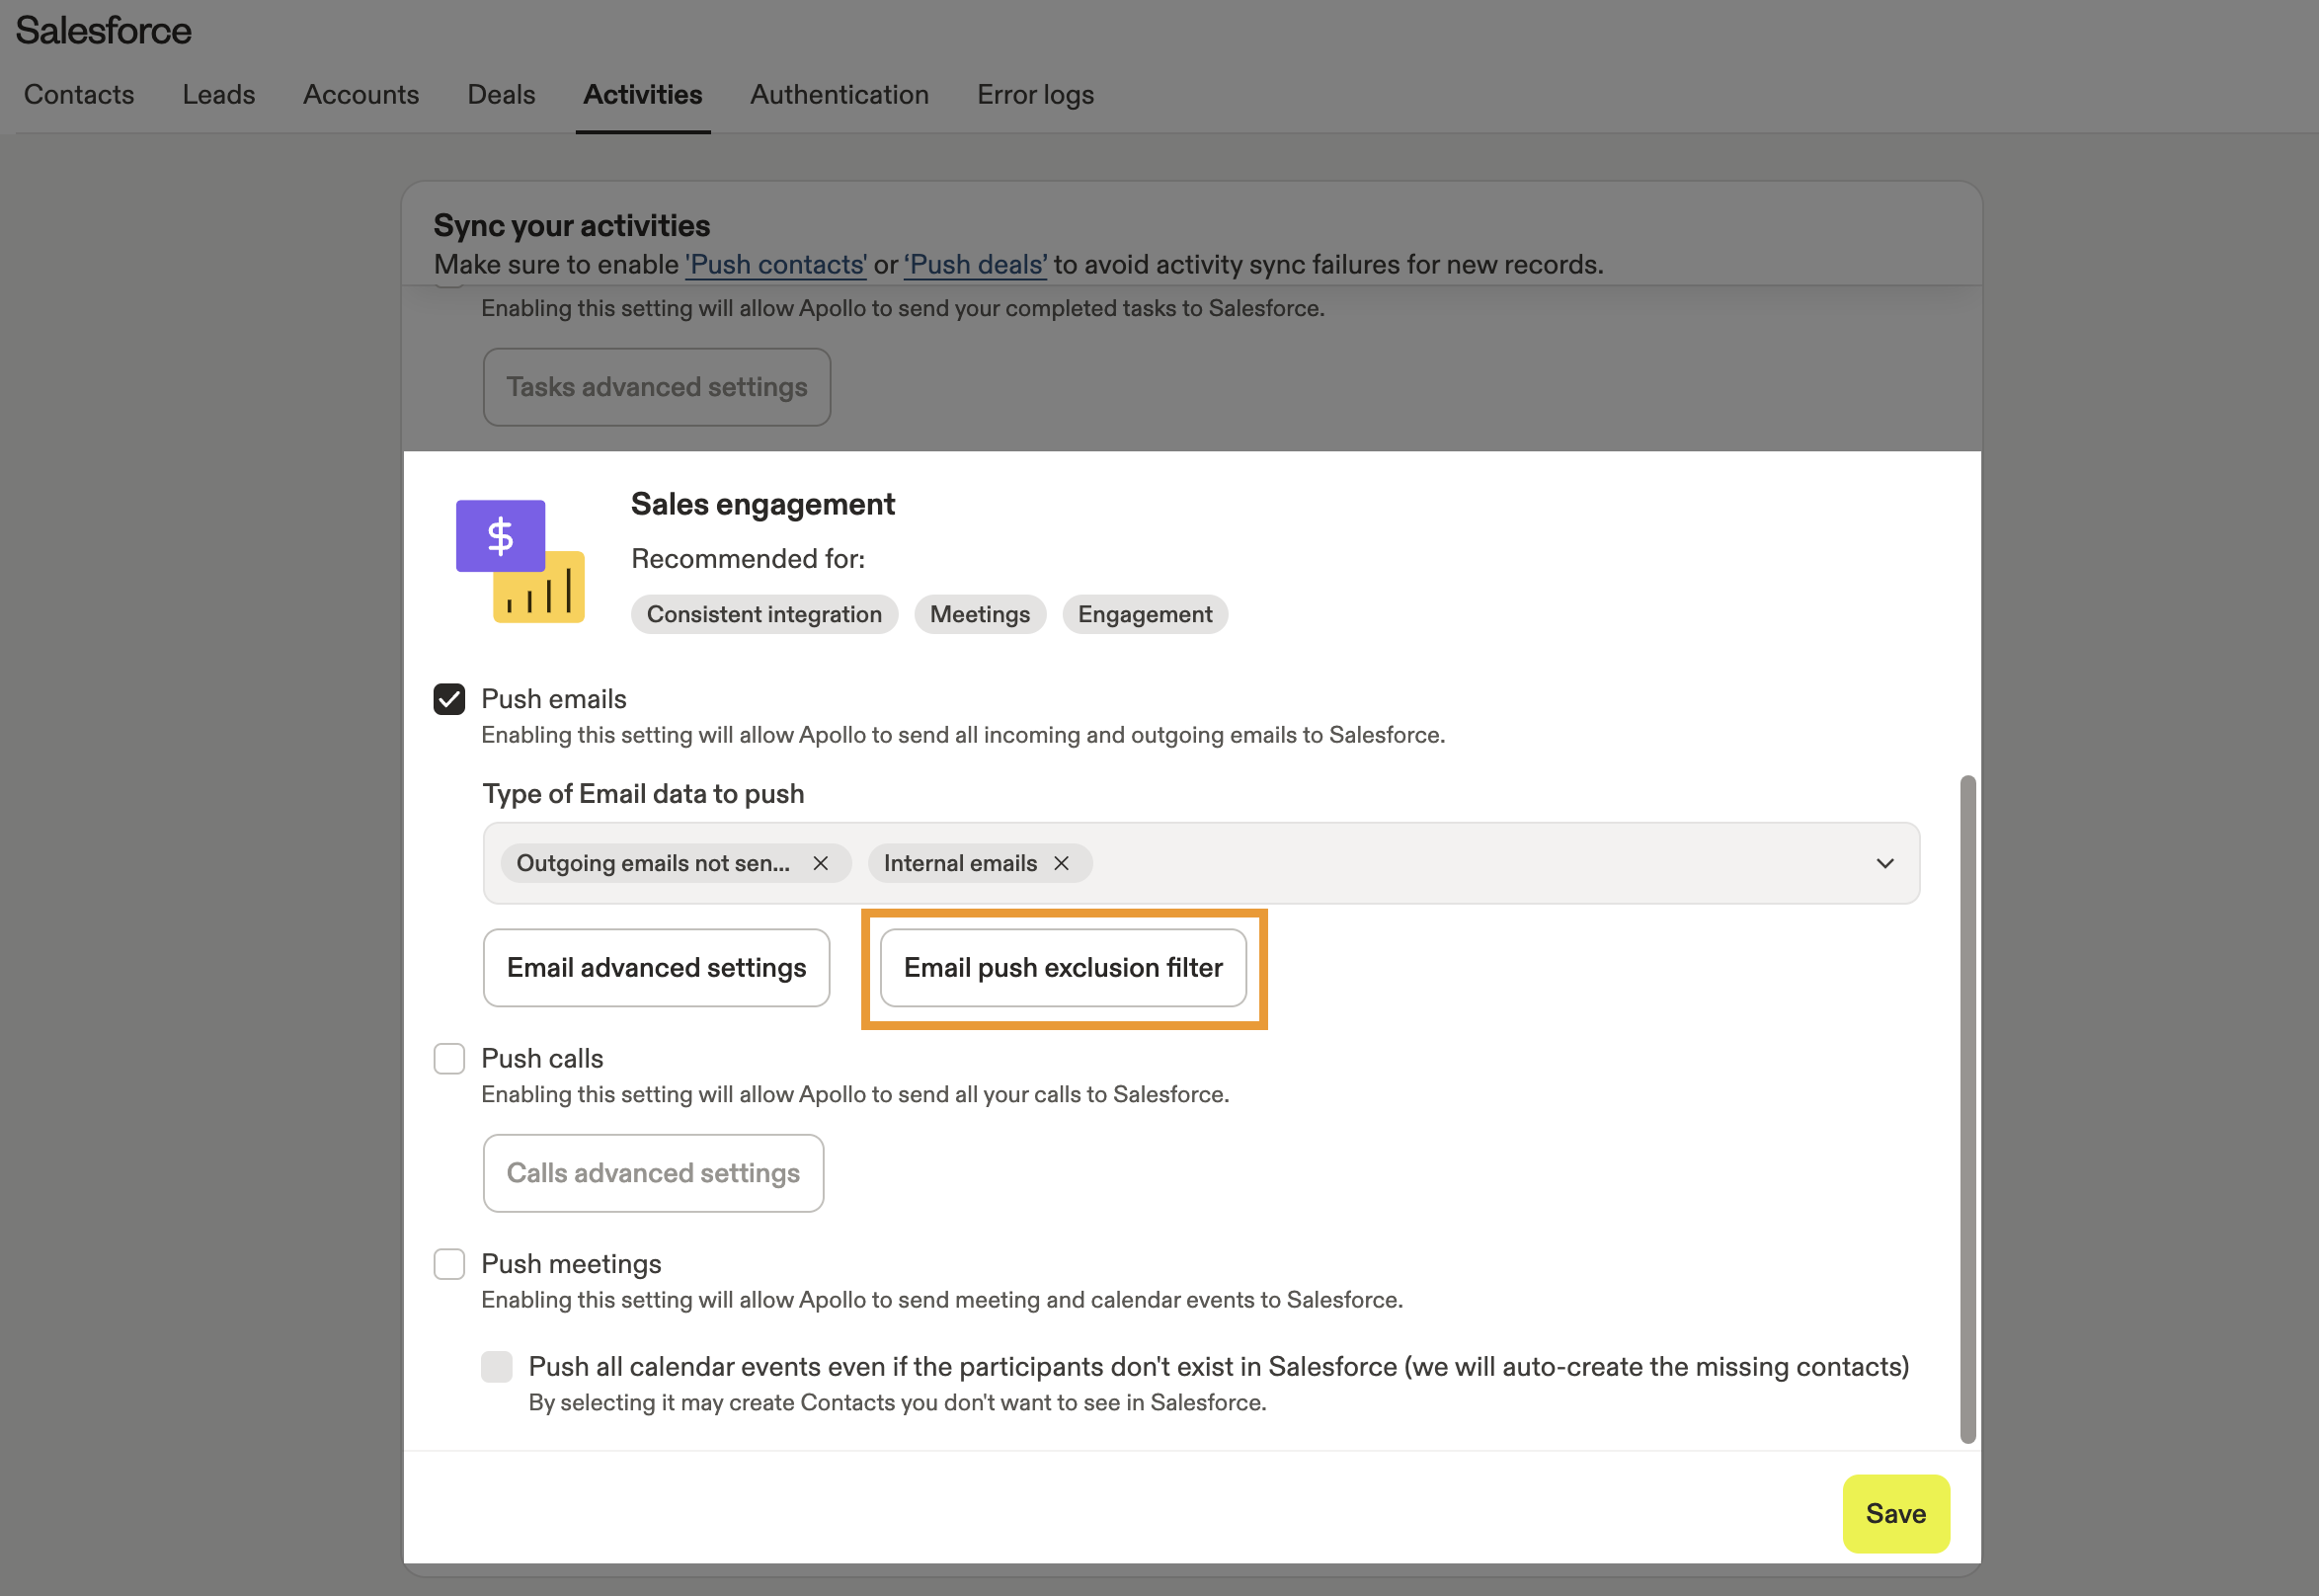
- (Optional) Click Email advanced settings to customize the email title template.
- (Optional) Click Email push exclusion filter to filter the emails that are synced to Salesforce.
- Enter specific email domains, email addresses, or subject line keywords to create email exclusion rules. You can create incoming or outgoing email exclusions by setting From and To rules.
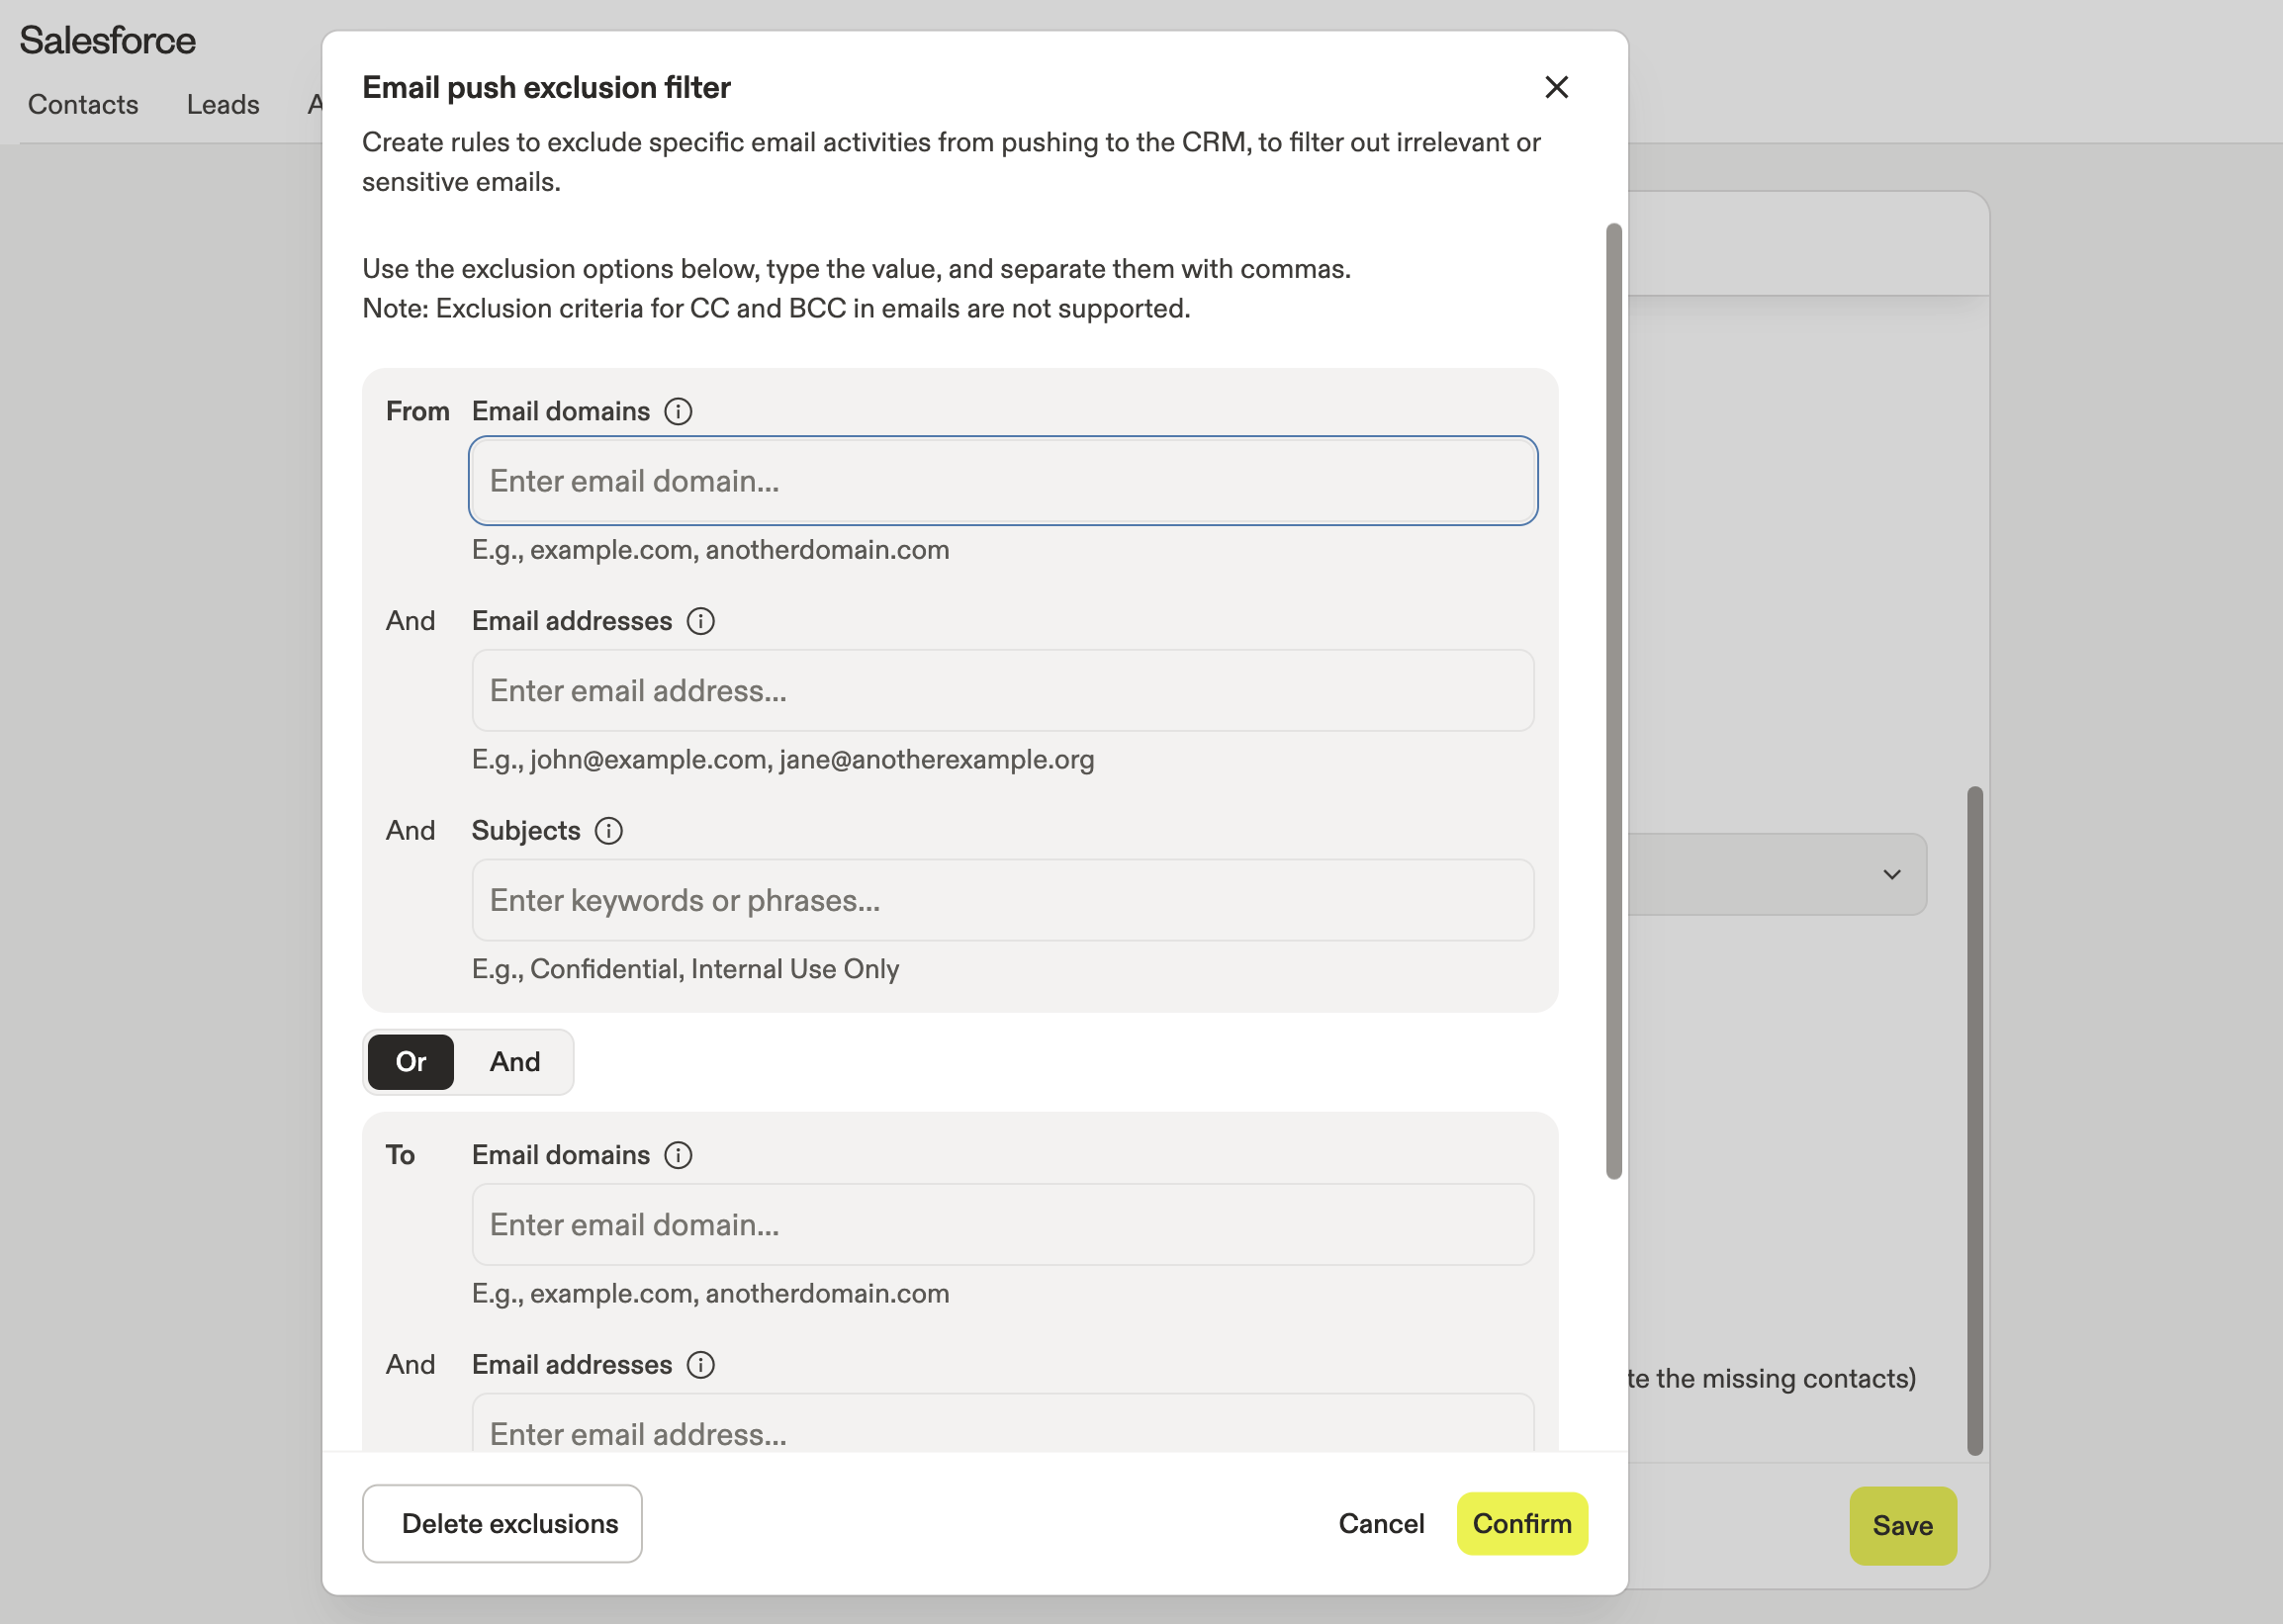
Each email domain, email address, and subject line you add on a rule works with AND logic. If you filter emails from "ymail.org" with the subject line "Confidential," Apollo only filters emails from ymail.org — and not emails from other domains with the subject line keyword "Confidential."
Apollo doesn't filter by CC or BCC in emails.
Toggle AND or OR to control how a rule applies to both the From and To values:
-
AND: Only emails that match both from and to criteria will be filtered. -
OR: Emails that match either from or to criteria will be filtered.
- Click Confirm.
- When finished, click Save.
You have now configured push settings for emails.
Notes
- Check Push notes to push notes from Apollo to Salesforce.
- When finished, click Save.
Tasks
- Check Push tasks to push notes from Apollo to Salesforce.
- (Optional) Click Tasks Advanced Settings to customize the title template you use when you push tasks data to Salesforce.
- When finished, click Save.
Calls
- Check Push calls to push calls made in Apollo to Salesforce.
- Click View Advanced Settings to customize the title template you use when you push call data to Salesforce.
- When finished, click Save.
Meetings / Events
- Check Push meetings to push meetings scheduled in Apollo to Salesforce.
- (Optional) Check Push all calendar events to push events where participants don't exist in Salesforce.
- When finished, click Save.
Conversations
- Check Push meeting summaries to push conversation summaries as an activity / note to an associated deal or opportunity.
- When finished, click Save.
To push meeting summaries to Salesforce, enable and use deals on Apollo.
You have now configured Salesforce integration push settings for activities.
Push Records Manually
If you manually push individual records, you override any sync settings configured. This means that Apollo pushes a record to Salesforce regardless of contact stage restrictions or other limits you enabled in the push settings.
You can manually push records to Salesforce during a people search or company search.
Manual push may be unavailable in the following cases:
- If your team hasn't connected Salesforce, you can't push to Salesforce.
- If Salesforce is connected but push isn't enabled in sync settings, you can't push to Salesforce.
- If your team is still in the initial data pull after connecting Salesforce, the option to manually push appears, but you can't use it yet. Once push is enabled and the initial pull completes, manual push works as expected.
To manually push records to Salesforce:
- Launch Apollo and click People or Companies.
- Check one or more prospects or companies, then click Salesforce > Push to Salesforce.

- Apollo pushes the record in real-time to Salesforce.
You have now manually pushed a record.
Next Steps
Want to tighten up the rest of your Salesforce setup? These related resources can help your team keep the sync clean, predictable, and easier to manage.
| Integrate Salesforce with Apollo | Need to double-check the foundation first? Connect Salesforce to Apollo to make sure your team starts from the right integration setup before records begin moving between systems. |
|---|---|
| Configure Salesforce Pull Settings | Pair your push rules with Salesforce pull settings to control what comes back into Apollo and keep both sides of the sync aligned. |
| Map Default Apollo Fields to Salesforce | Before your team pushes data at scale, map default Apollo fields to Salesforce to make sure core contact, lead, account, and deal data lands where it should. |
| Automatically Create and Map Stages Between Salesforce and Apollo | Working with stage-based push rules? Automatically create and map stages between Salesforce and Apollo to keep lifecycle changes consistent across both platforms. |
| Link Custom Salesforce Fields to Custom Apollo Fields | If you're using custom properties in your workflow, link custom Salesforce fields to custom Apollo fields to keep your unique data points synced instead of stranded in one system. |