Overview
If you have a list of contacts that you want to add to Apollo, import them directly from a CSV file into Apollo. During the import process, you can also turn on waterfall enrichmentto enrich imported contacts, ensuring you have the most actionable email and phone data before outreach.
Check out Import a CSV of Accounts or Import a CSV of Deals for guidance on importing accounts or deals to Apollo.
Check out the following sections to upload a CSV of contacts.
Import a CSV of Contacts
Format Your CSV
To import contacts, your CSV file must have at least one of the following columns:
Company NameCompany WebsiteContact LinkedIn URLContact Email
However, you should include as many columns as you can in your CSV. Apollo recommends you include First Name, Last Name, Contact Email, Contact LinkedIn URL, Company Name, Company Website, and any other available contact data that you can map to Apollo fields.
More data makes it easier for Apollo to recognize a contact. Enrichment may not work if Apollo doesn't have enough data to find your imported contacts.
Download a sample CSV file to help you get started.
Next, ensure your computer is set to support one of the following delimiters:
- Comma
, - Semicolon
; - Colon
: - Pipe
|
Learn how to set a delimiter on your computer.
Use the following formatting when you create your CSV:
- If your CSV includes a column with multi-select options, each value in a cell should be separated by a semicolon (
;). - If your CSV includes values that should be mapped to a checkbox in Apollo, enter
Truefor checked andFalsefor unchecked. - If you include an account website, enter the domain only, without
www.or any prefixes.

Avoid uploading CSV files with more than 10,000 rows. Instead, split large CSVs into separate, smaller files.
If you see “Most rows need a valid full name” or “Illegal quoting in line 1,” your file likely fails CSV validation. Make sure your rows include a real contact name (first and last), remove non-contact rows, and re-export as a clean CSV. For illegal quoting, fix mismatched quotes and re-save the file as CSV.
With your CSV formatted, you're ready to upload your CSV.
Upload Your CSV
To upload your contacts CSV, you need permission to bulk import contacts via CSV. If you don't have permission, ask your team's Apollo admin to update your permission profile.
To upload a CSV of contacts:
- Launch Apollo and click People.
- Click Import > CSV.
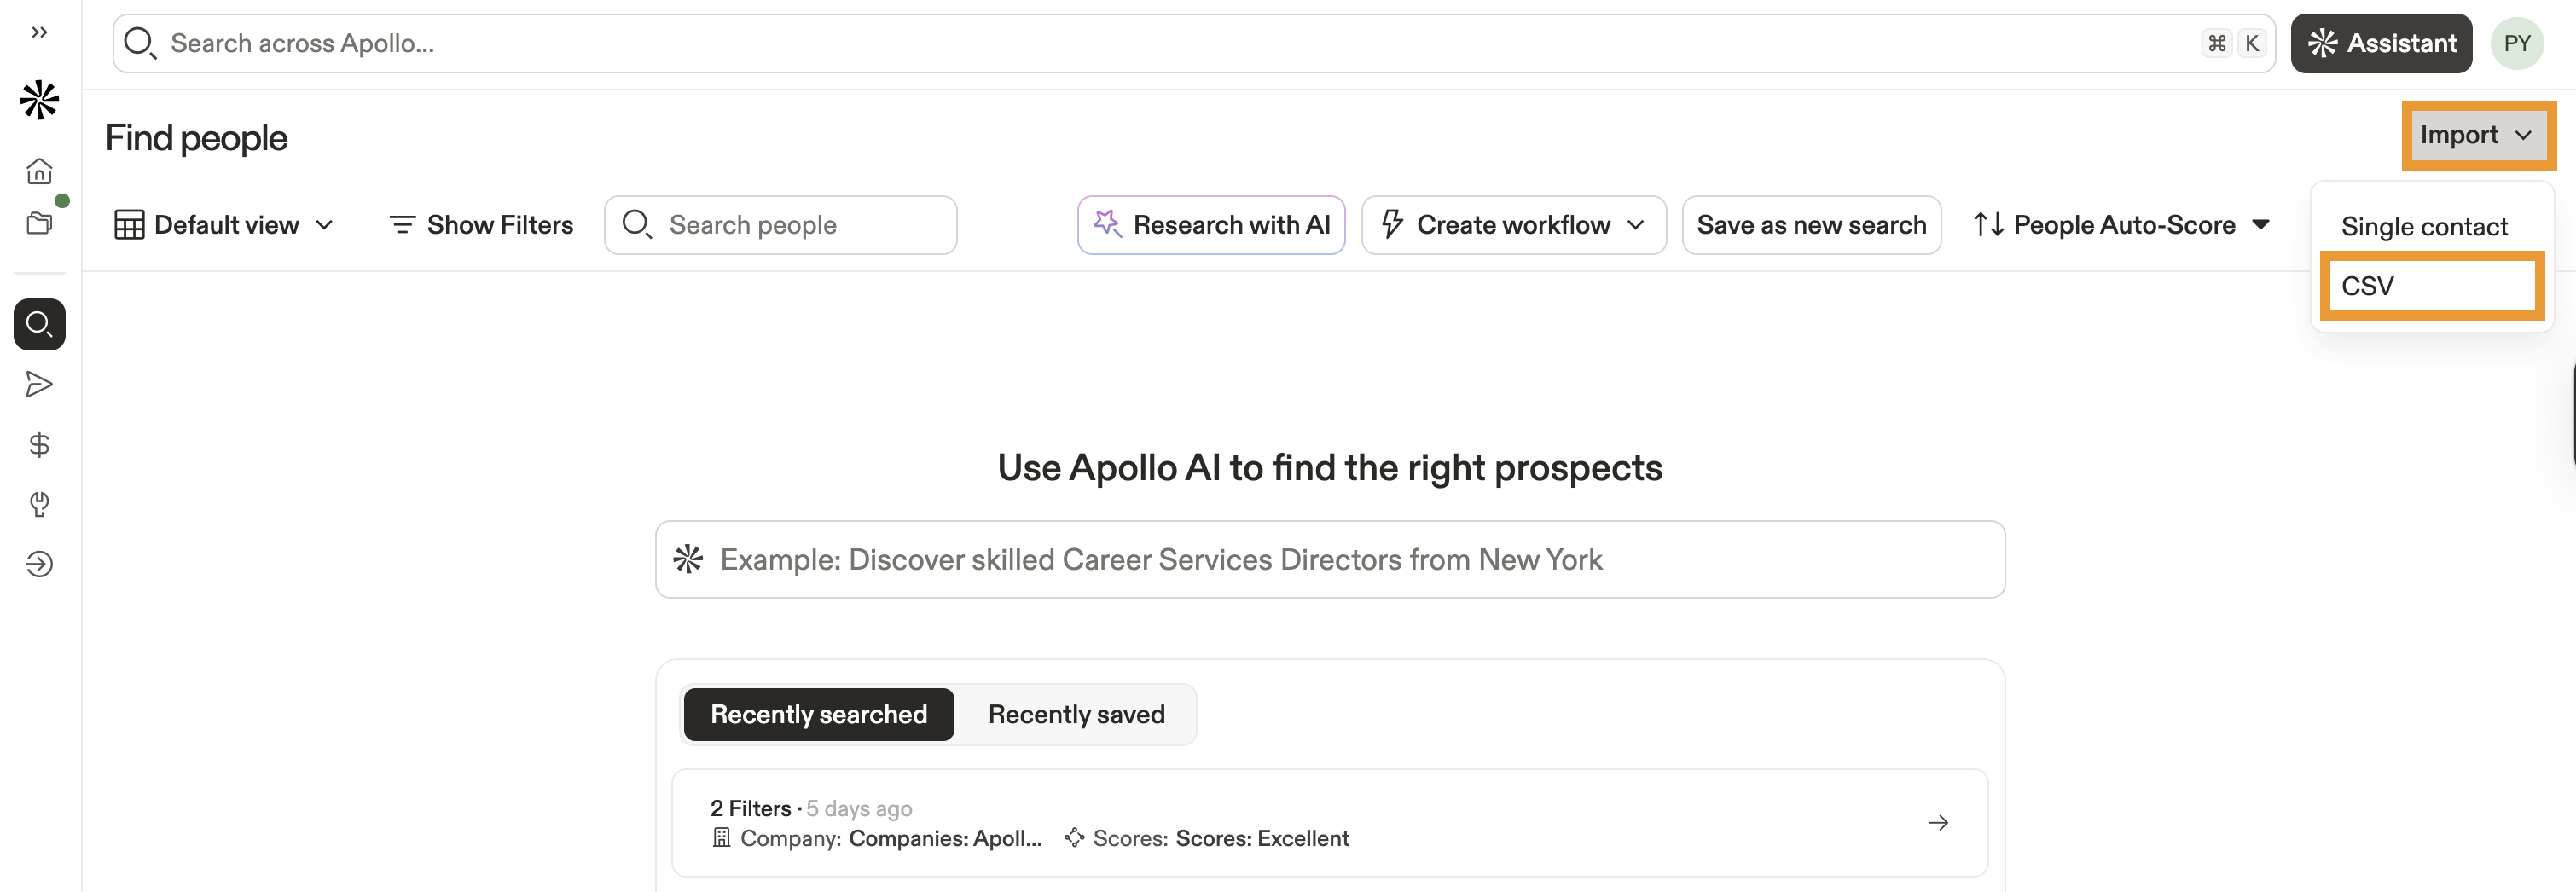
- Click Select CSV File under Import contacts. Choose a CSV file to upload.

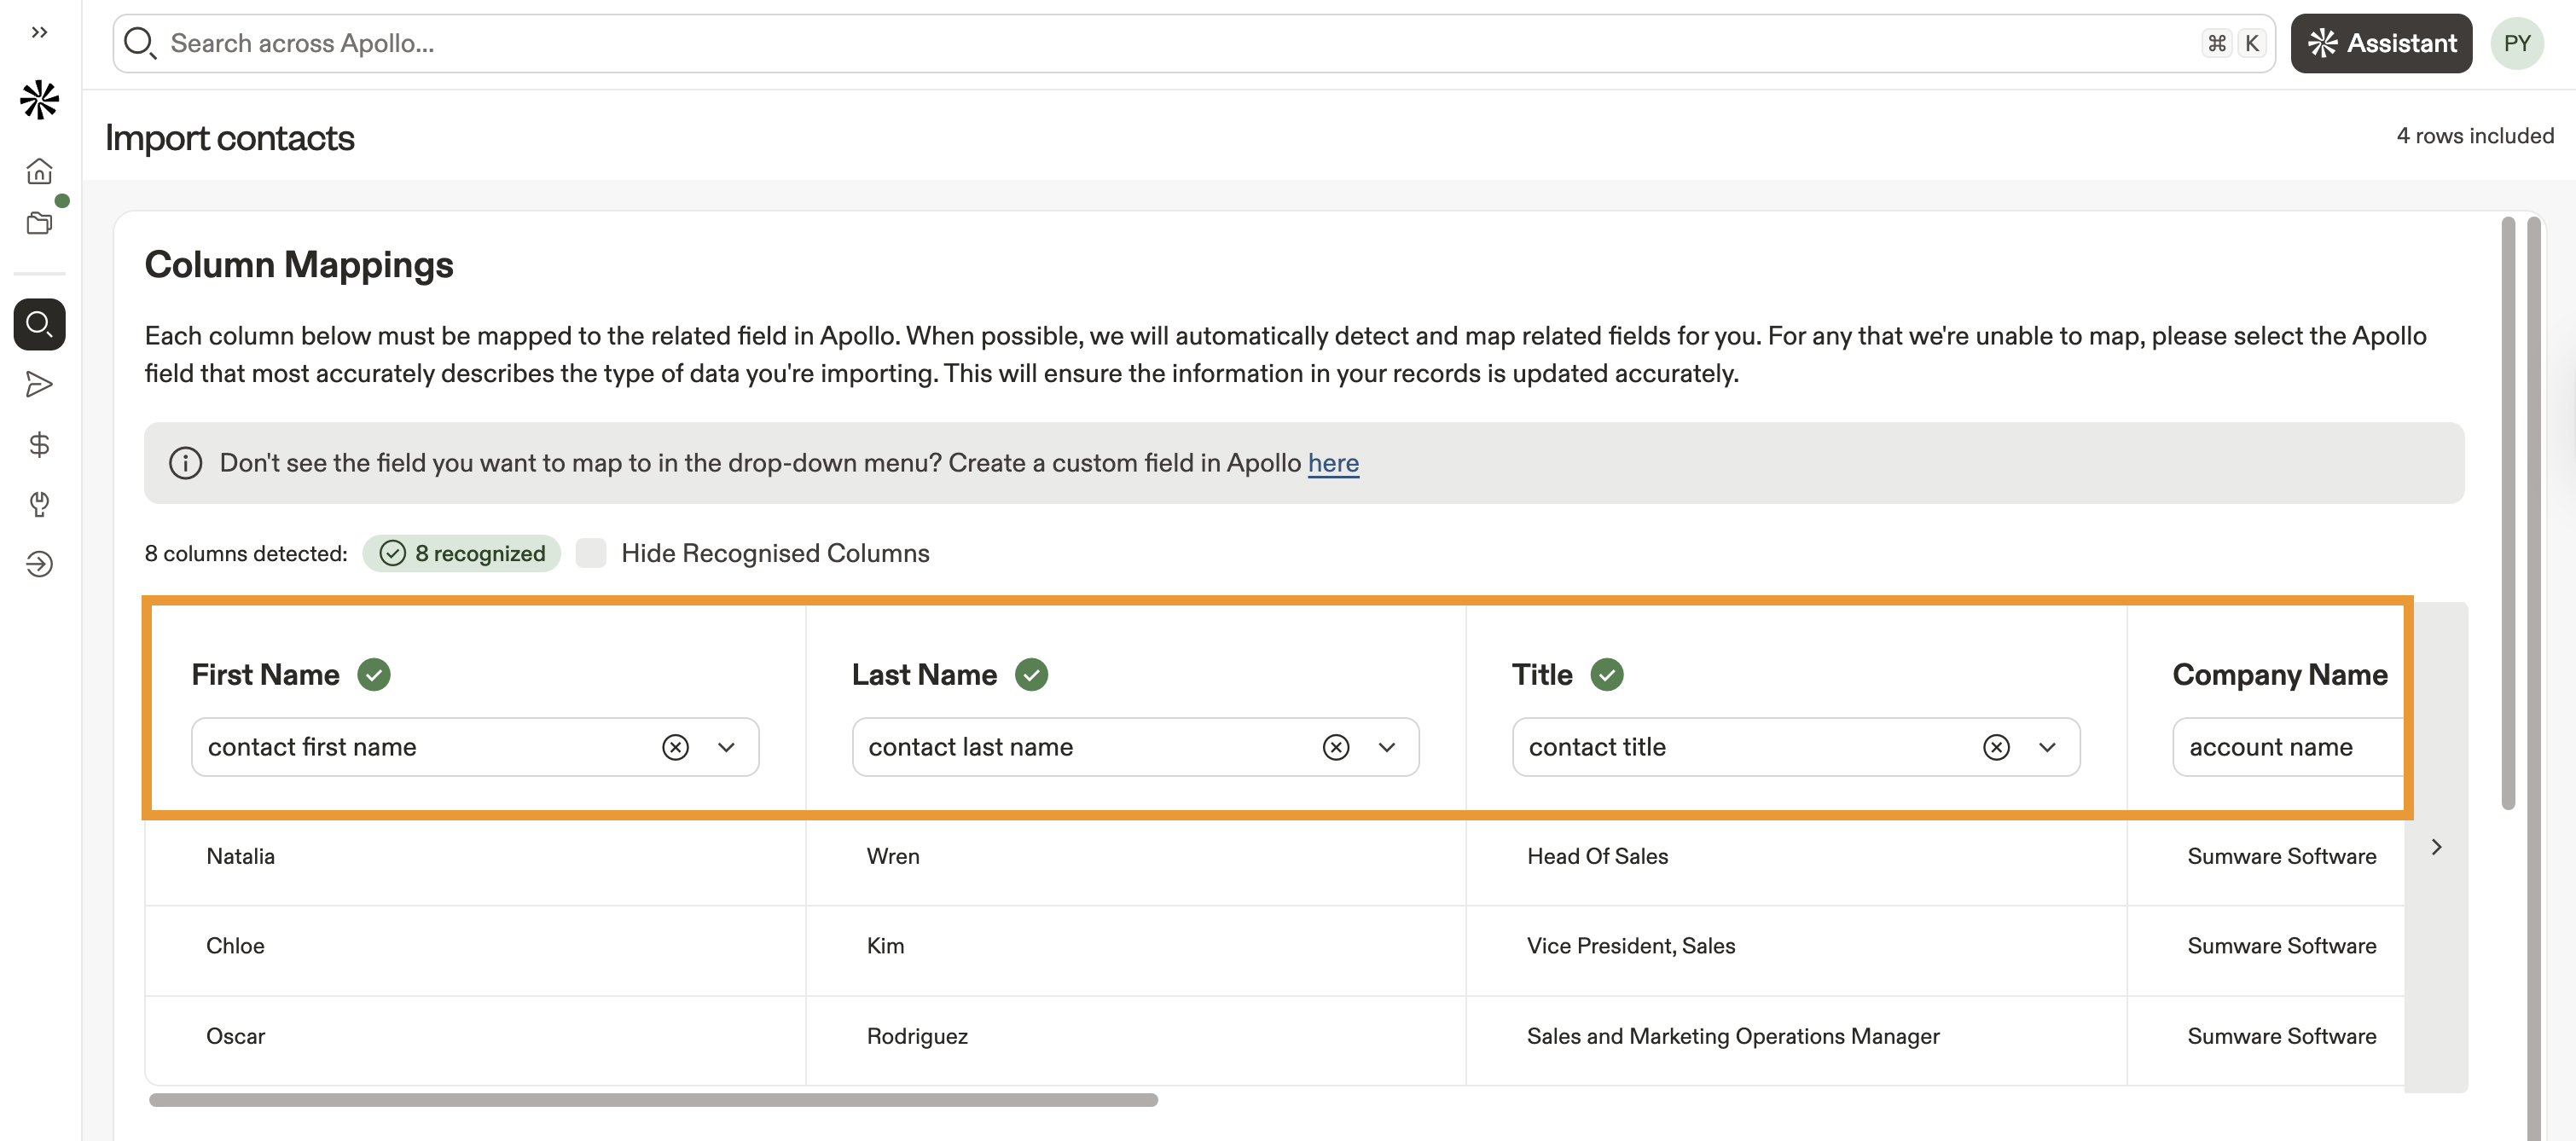
- Next, map your CSV column headers to the corresponding Apollo fields.
Wondering which fields you can use to map? Check out the list of default Apollo fields. You can also create a custom contact field if you don't have an available field for mapping. You need to restart the upload after you create additional custom fields.
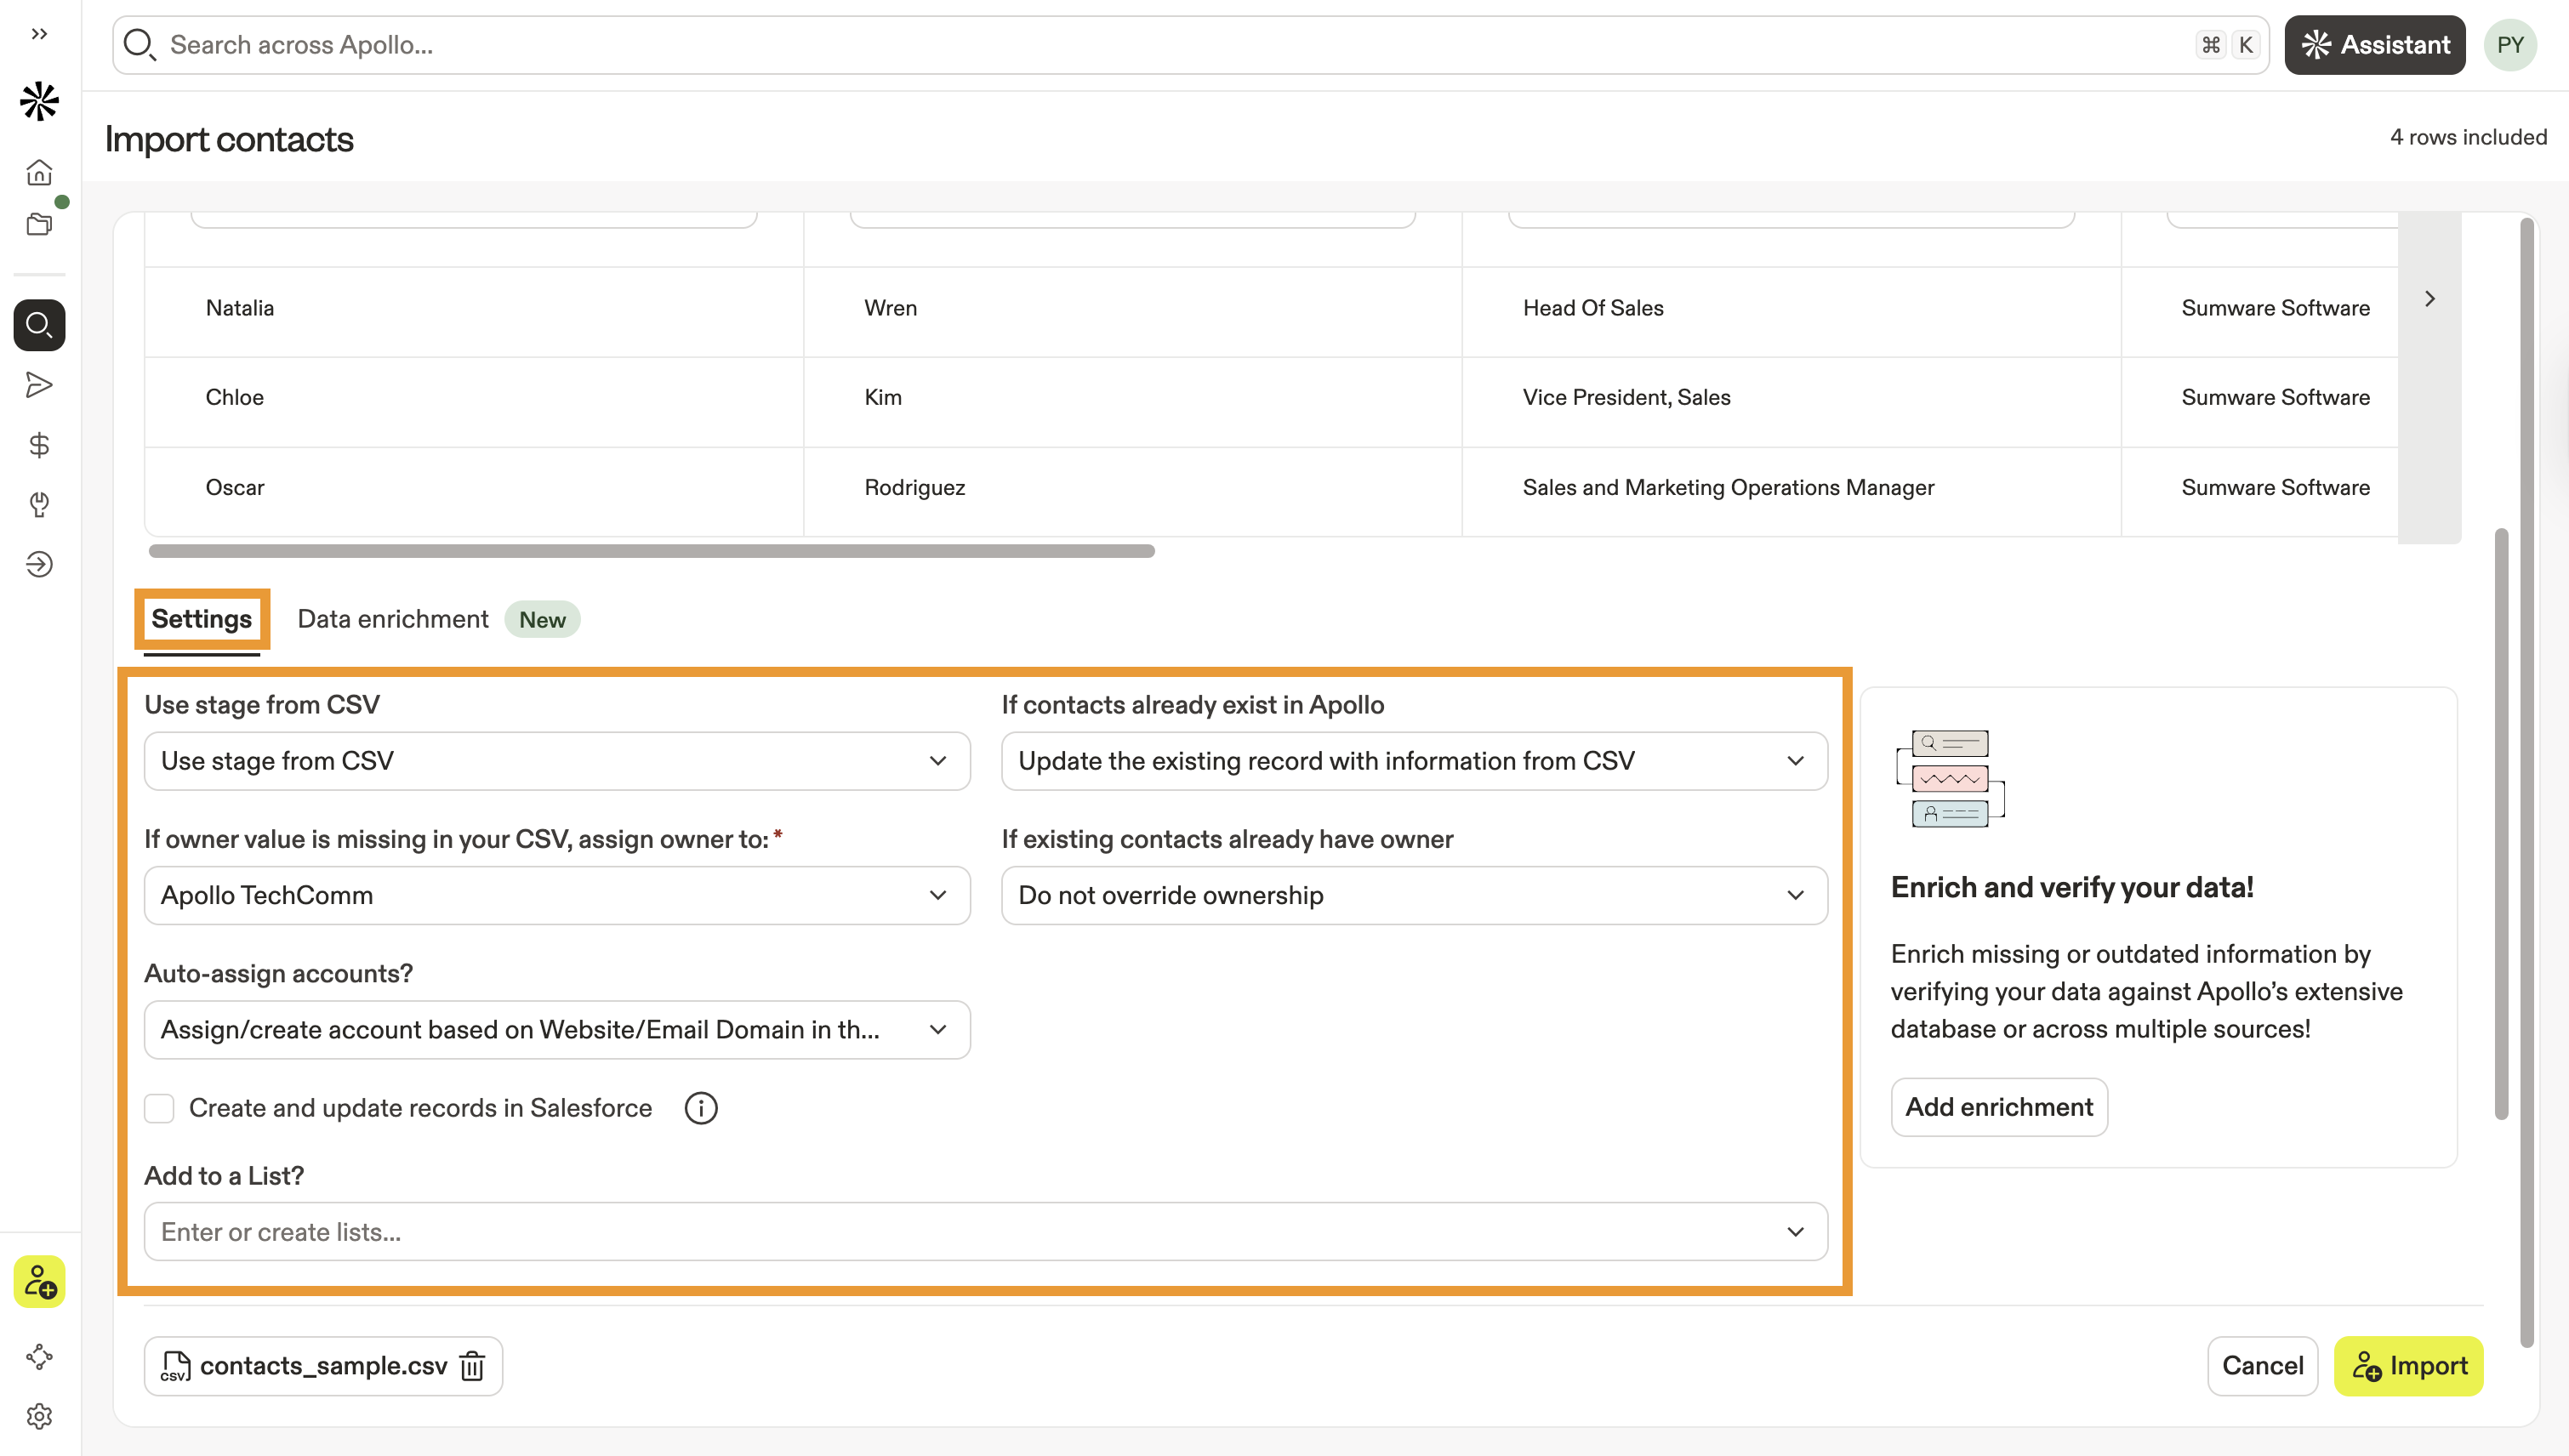
- Scroll to configure the following settings for your imported contacts:
| Stage | Select the contact stage that best represents the engagement status for all of the contacts in the CSV. The correct contact stage enables you to efficiently message people once they're in a sequence. Select Use stage from CSV to set the stage for each contact directly from your CSV file. |
|---|---|
| If contacts already exist | When you import contacts via CSV, Apollo checks for existing records with the same first name, last name, company, email, or LinkedIn URL to identify duplicates. Use this setting to tell Apollo how to handle duplicates. Select Update the existing record to add CSV data to the existing record in Apollo and prevent duplicates. |
| If owner is missing | If the owner value is missing in your CSV, select a user that should own the imported contacts in Apollo. |
| If existing contacts already have an owner | Select what happens if contacts in your CSV already have an owner in Apollo. If you select Update Ownership, Apollo assigns the user that you selected in If owner is missing. |
| Add to a list | Enter the name of a new list, or select an existing list. |
| Auto-assign accounts | Choose whether to auto-assign or create accounts based on the website or domain in the CSV. |
| Create and update records in CRM | If you have connected a CRM like Salesforce, HubSpot, or Pipedrive, check to create and update records in your CRM. This overrides any push settings configured for the integration. |
- Click Data enrichment to enrich your contacts on import. Toggle to enrich phone numbers, emails, or both.
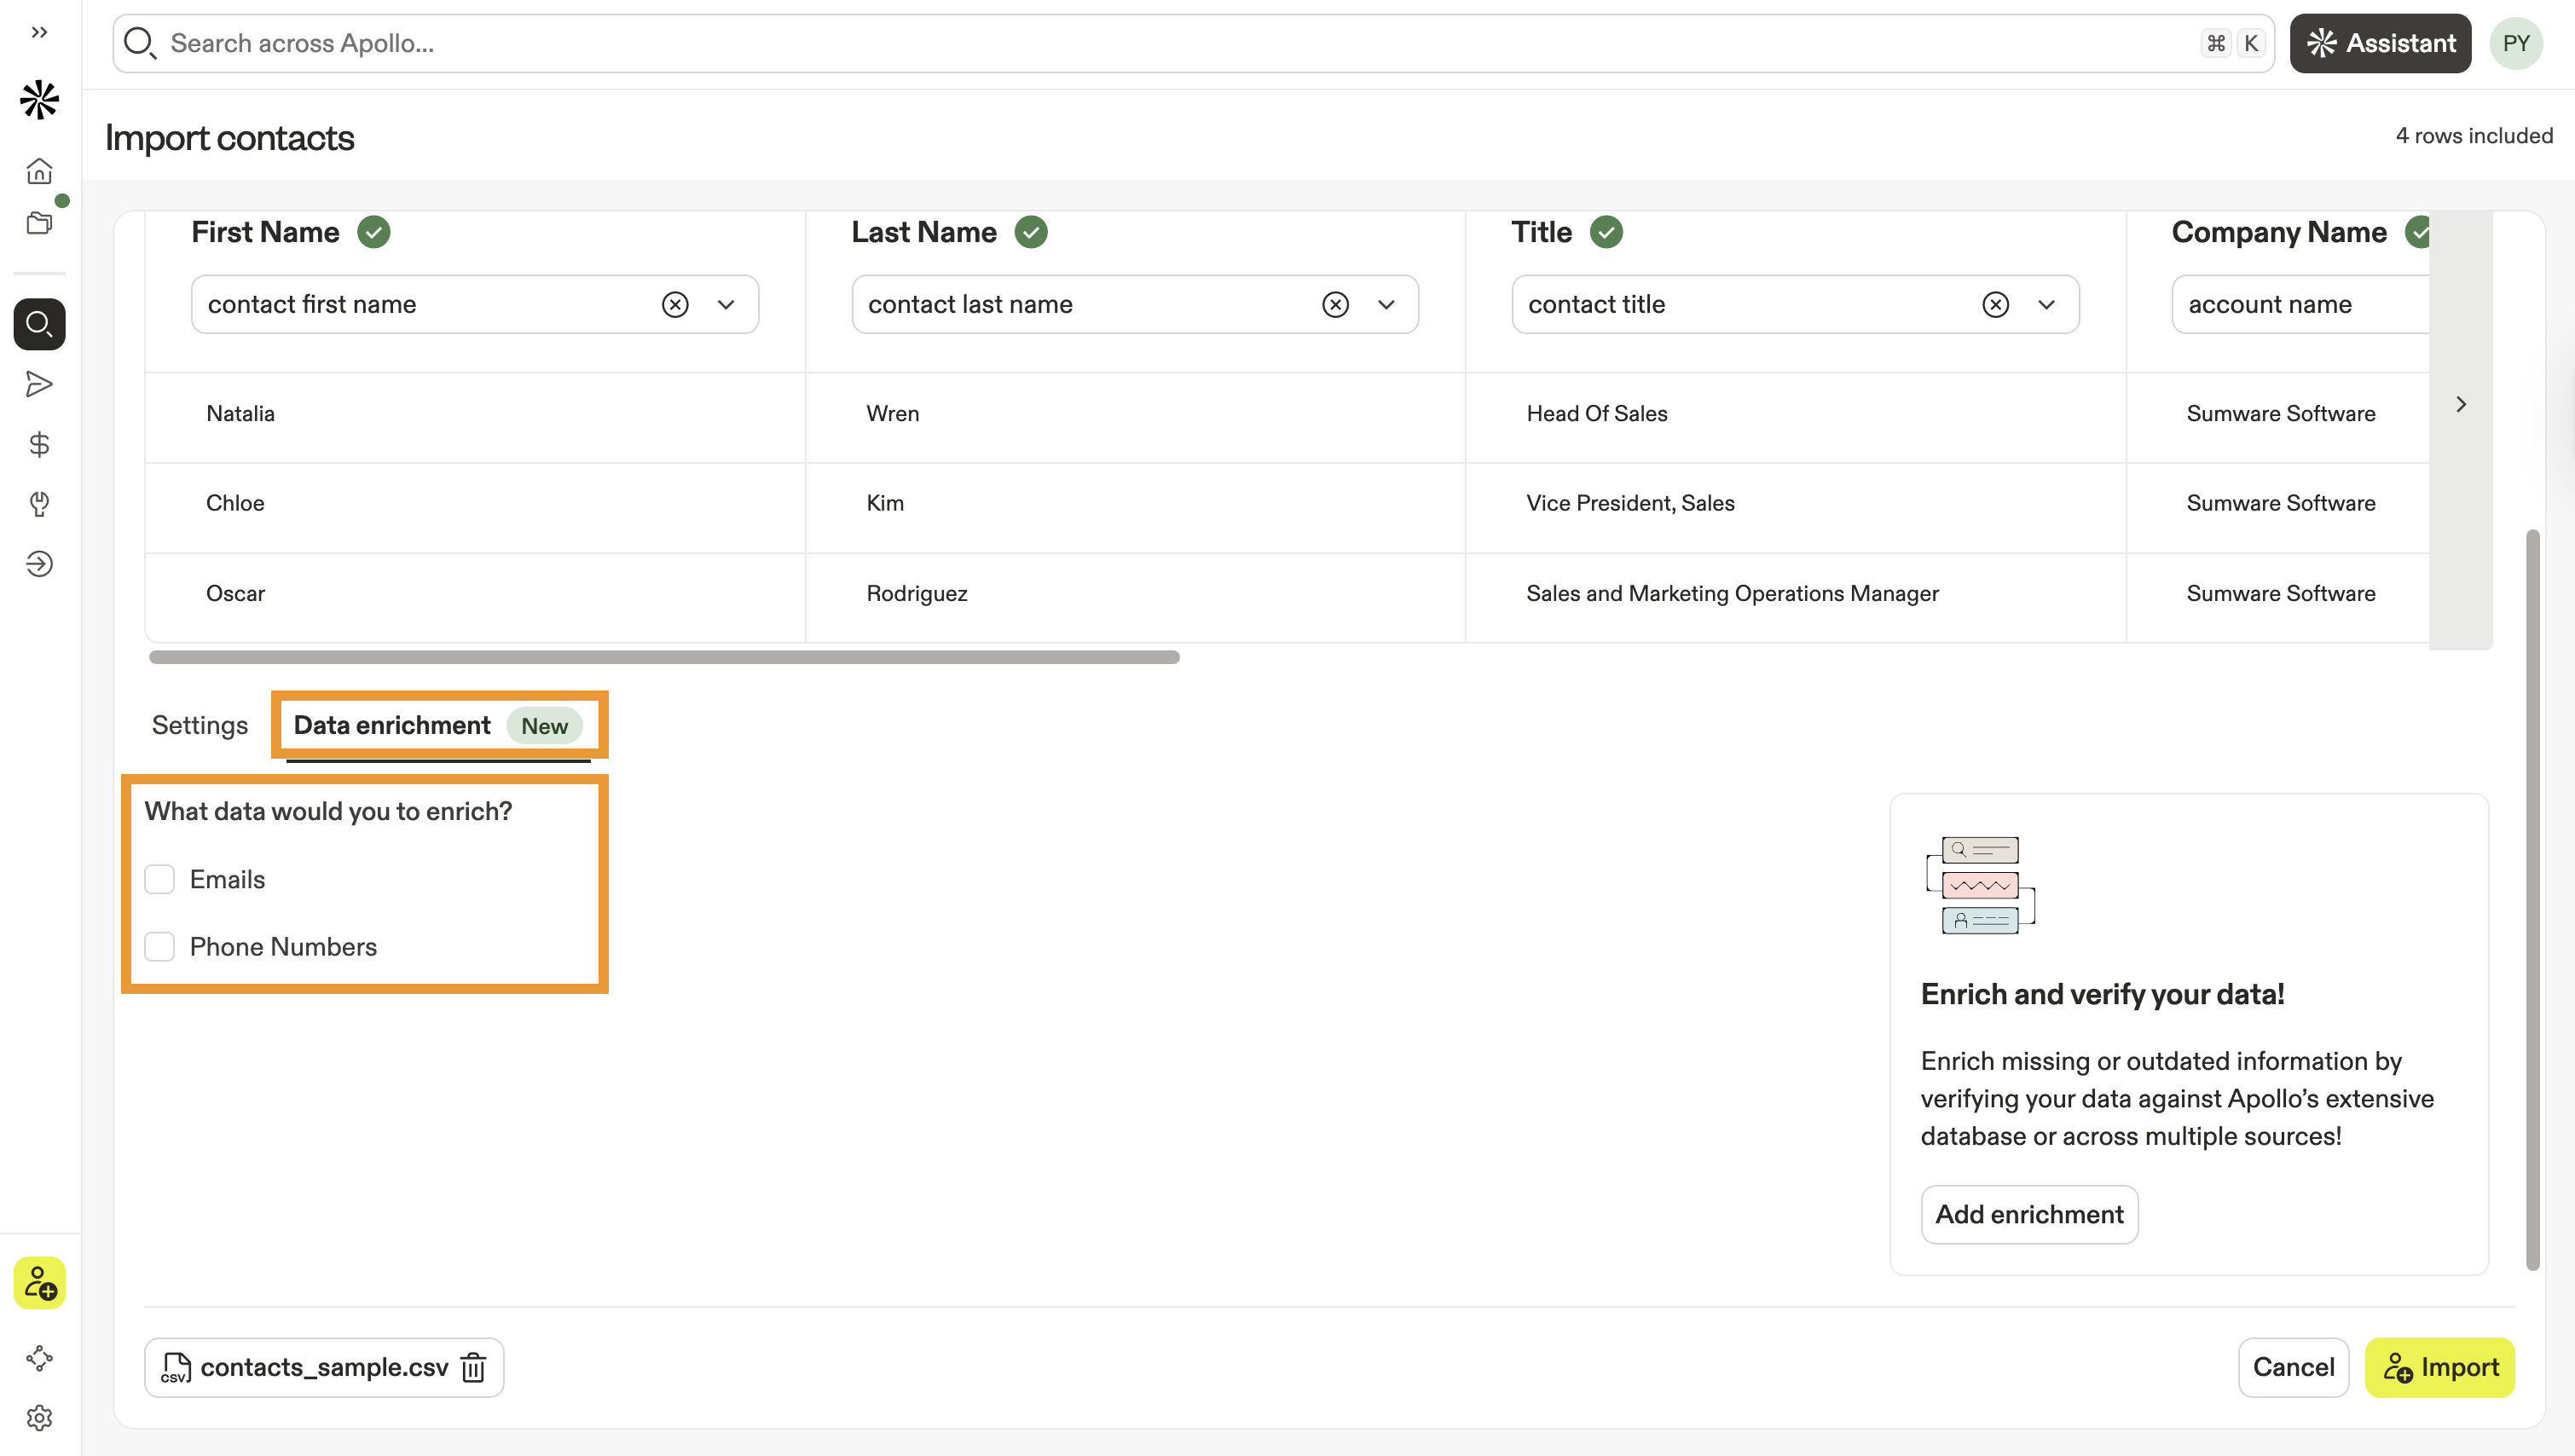
Only people with paid Apollo plans can access data enrichment on CSV import. If you're on a free Apollo plan, upgrade your plan to get access to data enrichment on import.
- (Optional) Toggle Enrich with Multi-source to use waterfall enrichment to find data via multiple third-party data sources.
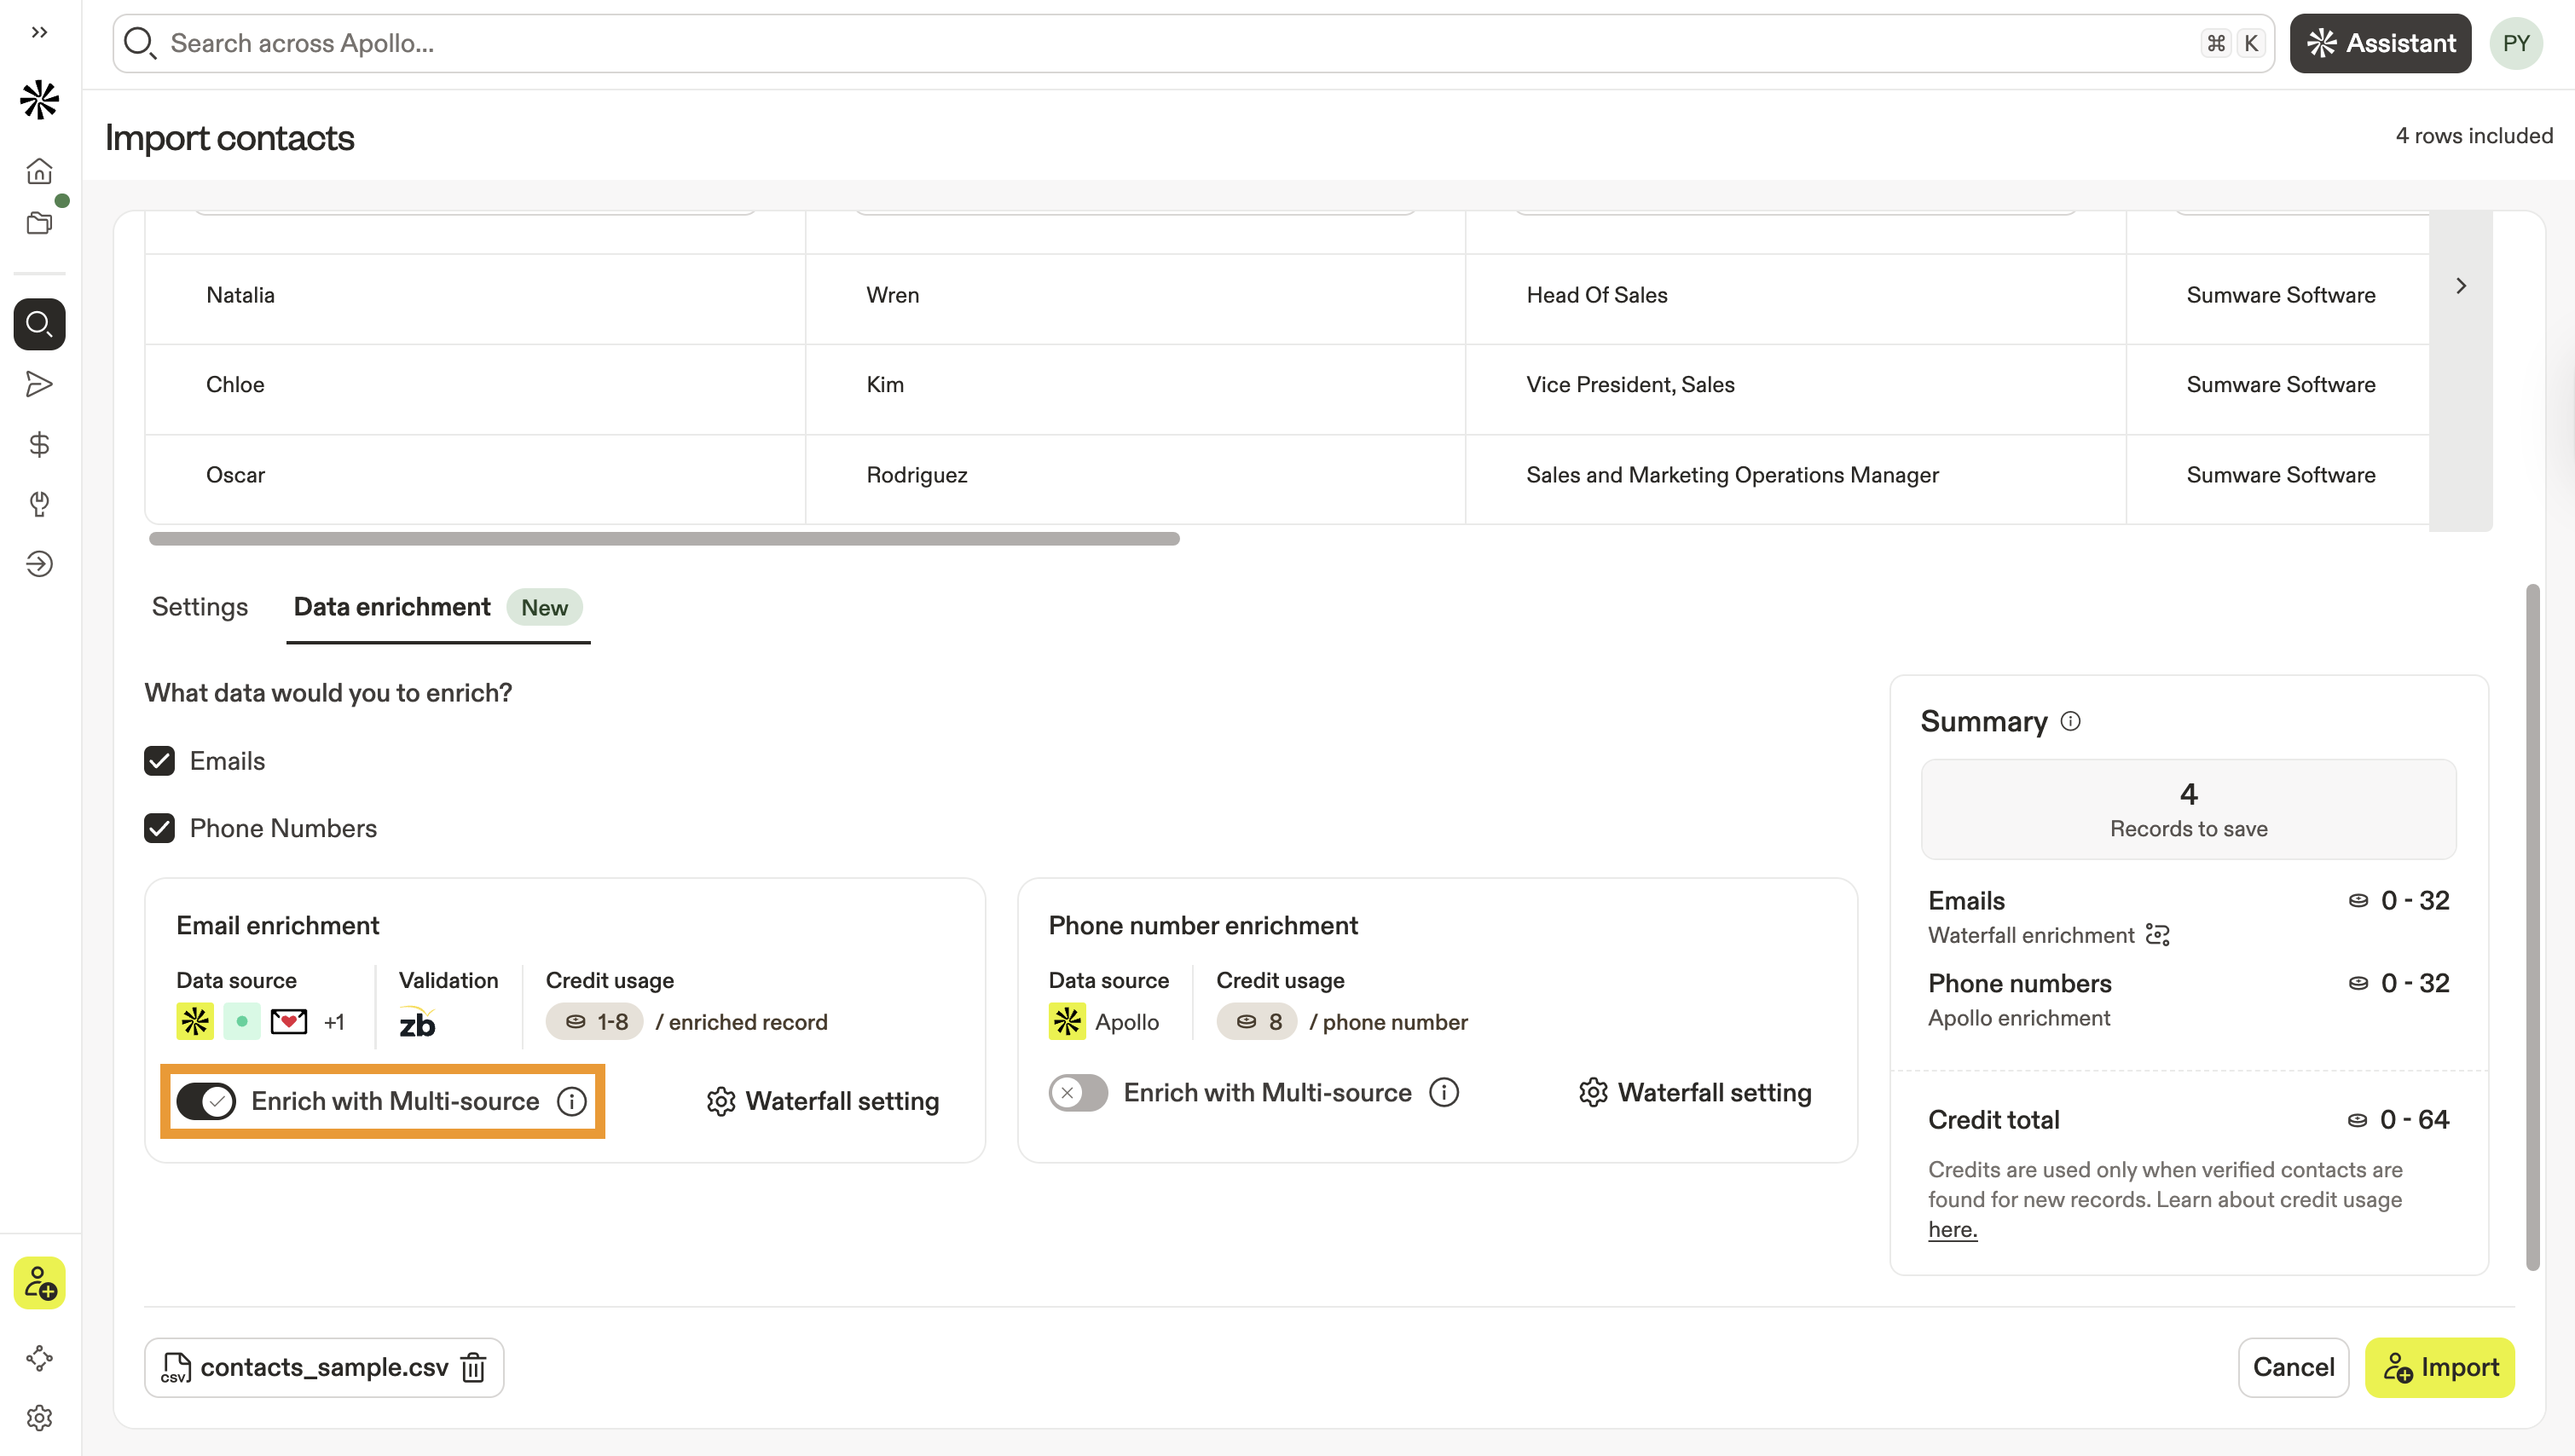
(Admin only) Click Waterfall Settings to update your waterfall settings or adjust your lineup of data sources.
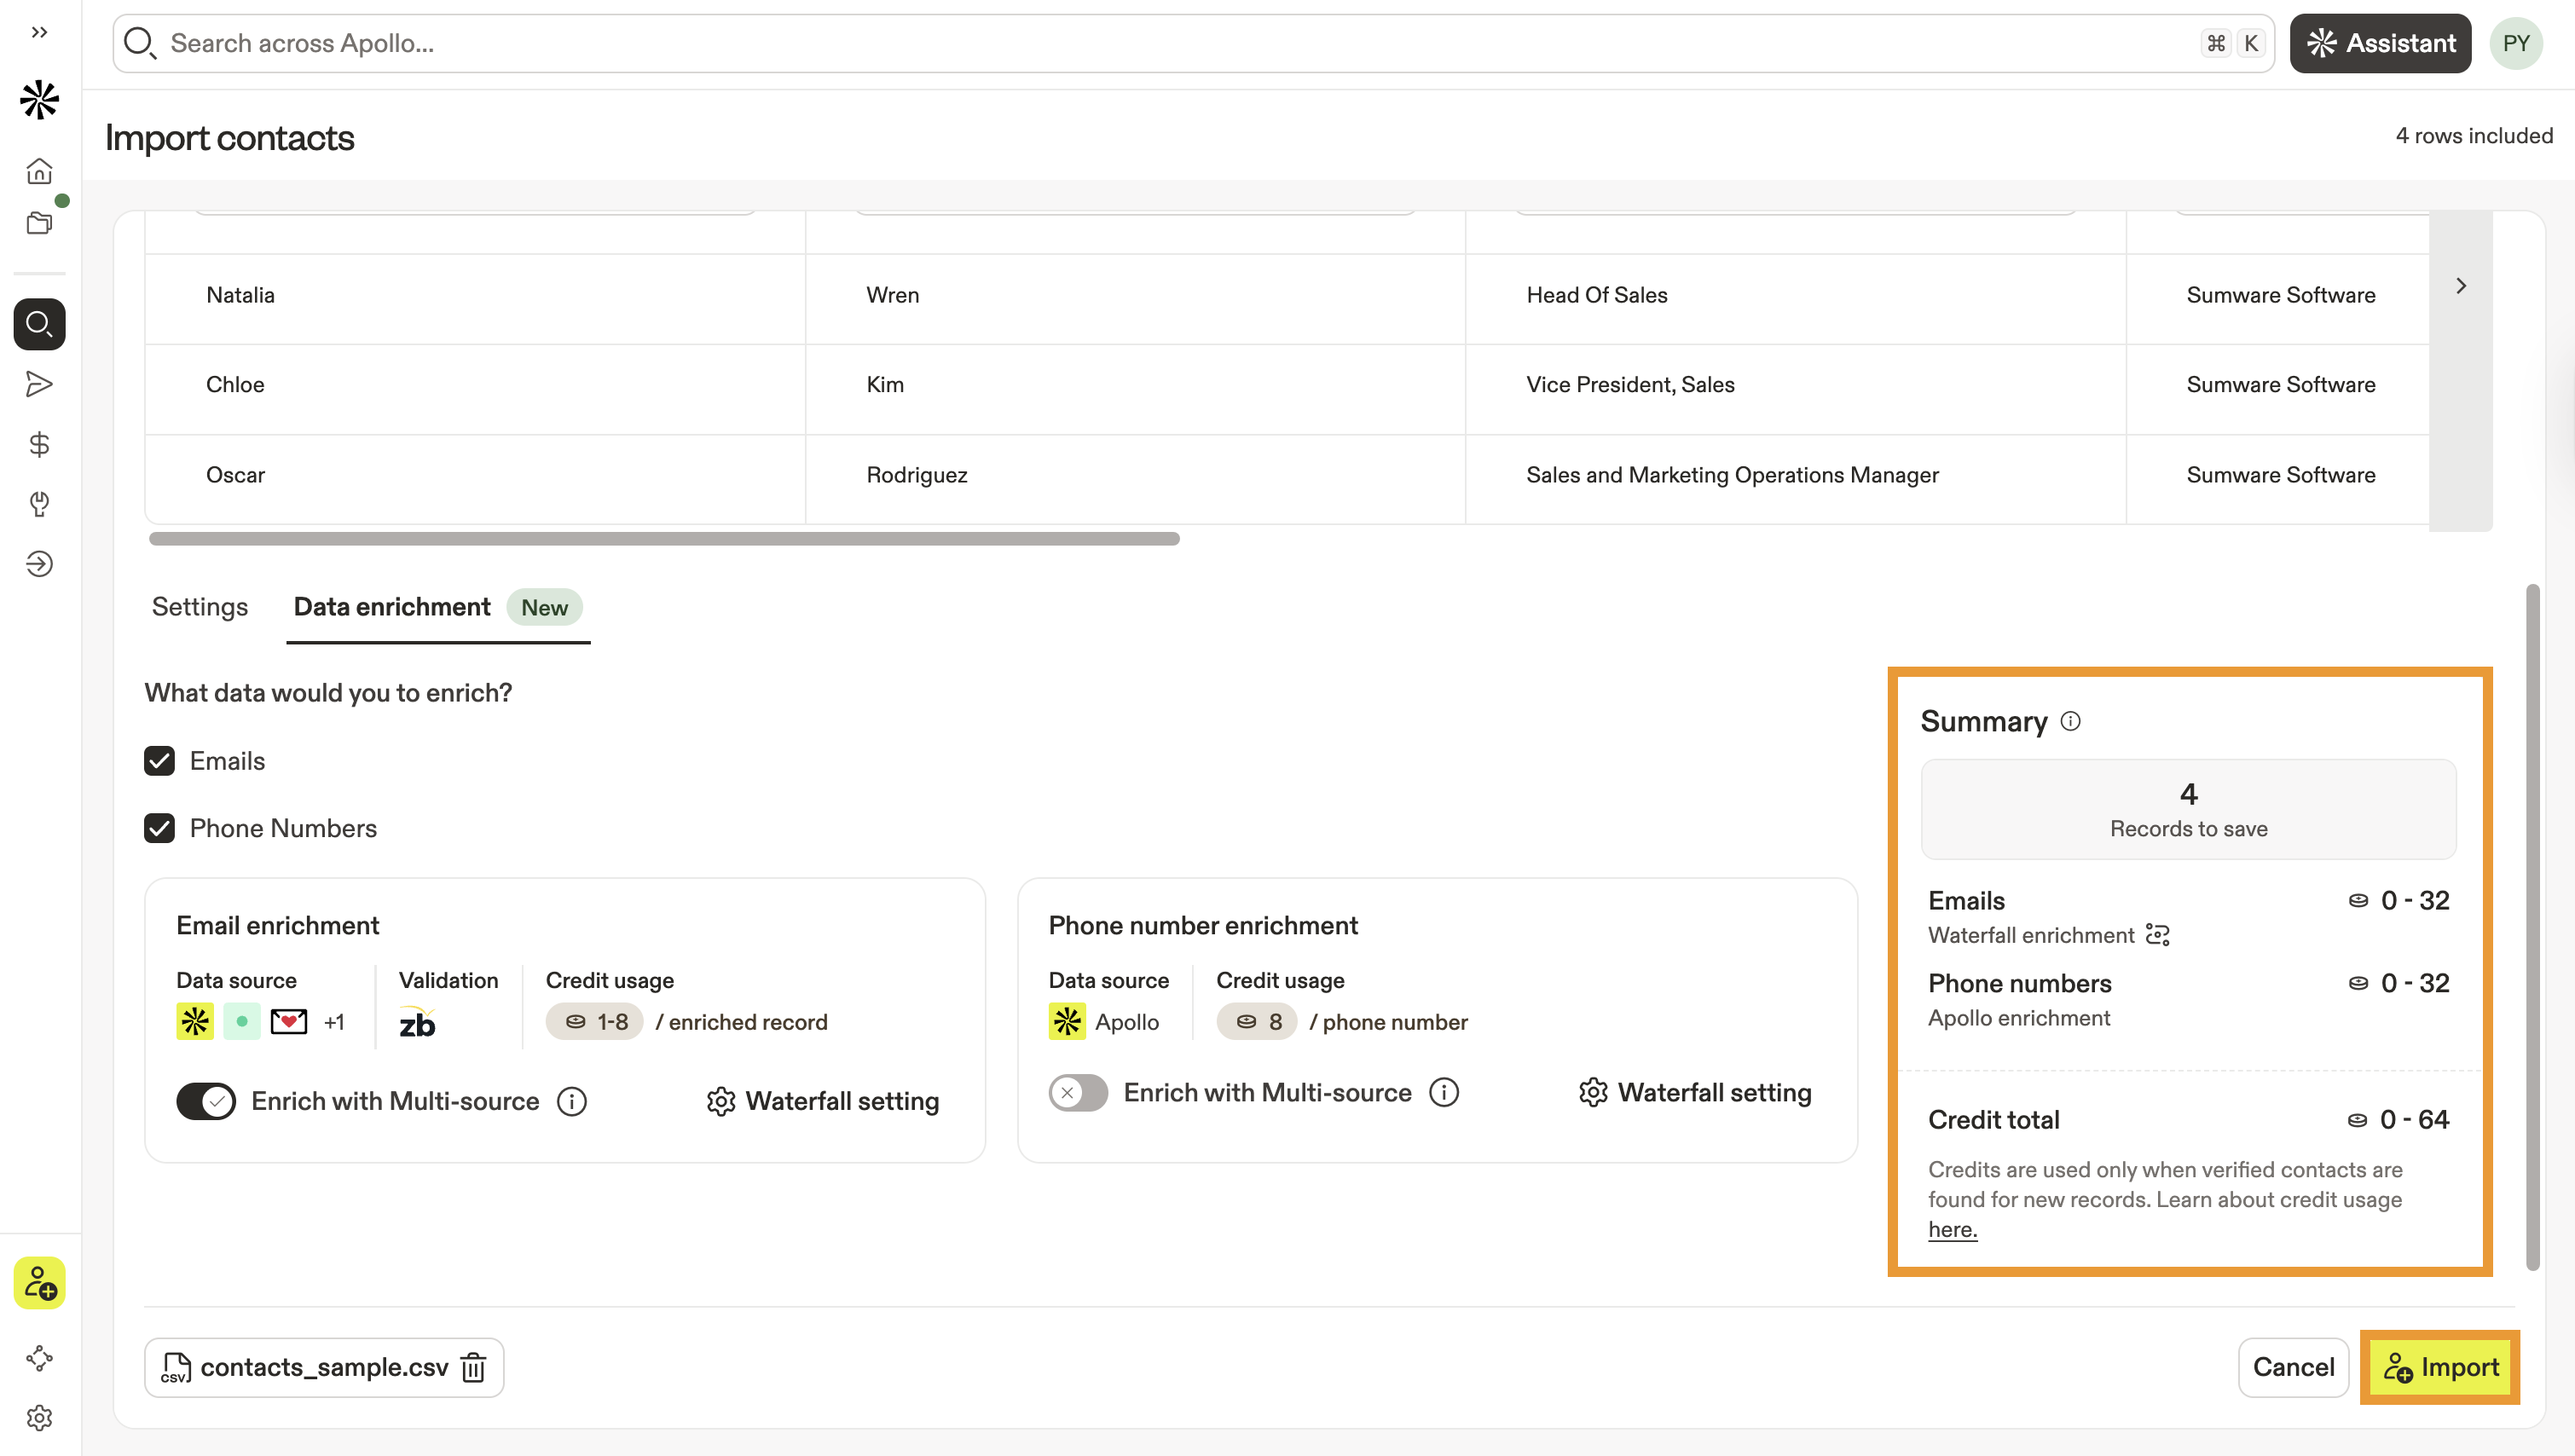
- Enriching contacts in Apollo costs credits. Apollo provides a credit estimate based on the number of records you're importing and the enrichment settings you've selected.
- When finished, click Import.
You have now imported contacts from a CSV.
To check the status of your import, go to Settings > Imports and exports > Contact Import. Most imports finish in a few minutes, but large CSVs can take a few hours.
Once your import is done, you can quickly filter for companies associated with your contacts. You can also add your contacts to a list, to a sequence, or narrow your search for people on the CSV with the contact CSV import filter.
Apollo enforces weekly CSV import limits to help maintain platform performance and reliability. Your weekly CSV import limit is based on your team's subscription size, including your annual Apollo subscription value, seats, and any add-ons, not solely on your plan. As your subscription changes, your weekly import allowance updates automatically.
| Annual subscription investment | Weekly CSV import limit (rolling 7 days) |
|---|---|
| ≥ $1,000 | 100,000 rows |
| ≥ $5,000 | 500,000 rows |
| ≥ $20,000 | 3,000,000 rows |
| ≥ $100,000 | 10,000,000 rows |
If your team is over the weekly limit for your tier, Apollo blocks the import with an error like: "You can import a maximum of 100000 rows per week." These limits are tracked on a rolling 7-day window, meaning your import usage is calculated based on the total number of rows imported in the last seven days, and capacity becomes available again automatically as earlier imports fall outside that window.
Find Companies from Imported Contacts
Once you upload a file of contacts, use Apollo to find companies where the prospects work. To find companies from imported contacts:
- Launch Apollo and click People.
- Click Filters > More Filters.
- Click Contact CSV Import then select the file name of your CSV.
- Click Apply Filters.

- Check the people for whom you want to find companies, then, click ... > View Companies.

- Apollo shows companies associated with the selected contacts. Apply more search filters to narrow your search.
You have now found companies from imported contacts.
FAQs
Which delimiters does Apollo support?
Apollo supports the following delimiters:
-
Comma
, -
Semicolon
; -
Colon
: -
Pipe
|
If you experience formatting issues when you upload your file, you may need to change your delimiter settings.
To update your delimiter settings:
Mac
- Close your CSV application and click the Apple system icon.
- Click System Settings > General > Language and Region.
- Scroll to number format and change the decimal separator to one of the supported delimiters.
- Re-attempt the CSV upload in Apollo.
PC
- Launch the Windows Start Menu and click Control Panel.
- Click Regional and Language Options > Regional Options > Customize / Additional settings.
- Change the delimiter in the list separator section to one of the Apollo-supported characters.
- Click Okay to confirm the change.
- Restart your machine. Then, re-attempt the CSV upload in Apollo.
Which fields can I import?
To ensure Apollo recognizes your contacts, your CSV must include fields for either company name, company website, LinkedIn URL, or contact email.
By default, you can map imported fields to the following Apollo fields:
- Contact first name
- Contact last name
- Contact title
- Contact email
- Contact LinkedIn URL
- Contact raw address
- Contact place street
- Contact place city
- Contact place state
- Contact place country
- Contact place postal code
- Contact stage
- First phone
- Work direct phone
- Corporate phone
- Home phone
- Mobile phone
- Other phone
- Owner
- Account website
- Email sent
- Email opened
- Email auto responded
- Email clicked
- Email replied
- Email unsubscribed
Additionally, you can import any other field as long as there's an existing custom contact field to match to it in Apollo.
How do I enrich data from a CSV?
You can enrich CSV data during import to ensure your outreach data is fresh and up-to-date. Follow the steps above to configure your enrichment settings before importing your file. Based on the settings you choose, Apollo enriches email and/or phone data for your imported contacts during the import process.
If you didn't configure enrichment during import, you can also enrich CSV data after import. To configure enrichment during import:
- Launch Apollo and click People.
- Click Show filters and select the Contact CSV import filter.
- Select your CSV file to find the people you imported.
-
Check each person you want to enrich, then click
Enrich
and select what you want to update:
- Enrich emails
- Enrich mobile numbers
- Enrich job change
- Reject job change enrichment

- Apollo enriches the people you selected.
You have now enriched your contact information.
Want to enrich more fields? Head to Data enrichment > CSV to run CSV enrichment, a separate feature that allows you to enrich a CSV of contacts or accounts with Apollo data. With CSV enrichment, upload a CSV and choose which fields for Apollo to enrich. Then download the CSV with your updated information. To add them as contacts to Apollo, you then need to import the updated CSV. Learn more about enrichment on Apollo.
How do I find the contacts I imported?
To find the contacts you imported:
- Launch Apollo and click People.
- Click Show Filters > More filters then select the contact CSV import filter. Select your CSV.
- Apollo displays the contacts you imported.
- Check one or more contacts then choose an action to take:

When I import a list of contacts, does it match with the contacts I already have in Apollo?
When you import contacts, your import settings determine whether Apollo should update existing contacts if they already exist with information from your CSV. Alternatively, you can choose to skip updating existing contacts.
I made a mistake on my import. How do I delete the import and start over?
If you made a mistake when importing, such as mapping data incorrectly, you can:
- Edit contact information manually in each contact's profile.
- Delete the imported contacts and start over with a fresh import.
Unless you imported only a few records, Apollo recommends you delete, fix, and re-import the CSV file.
To delete and start over:
- Launch Apollo and click People.
- Use the contact CSV import filter to select your import.
- Check each contact you want to remove, then click ... > Delete.
With your records removed, you can retry the CSV import.
How long does an import take?
Most imports finish in a few minutes, but larger CSV files can take a few hours to process.
To check the status of your import after you've initiated it, navigate to Settings > Imports and exports > Contact Import.
Apollo recommends that you avoid uploading CSV files with more than 10,000 rows. If you have a larger file, it's best to split the CSV into separate, smaller files for more efficient processing.
Can I import a CSV via Apollo API?
While it isn't possible to import a CSV via Apollo API, you can use the API to create contacts or accounts. Learn more about using Apollo API.
Why do I see fewer contacts in Apollo than rows in my CSV?
When you import a CSV of contacts, Apollo might update existing contacts instead of creating a new contact for every row. The most common reasons are:
- Apollo updated an existing contact: When a row matches an existing contact, such as one with the same email address, Apollo updates that contact instead of creating a new one.
- You're viewing a list, not everything saved: If imported people aren't added to a list during import, Apollo still saves them as contacts in People, but they won't show up together in a single list.
- Your current filters limit the contacts you see: Filters like owner, stage, and list can change what you see in People. Use the contact CSV import filter to view contacts tied to a specific file.
- The import is still processing: Large CSV imports can take time to process, so you might not see every row right away. To check progress, go to Settings > Imports and exports > Contact Import, select your CSV, and review its status.
- Field mapping didn't match your columns: If your field mapping doesn't match your columns, Apollo might import data into the wrong fields. You can re-import the file with the correct mapping, and follow the steps in this FAQ to delete and start over.
To manually reconcile your CSV with Apollo:
- Launch Apollo and go to People.
- Click Show Filters > More Filters.
- Click contact CSV import, select your CSV file, then apply the filter. Apollo shows only the contacts tied to that import.
- (Optional) Export the filtered results, then compare them to your original CSV in a spreadsheet.
- If you find true duplicates, you can merge records to keep your database tidy.
You have now reconciled your CSV with Apollo.
Apollo only shows import status and file-level results, but it doesn't include a row-by-row “skipped rows” report for contact imports.
Next Steps
Here are a few helpful next steps you can take to keep building momentum with your contact imports:
| Import a CSV of Accounts | If your workflow includes account-level data, you can import a CSV of accounts to keep your team aligned on every company in your pipeline. |
|---|---|
| Import a CSV of Deals | You can also streamline pipeline setup by importing a CSV of deals to quickly populate opportunities your team is already working. |
| Use CSV Enrichment | Make your imported data instantly more actionable when you use CSV enrichment to fill in missing details and upgrade data quality. |
| Waterfall Enrichment Overview | Get a sense of how Apollo helps you find more actionable data via multiple data sources with waterfall enrichment, including more info about waterfall credit usage. |
| Use Waterfall Enrichment | Learn how to configure and run waterfall enrichment to quickly find actionable contact data throughout Apollo. |